background image

  3

1

3

4

5

6

(1)

(2)

(A)

(B)

2

2

3

1

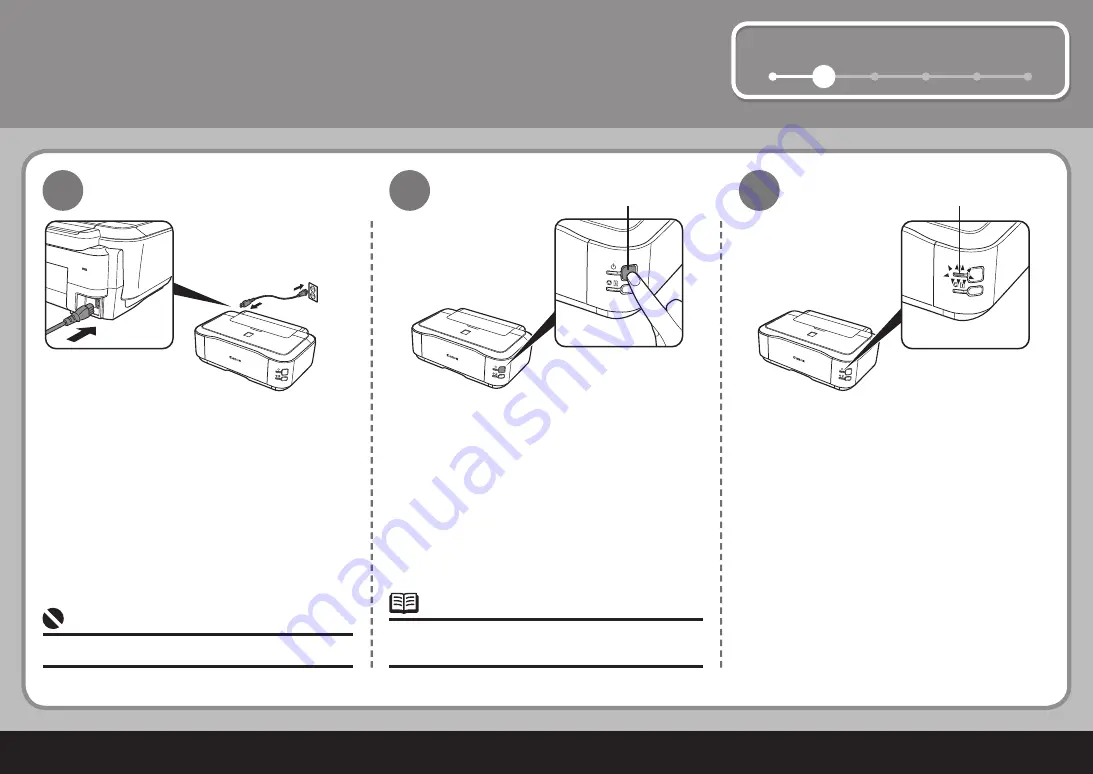
Turn the Power On

Plug in the power cord on the left side at the 

back of the printer and connect the other end 

to the wall outlet.

Press the  

ON 

  button  (A) to turn on the printer.

Confirm that the  

POWER 

  lamp  (B) lights 

green.

Do NOT connect the USB cable at this stage.

The printer may make some operating noises. 

This is normal operation.

Содержание 2868B002

Страница 1: ...Getting Started Make sure to read this manual before using the printer Please keep it in hand for future reference iP3600 Read Me First Photo Printer series ...

Страница 2: ...n Microsoft is a registered trademark of Microsoft Corporation Windows is a trademark or registered trademark of Microsoft Corporation in the U S and or other countries Windows Vista is a trademark or registered trademark of Microsoft Corporation in the U S and or other countries Macintosh and Mac are trademarks of Apple Inc registered in the U S and other countries Descriptions for operations tha...

Страница 3: ... Contents Check the Included Items Turn the Power On Install the Print Head Install the Ink Tanks Install the Software Loading Paper 1 2 3 4 5 6 After Installing the Printer ...

Страница 4: ...g on the printer remove all the orange tapes and the protective sheets power cord Print Head ink tank Manuals Setup CD ROM containing the drivers applications and on screen manuals Warranty A USB cable is necessary to connect the printer with your computer ...

Страница 5: ...left side at the back of the printer and connect the other end to the wall outlet Press the ON button A to turn on the printer Confirm that the POWER lamp B lights green Do NOT connect the USB cable at this stage The printer may make some operating noises This is normal operation ...

Страница 6: ... stops The Print Head Lock Lever may feel heavy If the Print Head Holder does not move make sure that the printer is turned on The Print Head Holder C comes out This is where you install the Print Head Do not handle the Print Head roughly such as applying them excessive pressure or dropping them The Print Head Holder makes a noise as it moves This is normal operation ...

Страница 7: ...or light blue ink on the inside of the bag the Print Head comes in or the inside of the protective cap this has no effect on print quality Be careful not to get ink on yourself when handling these items Be careful not to stain your hands Do not to knock the Print Head against the sides of the Holder Pinch the Print Head Lock Lever firmly and lower it gently Once you have installed the Print Head d...

Страница 8: ... the sides of the ink tank ink may splash Do not handle the ink tanks roughly such as applying them excessive pressure or dropping them While pressing down with your left thumb twist off the orange protective cap A located on the bottom of the ink tank If the Print Head Holder moves to the right close and reopen the Top Cover Be sure to use the supplied ink tanks ...

Страница 9: ...ll the ink tanks Make sure all the Ink lamp lights red Once you have installed the ink tanks do not remove them unnecessarily Press the PUSH mark on the ink tank until it clicks into place Make sure the Ink lamp lights red Install the Ink Tank Match the labels when installing ...

Страница 10: ...This is normal operation Close the Top Cover If an Alarm lamp B flashes orange make sure that the Print Head and the ink tanks are correctly installed Load three or more sheets of A4 or Letter sized plain paper into the Cassette C For details refer to 6 Loading Paper on page 22 Close the Paper Output Tray to make it easier to pull out the Cassette Install the Ink Tanks ...

Страница 11: ... P 10 Quit all running applications before installation You need to log on as the administrator or a member of the Administrators group Do not switch users during the installation process It may be necessary to restart your computer during the installation process Follow the on screen instructions and click OK and do not remove the Setup CD ROM during restarting The installation resumes from where...

Страница 12: ...ting noise continues for about 30 seconds until the printer turns off Make sure that the POWER lamp B stops flashing Windows Vista Windows XP 2000 Go to Step Go to Step 1 2 3 If the program does not start automatically double click the CD ROM icon on the computer When the CD ROM contents appear double click MSETUP4 EXE Click Cancel to quit the screen Proceed from Remove the USB cable connected to ...

Страница 13: ... 1 2 3 5 4 3 2 Windows Vista Windows Vista AutoPlay screen appears click Run Msetup4 exe User Account Control screen appears click Continue If the same screen reappears in subsequent steps click Continue ...

Страница 14: ...o install the software Read the License Agreement screen carefully and click Yes Click Easy Install The drivers application software and on screen manuals are installed automatically If you want to select particular items to install click Custom Install and follow the on screen instructions to proceed with the installation Windows ...

Страница 15: ...ick Help and confirm the message When the Printer Connection screen appears connect one end of the USB cable to the computer the other to the printer then TURN THE PRINTER ON Click Next For better print results it is recommended that you align the Print Head before printing photos To align the Print Head click Execute Follow the steps in Aligning the Print Head on page 29 for alignment You can per...

Страница 16: ...r to 6 Loading Paper on page 22 When the Load plain paper into the cassette screen appears load plain paper in the Cassette and click Next Click Next It may take a while for the next screen to appear Click Next only once Windows ...

Страница 17: ...screen instructions to register your product You will need your product serial number which is located on the inside of the printer To register later click Cancel User Registration can be started from the Solution Menu icon For details refer to Solution Menu on page 26 Internet connection is required Connection fees apply ...

Страница 18: ...er restarting the computer remove the Setup CD ROM and keep it in a safe place Next read 6 Loading Paper on page 22 When the Extended Survey Program screen appears confirm the message If you can agree click Agree If you click Do not agree the Extended Survey Program will not be installed This has no effect on the printer s functionality Windows ...

Страница 19: ... click the Setup icon If the CD ROM folder does not open automatically double click the CANON_IJ icon on the desktop The USB port is located on the right side at the back of the printer Enter your administrator name and password Click OK If you do not know your administrator name or password click Help then follow the on screen instructions Macintosh Make sure the printer is turned on ...

Страница 20: ...d on screen manuals are installed automatically Click Install Move the cursor over items to display explanations If you want to select particular items to install click Custom Install and follow the on screen instructions to proceed with the installation Macintosh ...

Страница 21: ...ctions to install the software For better print results it is recommended that you align the Print Head before printing photos To align the Print Head click Execute Follow the steps in Aligning the Print Head on page 29 for alignment You can perform Print Head Alignment at any time For details refer to the on screen manual Basic Guide ...

Страница 22: ...20 5 8 9 Click Next Macintosh For details refer to 6 Loading Paper on page 22 When the Load plain paper into the cassette screen appears load plain paper in the Cassette and click Next ...

Страница 23: ...ck Next If connected to the Internet the user registration page appears Follow the on screen instructions to register your product You will need your product serial number which is located on the inside of the printer To register later click Cancel User Registration can be started from the Solution Menu icon For details refer to Solution Menu on page 26 Internet connection is required Connection f...

Страница 24: ...e Cassette A supports plain paper C only To print on Photo Paper Hagaki D be sure to load it in the Rear Tray B Pull out the Cassette A and remove the Cover E Pull the Tab F in the direction of the arrow and extend the Cassette Load in the Cassette Move the Paper Guides G and H to both edges Loading Paper ...

Страница 25: ...t left edge of the paper Attach the Cover E and insert the Cassette into the printer until it clicks into place Load paper with the printing side facing down Slide the Paper Guide H to align with the mark of paper size The Paper Guide H will stop when it aligns with the corresponding mark of paper size There may be a little space between the Paper Guide and the paper stack ...

Страница 26: ...des L against both edges of the paper For details on media sizes and types you can use refer to Loading Paper in the on screen manual Basic Guide Load paper in portrait orientation with the printing side facing up Do not exceed the Load Limit Mark M Load paper in the center of the Rear Tray Load paper in the Rear Tray Move the Paper Guides L to both edges Loading Paper ...

Страница 27: ...how to set up and use your printer Introduces the printer and its functions the included manuals and application software Basic Guide on screen manual Describes the basic operations and gives an introduction to other functions available Advanced Guide on screen manual Describes various operating procedures to make full use of the printer Also includes Troubleshooting information for your printer ...

Страница 28: ...ick You can start Solution Menu from the Solution Menu icon on the desktop Windows or on the Dock Macintosh If you have a problem with printer settings click the Change settings or find solutions to problems icon in Solution Menu to open My Printer Windows only The buttons displayed vary depending on the country or region of purchase Example Windows Vista After Installing the Printer ...

Страница 29: ... you to print in various ways using the printer driver and application software installed on the computer For example you can print borderless photos and create your own calendar etc easily For detailed operating procedures and functions refer to the on screen manuals ...

Страница 30: ...in a folder then click Layout Print Easy PhotoPrint EX starts When a photo is selected the number of copies is set to 1 For opening Solution Menu refer to Solution Menu on page 26 For more information refer to the on screen manual Advanced Guide Load a sheet of photo paper in the Rear Tray A in portrait orientation For details refer to 6 Loading Paper on page 22 Click Print Printing will start Loa...

Страница 31: ... Sound See below for the procedures to open the printer properties dialog box and Canon IJ Printer Utility Double click your printer s icon and click Utility Select System Preferences from the Apple menu and click Print Fax Select your model from Product and click Maintenance Select the Maintenance tab on the printer properties dialog box For Macintosh select Test Print on the Canon IJ Printer Uti...

Страница 32: ...message appears after clicking Align Print Head click OK Printing of the first pattern starts After the pattern is printed click Yes Do not open the Top Cover while printing Make sure that the Paper Output Tray B and the Output Tray Extension C are open Aligning the Print Head ...

Страница 33: ... noticeable vertical or horizontal streaks for columns A to G then click OK Send for Macintosh Less noticeable vertical white streaks More noticeable vertical white streaks Less noticeable horizontal white streaks More noticeable horizontal white streaks If it is difficult to pick the best pattern pick the setting that produces the least noticeable white streaks Do not open the Top Cover while pri...

Страница 34: ...ticeable vertical streaks for columns H to Q then click OK Send for Macintosh Less noticeable vertical white streaks More noticeable vertical white streaks Confirm the displayed message and click OK Click OK in the subsequent message Printing of the third pattern starts Aligning the Print Head ...

Страница 35: ...oticeable horizontal white stripes More noticeable horizontal white stripes Click OK Quit for Macintosh Return to the software installation procedure If it is difficult to pick the best pattern pick the setting that produces the least noticeable white stripes Windows Macintosh Return to step in 5 Install the Software on page 14 Return to step in 5 Install the Software on page 20 ...

Страница 36: ...th USB 1 1 it can be used at USB 1 1 Print width 8 inches 203 2 mm for Borderless Printing 8 5 inches 216 mm Acoustic noise level Approx 41 0 dB A When printing in the standard print quality mode on Photo Paper Plus Glossy II Operating environment Temperature 5 to 35 C 41 to 95 F Humidity 10 to 90 RH no condensation Storage environment Temperature 0 to 40 C 32 to 104 F Humidity 5 to 95 RH no conde...

Страница 37: ...upport free of service charges Monday Friday excluding holidays during the warranty period Telephone Device for the Deaf TDD support is available at 1 866 251 3752 Toll Free Live Tech Support 1 800 828 4040 Ordering Information Call 1 800 OK CANON to locate a dealer near you or visit the Canon eStore at www canonestore com CLI 221 Black CLI 221 Magenta CLI 221 Yellow PGI 220 Black CLI 221 Cyan 294...

Отзывы: