42
(3) Rotate the quick-release lever to the OPEN position (see fig. 11).
The lever should be on the side of the wheel opposite the derailleur
and freewheel sprockets.
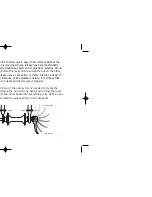
(4) Put the chain on top of the smallest freewheel sprocket. Then,
insert the wheel into the frame dropouts and pull it all the way in to
the dropouts (fig. 14).
(5) Tighten the adjusting nut until it is finger tight against the frame
dropout; then rotate the lever toward the front of the bike until it is
parallel to the frame's chainstay or seatstay and is curved toward the
wheel (fig. 14).
CAUTION: If you can fully close the quick release
without wrapping
your fingers around the fork blade for leverage, and the lever
does
not leave a clear imprint in the palm of your hand, the tension is
insufficient. Open the lever; turn the tension adjusting nut clock-
wise a quarter turn; then try again.
(6) If the lever cannot be pushed all the way to a position parallel to
the chainstay or seatstay tube, return the lever to the OPEN position.
Then turn the adjusting nut counterclockwise one-quarter turn and try
tightening again.
!
fig. 14 Wheel in Rear Dropouts
2000 owner's manual 10/27/99 10/27/99 11:16 AM Page 42
Содержание Bicycles
Страница 108: ...4 ...

