THE ‘E’ SETTING
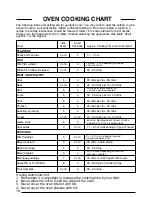
This is used for slow cooking, keeping food warm and warming plates for short
periods.
USING THE ‘E’ SETTING FOR SLOW COOKING
1. All dishes cooked by the ‘E’ setting should be cooked for a minimum of 6
hours. They will ‘hold’ at this setting for a further hour but marked
deterioration in appearance will be noticed in some cases.
2.
Joints of meat and poultry should be cooked at Mk 6 for 30 minutes before
turning to the ‘E’ setting and never be cooked lower than the middle shelf
position.
3.
Joints of meat over 6 lbs (2.7kg) and poultry over 4 lbs 8oz (2kg) should not
be cooked using the ‘E’ setting.
4.
Always stand covered joints on a rack over the meat tin to allow good air
circulation.
5.
Pork joints and poultry must be checked for an internal temperature of at
least 88°C using a meat thermometer.
6.
This method is unsuitable for stuffed meat and poultry.
7.
Always bring soups, casseroles and liquids to the boil before putting in the
oven.
8.
Cover casseroles with foil and then the lid to prevent loss of moisture.
9.
Always thaw frozen food completely before cooking.
10. Root vegetables will cook better if cut into small pieces.
11. Adjust seasonings and thickenings at the end of the cooking time.
12. Use the zones of heat in the oven, e.g. meringues and milk puddings can be
cooked lower in the oven whilst other dishes requiring greater heat can be
cooked above them.
13. Egg and fish dishes need only 1-5 hours cooking and should be included in
day cooking sessions, when they can be observed from time to time.
14. Dried red kidney beans must be boiled for a minimum of ten minutes after
soaking, before inclusion in any dish.
REPLACEMENT OF OVEN LIGHT BULB
Light bulbs are not covered by the manufacturer’s guarantee.
A new 25W, 300°C rated SES bulb can be obtained from your cooker supplier or
any major electrical retailer.
1. Disconnect the electricity supply to the cooker and remove the shelves from
the oven.
2. Unscrew the lens using a thick cloth to your protect fingers in the unlikely
event of a lens fracture.
3. Unscrew
bulb.
4. Fit new bulb and refit lens.
16
OVEN
Содержание Winchster
Страница 2: ......

