background image

1. GENERAL WARNINGS

Thank you for choosing one of our products. To get the most out of 
your oven we recommend that you:

This is a completely normal, if it does occur you merely have to wait for 
the fumes to clear before putting the food into the oven.

•  Read  the  notes  in  this  manual  carefully:  they  contain  important 
instructions on how to install, use and service this oven safely.
• Keep this booklet in a safe place for easy, future reference.

When  the  oven  is  first  switched  on  it  may  give  out  acrid  smelling 
fumes. This is because the bonding agent for insulating panels around 
the oven has been heated up for the first time.

All accessible parts are hot when the appliance is in operation, take 
care to not touch these elements.

An oven by its very nature becomes very hot. Especially the glass of 
the oven door.

1.

1

 SAFETY HINTS

– If the oven breaks down or develops a fault switch it off at the mains and 
do not touch it.

•The oven must be used only for the purpose for which it was designed: it 
must  only  be  used  for  cooking  food. Any  other  use,  e.g.  as  a  form  of 
heating, is an improper use of the oven and is therefore dangerous.

– Do not touch the oven with wet or damp hands or feet.
– Do not use the oven unless you are wearing something on your feet.

When replacing the cable, follow these instructions. Remove the power 
cable and replace it with one of the H05V2V2-F type. The cable must be 
able to bear the electrical current required by the oven. Cable replacement 
must be carried out by properly qualified technicians. The earthing cable 
(yellow-green) must be 10 mm longer than the power cable.
Use  only  an  approved  service  centre  for  repairs  and  ensure  that  only 
original parts are used. If the above instructions are not adhered to the 
manufacturers cannot guarantee the safety of the oven.

– Do not pull on the power cable to remove the plug from the socket.

•If the cable is at all damaged it must be replaced promptly.

–  It  is  not  generally  a  good  idea  to  use  adapters,  multiple  sockets  for 
several plugs and cable extensions.

•Do  not  line  the  oven  walls  with  aluminium  foil  or  single-use 
protection  available  from  stores.  Aluminium  foil  or  any  other 
protection, in direct contact with the hot enamel, risks melting and 
deteriorating the enamel of the insides.

•The manufacturers cannot be held responsible for any damage caused 
by improper, incorrect or unreasonable use. 

When using any electrical 

appliance you must follow a few basic rules.

1.

2

 INSTALLATION

Installation is the customer’s responsibility. The manufacturers have no 
obligation to carry this out. If the assistance of the manufacturer is required 
to  rectify  faults  arising  from  incorrect  installation,  this  assistance  is  not 
covered by the guarantee. 
The installation instructions for professionally qualified personal must be 
followed.  Incorrect  installation  may  cause  harm  or  injury  to  people, 
animals or belongings. The manufacturer cannot be held responsible for 
such harm or injury.

Remove the back of the kitchen unit to ensure an adequate current of 
air circulates around the oven. The hob must have a rear gap of at 
least 45 mm.

If the oven is to work properly, the kitchen housing must be suitable. The 
panels of the kitchen unit that are next to the oven must be made of a heat 
resistant material. Ensure that the glues of units made of veneered wood 
can  withstand  temperatures  of  at  least  120  °C.  Plastics  or  glues  that 
cannot withstand such temperatures will melt and deform the unit. Once 
the  oven  has  been  lodged  inside  the  unit,  the  electrical  parts  must  be 
completely insulated. This is a legal safety requirement. All guards must 
be firmly fixed into place so that it is impossible to remove them without 
using special tools.

1.

3

 FITTING THE OVEN INTO THE KITCHEN UNIT

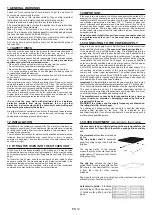
Fit the oven into the space provided in the kitchen unit; it may be fitted 
underneath a work top or into an upright cupboard. Fix the oven in position 
by screwing into place, using the four fixing holes in the frame. (Fig.on last 
page).
To locate the fixing holes, open the oven door and look inside.To allow 
adequate ventilation, the measurements and distances indicated in the 
diagram on last page must be adhered to when fixing the oven.

Note:

  For  ovens  that  are  combined  with  a  hob  unit  the  instructions 

contained in the manual for the hob unit must be followed.

1.

4

 IMPORTANT

The manufacturers cannot be held responsible for any harm or 
injury  to  persons,  animals  or  belongings  caused  by  failure  to 
properly earth the oven.

If the model of oven is not fitted with a plug, fit a standard plug to the 
power cable. It must be able to bear the power supply indicated on the 
specifications plate. The earthing cable is yellowgreen. The plug must 
be fitted by a properly qualified person. If the socket and the plug are 
incompatible  the  socket  must  be  changed  by  a  properly  qualified 
person.A properly qualified person must also ensure that the power 
cables can carry the current required to operate the oven.

Plug into the power supply. Ensure first that there is a third contact that 
acts as earthing for the oven. 

The oven must be properly earthed.

An ON/OFF switch may also be connected to the power supply. The 
connections  must  take  account  of  the  current  supplied  and  must 
comply  with  current  legal  requirements.  The  yellow-green  earthing 
cable must not be governed by the ON/OFF switch. The socket or the 
ON/OFF switch used for connecting to the power supply must be easily 
accessible when the oven has been installed.

Important:

 During installation, position the power cable in such a  way 

that it will not be subjected to temperatures of above 50°C at any point.
The oven complies with safety standards set by the regulatory bodies. 
The  oven  is  safe  to  use  only  if  it  has  been  adequately  earthed  in 
compliance with current legal requirements on wiring safety. You must 
ensure that the oven has been adequately earthed.

WARNING: the voltage and the supply frequency are showed on 
the rating plate (fig. on last page).

The  cabling  and  wiring  system  must  be  able  to  bear  the  maximum 
electric  power  required  by  the  oven.  This  is  indicated  on  the 
specifications plate. If you are in any doubt at all, use the services of a 
professionally qualified person.

1.

5

 CONNECTING TO THE POWER SUPPLY

It is necessary to do an initial cleaning of the equipment before the 
first use of each of them.Wash them with a sponge. Rinse and dry 
off.

1.

6

 OVEN EQUIPMENT 

(according to the model)

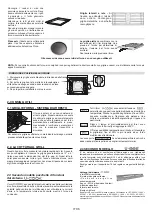
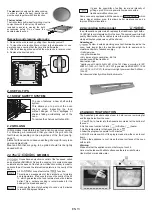
The  special  profile  of  the  shelves 
means they stay horizontal even when 
pulled right out. There is no risk of a dish 
sliding or spilling.

The simple shelf

 can take moulds and 

dishes.

The  tray  holder  shelf

  is  especially 

good for grilling things. Use it with the 
drip tray.

The  drip  tray

  catches  the  juices  from 

grilled foods. It is only used with the Grill, 
Rotisserie, or Fan Assisted Grill ; remove 
it  from  the  oven  for  other  cooking 
methods.

Never use the drip tray as a roasting tray as this creates smoke and fat 
will spatter your oven making it dirty.

EN 1

2

Lateral wire grids - 

It located 

at both sides of the oven cavity. 
It  holds  metal  grills  and  drip 
pans.

A low light around the central main switch could be present when the oven 
is off. This is a normal behavior. I can be removed just turning the plug 
upside down or swapping the supply terminals.

Содержание FCP602W/E

Страница 1: ...ES NOTICE D EMPLOI ET D INSTALLATION ФУРНИ ИНСТРУКЦИИ ЗА ПОТРЕБИТЕЛЯ NAVODILO ZA UPORABO VEČNAMENSKE VGRADNE PEČICE CANDY HOOVER GROUP S R L Via Comolli 16 20861 Brugherio MB Italy EN IT ES FR BG 02 17 SL 63 69 EN IT ES FR BG 02 SL 32 38 ДУХΟΒІ ШΑΦИ IHCTPУКЦІЯ КОРИΤУBAЧA UA 45 PEĆNICE KORIŠTENJE PRIRUČNIK HR 69 53 ...

Страница 2: ...el Forno secondo Modello 2 1 Griglie Forno Sistema Di Arresto 2 2 La Cottura Al Grıll 2 3 Secondo Modello Led Vision 2 4 Tempı Di Cottura 2 5 La Funzione AQUACTIVA 2 6 Pulızıa E Manutenzıone 2 7 Garanzie Consigli Utili 6 3 1 Uso Del Contaminuti 3 2 Uso Del Temporizzatore 3 3 Regolazione Ora 3 4 Timer Elettronico A Sfioramento Contaminuti 8 Istruzioni Per L uso 9 IT 02 ...

Страница 3: ...nvece che in un vassoio aperto Non utilizzare un getto di vapore per pulire Qualsiasi materiale fuoriuscito in eccesso deve essere tolto prima della pulizia l elettrodomestico Questa operazione deve essere eseguita solo da un tecnico adeguatamente addestrato In caso di i n c o m p a t i b i l i t à t r a p r e s a e s p i n a dell elettrodomestico richiedere ad un tecnico specializzato di sostitui...

Страница 4: ... ATTENZIONE Non riempire il fondo della cavità con acqua durante la cottura o quando il forno è caldo AVVERTENZA Non togliere mai la guarnizione della porta del forno dietro a una porta a scopo ornamentale per evitarne il surriscaldamento AVVERTENZA Non rivestire le pareti del forno con fogli di alluminio o protezioni monouso disponibili nei negozi I fogli di fondere e deteriorare lo smalto degli ...

Страница 5: ...onei ed irragionevoli non usare l apparecchio a piedi nudi L uso di un qualsiasi apparecchio elettrico comporta In caso di danneggiamento del cavo provvedere tempestivamente alla sua sostituzione secondo le seguendi indicazioni in generale è sconsigliabile l uso di adattatori prese multiple e prolunghe aprire il coperchio morsettiera togliere il cavo di alimentazione e sostituirlo con uno corrispo...

Страница 6: ...delicata è indicata sopratutto per il pane e la pasticceria I forni sono dotati di controllo elettronico della ventilazione di cottura brevettato VarioFan il sistema cambia automaticamente la velocità della ventola del multifunzione per ottimizzare le correnti d aria e la temperatura interna della cavità mentre il forno sta cucinando 2 3 Secondo modello pacchetto di funzioni del sistema Riduce il ...

Страница 7: ... superfici e le parti estetiche La pulizia del forno è molto importante e deve essere effettuata ogni volta che questo viene usato Infatti sulle pareti si depositano grassi sciolti durante la cottura che potrebbero alla successiva accensione produrre odori sgradevoli che nuocerebbero al buon esito della cottura Per la pulizia usare acqua calda e detersivo sciacquando accuratamente Usare detersivi ...

Страница 8: ...i per regolare la durata Lasciare i tasti Selezionare la funzione di cottura con la manopola commutatore Al termine della durata impostata il forno si spegne da solo se deve essere fermato prima si deve portare la manopola commutatore in posizione O oppure portare a 0 00 la durata della cottura tasti SELECT e Permette di impostare la durata della cottura del cibo inserito nel forno Per visualizzar...

Страница 9: ...e al forno e per rendere i cibi molto croccanti SCONGELAMENTO questa posizione permette di far circolare l aria a temperatura ambiente intorno al cibo surgelato facendolo così scongelare in pochi minuti senza modificare od alterare il contenuto proteico RESISTENZAINFERIORE VENTILATA adatta per cotture delicate torte soufflè T preimpostata PIZZA Il calore avvolgente in questa funzione ricrea un ambi...

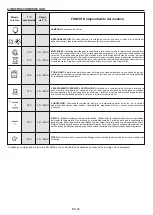
Страница 10: ...t according To The Model 2 1 Shelf Safety System 2 2 Grilling 2 3 The U Cook Models 2 4 U See 2 5 Self cleaning Oven With Catalytic 2 6 AQUACTIVA Function 2 7 Cleaning And Maintenance 2 8 Service Centre Useful Tips 13 3 1 Using The Minute Timer 3 2 Using The End Of Cooking Timer 3 3 Setting The Correct Time 3 4 Use Of The Electronic Programmer Timer 14 Operating Instructions 16 ...

Страница 11: ...eration The earth conductor is yellow green in colour This operation should be carried out by a The appliance must not be installed behind a decorative door in order to avoid overheating CAUTION Do not refill the cavity bottom with water during cooking or when the oven is hot A long power supply failure during an occurring cooking phase may cause a malfunction of the monitor ln this case contact c...

Страница 12: ...be completely insulated This is a legal safety requirement All guards must be firmly fixed into place so that it is impossible to remove them without using special tools 1 3 FITTING THE OVEN INTO THE KITCHEN UNIT Fit the oven into the space provided in the kitchen unit it may be fitted underneath a work top or into an upright cupboard Fix the oven in position by screwing into place using the four ...

Страница 13: ...meat rolls Meat and fish that are going to be grilled should first be lightly doused with oil 2 3 The MODELS It reduces the time of preheating of ovens only 8 minutes to reach 200 degrees Celsius Some ovens are equipped with the new doorj WIDE DOOR which has a bigger window area this allows better maintenance and a improved thermal insulation It gives the possibility of setting level and intensity...

Страница 14: ...jected to specific treatments in order to remove and dispose properly all pollutants and recover and recycle all materials Individuals can play an important role in ensuring that WEEE does not become an environmental issue it is essential to follow some basic rules WEEE shall not be treated as household waste WEEE shall be handed over to the relevant collection points managed by the municipality o...

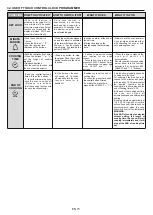
Страница 15: ...lease all the buttons When the set time as elapsed an audible alarm is activated this alarm will stop on its own however it can be stopped immediately by pressing the button SELECT Sounds an alarm at the end of the set time During the process the display shows the remaining time Allows to use the oven as alarm clock could be activated either with operating the oven or with out operating the oven R...

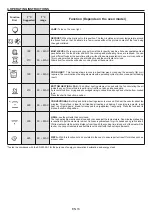
Страница 16: ... circulates air at room temperature around the frozen food so that it defrosts in a few minutes without the protein content of the food being changed or altered BOTTOM HEATING FAN The bottom heating element is used with the fan circulating the air inside the oven This method is ideal for juicy fruit flans tarts quiches and pâté It prevents food from drying and encourages rising in cakes bread doug...

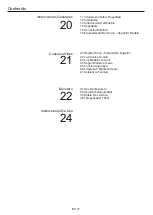
Страница 17: ...nto Del Horno Según El Modelo 2 1 Rejillas Horno Sistema De Sujeción 2 2 La Coccıón Al Grill 2 3 Los Modelos U cook 2 4 Segùn Modelos U see 2 5 Función Aquactiva 2 6 Limpieza Y Mantenimiento 2 7 Asistencıa Técnica Consejos Útiles 21 3 1 Uso Del Mınutero 3 2 Uso Del Temporizador 3 3 Ajuste De La Hora 3 4 Temporizador Táctil Mınutero 22 Instrucciones De Uso 24 ES 17 ...

Страница 18: ...érmica recomendada para este horno El electrodoméstico no debe instalarse detrás de una puerta decorativa para evitar que se caliente en exceso Esta operación debe realizarla un profesional debidamente cualificado El conductor de toma de tierra amarillo y verde debe ser aproximadamente 10 mm más largo que los otros conductores Para cualquier reparación diríjase únicamente a un centro de asistencia...

Страница 19: ...nterior asegúrese de dirigir el tope hacia arriba en la parte trasera de la cavidad La bandeja debe introducirse por completo en la cavidad N o e s n e c e s a r i o l l e v a r a c a b o operaciones configuraciones adicionales para que el electrodoméstico funcione a las frecuencias nominales ATENCIÓN No llene el fondo del horno con agua durante la cocción o cuando esté caliente ATENCIÓN No quite ...

Страница 20: ...s adyacentes al horno deberán ser de un material resistente al calor En el caso de los muebles de madera chapada el encolado deberá resistir una temperatura de 120 C los 1 4 IMPORTANTE En los modelos desprovistos de clavija monte una clavija estándar en el cable capaz de soportar la carga indicada en la placa de características El hilo de tierra es de color amarillo verde Esta operación deberá rea...

Страница 21: ... la humedad y de la temperatura Reduce la perdida de humedad en un 50 lo que garantiza un alimento más sabroso y tierno Esta función es recomendada para cocinar pasteles y pan 2 3 Los modelos La función Sprinter reduce el tiempo de calentamiento del horno en sólo 8 minutos alcanza 200 Algunos hornos vienen equipados con la nueva contrapuerta de cristal la cual tiene una mayor área de cristal y per...

Страница 22: ...be recolectar gratuitamente de manera individual siempre que el equipo sea de un tipo equivalente y que tenga las mismas funciones que el equipo entregado RAEE La RAEE contiene tanto sustancias contaminantes que pueden generar consecuencias negativas para el medio ambiente como componentes básicos que pueden reutilizarse Es importante someter los RAEE a tratamientos específicos con el fin de retir...

Страница 23: ...ste a 0 00 el tiempo de la cocción teclas SELECT Permite seleccionar el tiempo de cocción del alimento introducido en el horno Para visualizar el tiempo restante pulse la tecla SELECT Para modificar el tiempo restante pulse la tecla SELECT Para detener la señal pulse cualquier tecla Pulse el botón central para volver a la función de reloj Pulse el botón central 3 veces Pulse las teclas para ajusta...

Страница 24: ...ión previa a una cocción CALENTAMIENTO INFERIOR VENTILADOR Utilización de la resistencia inferior más la turbina que hace circular el aire dentro del espacio del horno Ideal para hacer tartas de frutas jugosas tortadas quiches pasteles Evita que se sequen los alimentos y favorece la subida de bizcochos masa de pan y otras cocciones realizadas por debajo Coloque la rejilla en la ranura inferior PIZ...

Страница 25: ... 1 6 Important 1 7 Equipement Du Four Equipement Different Selon Le Type De Four 2 1 Grilles Du Four Nouveau Système D arrêt 2 2 La Cuisson Au Gril 2 3 Selon Modèle Le Pack U cook 2 4 Selon Modèle U see 2 5 Fonction Aquactiva 2 6 Conseils De Nettoyage Et D entretien 2 7 Assistance Technique 3 1 Utilisation Du Minuteur Sonore 3 2 Utilisation Du Mınuteur Coupe circuit 3 3 Reglage De L heure 3 4 Horl...

Страница 26: ...e toutes façons dès que le four aura atteint la température de cuisson Le câble d alimentation requis est le H05V2V2 F Le non respect des consignes ci dessus peut compromettre la sécurité de l appareil et annuler la garantie Le débranchement doit se faire à l aide soit de la prise d alimentation soit d un interrupteur installé sur le circuit électrique fixe conformément aux normes électriques Élim...

Страница 27: ...chaud Aucune autre opération ni aucun autre réglage ne sont requis pour faire fonctionner l appareil aux fréquences nominales AVERTISSEMENT Ne recouvrez pas les parois du four avec du papier aluminium ou une protection jetable disponible dans les magasins Le papier d aluminium ou toute autre protection en contact direct avec l émail chaud risque de fondre et de détériorer l émail de la cavité inté...

Страница 28: ...sance absorbée par le four Si votre installation électrique n est pas conforme faites la modifier par un électricien afin de prévenir tous risques On peut également effectuer le branchement au réscau en interposant entre l appareil et le réseau un interrupteur omnipolaire dimensionnée en fonction de la charge et conforme aux normes en vigueur Le fil de terre jaune et vert ne doit pas être interrom...

Страница 29: ...es surfaces en inox et en émail utilisez de l eau tiède légèrement savonneuse Vous pouvez utiliser un produit adapté au nettoyage de ce type de surface Eviter absolument les produits abrasifs qui pourraient endommager la surface du four En cas de salissures tenaces évitez d utiliser des ustensiles susceptibles de rayer irrémédiablement la surface de votre four Il est conseillé de nettoyer régulièr...

Страница 30: ... Gardez les joints propres et en bon état pour éviter toute déperdition d énergie Si vous avez un contrat électrique avec un tarif heure creuse le programme cuisson différée peut vous faire réaliser des économies d énergie en déplaçant le début du programme à un intervalle de temps à tarif réduit 3 4 HORLOGE À COMMANDE SENSITIVE FONCTION COMMENT L UTILISER COMMENT L ARRETER BUT Á QUOI SERT IL MINU...

Страница 31: ...e décongélation avant une cuisson RÉSISTANCE INFÉRIEURE VENTILATEUR idéale pour les tartes à fruits juteux les tourtes les quiches les pâtés Elle évite le dessèchement des aliments et favorise la levée pour les cuissons de cakes pâte à pain et autres cuissons par le dessous Placer la grille sur le gradin inférieur Avec ce mode de cuisson un préchauffage est nécessaire en Chaleur Brassée pendant un...

Страница 32: ... Oprema Pečice odvisno Od Modela 2 1 Nekaj Korıstnıh Nasvetov 2 2 Žar 2 3 Modelı U cook 2 4 Odvisno Od Modela U see 2 5 Funkcija Aquactiva 2 6 Čiščenje In Vzdrževanje Pečice 2 7 Servisiranje Korıstnı Nasvetı 35 3 1 Uporaba Števca Mınut kuhınjske Ure 3 2 Nastavljanje Trajanja Pečenja 3 3 Nastavljanje Točnega Časa 3 4 Uporaba Programske Ure Nastavljanje 36 Funkcije 37 Vsebina SL 32 ...

Страница 33: ...ora ozemljena in v brezhibnem stanju Kabel za ozemljitev je Prekinitev napajanja mora biti možna bodisi z odklopom vtikača iz vtičnice oziroma prek dodatno vgrajenega stikala nameščenega skladno s pravili elektro stroke Rumeno zelenega kabla ni dovoljeno prekinjati z varovalko Vtičnica ali varovalka ki sta vgrajeni med vtičnico in napravo morata po namestitvi naprave ostati enostavno dostopni Če j...

Страница 34: ...rešetke Globji pekač je namenjen lovljenju maščobe ki med peko na žaru ali ražnju odvisno od modela kaplja iz mesa Ne uporabljajte ga za peko pečenk saj bi se maščoba v tem primeru razpršila po vsej pečici se začela žgati in pojavil bi se dim Pekač za pizzo zagotavlja najboljše rezultate ob uporabi funkcije Pizza Nosilec pekača je idealen za peko na žaru uporabljate ga skupaj s pekačem za lovljenj...

Страница 35: ...te pečico najprej ločiti od električnega omrežja Odvijte zaščitni pokrovček in zamenjate pregorelo žarnico z žarnico enake vrste Žarnica mora biti odporna na visoke temperature Skrajša čas predhodnega segrevanja pečice ta se samo v 8 minutah segreje na 200 stopinj C Nekatere pečice so opremljene z novimi vrati z večjim oknom kar olajša vzdrževanje in izboljša termično izolacijo Omogoča nastavljanj...

Страница 36: ...tiskom na srednjo tipko prikličete nazaj funkcijo ure 3 krat pritisnite na srednjo tipko S pomočjo tipk nastavite čas ko želite da se pečica izklopi Sprostite pritisk na vse tipke Izberite funkcjio pečenja s pomočjo stikala za izbiranje funkcij pečice Ob nastavljenem času se pečica izklopi Če želite predčasno prekiniti pečenje ali obrnite stikalo za izbiranje funkcij na 0 Omogoča vam da določite č...

Страница 37: ...je in energijskega razreda LAMP Za prižiganje luči v pečici Samodejno se aktivira tudi ventilator za hlajenje modeli z ventilatorjem NA VEČ NIVOJIH Delujeta oba grelca ter ventilator tako da vroč zrak kroži v pečici Ta način priporočamo za peko perutnine sladic rib in zelenjave Enakomerna temperatura v notranjosti skrajša čas pečenja in predhodnega segrevanja pečice Naenkrat lahko pečete različne ...

Страница 38: ...истема за безопасност на рафтовете 2 2 Грил 2 3 U Cook Модели 2 4 U See 2 5 Самопочистваща се ФУРНА с катализатор 2 6 AQUACTIVA функция 2 7 Почистване и поддръжка 2 8 Сервизен център Полезни съвети 42 3 1 Използване на таймера 3 2 Използване на таймера за край на готвенето 3 3 Използване на електронния програматор 3 4 Настройка на точното време Таймер 43 Инструкции за работа 44 Съдържание БГ 38 ...

Страница 39: ...изключващо устройство като например таймер нито да бъде свързан към верига която се включва и изключва редовно отстраняване на демонтиращите се части След почистване ги сглобете отново съгласно инструкциите Ако захранващият кабел е повреден той трябва да бъде заменен с кабел или с п е ц и а л е н п а к ет п р ед о с та ве н от производителя или като се свържете с отдела за обслужване на клиенти Ти...

Страница 40: ...ешността на фурната с алуминиево фолио или защитно фолио за еднократна употреба от търговската верига При докосване до нагорещените емайлирани повърхности алуминиевото фолио или другите видове защита може да се разтопят и така да увредят емайла на вътрешните стени ВНИМАНИЕ Не допълвайте дъното на кухината с вода по време на готвене или когато фурната е гореща 1 ОБЩИ МЕРКИ ЗА БЕЗОПАСНОСТ Благодарим...

Страница 41: ...е използват четирите фиксиращи отвора в рамката фиг на последната страница За да намерите отворите за закрепване отворете вратата на фурната и погледнете вътре За да се позволи подходяща вентилация измерванията и разстоянията посочени в диаграмата на последната страница трябва да се спазват Забележка За фурни които са комбинирани с котлони инструкциите съдържащи се в ръководството за плочата трябв...

Страница 42: ...чно осветление във фурната живее по дълго в сравнение с традиционните крушка и е по лесно и да се поддържа и най вече пести енергия По добро осветяване Дълъг живот на осветление 5 Много ниска консумация на енергия 95 по ниска от консумация Уреда с бяла светлина LED на 1М Class според IEC 6082 1 1993 A1 1997 A2 2001 еквивалентен на EN 60825 1 1994 A1 2002 A2 2001 максимално светлината излъчвана мощ...

Страница 43: ...ни По време на работа Аларма в края на времето се показва ост време фурната като алармен часовник при включена и изключена фурна Позволява да използвате Натиснете бутони или за да изберете продължителност освободете всички бутони Изберете функция със Натиснете централния бутон 2 пъти селектора Натиснете някой бутон за да спрете сигнала Натиснете централния бутон за да се върнете до часовника 00 00...

Страница 44: ... доставеното оборудване WEEE не трябва да бъдат третирани като домакински отпадъци БГ 44 50 MAX 50 MAX 50 MAX 50 MAX 50 MAX 50 MAX Изпитано в съответствие с EN 60350 1 за целите на декларацията за потребление на енергия и енергиен клас LAMP включва светлината на интериора МНОГОЕТАЖНО ГОТВЕНЕ Използват се долен и горен нагреватели заедно с вентилатора който циркулира въздуха вътре във фурната Препо...

Страница 45: ...ті Полиць 2 2 СМАЖЕННЯ НА ГРИЛІ 2 3 Моделі U COOK 2 4 Відповідно До Моделі 2 5 Духовка З Режимом Самоочищення Та Каталітичним Покриттям 2 6 Функція Aquactiva 2 7 Очищення Та Обслуговування 2 8 Сервісний Центр Корисніпоради 49 3 1 Використання Хвилинного Таймера 3 2 Автоматичне Відключення Після Закінчення Відліку Таймера 3 3 Встановлення Правильного Часу 3 4 Сенсорне Програмування Годинника Таймер...

Страница 46: ...йте лише зонд для м яса рекомендований для цієї духовки Перед очищення потрібно усунути будь які залишки розлитих речовин Прилад не слід встановлювати за декоративними дверцятами оскільки це призведе до перенагрівання вимикач що використовуються для п і д к л юч е н н я п о в и н н і з а л и ш ат и с я легкодоступними після встановлення приладу Недотримання вищезазначених вказівок може негативно в...

Страница 47: ... д о д а т к о в и х операцій налаштувань переконайтеся що обмежувач спрямовано вгору та в задню частину порожнини Полицю потрібно повністю помістити в порожнину УВАГА Не використовуйте алюмінієву фольгу чи одноразові захисні засоби доступні в магазинах для захисту стінок духовки Алюмінієва фольга чи будь які інші захисні засоби при контакті з нагрітою емальованою поверхнею можуть розплавитися та ...

Страница 48: ...витримувати напругу зазначену на табличці з технічними даними Кабель заземлення позначено жовто зеленим кольором Вилку повинен під єднувати тільки кваліфікований фахівець Якщо розетка та вилка є несумісними тоді кваліфікований фахівець повинен замінити розетку Кваліфікований фахівець повинен також переконатися що кабелі живлення здатні пропускати струм необхідний для роботи духовки Важливо Під час...

Страница 49: ...ь панелі на своє місце у зворотньому порядку 2 Зніміть панелі потягнувши їх на себе Щоб вийняти полиці потягніть та припідніміть їх Духовка оснащена новою системою надійності полиць Це дозволить вам виймати полиці з духовки під час огляду їжі без ризику проливання або ж раптового випадання полиці з духовки На грилі можна готувати практично будь які страви за винятком дуже ніжної дичини чи м ясних ...

Страница 50: ...користовуйте той залишок тепла який продовжує виробляти піч Слідкуйте щоб затвори завжди були чистими та справними щоб уникнути витоку тепла з порожнини печі Якщо у вас погодинне тарифікування електроенергії програма відкладеного старту початку приготування сприяє процесу економії електроенергії запускаючи процес приготування у той часовий відрізок коли тариф на електроенергію є нижчим Ніколи не в...

Страница 51: ...передньо задати час приготування необхідний для вибраного рецепту щоб перевірити скільки часу залишилося до закінчення нати сніть кнопку ВИБІР 2 рази для зміни попередньо заданого часу натисніть ВИБІР та кнопки натиснути будь яку кнопку щоб вимкнути сигнал Натиснути головну кнопку щоб повернутися до функції годинника ЗАКІНЧЕННЯ ПРИГОТУВАННЯ натиснути головну кнопку 3 рази натиснути кнопки щоб зада...

Страница 52: ...бхідну кількість жиру та олії Поєднання нагрівальних елементів з пульсуючим потоком повітрям гарантує ідеальний результат приготування Використовується тільки верхній нагрівальний елемент і ви можете регулювати температуру Для того щоб елементи нагрілися до червоного кольору необхідно п ять хвилин поперед нього нагрівання Успіх гарантовано для страв гриль кебабів та гратенів Біле м ясо слід розташ...

Страница 53: ...rnosni sustav polica 2 2 Pečenje na grillu 2 3 U Cook pećnice 2 4 U See osvjetljenje 2 5 Funkcija AQUACTIVA 2 6 Čišćenje i održavanje 2 7 Ovlašteni servis Korisni savjeti 57 3 1 Korištenje timera za određivanje trajanja kuhanja u minutama 3 2 Korištenje timera za kraj kuhanja 3 3 Podešavanje točnog vremena 3 4 Korištenje programskih tipki sata Korištenje pećnice 59 Radne upute 60 HR 53 Opis funkci...

Страница 54: ...jte koristiti deterdžente vratite u unutrašnjost pećnice prema uputama u ovoj knjižici Koristite isključivo termometre koji su predviđeni za pećnice Električni kabel uređaja s utikačem mora biti spojen u pravilno uzemljenu zidnu utičnicu U slučaju da je uređaj isporučen bez utikača na kabel je potrebno montirati standardni utikač s priključkom za uzemljenje koji je u stanju podnjeti opterećenje ur...

Страница 55: ...rijavanje Pri stavljanju police u unutrašnjost pećnice pazite da je zaustavljivač usmjeren prema gore i da je na stražnjoj strani uređaja Polica se mora u potpunosti postaviti u unutrašnjosti pećnice HR 55 ...

Страница 56: ...te unutarnje stijenke pećnice aluminijskom folijom ili jednokratnimzaštitamakoje se mogu nabavitiu trgovačkojmreži Ne izvlačite utikač iz zidne utičnice tako da vučete električni kabel već zahvatiteutikači izvaditega iz utičnice Djeca ili druge nepouzdane osobe ne smiju upravljati električnim uređajimabez nadzora U slučaju kvara i ili nepravilnog rada odmah isključite uređaj i nemojte ga daljekori...

Страница 57: ...ečenje kruha i kolača Sve pećnice omogućuju funkciju pećnice opremljene su elektronskom kontrolom brzine ventilatora koji se naziva VARIOFAN Tijekom pečenja ovaj sustav automatski mijenja brzinu ventilatora u višenamjenskom načinu rada kako bi optimizirao strujanje zraka i unutarnju temperaturu pećnice 2 3 MODELI PEĆNICA Ova funkcija skraćuje vrijeme predzagrijavanja pećnice Za samo 8 minuta posti...

Страница 58: ...kom pečenja može izazvati opasne posljedice Za i enje unutrašnjosti pećnice koristite vru u vodu i detrd ent i u potpunosti je isperite Taj svakida nji posao možete učinite nepotrebnim jer svi modeli mogu biti opremljeni Za čišćenje pećnice nikada nemojte koristiti uređaje na paru ili sprejeve pod visokim pritiskom MIJENJANJE ŽARULJE U UNUTARNJOSTI PEĆNICE klasično osvjetljenje pećnice isklju ite ...

Страница 59: ...ključiti ili se može isključiti pritiskom na tipku SELECT omogućuje korištenje pećnice kao budilice može se aktivirati u radu s pećnicom ili bez pećnice preostalo vrijeme minute sekunde uključuje zvučni signal na kraju podešenog vremena tijekom postupka prikazano je pomoću tipki ili podesite potrebno vrijeme dužinu otpustite sve tike podesite način kuhanja pomoću gumba za odabir pritisnite središn...

Страница 60: ...ači keksa i jabuka Jela su na kraju pečenja lijepo hrskava ODLEĐIVANJE Kada je gumb za funkcije podešen na ovaj položaj ventilator okreće zrak na sobnoj temperaturi oko zaleđene hrane tako da se odledi za nekoliko minuta bez da sadržaj bjelančevina u hrani bude promijenjen VENTILATOR DONJI GRIJAČ GRILLA Ova funkcija je idealna za pečenje osjetljivo hrane TEMPERATURA predpodešena i ručno podešena m...

Страница 61: ...r la performance maximale du four il est nécessaire de créer une ouverturede500x10mmoulamêmesurfacedans5 000mm2 FR A Ако монтажът на цокъла не позволява циркулация на въздуха за да се постигне максимална производителност на фурната е необходимо да се пробие отвор от 500х100 mm или същата повърхноств5000mm2 BG A 595 mm 595 mm 546 mm 22 mm 580 mm 560 mm A 600 mm 560 mm 560 mm 560 mm 560 mm x 45 mm A...

Страница 62: ...l intérêtdel utilisation sanscauserdepréjudicesauxcaractéristiquesdefonctionnementdesécuritédesappareils FR 70007896 A4 07 2022 Rev_A The manufacturer will not be responsible for any inaccuracy resulting from printing or transcript errors contained in this brochure We reserve the right to carry out modifications to products as required includingtheinterestsofconsumption withoutprejudicetothecharac...

Отзывы: