background image


15 

6.  Care and Cleaning


What?


How?


Important!


Everyday soiling on 
glass (fingerprints, 
marks, stains left by 
food or non-sugary 
spillovers on the 
glass) 

1.  Switch the power to the cooktop off. 
2.  Apply a cooktop cleaner while the 

glass is still warm (but not hot!) 

3.  Rinse and wipe dry with a clean cloth 

or paper towel. 

4.  Switch the power to the cooktop 

back on. 

  When the power to the cooktop is switched 

off, there will be no ‘hot surface’ indication 
but the cooking zone may still be hot! Take 
extreme care. 

  Heavy-duty scourers, some nylon scourers 

and harsh/abrasive cleaning agents may 
scratch the glass. Always read the label to 
check if your cleaner or scourer is suitable. 

  Never leave cleaning residue on the 

cooktop: the glass may become stained. 

Boilovers, melts, 
and hot sugary 
spills on the 
glass 

Remove these immediately with a fish 
slice, palette knife or razor blade scraper 
suitable for Induction glass cooktops, but 
beware of hot cooking zone surfaces: 
1.  Switch the power to the cooktop off at 

the wall. 

2.  Hold the blade or utensil at a 30° angle 

and scrape the soiling or spill to a cool 
area of the cooktop. 

3.  Clean the soiling or spill up with a 

dish cloth or paper towel. 

4. Follow steps 2 to 4 for ‘Everyday 

soiling on glass’ above. 

  Remove stains left by melts and sugary 

food or spillovers as soon as possible. If left 
to cool on the glass, they may be difficult to 
remove or even permanently damage the 
glass surface. 

  Cut hazard: when the safety cover is 

retracted, the blade in a scraper is razor-
sharp. Use with extreme care and always 
store safely and out of reach of children. 

Spillovers on the 
touch controls 

1.  Switch the power to the cooktop off. 
2.  Soak up the spill 
3.  Wipe the touch control area with a 

clean damp sponge or cloth. 

4.  Wipe the area completely dry 

with a paper towel. 

5.  Switch the power to the cooktop 

back on. 

  The cooktop may beep and turn itself off, 

and the touch controls may not function 
while there is liquid on them. Make sure 
you wipe the touch control area dry before 
turning the cooktop back on. 


7.  Hints and Tips 


Problem


Possible causes


What to do


The induction hob 
cannot be turned on. 

No power. 

Make sure the induction hob is 
connected to the power supply 
and that it is switched on. 
Check whether there is a power 
outage in your home or area. If you’ve 
checked everything and the problem 
persists, call a qualified technician. 

The touch controls are 
unresponsive. 

The controls are locked. 

Unlock the controls. See section 
‘Using your induction cooktop’ for 
instructions. 

The touch controls are 
difficult to operate. 

There may be a slight film of 
water over the controls or you 
may be using the tip of your 
finger when touching the 
controls. 

Make sure the touch control area is dry and 
use the ball of your finger when touching 
the controls. 

The glass is being 
scratched. 

Rough-edged cookware. 


Unsuitable, abrasive scourer or 
cleaning products being used. 

Use cookware with flat and smooth 
bases. See ‘Choosing the right 
cookware’. 


See ‘Care and cleaning’. 

Содержание CIKC30

Страница 1: ...dy induction hob Please read this instruction manual carefully before using the hob and keep it in a safe place for future reference Instructions Manual For Induction Hob ENGLISH Manuel d instructions...

Страница 2: ......

Страница 3: ...2 Choosing the right Cookware 9 3 3 How to use 10 3 3 1 Start cooking 10 3 3 2 Finish cooking 11 3 3 3 Locking the Controls 11 3 3 4 Timer control 11 3 3 5 Using the Boost function 12 3 3 6 Default w...

Страница 4: ...9 6 Cautions 20 9 7 Connecting the hob to the mains power supply 21...

Страница 5: ...t in injury or cuts 1 2 3 Important safety instructions Read these instructions carefully before installing or using this appliance No combustible material or products should be placed on this applian...

Страница 6: ...get hot A steam cleaner is not to be used Do not use a steam cleaner to clean your cooktop The appliance is not intended to be operated by means of an external timer or separate remote control system...

Страница 7: ...tracted Use with extreme care and always store safely and out of reach of children Failure to use caution could result in injury or cuts 1 3 5 Important safety instructions Never leave the appliance u...

Страница 8: ...n your cooktop Do not stand on your cooktop Do not use pans with jagged edges or drag pans across the Induction glass surface as this can scratch the glass Do not use scourers or any other harsh abras...

Страница 9: ...for future reference 2 Product Induction 2 1 Top View 1 Max 1800 2000 W zone 2 Max 1800 2000 W zone 3 Glass plate 4 ON OFF control 5 Control panel 2 2 Control Panel 1 ON OFF control 2 Time control 3...

Страница 10: ...e L W H mm 288X520X59 5 Building in Dimensions A B mm 268X500 3 Operation of Product 3 1 Touch Controls The controls respond to touch so you don t need to apply any pressure Use the ball of your finge...

Страница 11: ...on the market are not suitable for induction cooking because they have only a part of the bottom in ferromagnetic material with parts in another material These areas may heat up at different levels o...

Страница 12: ...ou wish to use Make sure the bottom of the pan and the surface of the cooking zone are clean and dry Rotate the corresponding knob and the indicator next to the knob will flash Select a heat setting b...

Страница 13: ...the controls to prevent unintended use for example children accidentally turning the cooking zones on When the controls are locked all the controls except the ON OFF control are disabled To lock the...

Страница 14: ...time is set it will begin to count down immediately The display will show the remaining time and the timer indicator flash for 5 seconds NOTE The red dot next to power level indicator will illuminate...

Страница 15: ...es Start cooking on a high setting and reduce the setting when the food has heated through 4 1 1 Simmering cooking rice Simmering occurs below boiling point at around 85 C when bubbles are just rising...

Страница 16: ...Small Articles When an unsuitable size or non magnetic pan e g aluminum or some other small item e g knife fork key has been left on the hob the hob automatically go on to standby in 1 minute The fan...

Страница 17: ...anently damage the glass surface Cut hazard when the safety cover is retracted the blade in a scraper is razor sharp Use with extreme care and always store safely and out of reach of children Spillove...

Страница 18: ...ooking zone The induction hob or a cooking zone has turned itself off unexpectedly a tone sounds and an error code is displayed typically alternating with one or two digits in the cooking timer displa...

Страница 19: ...es not start High temperature of the hob Ambient temperature may be too high Air Intake or Air Vent may be blocked There is something wrong with the fan Check whether the fan runs smoothly if not repl...

Страница 20: ...shown below Note The safety distance between the sides of the hob and the inner surfaces of the worktop should be at least 3mm A mm B mm C mm D mm E mm F mm G 268 4 0 500 4 0 50min 50 min 50 min 50 mi...

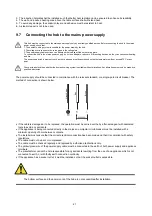
Страница 21: ...nd applicable standards and regulations A suitable isolating switch providing full disconnection from the mains power supply is incorporated in the permanent wiring mounted and positioned to comply wi...

Страница 22: ...ferent table top thickness Under any circumstances the brackets cannot touch with the inner surfaces of the worktop after installation see picture 9 6 Cautions 1 The induction hotplate must be install...

Страница 23: ...terations Any alterations must only be made by a qualified electrician The power supply should be connected in compliance with the relevant standard or a single pole circuit breaker The method of conn...

Страница 24: ...d of in the wrong way The symbol on the product indicates that it may not be treated as normal household waste It should be taken to a collection point for the recycling of electrical and electronic g...

Страница 25: ...s tactiles 8 3 2 S lection du bon ustensile de cuisson 9 3 3 Comment l utiliser 10 3 3 1 Commencer cuire 10 3 3 2 Finir de cuisiner 11 3 3 3 Verrouillage des commandes 11 3 3 4 Commande de la minuteri...

Страница 26: ...9 4 Avant de placer les triers de fixation 20 9 5 R glage de la position des triers 20 9 6 Mises en garde 21 9 7 Branchement de la plaque sur le secteur 21...

Страница 27: ...1 2 3 Consignes de s curit importantes Lisez attentivement ces instructions avant d installer ou d utiliser cet appareil Aucun produit ou mati re combustible ne doit tre pos sur cet appareil Veuillez...

Страница 28: ...ur nettoyer votre plaque de cuisson L appareil n est pas pr vu pour tre utilis au moyen d une minuterie ext rieure ou d un syst me de t l commande s par AVERTISSEMENT risque d incendie ne ranger aucun...

Страница 29: ...les ne soient pas au dessus d autres zones de cuisson allum es Gardez les poign es hors de port e des enfants Si vous ne respectez pas ce conseil vous pourriez vous br ler et vous bouillanter 1 3 4 Ri...

Страница 30: ...rtie de l appareil sauf si cela est recommand sp cifiquement dans le mode d emploi Toutes les autres op rations de r paration doivent tre faites par un technicien qualifi Ne placez pas et ne laissez p...

Страница 31: ...cas de besoin 2 Induction du produit 2 1 Vue de dessus 1 Zone max 1 800 2 000 W 2 Zone max 1 800 2 000 W 3 Plaque en verre 4 Commande Marche Arr t 5 Panneau de commande 2 2 Panneau de commande 1 Comma...

Страница 32: ...40 V 50 ou 60 Hz Puissance lectrique install e 3 500 W Taille du produit L l H en mm 288X520X59 5 Dimensions du produit encastr A B en mm 268X500 3 Fonctionnement du produit 3 1 Commandes tactiles Les...

Страница 33: ...fond en mat riau ferromagn tique et contiennent d autres pi ces dans un autre mat riau Ces zones peuvent chauffer diff rents niveaux ou avec une puissance plus faible Dans certains cas lorsque le fond...

Страница 34: ...que le fond de la casserole et la surface de la zone de cuisson soient propres et secs Tournez le bouton correspondant et l indicateur c t du bouton se mettra clignoter S lectionnez un r glage de cha...

Страница 35: ...des enfants teignant par inadvertance les zones de cuisson allum es Quand les commandes sont verrouill es toutes les commandes sont d sactiv es l exception de la commande Marche Arr t Pour verrouille...

Страница 36: ...restant et le voyant de la minuterie clignote pendant 5 secondes REMARQUE le point rouge c t du voyant du niveau de puissance s allume pour indiquer la zone s lectionn e Quand le temps de cuisson est...

Страница 37: ...isiner avec un r glage lev puis r duire le r glage quand la nourriture est chaude 4 1 1 Faire mijoter cuire du riz Un liquide fr mit en dessous du point d bullition environ 85 C quand les bulles comme...

Страница 38: ...e ou non magn tique par ex aluminium ou un autre petit l ment par ex couteau fourchette clef a t laiss sur la plaque la plaque passe automatiquement en mode veille en 1 minute Le ventilateur continue...

Страница 39: ...e Risque de coupure quand le couvercle de s curit est enlev la lame du racloir est particuli rement coupante Faites extr mement attention quand vous l utilisez et rangez la toujours l abri et hors de...

Страница 40: ...t pas centr e correctement dessus Centrez la casserole et assurez vous que sa base correspond bien la taille de la zone de cuisson La plaque induction ou une zone de cuisson s est coup e l improviste...

Страница 41: ...sson s allume mais la plaque ne chauffe pas Temp rature lev e de la plaque La temp rature ambiante pourrait tre trop lev e L admission d air ou l vent d air pourrait tre obstru V rifiez s il y a un pr...

Страница 42: ...us importantes caus es par le rayonnement thermique provenant de la plaque chaude Comme cela est montr ci dessous Remarque la distance de s curit entre les c t s de la plaque de cuisson et les surface...

Страница 43: ...sus d un four le four doit avoir un ventilateur de refroidissement incorpor L installation sera conforme aux exigences en mati re de d gagement et aux normes et r glementations applicables Un sectionn...

Страница 44: ...de la position des triers Fixez la plaque sur la surface de travail au moyen de 4 triers vis sur le fond de la plaque voir image apr s l installation R glez la position des triers en fonction de l pai...

Страница 45: ...on ne doit toucher aucune des parties chaudes et doit tre positionn de mani re ce que la temp rature ne d passe jamais 75 C Faites effectuer un contr le par un lectricien pour savoir si le syst me de...

Страница 46: ...le recyclage des produits lectriques et lectroniques Cet appareil requiert une mise au rebut sp cialis e Pour plus d informations sur le traitement la r cup ration et le recyclage de ce produit veuil...

Отзывы: