background image

Canarm Octa-Lite 8LEC Series

Mini-Eppler    Blades

 (patent pending)

8LEC Control and Power Assembly

 (patent pending)

MODEL 

DESCRIPTION 

WIDTH (X) 

LENGTH (Y) 

HEIGHT (Z)

SHIPPING WEIGHT

8L06EC

6’ / 1.8M Fan

8” (203 mm)

36” (914 mm)

9” (229 mm)

22 lbs. (10 kg)

8L08EC

8’ / 2.4M Fan 

8” (203 mm)

48” (1219 mm)

9” (229 mm)

27 lbs. (12 kg)

8L10EC

10’ / 3.0M Fan

8” (203 mm)

60” (1524 mm)

9” (229 mm)

33 lbs. (15 kg)

8L12EC

12’ / 3.6M Fan 

8” (203 mm)

72” (1829 mm)

9” (229 mm)

38 lbs (17 kg)

8L14EC

14’ / 4.3M Fan

8” (203 mm)

84” (2134 mm)

9” (229 mm)

43 lbs. (20 kg)

8L16EC

16’ / 4.9M Fan 

8” (203 mm)

96” (2438 mm)

9” (229 mm)

48 lbs (22 kg)

MODEL 

DESCRIPTION 

LENGTH

WIDTH

HEIGHT

SHIPPING WEIGHT

8LEC

Control & Power Assembly

30.5” (775mm)

33.0” (838mm)

30.5” (775mm)

140 lbs (64kg)

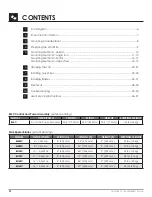
CONTENTS

 1


Fan Diagram  ..................................................................................................................................6

 2


Important Information  ...................................................................................................................

7

 3


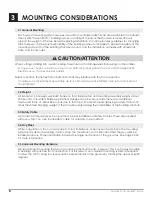
Mounting Considerations  .............................................................................................................8

 4


Preparing the Work Site  ................................................................................................................

9

 5


Mounting Method 1: I-Beam 

 ......................................................................................................

10


Mounting Method 2: Angle Iron 

 ...........................................................................................

11-15


Mounting Method 3: Purlins 

 ...................................................................................................

16-17


Mounting Method 4: Upper Truss 

 ..........................................................................................

18-19

 6


Hanging the Fan  .....................................................................................................................

20-21

 7


Installing Guy Wires .................................................................................................................

22-23

 8


Installing Blades  ......................................................................................................................

24-27

 9


Electrical 

 ..................................................................................................................................

28-32

10

    Troubleshooting  ......................................................................................................................

33-35

11

   User Servicing Instructions  ......................................................................................................

36-37

Содержание 8LEC Series

Страница 1: ...OCTA LITE FANS 8LEC SERIES 6 16 Models INSTALLATION MANUAL Custom Designed Reduced Maintenance STOL Technology Patent pending...

Страница 2: ...g fire rated construction Failure to comply could result in personal injury electric shock death fire and or property damage Before attempting installation servicing or cleaning unit switch power off...

Страница 3: ...ils et ne pas les utiliser des fins autres que celles pr vues par le fabricant This unit has an unguarded impeller Do not use in locations readily accessible to people or animals Cet appareil poss de...

Страница 4: ...8 203 mm 84 2134 mm 9 229 mm 43 lbs 20 kg 8L16EC 16 4 9M Fan 8 203 mm 96 2438 mm 9 229 mm 48 lbs 22 kg MODEL DESCRIPTION LENGTH WIDTH HEIGHT SHIPPING WEIGHT 8LEC Control Power Assembly 30 5 775mm 33...

Страница 5: ...4 10 DRAWN BY TH PART NUMBER 6001 S REV _001 THIS DRAWING IS THE EXCLUSIVE PROPERTY OF SKYBLADE FAN COMPANY AND CANNOT BE REPRODUCED OR DISCLOSED TO ANY THIRD PARTY WITHOUT THE AUTHORIZATION OF SKYBLA...

Страница 6: ...rce is not accepted 1 1 2 2 3 3 4 4 5 5 6 6 7 7 8 8 A A B B C C D D SHEET 1 OF 1 DRAWN CHECKED QA MFG APPROVED sales 5 15 2019 DWG NO 19 05 15 IOM Page 5 png TITLE SIZE D SCALE REV 0 25 1 1 FAN DIAGRA...

Страница 7: ...the fan closer than 15 of its diameter to any object or its path If this is an issue mounting extension bars and smaller fans are available from Canarm 2 3 Fire Suppression Systems and Fan Placement I...

Страница 8: ...stallation of Safety Cables These are supplied with every fan You must install safety cable for warranty to be in effect 3 4 Guy Wires While in operation a fan can sway due to minor imbalance or becau...

Страница 9: ...acing between multiple fans should be no less than 2 5x the fans diameter when measured from the center of the fans The mounting structure must be able to withstand the torque which is generated by th...

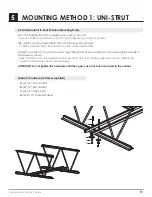
Страница 10: ...istrut Span between mounting point Minimum Unistrut Size W x H x T Qty of Unistrut Needed 8 2 4m 1 5 8 2 Support Directly From Building Structure All mounting instructions assume that the building str...

Страница 11: ...cture du toit chaque extr mit Fasten the unistrut to the roof structure mounting points at each end with customer supplied Grade 5 hardware as shown Fixez l unistrut aux points de fixation de la struc...

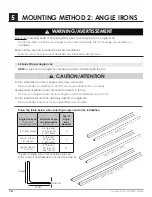
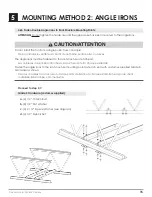
Страница 12: ...a single purlin truss or bar joist Ne pas installer le ventilateur partir d une seule panne botte ou solives Unsupported angle iron spans should not exceed 12 3 7m Non pris en charge trav es de fer d...

Страница 13: ...Irons Together if span is longer than 8 If the angle iron span is 8 2 4m or less proceed to step 5 6a on the following page If the angle iron span is longer than 8 2 4m it is necessary to use double...

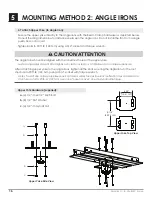
Страница 14: ...Washer see diagram d 4 1 2 Nylock Nut 2 5 6 4 cm 9 16 Dia 1 4 cm 2 5 6 4 cm Do not install the fan from a single purlin truss or bar joist Ne pas installer le ventilateur partir d une m me purlin bot...

Страница 15: ...Nylock Nut Do not install the fan from a single purlin truss or bar joist Ne pas installer le ventilateur partir d une m me purlin botte ou solives The angle irons must be fastened to the roof structu...

Страница 16: ...DRAWING IS THE EXCLUSIVE PROPERTY OF SKYBLADE FAN COMPANY AND CANNOT BE REPRODUCED OR DISCLOSED TO ANY THIRD PARTY WITHOUT THE AUTHORIZATION OF SKYBLADE FAN COMPANY MATERIAL XXXXXXXX ALL DIMENSION ARE...

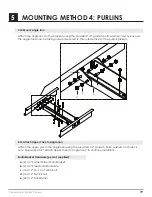
Страница 17: ...to Hanging the Fan on pg 21 Clamping Plate Hardware purchased separately a 4 1 2 13x2 1 2 GR 5 Bolt b 8 1 2 Flat Washer c 4 1 2 13 Nylock Nut d 2 Clamping Plate Install the Clamping Shims only if the...

Страница 18: ...ced on both sides of the plate for each bolt 5 12 Pre Drill Angle Iron Brackets Holes Your angle iron should be cut to allow 1 2 1 27 cm clearance between the end of the angle iron and the purlin you...

Страница 19: ...the purlin brackets 5 15 Attach Upper Yoke to Angle Iron Attach the upper yolk to the angle irons using the provided 1 2 grade 5 bolts washers and nylock nuts See section 5 7 Attach Upper Yoke to Ang...

Страница 20: ...ied a 2 1 2 13x 3 1 2 GR 5 Bolt b 4 1 2 Flat Washer c 2 1 2 13 Nylock Nut Cable End Detail The safety cable is a critical safety feature of the fan and must be installed correctly Le c ble de s curit...

Страница 21: ...vitesses ce qui peut entra ner des dommages ou une dur e de vie raccourcie Ne pas installer le niveau annulera la garantie du fabricant WARNING AVERTISSEMENT 6 3 Attach the Motor to extension tube Att...

Страница 22: ...rence Eye Hook illustration on page 23 1 Slide the unlooped end of the guy wire through the eye hook 2 Feed the wire through the loop on the other end of the wire 3 Pull tight so the wire tightens on...

Страница 23: ...ing a Beam Clamp b Eye Hook c Gripple Wire Loop Gripple Maximum Angle Gripple Hook Tab Motor Make certain all electrical cords are not obstructed by guy wires Assurez vous que tous les c bles lectriqu...

Страница 24: ...Soc Cap 5 16 18 x 5 8 c 16 Zinc Split Lock Washer 5 16 c a b Top of Blade To reduce the risk of personal injury do not bend the blade brackets when installing the brackets balancing the blades or cle...

Страница 25: ...Canarm Octa Lite 8LEC Series 25 8 INSTALLING BLADES 8 1 Attach Blades to Hub Slide blade onto struts until blade holes and strut holes are aligned...

Страница 26: ...Cap 5 16 18 x 3 4 c 16 Zinc Split Lock Washer 5 16 ATTENTION Upon completion of the mechanical installation of the fan and before powering on spin the fan around multiple times by hand to ensure all b...

Страница 27: ...nd of blade after blade has been securely attached to the strut Fasten wingtip to blade using a 10 32 X 5 8 Button Cap 8 INSTALLING BLADES 8 3 Wingtip Assembly Wingtip Hardware Kit supplied a 8 10 32x...

Страница 28: ...nterference EMI Voltage disturbance refers to transient overvoltage voltage unbalance voltage swells rapid voltage change flicker superimposed signals harmonic voltages supply voltage variations volta...

Страница 29: ...rom line inputs at the fan controllers disconnect L1 L2 L3 Wait three 3 minutes for capacitors to discharge to safe voltage levels Darkened display LEDs are NOT an indication of safe voltage levels Fa...

Страница 30: ...tallation CAUTION ATTENTION IMPORTANT Check that the correct input voltage is being sent to the fan See rating labels on the motor for acceptable voltage A blown fan due to incorrect input voltage is...

Страница 31: ...f the incoming power on the motor is required NOTE Canarm suggests using a field supplied fused disconnect switch 1 Phase Voltage 120V 1Ph 230V 1Ph 3 Phase Voltage 230V 3Ph 460V 3Ph 2 2 3 3 4 4 5 5 6...

Страница 32: ...a Fire Alarm Panel If the installation of the fan is required to be wired to a fire alarm emergency shut off an external relay will have to be placed by a fire suppression specialist between the volt...

Страница 33: ...ding at the motor controller and from the controller to the supply b Do not run your controller and sensitive equipment on the same power line c Install properly sized EM RFI filter d Contact Customer...

Страница 34: ...controller wiring sheet Is the wiring correct Fix incorrect wiring No Yes Check all brackets and bolts Ensure bolts are torqued to the proper rating and brackets are free to spin without collisions K...

Страница 35: ...lt may be occurring a line reactor may need to be placed to reach correct voltage If the voltage is low at splice of the fan motor Under volt may be occurring a line reactor may need to be placed to r...

Страница 36: ...7 Chassis Silver PP 172 8 8 Mini Blades PP 029 Chassis Bottom Plate Steel PP 172 10 10 Mini Blades PP 054 Hub Cylinder 8 Silver Mini Blade 6 16 Fans PP 172 12 12 Mini Blades PP 064 8 Hub Plate 8 Silve...

Страница 37: ...of fire electric shock or injury to persons during cleaning and user maintenance Risque d incendie de choc lectrique ou de blessures lors du nettoyage et de l entretien par l utilisateur Disconnect t...

Страница 38: ...38 Canarm Octa Lite 8LEC Series 12 USER SERVICING INSTRUCTIONS Maintenance Log Replacement Part List DATE MAINTENANCE PERFORMED REPLACEMENT PARTS REQUIRED PART NO DESCRIPTION...

Страница 39: ...Canarm Octa Lite 8LEC Series 39 NOTES...

Страница 40: ...LIM8LEC 0123_02 www canarm com PHONE 1 613 342 5424 FAX 1 800 263 4598 E Mail hvacsales canarm ca...

Отзывы: