7.2 Mount the sensor
The WindSonic4 is mounted using the components of the mounting kit shipped with the
WindSonic4 (see
(p. 2)).
1. Thread the connector end of the cable through the tubing; start at the end without the
three threaded holes.
2. Attach the female mating connector on the cable to the male mating connector located on
the bottom of the WindSonic4.
3. Secure the WindSonic4 to the tubing using the three included pan-head screws.
4. Attach the tubing to a crossarm using the CM220 Right Angle Mounting Kit (see
5. Mount the crossarm to the tripod or tower.
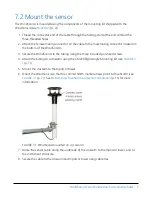
6. Orient the WindSonic4 so that the colored North marker arrows point to True North (see
(p. 7)). See
Determining True North and sensor orientation
(p. 15) for more
information.
FIGURE 7-1. WindSonic4 mounted on a crossarm
7. Route the sensor cable along the underside of the crossarm to the tripod or tower, and to
the instrument enclosure.
8. Secure the cable to the crossarm and tripod or tower using cable ties.
WindSonic4 Two-Dimensional Sonic Anemometer
7

