


3. Initial inspection
l
Upon receipt of the WindSonic4, inspect the packaging and contents for damage. File
damage claims with the shipping company. Immediately check package contents against
the shipping documentation (see
(p. 2)). Contact Campbell Scientific about any
discrepancies.
l
The model number and cable length are printed on a label at the connection end of the
cable. Check this information against the shipping documents to ensure the expected
product and cable length are received.
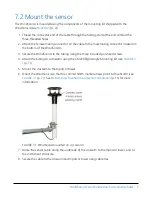
3.1 Ships with
The WindSonic4 is shipped with a mounting kit that includes:
l
34.93 cm (13.75 in) length of tubing
l
Three #6-32 x 0.375 inch pan head screws
l
CM220 Right Angle Mounting Kit
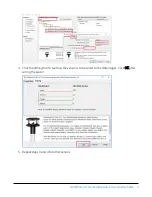
4. QuickStart
A video that describes data logger programming using Short Cut is available at:
www.campbellsci.com/videos/cr1000x-datalogger-getting-started-program-part-3
. Short Cut
is an easy way to program your data logger to measure the sensor and assign data logger wiring
terminals. Short Cut is available as a download on
. It is included in
installations of LoggerNet, RTDAQ, PC400, or PC200W.
The following procedure also shows using Short Cut to program the WindSonic4.
1. Open Short Cut and click Create New Program.
2. Double-click the data logger model.
3. In the Available Sensors and Devices box, type WindSonic1 or locate the sensor in the
Sensors > Meteorological > Wind Speed & Direction folder. Double-click the WindSonic4
(SDI-12) Two Dimensional Ultrasonic Wind Sensor. The wind speed defaults to meters per
second. This can be changed by clicking the Wind Speed box and selecting one of the
other options. Type the correct SDI-12 Address; default is 0.
WindSonic4 Two-Dimensional Sonic Anemometer
2