CAMPAGNOLO COMPONENTS - TECHNICAL MANUAL
8
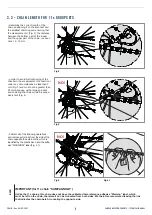
Fig.13
Fig.15
Fig.16
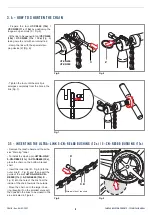
- Check that the tapered tip of the pusher
(F) (Fig. 13) is in line with the centre of
the bushing ULTRA-LINK 5-CN-RE500
(11s) / 5-CN-RE600 (12s) (E) (Fig. 13).
- While exerting a uniform force, screw
in the tool (Fig. 14) so that the bushing
ULTRA-LINK 5-CN-RE500 (11s) / 5-CN-
RE600 (12s) (E) has completely entered
the thickness of the chain.
Note
In order to minimize the possibility of
damaging the chain irreparably, DO NOT
TIGHTEN the tool beyond the beat. Let
the bushing ULTRA-LINK 5-CN-RE500
(11s) / 5-CN-RE600 (12s) (E) protrude
0.1 mm from the inner side of the chain
(Fig. 13).
- Insert the protruding part of the guide
into the hole provided at the base of the
tool and split it by bending (Fig. 14).
The terminal part of the split guide must
always remain inside the bushing.
- Remove the clamping device and remove
the chain from the tool.
Fig.17
Fig.18
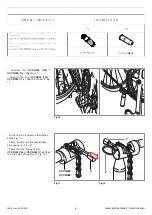
- Prepare the tool UT-CN400 (12s) /
UT-CN300 (11s / 12s) by positioning the
tongue in closure mode (Y - Fig. 17).
- Position the tool UT-CN400 (12s) /
UT-CN300 (11s / 12s) as indicated in Fig.
18 (from the outside of the chain towards
the inside).
Fig.14
F
E
Lato esterno
della catena.
E
F
E
Lato interno
della catena
E
0,1 mm
E
Y
3.6 -
LOCKING THE BUSHING ULTRA-LINK
5-CN-RE600 (12s) / 5-CN-RE500 (11s)
CHAIN - Rev. 06/ 02-2021
External side
of the chain
Internal side
of the chain
Содержание Ergopower Record 12s
Страница 1: ...CAMPAGNOLO COM 12s 11s CHAIN...


