- 7 -
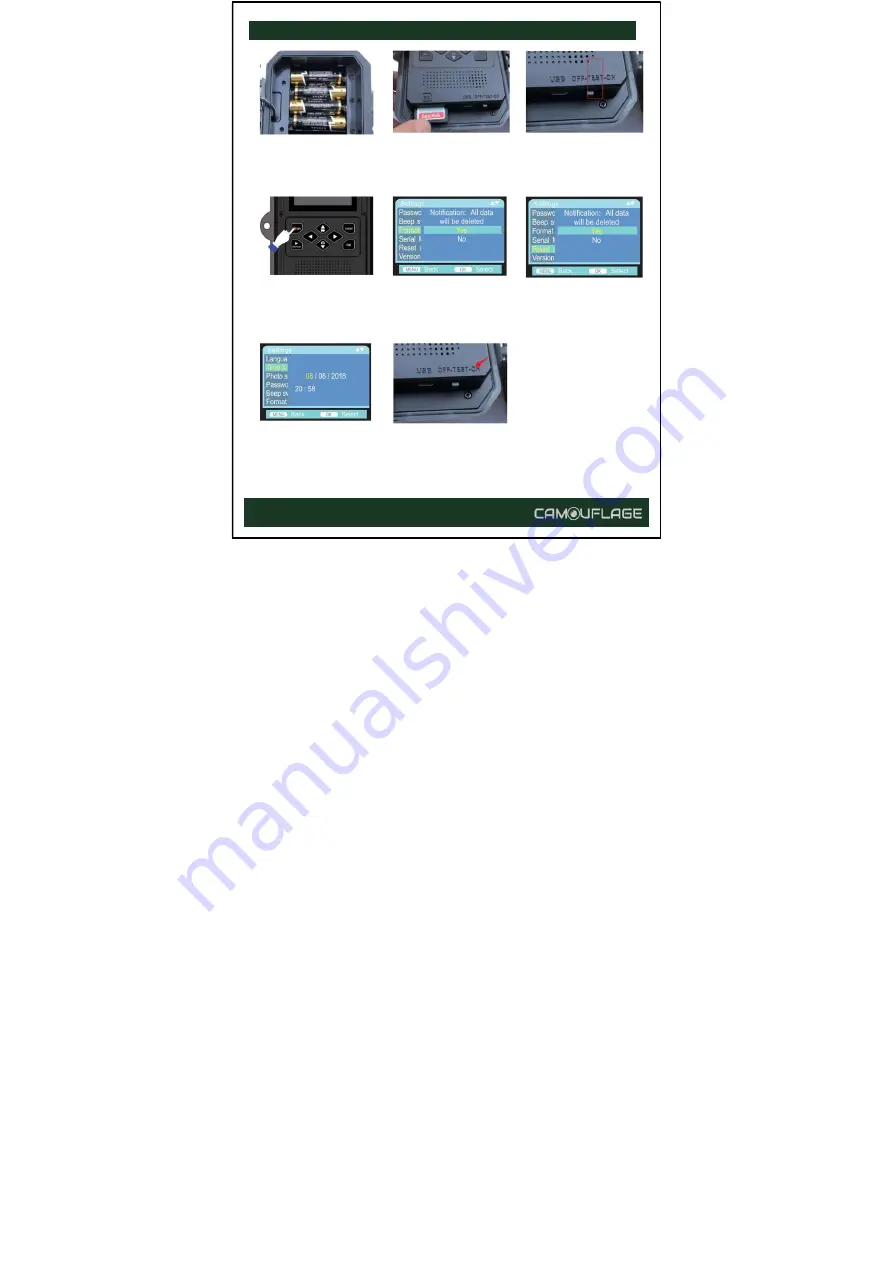
Simple to use this camera
Install batteries
Install SD card.
Switch to TEST.
Press Menu to
setting
Format memory
card
Reset to factory
Set the Date & Time
Switch to ON to
use.
Страница 1: ...Digital Wildlife Camera EZ2...
Страница 2: ...g an external power source 8 Inserting the SD card 9 Camera Operation 10 Mode Switch 10 OFF Mode 10 ON Mode 10 TEST Mode 10 Mode Change Setting in TEST Mode 11 Mode 11 Photo resolution 12 Photo series...
Страница 3: ...wing Images Directly from the SD Card 21 Reviewing Images by Connecting to a Computer 21 Showing recordings on an external monitor 21 Troubleshooting FAQ 22 a Photos Do Not Capture Subject of Interest...
Страница 4: ...front of your camera To make our product easy to use and have a general understanding we have made this manual specifically for you This manual explains how to use this camera systematically Read thi...
Страница 5: ...y takes pictures videos at speci ed intervals This is very useful when observing plants owering birds building nests or when monitoring unattended properties such as parking lots With Target recording...
Страница 6: ...st extreme temperatures from 20 C to 60 C Compact size 142 x109x74mm Well designed to deploy covertly Lockable and password protected IP66 water resistance Applications Trail camera for hunting Animal...
Страница 7: ...Up button 2 Right button 3 Shot button 4 OK button 5 Left button 6 Menu button 7 Replay button 8 Down button 9 SD slot 10 USB jack 11 OFF 12 Test 13 ON 14 Infrared LEDs 15 Lens 16 Front motion sensor...
Страница 8: ...7 Simple to use this camera Install batteries Install SD card Switch to TEST Press Menu to setting Format memory card Reset to factory setting Set the Date Time Switch to ON to use...
Страница 9: ...sing 4 batteries they all should be installed in the top 4 slots or the bottom 4 slots Note NEVER INSTALL DIFFERENT TYPES OF BATTERIES or NEW AND OLD BATTERIES in the product at the same time Also do...
Страница 10: ...ite protect switch on the side of the card is OFF NOT in the Lock position Insert the SD card into the card slot A click sound indicates that the card is installed successfully If the wrong side of th...
Страница 11: ...eplacing the SD card or batteries or transporting the device ON Mode The camera will take photos or videos automatically according to its current parameter settings when it is triggered by the PIR sen...
Страница 12: ...ake a video for a test Press the DOWN key then press SHOT to take a photo for a test Pressing the MENU button the setup menu will be shown on the LCD Press the UP or DOWN key scrolls to the next or pr...
Страница 13: ...mode 1 photo you can take 2 photos in series or 3 photos in series Video resolution Select video resolution Options 4K 3840x2160 2 7K 2688x1520 1080P 1920 x1080 720P 1280x720 WVGA 720x480 VGA 640x480...
Страница 14: ...sors provide a wider sensing angle and enhance response time However in some situations you have dif culty removing the interfering twigs or avoiding the sunlight If so you have the option to turn off...
Страница 15: ...any images outside of the active phase Time lapse Time lapse mode disables the PIR sensor and instead takes photos or records video clips automatically at your choice of intervals This has the advant...
Страница 16: ...he LEFT and RIGHT keys to move to the next eld Use the UP or DOWN keys to change the setting and press the OK button to save Photo stamp Select ON to print the temperature moon phase date and time on...
Страница 17: ...serve first Press OK to execute and press MENU to exit without formatting Serial NO Select On if you want to use a serial number to rank the camera You can set a 4 digit combination This helps multi c...
Страница 18: ...he other side While doing this monitor the motion display If this lights up in blue you have been detected by one of the activated side motion sensors If it lights up in red you have been detected by...
Страница 19: ...nd will record media according to the switch settings Firstly the motion indicator LED will blink red for about 5 seconds Any motion is detected by the side PIR sensor the camera will be active withou...
Страница 20: ...eleting Photos or Videos Put the power switch in the TEST position Press the Replay key to enter image review mode Press the MENU key You will see the rst Delete screen It lets you select the option t...
Страница 21: ...rotect current le to protect the currently selected recording from accidental deletion Select Write protect all les to protect all saved recordings from accidental deletion Select Unlock current le to...
Страница 22: ...When using a PC or Mac to view photos or video clips rst connect the device to the computer with the USB cable supplied It will be recognized as a mass storage You can view images and videos in the f...
Страница 23: ...mera in an inside environment and aiming at a location where there is no motion 3 If the camera continues to show issues please contact our customer service b Battery life is shorter than expected 1 B...
Страница 24: ...23 4 If the SD card has its write protect switch in the lock position the camera will not take images 5 If you have used an SD card on another device before you might want to try formatting the card...
Страница 25: ...battery indicator icon to see if the battery power is full The ash will stop operating near the end of the battery life b You will get the best results when the subject is within the ideal ash range...
Страница 26: ...ding to the length set a Check to make sure that the SD card is not full b Make sure that the camera has good batteries in it Near the end of the battery life the camera may choose to record shorter v...
Страница 27: ...by pressing OK after changing the setting i Moisture or Ants inside the Camera 1 To ensure humidity or rain is kept out of the camera secure the DC In plug rmly in place 2 Ants can be attracted by lo...
Страница 28: ...ge of IR ash 20 meters Triggering distance 20 meters Below 77 F 25 C at the Normal Detection angle of sensors 120 PIR Sensitivity High Normal Low Temperature compensation Yes Pep PIR Sensing Angle On...
Страница 29: ...Build in Speaker Yes Auto distinguish images Color images in daytime black white night images Auto Power Off Auto power off in 2 minutes while no keypad controlling TV out Yes PC Interface Mini USB 2...
Страница 30: ...ns may cause harmful interference to radio communications However there is no guarantee that interference will not occur in a particular installation If this equipment does cause harmful interference...
Страница 31: ...batteries in the user manual 3 Remove the rechargeable batteries from the product before charging With built in batteries turn off the device before charging 4 The rechargeable battery with battery ca...
Страница 32: ...and negative poles 3 Do not charge disposable batteries 4 Do not mix the old ones with new batteries or different types of batteries 5 Dispose of all batteries safely Never burn the batteries as they...