OWNER’S MANUAL
MOTORIZED 7” WIDETFT LCD COLOR MONITORCNT-701
PW
Страница 1: ...OWNER S MANUAL MOTORIZED 7 WIDE TFT LCD COLOR MONITOR CNT 701 PW ...
Страница 2: ...NIT DEVICE WHICH IS NOT APPROVED BY THE PARTY RESPONSIBLE IS NOT APPROVED BY THE PARTY RESPONSIBLE FOR COMPLIACE COULD VOID THE USER S FOR COMPLIACE COULD VOID THE USER S AUTHORITY TO OPERATE THE EQUIPMENT AUTHORITY TO OPERATE THE EQUIPMENT WARNING WARNING DO NOT WATCH MONITOR WHILE DRIVING DO NOT WATCH MONITOR WHILE DRIVING ...
Страница 3: ... an electric shock KEEP SMALL ARTICLES OUT OF REACH OR CHILDREN Keep small things screws etc in places not accessible to children If swallowed consult a physician immediately FUSE REPLACEMENT When replacing the fuses the replacement must be the same amperage as shown on the fuse holder If the fuse s blow more than once carefully check all electrical connections for short circuit also have your veh...
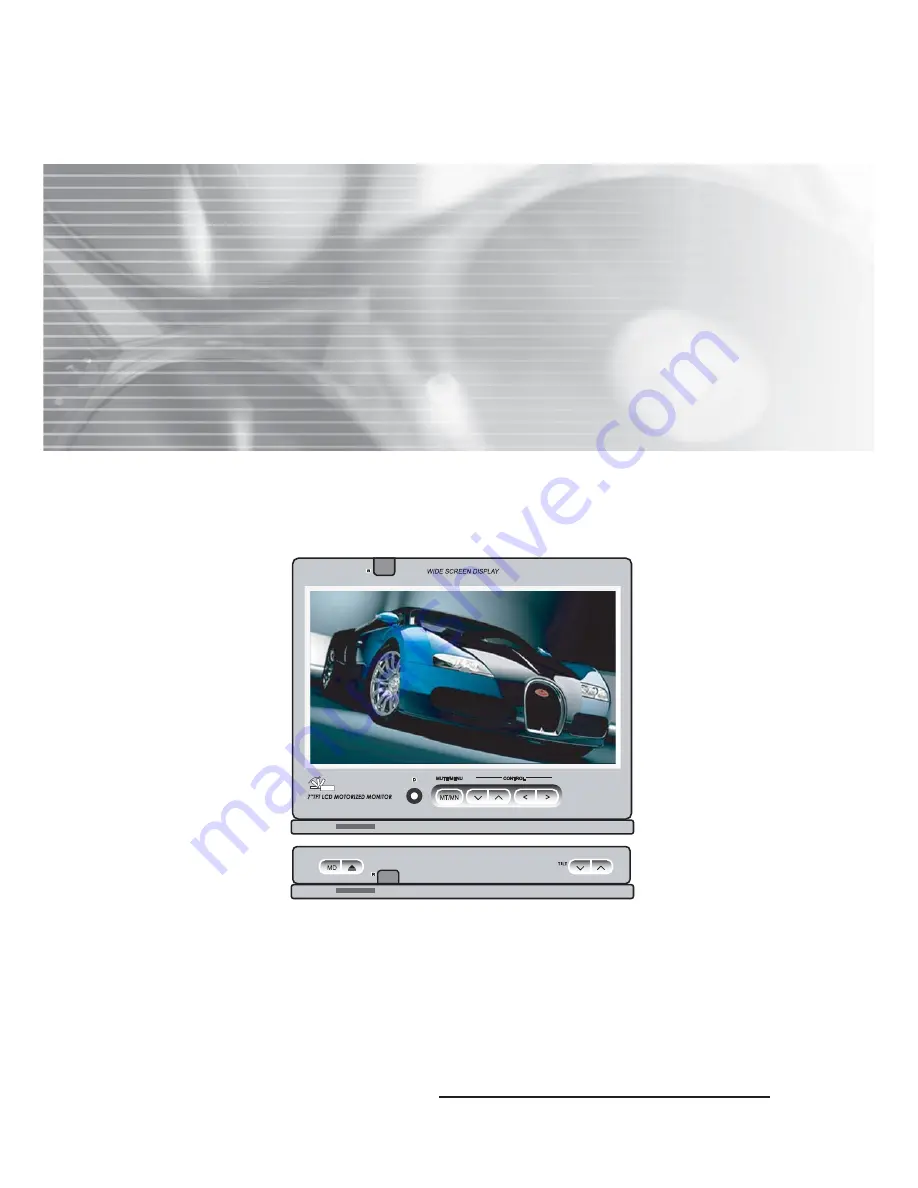
Страница 4: ...EMOTE CONTROL BASIC OPERATION POWER ON OFF OPENING THE MONITOR CLOSING THE MONITOR ADJUSTING TILT POSITION ADJUSTING MOVE POSITON ADJUSTING LEFT RIGHT VIEWING POSITION SELECTING MODE SETTING THE CAMERA IN WARNING SCREEN ADJUSTING VOLUME AUDIO MUTE FUNCTION SELECTING THE MENU PICTURE CONTROL AUDIO CONTROL MENU SETTING CONTROL TROUBLE SHOOTING SPECIFICATION ...
Страница 5: ...emote Control Unit with insulation sheet To use the Remote Control Unit remove the insulation sheet as shown PULL OUT Slim size 1 2 DIN design NTSC PAL compatible Built in FM transmitter 2 Video input 1 Video output 1 Speaker MODE NAVI IN UP DN OUT ASPECT C A B TILT TILT MUTE OPEN CH MENU M CH SCAN M CH A M VOL VOL CH 2 4 Mounting Screws 7 SD Card SPK L SPK R 6 GPS 3M tape 8 Manual 2x Double side ...
Страница 6: ... REVERSE GEAR SENS BROWN REVERSE GEAR SENS BLACK YELLOW RS 232 TMC GPS RED AVIN R AVIN L AVIN V WHITE WHITE YELLOW YELLOW To VIDEO INPUT To VIDEO OUTPUT ToREARVIEWCAMERAVIDEOINPUT To AUDIO INPUT R SPK L SPK R To AUDIO OUTPUT R To AUDIO OUTPUT L To AUDIO INPUT L YELLOW PW PW ...
Страница 7: ...n Open Close Button Tilt Up Down Button Mute Button Cursor Up Down Cursor Left Right Volume Up Down Button Remote sensor Short Key Function Long Key Power Button Move Up Down Button Menu Button Getting Started 8 8 SD Card Reader ...
Страница 8: ...o not expose the remote sensor to direct sunlight or lighting apparatuses Doing so may cause a malfunction PULL OUT PUSH Replacing a new battery as shown Use CR2025 lithium battery 3 Closing the cover CR2025 3V CR2025 3V The operation range of the remote control PW Getting Started REMOTE CONTROL IN IN 1 1 4 4 5 5 6 6 2 2 3 3 UP UP DN DN OUT OUT A A OPEN OPEN TILT TILT TILT TILT CH CH MENU MENU M U...
Страница 9: ... pulled out the monitor will be closed automatically Press any button the monitor will be opened Press Open Close Button on the unit The monitor will be closed or opened If it is not closed hold left and right upper side of the monitor and make the monitor parallel with the unit as the picture The tilt position can be adjusted in 8 steps by pressing Tilt Up Down Button Each time you press Tilt Up ...
Страница 10: ...nimum Maximum crooked angle of the front panel The monitor s left right position can be adjusted for easier viewing by hand as the picture below Press Mode Button to select the desired mode Each time you press this button the mode changes as follows If the REVERSE wire is connected to power output of the reverse gear the mode will be automatically changed to RVC when the gear is positioned to REVE...
Страница 11: ...icture when parking brake is not pulled or while driving to prevent traffic accident that may happen while watching the screen The monitor shows the warning picture only and does not operate menu control Press the Volume Up Down Button to adjust the volume level Press the Mute Button to mute the audio Press the mute button or any button again to return to the previous audio level 11 WARNING SCREEN...
Страница 12: ...50 Default set The brightness level is set to 70 The brightness level is set to 40 It is automatically changed between DAY and NIGHT depending on the brightness of the environment The brightness level is set to a user s set level STANDARD DAY NIGHT AUTO USER STANDARD DAY NIGHT AUTO USER The MENU is automatically disappeared about 10 seconds after it appears on the screen The appeared time is also ...
Страница 13: ...Menu Button repeatedly to show TV AUDIO on the screen Press Cursor Up Down Button to select the desired item Press Cursor Left Right Button to change the item s value or level Adjusting for audio volume The volume level is indicated in the monitor from 0 min to 50 max Transfer a wireless audio signal to your car stereo The selectable frequencies are from 87 9MHz to 90 9MHz with 0 2MHz span Set the...
Страница 14: ... this button VIDEO3 MIRROR mode will be changed as follows When you set VIDEO3 MIRROR 180 and input mode selected to RVC the screen will be show mirror looking image It is useful when a rear view camera is connected to RVC input 1 TV SYSTEM 2 DISPLAY MODE 3 OSD TIMEOUT 4 TRANSPARENCY 5 LANGUAGE 6 VIDEO3 MIRROR 14 180 0 For memorizing re adjusting value press MENU button and exit MENU SETTING page ...
Страница 15: ...s dead or there is no battery in the remote controller unit The Remote controller does not work Check the parking brake is applied The parking brake is not pulled or the parking brake wire is not connected Warning screen is displayed Adjust the brightness properly The temperature inside the vehicle may be 0 degree or less Set to an appropriate temperature 25 degree or so and check it again The dis...
Страница 16: ...rive system Number of Pixels Effective Pixels Back Lighting Color system DC 14V 11V 15V 1 5 A 10 60 1 0 Vpp 75Ω 1 0 Vpp 75Ω 178 25 189 mm Negative Ground 1 7Kg 2 2Kg MONITOR SECTION Specifications are subject to be changed without notice 7 Inch Wide Transparent type TN LCD TFT Active matrix 336 960 1 440 x 234 99 or more U shaped cold cathode Fluorescent Tube NTSC PAL ...