background image

FUNCTION SETUP > SCHEDULE SETUP

OSD -

7

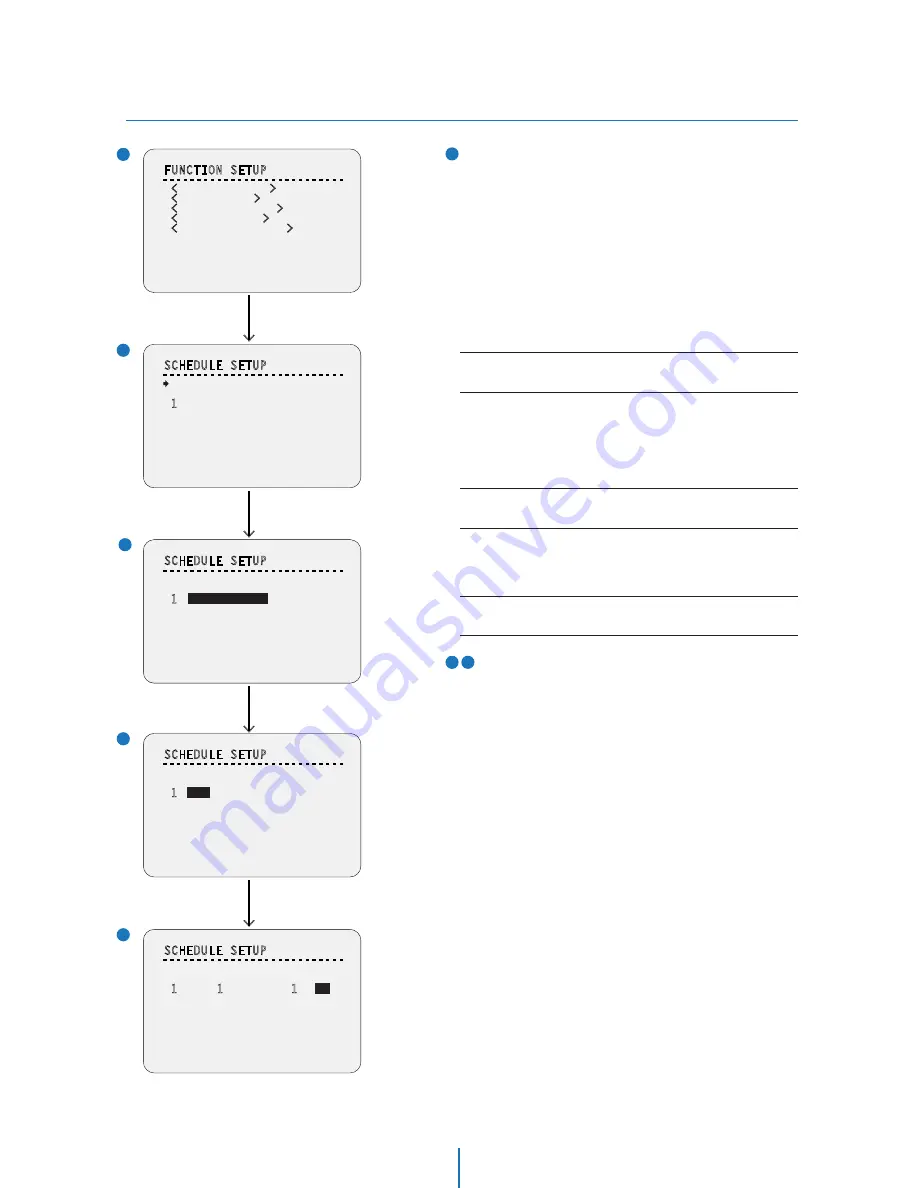
      SCHEDULE SETUP - Assign Value

Each field (DAY, TIME, ACT, NO., ON) can be selected by Left/Right
keys and the values in the field are changed using Up/Down keys.

MASTER ENABLE

Decide whether schedule function is active or not.

DAY

Set the day for scheduling. 

Undefined:

 Inactivate

All:

 Applies to every day

WKD:

 Applies to every day except Saturday and Sunday

SUN-MON:

 Applies to designated day only

TIME

Set the time.

ACT NO

Set the function and no.

ON

Decide to make this rule effective or not.

>

>

>

>

Press Near/Enter Key

Joystick Down

Assign Value

Joystick Down,
Press Near Key

3

1

2

2

4

5

4 5

FUNCTION SETUP

-  -  -  -  -  -  -  -  -  -  -  -  -  -  -  -  -  -  -  -  -  -  -  -  -  -  - 


<

PRESET SETUP

>


<

SCAN SETUP

>


<

PATTERN SETUP

>


<

GROUP SETUP

>


<

SCHEDULE SETUP

>


  BACK

  EXIT

SCHEDULE SETUP

-  -  -  -  -  -  -  -  -  -  -  -  -  -  -  -  -  -  -  -  -  -  -  -  -  -  - 

  MASTER ENABLE            OFF

       DAY  TIME    ACT  NO  ON


1

   UNDEFINED

  2   UNDEFINED


3

   UNDEFINED


4

   UNDEFINED


5

   UNDEFINED


6

   UNDEFINED

  7   UNDEFINED

  BACK

SCHEDULE SETUP

-  -  -  -  -  -  -  -  -  -  -  -  -  -  -  -  -  -  -  -  -  -  -  -  -  -  - 

  MASTER ENABLE            OFF

       DAY  TIME    ACT  NO  ON


1


UNDEFINED

  2   UNDEFINED


3

   UNDEFINED


4

   UNDEFINED


5

   UNDEFINED


6

   UNDEFINED

  7   UNDEFINED

  BACK

SCHEDULE SETUP

-  -  -  -  -  -  -  -  -  -  -  -  -  -  -  -  -  -  -  -  -  -  -  -  -  -  - 

  MASTER ENABLE            OFF

       DAY  TIME    ACT  NO  ON


1


ALL

  00:00  HOM        OFF

  2   UNDEFINED


3

   UNDEFINED


4

   UNDEFINED


5

   UNDEFINED


6

   UNDEFINED

  7   UNDEFINED

  BACK

SCHEDULE SETUP

-  -  -  -  -  -  -  -  -  -  -  -  -  -  -  -  -  -  -  -  -  -  -  -  -  -  - 

  MASTER ENABLE            OFF

       DAY  TIME    ACT  NO  ON


1

   ALL  

1

2:00  PRS  

1

28 

ON

  2   UNDEFINED


3

   UNDEFINED


4

   UNDEFINED


5

   UNDEFINED


6

   UNDEFINED

  7   UNDEFINED

  BACK

SCHEDULE SETUP SCREEN

The schedule function allows running an appropriate function
like preset, scan, pattern, group, home move at designated
day and time. 

EX) If you setup a rule ‘Tuesday at 9:00AM’ and ‘Preset 1(say main
        gate)’, the camera will move to main gate every Tuesday at 9:00
        AM. If you choose weekday, camera will move to main gate 
        everyday except weekend.

It is noted that due to the real time clock(ROOT MENU>
SYSTEM SETUP>DATA/TIME SETUP), the time data will be kept
regardless of blackout. The initial time and day setup is
essential to proper schedule function.

ON / OFF

UNDEFINED / ALL / WKD / SUN ~ MON

00:00 ~ 23:59 (hour:min)

HOM(HOME) / PRS(Preset) 1~255
/ SCN(Scan) 1~8 / PTN(Pattern) 1~4
/ GRO(Group) 1~8

ON /OFF

Содержание PTI-403I

Страница 1: ...Ver 1 0 2011 01 User sManual In ceiling Mount Camera IP PTZ Indoor ...

Страница 2: ...injury due to fire electric shock or falling objects Do not install the unit in humid dusty or sooty locations Doing so may cause fire or electric shock If any unusual smells or smoke come from the unit stop using the product In such case immediately disconnect the power sorce and contact the service center Continued use in such a condition may cause fire or electric shock If this product fails to op...

Страница 3: ...8 Do not install near any heat sources such as radiators heat registers or other apparatus including amplifiers that produce heat 9 Do not defeat the safety purpose of the polarized or grounding type plug A polarized plug has two blades with one wider than the other A grounding type plug has two blades and a third grounding prong The wide blade or the third prong are provided for your safety If th...

Страница 4: ...tact your city office waste disposal service or the shop where you purchased the product This equipment has been tested and found to comply with the limits for a Class A digital device pursuant to part 15 of the FCC Rules These limits are designed to provide reasonable protection against harmful interference when the equipment is operated in a commercial environment This equipment generates uses a...

Страница 5: ... Alarm Input 1 Setup Alarm Input 2 8 Setup Motion Detection Setup Schedule Setup Auto Tracking Setup Transfer Setup FTP Setup SMTP Setup SD CARD Setup Users Setup Date Time Setup Firmware Update Default Set Restart Log Search Check Points before Operation Aux Functions OSD Information General Rules of Menu Operation ROOT MENU SYSTEM INFORMATION DISPLAY SETUP CAMERA ID DISPLAY SETUP PRIVACY ZONE MO...

Страница 6: ... Product Accessories Introduction 1 Manual CD Product Accessories Quick Manual Dome Cover In ceiling Hosing with PTZ Mechanism Safety Wire x2 ...

Страница 7: ...e Cover Side Hole PTZ Mechanism PTZ Mechanism Hook In ceiling Housing PTZ Mechanism Hook Guide Mounting Clip Inceiling Housing Border Mounting Clip Bolt Housing Safety Wire Hanger Junction Box Junction Box Hook Junction Box Cover Junction Box Cover Side Hole ...

Страница 8: ... control using DVR or system keyboard their protocol must be identical to camera Otherwise you can not control the camera If you change camera protocol by changing DIP switch the change will be effective after you reboot the camera Protocol Setup Baud Rate Setup RS 485 Termination Resistor ON 8J 2 1 3 4 5 6 7 8 1 Auto Factory Default ON 8J 2 1 3 4 5 6 7 8 2 ON 8J 2 1 3 4 5 6 7 8 PELCO D 3 ON 8J 2 ...

Страница 9: ...tor Pin 8 is used for on off of RS 485 termination Normally it must be off state Especially when you have trouble with long daisy chain style connection turn on this termination switch of the last camera ON 8J 2 1 3 4 5 6 7 8 Pin 1 2 3 4 5 6 7 8 1 2 4 8 16 32 64 128 ID Value ex ID 5 ex ID 10 on off off on on off off on off off off off off off off off If you want to control a certain camera you mus...

Страница 10: ... cover by pressing down the hooks in both sides of the junction box Drill the hole on the ceiling To install the in ceiling housing in the ceiling drill a hole 190mm diameter on the ceiling Hook the Safety Wires Connect one of the rings of safety wire for preventing falling down with the housing safety wire hanger in either sides of Housing Then connect the remained ring of the safety wire with th...

Страница 11: ...ox Main Connector Port Audio I O Port Network Cable Port 5 Close the Junction Box Cover Close the junction box cover by inserting the both junction box cover side holes to the junction box hooks Connect the Wires and Terminal blocks Connect cables to terminal blocks and BNC in the inner box of junction box See the cabling in the next section ...

Страница 12: ...ing by inserting PTZ Mechanism hook to the mechanism hook guides Fix the In ceiling Housing Fix the In ceiling housing by turning the mounting clip bolts clockwise 6 7 8 Insert the In ceiling Housing Insert the housing to the ceiling hole and press the edge of housing against the ceiling ...

Страница 13: ...he Dome Cover Attach the dome cover by fixing the dome cover side hooks to the edge of housing Detach the Protection Vinyl Detach the Dome Cover Detach the dome cover from the cover side hole by using a flathead screwdriver or a coin 9 10 ...

Страница 14: ... Keyboard For PTZ control connect this line to keyboard and DVR To control multiple cameras at the same time RS 485 communication lines of them are connected in parallel as shown below Power Connection Please check the voltage and current capacity of rated power carefully BNC Cable Crossover Cable Inner Box 1 2 3 4 Keyboard Controller DVR RS 485 1 2 n a Rate Power Current Consumption AC 24V Heater...

Страница 15: ...ty AC DC and isolations between channels Care must be taken for the power capacity of relay contact written above Out Out N C Activation Activation N O Q 20 Q 20 Q 20 Q 20 It is noted that short circuit between GND and Input pin means alarm activation Sensor Input If you want to use alarm input the types of sensor must be selected in OSD menu The sensor types are Normal Open and Normal Close If se...

Страница 16: ...In case the microphone connects directly to Audio Out port the speaker does not work The Mic In function is not supported Audio In Connect the Audio In port of the camera to the microphone directly or Line Out port of the amplifier connected with microphone 7 Inner Box Amplifier Mic Speaker Line Out Connection Direct Connection Mic Line In Connection ...

Страница 17: ...rom the slot Pressing too hard on the SD memory card can cause the card to shoot out uncontrollably from the slot when released If you have saved data in the SD memory card removing the SD memory card prior to setting record to OFF will cause damage to the data stored in the card Recommended SD Card Specification Not Included Type Micro SD SDHC Manufacturer Transcend Kingston Toshiba Sanddisk Capa...

Страница 18: ...efault gateway and DNS server 11 If this is standalone unit with a direct connection to a cable DSL Broadband modem then input the addresses you have received from your ISP If you received no IP address from your ISP please select Dynamic and choose the proper settings Current TCP IP Settings IP Address Subnet Mask Default Gateway Primary DNS Server Secondary DNS Server Option Access your IP Camer...

Страница 19: ...efault Gateway DNS Servers etc blank For information on how to change your IP address and subnet mask see Appendix B After you have made the changes to your IP address and subnet mask you may then attach the IP Camera to your PC via the supplied crossover cable Plug in either end of the crossover cable into the PC s network card and the other end into your IP Camera After connecting the PC and IP ...

Страница 20: ...or install the IP Camera Even though your IP is not dynamic you will get a benefit if you register to DDNS In this case you just remember alex net4c net gate1 instead of complicated series of number like http 201 23 4 76 8078 For more detail information please contact our Support Center To register IP Camera to DDNS you should know the Serial No of your IP Camera The Serial No can be found in sect...

Страница 21: ...any information and settings that you have received from your Internet Service Provider ISP You may need to refer to these IP addresses at a later time during the configuration 1 You must determine whether the IP address that you were assigned from the ISP is STATIC or DYNAMIC At this moment you are only concerned about the ISP Did they provide you with a STATIC or DYNAMIC address If you are unsur...

Страница 22: ...on how to choose a private IP please read the FAQ 255 255 255 0 Example 192 168 0 1 Example Subnet Mask 3 You must use the same subnet mask as the one you noted under Current TCP IP Settings Default Gateway 4 This IP address must be the IP address of your router private or LAN side Use the same Default Gateway you noted under Current TCP IP Settings Use the 1st DNS Server from Assigned IP Address ...

Страница 23: ...e 80 Web Port 7 You may select any number between 1025 60000 7777 Control Port 8 You may select any number between 1025 60000 7778 Video Port 9 You may select any number between 1025 60000 7779 7780 Audio Transmit Port 10 You may select any number between 1025 60000 Audio Receive Port 11 You may select any number between 1025 60000 If you did not receive any IP addresses from your ISP please conta...

Страница 24: ...ove the power supply from the unit and close Internet Explorer Return your PC Laptop TCP IP properties to their original settings Before installing the IP Camera you must use Port Forwarding on your personal router Cases A B You will need to forward 5 ports t 8FC 1PSU ZPV BTTJHOFE UP UIF 1 BNFSB t POUSPM 1PSU ZPV BTTJHOFE UP UIF 1 BNFSB t 7JEFP1PSU ZPV BTTJHOFE UP UIF 1 BNFSB t VEJP 5SBOTNJU 1PSU ...

Страница 25: ...k by opening Internet Explorer and specifying the IP address and Web Port that you have assigned to the IP Camera 1 2 3 4 5 Access your IP Camera via the Internet 6 Examples http 192 168 0 200 8888 or http 24 106 88 123 If you left your Web Port set to 80 then you don t need to specify the port in the Address Bar when accessing the IP Camera If you use Case B C 1 Open Internet Explorer 2 Type the ...

Страница 26: ...on 2 Alarm input and Relay out 3 OSD menu in Camera See the section 4 Web Viewer Screen Aux Function Control Backup control tab button Click it to extend the panel for the Backup and Audio Control See the section 4 Web Viewer Screen Backup Control OSD setup tab button Click it to extend the panel to setup camera using OSD menu See the section 4 Web Viewer Screen OSD Setup Etc setup tab button Clic...

Страница 27: ...eo stream button Select a stream produced from the camera between Stream 1 5 to display it in the live view screen Refer the Setup Basic Video to setup the Video Stream Hide Button Hide all control panels extended 7 The Pan tilt wheel button Enables to move the camera for 8 directions to adjust live view Zoom control button The zoom ratio of the camera can be controlled by clicking or button Group...

Страница 28: ...ge box regarding the disk space will be shown and the recording will be stopped automatically Captured files folder Recorded files folder To play the recorded video in the Windows Media Player H 264 codec must be installed Backup Tab OSD Tab The Pan tilt wheel button Enables to move the camera for 8 directions to adjust live view In OSD menu mode it is used to move the cursor up down left right as...

Страница 29: ...SD menu Motion Detection are runned Auto Tracking and Motion Detection cannot be run at the same time Ex If you run Auto Tracking while running Motion Detection Motion Detection would be off automatically Since then although you make Auto Tracking off Motion Detection cannot be back ON 1 1 Alarm Input Status It shows the Alarm Input status If an alarm is fired the color of corresponding input numb...

Страница 30: ...n the current Map will be saved to the camera The map data stored can be used in the future operation and shared it with other Clients 3 Load Map If you click Load button the Map data stored previously will be downloaded from the camera If there is no map data stored in it you will see only black map in the Auto Map window The Auto map is the easiest way to control the PTZ in an intuitive manner I...

Страница 31: ...ant to move PT as smoothly as real joystick does you can use virtual joystick function using mouse in the full screen mode 2 Zoom In Out by Wheel Mouse Same with left Click Draw a box 4 Push the mouse wheel Pull the mouse wheel If you right click a position on a screen red line is displayed If you drag the mouse to desired direction the view will follow your direction by moving the camera while a ...

Страница 32: ...lobal affecting the view of all users currently logged on However OSD items changed are effective only after you refresh the viewer windows or restart the internet Explorer All settings are always saved in the video server even when you close the viewer program or you turn off the Power of the video server If you lost your password you must press the reset button to return all setting to its facto...

Страница 33: ...nstalled camera Using selected channel on the Web Viewer PTZ Control Video Format CH No 1 and No 2 are the default CH so they can t be changed However detailed category of default codec can be setup CH No 3 4 5 are the user channel and codec and detailed category of codec can be setup If CH No 1 2 and some of channel are setup to High Performance High Resolution and Frame Rate remainder of channel...

Страница 34: ...e quality of video and the frame rate are controlled in this mode Therefore the quality of video and the frame rate are likely to be varying when network traffic is changing VBR To guarantee the designated quality the bit rate of video stream is changed in this mode Therefore the frame rate of video is likely to be varying when network traffic is changing Bitrate Mode Select the bit rate control s...

Страница 35: ... Audio Setup Setup 5 1 2 3 Input Gain Adjust the input gain of audio 1 4 Output Gain Adjust the output gain of audio 0 10 Output gain 0 is mute Click Apply to make above setting effective 1 2 3 ...

Страница 36: ...e Type Select the type of Image after capturing the screen on the web viewer Image Count Select the number of Images that you want to store when click Capture button on the web viewer Click Apply to make above setting effective 1 2 3 ...

Страница 37: ...ss Default Gateway Default the Gateway IP Address Format is same as the IP address Description Port Name Default Range Web Port Control Port Video Port Audio Transmit Port Audio Receive Port Define HTTP Web Server Port Define Control Server Port Define Video Server port Define Audio Transmit Server port Define Audio Receive Server port 80 7777 7778 7779 7780 1025 60000 1 2 4 5 6 Preferred DNS Serv...

Страница 38: ...f the site the setup is completed by entering User Name and Password registered in that DDNS site If you setup DDNS properly the IP address of your camera will be updated automatically whenever IP address is changed or system is rebooted If IP updating to DDNS site is failed camera will keep retrying in 1min interval In this situation ACTIVE LED will be blinking If DDNS is disabled the ACTIVE LED ...

Страница 39: ... Status Setup 5 This menu will show you all the information of Network setting in the camera However you cannot change those here ...

Страница 40: ...ction Define a counter action from Alarm Output Alarm Image transfer Camera Action when Alarm Input is detected Click Apply to make above setting effective 3 Operation Off NO NC Ignore this Input sensor The contact is normally open and closed when activated The contact is normally closed and open when activated Always Only scheduled time An alarm event is activated whenever sensor Input is detecte...

Страница 41: ... Alarm Input 2 8 Setup Setup 5 You can setup the 1 8 type of Alarm Input each other ...

Страница 42: ...ne a counter action from Alarm Output Alarm Image transfer when motion is detected Click Apply to make above setting effective 3 Always Only scheduled time An alarm is activated whenever motion is detected An alarm event is activated only when motion is detected during the scheduled time To setup schedule you need to define Start time and End time followed by selecting Days If End time is earlier ...

Страница 43: ... detail see Transfer Setup in this chapter 1 2 Activation Time Select activation time from Always Only Scheduled Time 3 Always Only Scheduled Time Transfer image at all times Transfer image during the scheduled time To setup Only Scheduled Time you need to define Start time and End time followed by selecting Days The setup schedule is repeated every week If End time is earlier than Start time End ...

Страница 44: ...antly more than setting up in the Oscillation Count in the smaller area than setting up in the Oscillation Magnitude Object Camera will start tracking the motion when the detected object is smaller than you setup Camera will Zoom In when the detected object is smaller than you setup Camera will Zoom Out when the detected object is smaller than you setup 3 After Zooming out following the No Motion ...

Страница 45: ... duration of image transfer after an event 1 5 1 10 15 30 1 10 15 30 Transfer Mode Image Transfer method is selected from FTP and E Mail SMTP To use image transfer FTP and SMTP in the next sections must be configured properly SD Card Record If it is set to On the image is saved into the SD card as well It will setup OFF automatically when SD card doesn t applied The SD card setting can be configur...

Страница 46: ...box will be shown to try again Upload Path Define a path in FTP server to store video For the path name English Alphabets numbers and special characters a C A B can be used 1 2 4 5 6 Port Define the FTP Server Port If Port is not appropriate it is impossible to access to FTP Server User ID Define User ID to access to the FTP Server Fill out the correct User ID registered in the FTP Server Password...

Страница 47: ...o 40 characters including the spaces Click Apply to make above setting effective Plain SSL TLS Select Security mode of SMTP from Plain or SSL TLS After checking account setup of your SMTP Server you may select one SMTP Server Address Define the SMTP Server Address If the IP Address form is incorrect a Message box will be shown to try again Port Define the Port used in the Plain or SSL TLS security...

Страница 48: ...ning E mail If it is set ON and remained space of SD card reach to less than 8MB a warning e mail will be sent to the e mail account set in SMTP menu Overwriting Mode If it is set ON and remained space of SD card reach to less than 8MB new data will start to be overwritten on the oldest data However if it is set OFF and remained space of SD card reach to less than 8MB image recording will be stopp...

Страница 49: ...login for an account this account becomes the public account From the next login everybody can access the camera using this account without authentication Only one account can have the Auto Login User Level Select Operator or Viewer t 7JFXFS Only monitoring is allowed t 0QFSBUPS Most of the functions are allowed except Setup t ENJOJTUSBUPS MM GVODUJPOT BSF BMMPXFE Verify Enter the user Password ag...

Страница 50: ...yping manually 1 2 4 Synchronize with the time server In this mode date time is automatically updated using the Time Server selected After selecting the Time Zone properly Time Server must be selected However if you want to assign a time server not in the list select Manual Once synchronization is configured successfully the time and date will be updated every 1 hour automatically Click Apply to m...

Страница 51: ...wse button Start Update Click this button to start update Progress of uploading will be displayed using Progress Bar If you assign the wrong file name an error massage will be shown 3 1 2 Warning Do not turn off the power of camera during the Firmware update Otherwise the system can be stuck to be unstable If updating is finished the system will be rebooted automatically 1 2 3 ...

Страница 52: ...Settings to the Factory Defaults Except Network related settings reset all others to the Factory Defaults Warning If you click Apply you will lose all setting data If needed please make a note for further installation 2 Click Apply to make above setting effective It takes approximated 4 minutes after clicking Apply for the Default Set ...

Страница 53: ... Restart Setup If you click the RESTART menu a message box will be shown to confirm Click the Ok button to restart 5 ...

Страница 54: ...rt Network Connection Status Including IP Address Changing System Time Changing Video Setup Network Setup and Event Alarm Motion Alert will be recorded 1000 PCS of Log can be stored and the recorded data won t be deleted 5 ...

Страница 55: ...ime and number of stored images in the Event Setup can be different Page No of searched Images The latest page will be loaded at the head Stored Images Image will be stored by value at CH No 2 in Setup Video configuration By clicking the image see the image on the larger screen Stored Time of Images The interval of stored image can be setup depending on the each Events ...

Страница 56: ...ate preset pattern scan and group function with keyboard controller DVR in advance to operate camera function using them Refer to your system keyboard manual Auto Calibration If the camera is continuously subjected to very high temperature over 50 C or 122 F environment for a long time it is possible for the camera to lose focus As a result you will get blurry image In this case it is recommended ...

Страница 57: ... OSD menu 2 Run Pattern Method 1 Pattern key Pattern number 1 4 Enter key Ex Run pattern 2 Pattern key 2 Enter key 3 Delete Pattern To delete pattern use OSD menu Group The group function allows running sequence of presets pattern and or scans See the section ROOT MENU FUNCTION SETUP GROUP SETUP for more detailed information 1 Set Group To set group use OSD menu 2 Run Group Method Pattern key Grou...

Страница 58: ...eans output If an input is on state it will show the number of input If an input is off state will be displayed In the same way O 1 means output 1 is on and other output is off Ex When point 2 of inputs are on and output 1 is on OSD will show as below Compass Direction Shows the current compass direction of the camera The direction is shown as N North S South E East W West NE Northeast NW Northwes...

Страница 59: ...s Far Key Joystick Down Joystick Up ROOT MENU SYSTEM INFORMATION DISPLAY SETUP MOTION SETUP FUNCTION SETUP CAMERA SETUP INTELLIGENCE SYSTEM SETUP SYSTEM INITIALIZE EXIT ROOT MENU SYSTEM INFORMATION DISPLAY SETUP MOTION SETUP FUNCTION SETUP CAMERA SETUP INTELLIGENCE SYSTEM SETUP SYSTEM INITIALIZE EXIT 6 3 4 5 2 1 DISPLAY SETUP ADDRESS CAMERA ID PTZ INFORMATION ACTION TITLE PRESET LABEL ALARM I O DA...

Страница 60: ...g or changing SYSTEM SETUP Configure for basic system setup SYSTEM INITIALIZE Initializes system configuration and sets all data to factory default configuration EXIT To escape from the OSD setting go to exit SYSTEM INFORMATION FIRMWARE VER Shows the current firmware version COLOR SYSTEM Shows the current analog video system PROTOCOL Shows the current PTZ control protocol BAUD RATE Shows the curre...

Страница 61: ...ONE BACK EXIT ON BOT ON ON ON ON ON DISPLAY SETUP ADDRESS CAMERA ID PTZ INFORMATION ACTION TITLE PRESET LABEL ALARM I O DATE TIME PRIVACY ZONE BACK EXIT ON BOT ON ON ON ON ON DISPLAY SETUP ADDRESS CAMERA ID PTZ INFORMATION ACTION TITLE PRESET LABEL ALARM I O DATE TIME PRIVACY ZONE BACK EXIT ON BOT ON ON ON ON ON CAMERA ID OK CANCEL 1 2 3 4 5 6 7 8 9 0 A B C D E F G H I J K LMN O P Q R ST U VWX Y Z...

Страница 62: ... tilt angle over 90 image flipped region is designated camera will automatically move to identical poison by changing tilt angle less than 90 and moving pan angle 180 relatively EDIT MASK Adjust Mask Size Adjust mask size Use joystick or arrow buttons to adjust mask size Move Joystick Left Right Adjust Mask Width Move Joystick Up Down Adjust Mask Height To hide a certain zone completely regardless...

Страница 63: ...he color Y LEVEL of the mask RED ADJUST BLUE ADJUST PRIVACY ZONE MASK NO EDIT MASK DISPLAY CLEAR STYLE BACK EXIT 1 ON CANCEL COLOR PRIVACY ZONE STYLE Y LEVEL RED ADJUST BLUE ADJUST BACK EXIT COLOR 0 0 0 PRIVACY ZONE STYLE Y LEVEL RED ADJUST BLUE ADJUST BACK EXIT COLOR 0 0 0 PRIVACY ZONE STYLE COLOR Set the color of the mask ...

Страница 64: ... point of preset movement camera starts freezing the image of start point Camera keeps displaying the image of start point during preset movement and does not display the images which camera gets during preset movement As soon as camera stops at preset end point camera starts displaying live images which it gets at preset end point This function availability should be different by models PARKING A...

Страница 65: ...p independently or separately for each preset in each preset setup menu Each special WB AE value should the activated correspondingly when camera arrives at each preset location During jog operation general WB AE value should be applied All special WB AE value should not be changed although general WB AE value is changed If SPECIAL is selected the menu to set WB AE is shown on monitor ALARM OUT St...

Страница 66: ...k choose space character Back Space If you want to delete a character in front use back space character PRESET SETUP PRESET NO EDIT SCENE LABEL CLR PRESET CAM ADJUST ALARM OUT BACK EXIT 1 CANCEL GENERAL PRESET SETUP PRESET NO EDIT SCENE LABEL CLR PRESET CAM ADJUST ALARM OUT BACK EXIT 1 CANCEL SPECIAL CAM ADJUST PRESET1 WHITE BALANCE SETUP AUTO EXPOSURE SETUP BACK EXIT LABEL PRESET1 OK CANCEL 1 2 3...

Страница 67: ... the camera moves from the preset assigned as the 2nd point to the preset assigned as the 1st point in CCW Counterclockwise direction In case that the preset assigned as the 1st point is same as the preset assigned as the 2nd point the camera turns on its axis by 360 in CW direction and then it turns on its axis by 360 in CCW direction SCAN NO Selects the scan number to edit If a selected scan has...

Страница 68: ...recording press near or enter key 3 To exit this menu press far key EDIT PATTERN Records 1 Move the camera with joystick of the controller or run preset function to memorize the path mostly curve path in a selected pattern 2 The total memory size and the rest memory size is displayed in the form of bar 3 To save data and exit press near key 4 To cancel recording and delete the recorded data press ...

Страница 69: ...d group number CLEAR GROUP Deletes data in the current group EDIT GROUP Starts editing group 1 8 ACTION NO DWELL TIME Sets dwell time between function by moving joystick up down OPT It represents preset speed 2 360 when preset is selected It should be the number of repetition 1 255 when pattern or scan is selected for ACTION CANCEL OK NONE PRESET 1 255 PATTERN 1 4 SCAN 1 8 00 03 04 00 min sec PRES...

Страница 70: ...DIT END EDIT GROUP 1 NO ACTION NO DWELL OPT 1 PATTERN 1 00 03 1 2 NONE 3 NONE 4 NONE 5 NONE SAVE CANCEL 7 8 6 7 8 EDIT GROUP Selects Function Sequence After finishing setting up an ACTION press near or enter key to one upper level menu Move cursor up down to select ACTION NO and repeat to step 4 step 6 to edit the selected group EDIT GROUP Saves the Setting After finishing setting up all actions p...

Страница 71: ... NO ON 1 UNDEFINED 2 UNDEFINED 3 UNDEFINED 4 UNDEFINED 5 UNDEFINED 6 UNDEFINED 7 UNDEFINED BACK SCHEDULE SETUP MASTER ENABLE OFF DAY TIME ACT NO ON 1 ALL 00 00 HOM OFF 2 UNDEFINED 3 UNDEFINED 4 UNDEFINED 5 UNDEFINED 6 UNDEFINED 7 UNDEFINED BACK SCHEDULE SETUP MASTER ENABLE OFF DAY TIME ACT NO ON 1 ALL 12 00 PRS 128 ON 2 UNDEFINED 3 UNDEFINED 4 UNDEFINED 5 UNDEFINED 6 UNDEFINED 7 UNDEFINED BACK SCH...

Страница 72: ...ity has If you assign undefined function there will be no action Using reserved preset you can make various schedules For example PRS179 and PRS178 are DAY and NIGHT mode respectively Refer to Reserved Preset page 18 list in this manual SCHEDULE SETUP MASTER ENABLE ON DAY TIME ACT NO ON 1 MON 01 20 HOM ON 2 WED 07 00 PRS 12 ON 3 THU 11 40 SCN 3 ON 4 ALL 12 00 SCN 1 ON 5 UNDEFINED 6 UNDEFINED 7 UND...

Страница 73: ...NUAL SEMIAUTO ON OFF ON OFF ON OFF ON OFF WB SETUP DAY NIGHT WB MODE RED ADJUST BLUE ADJUST BACK EXIT DAY ATW2 0 0 ZOOM CAMERA SETUP FOCUS MODE DIGITAL ZOOM IMAGE FLIP FLICKERLESS DIS MODE WHITE BALANCE SETUP AUTO EXPOSURE SETUP SPECIAL BACK EXIT SEMIAUTO ON OFF OFF OFF WB SETUP DAY NIGHT WB MODE RED ADJUST BLUE ADJUST BACK EXIT DAY ATW2 0 0 WB SETUP DAY NIGHT WB MODE RED ADJUST BLUE ADJUST R GAIN...

Страница 74: ...c day night selection If set to LOW the image has to be very dark to be recognized as night among 3 settings If set to HIGH the image will be recognized as night even though it is a little dark LOW MIDDLE HIGH WB SETUP DAY NIGHT WB MODE BRIGHTNESS RED ADJUST BLUE ADJUST R GAIN B GAIN BACK EXIT NIGHT AWC MIDDLE 0 0 74 52 ...

Страница 75: ...TER SPD is deactivated SENS UP It activates the slow shutter function when luminance of image is too dark so that CCD can accumulate the light as much as it is multiplied by the number which is set 2 2 2 IRIS LEVEL BACKLIGHT Using this function the backlight effect which the object displays dark on the monitor when there is intensive backlight can be improved BLC You can set the desired area then ...

Страница 76: ...tus is maintained during the dwell time MASK AREA If the streetlights or traffic lights are present the mode might not be changed to B W In this occasion if you set MASK AREA on those kind of the spot light this can reduce the effect of the interference on criterion If BACKLIGHT is set to BLC MASK AREA function is deactivated ON OFF LOW MIDDLE HIGH 2 SEC 3 SEC 5 SEC 10 SEC 15 SEC 20 SEC 25 SEC 30 ...

Страница 77: ...HIGH the color element of the noise is reduced However the overall color sense of the scene can be decreased PIP Selects if the sub screen will be displayed Sub screen will be displayed on the bottom of the right side Even though the main image enables the digital zoom the sub screen will only display with maximum optical zoom POSI NEGA If set to the normal image will be outputted However if set t...

Страница 78: ...ons continue arbitrarily When the object that is fixed continues to move in the same position When a newly appearing object conceals another object that is moving MASK AREA Select the number of the area to be masked that will be excluded from motion detection DISPLAY When selected ON it displays the motion detected and detection of configured advanced function SENSITIVITY Sets the sensitivity of m...

Страница 79: ...t outputs alarm signal when the motion is detected and on a detection of configured advanced function INTELLIGENCE MOTION ADVANCED MASK AREA DISPLAY SENSITIVITY RESOLUTION ALARM OUT BACK EXIT OFF OFF 1 2 3 4 OFF 0 0 ALARM OUT MOTION FIX MOVE BACK EXIT ON ON MOTION FIX MOVE ON OFF ON OFF ...

Страница 80: ...setup PASSWORD Start PASSWORD setup SET HOME POSITION Starts SET HOME POSITION setup SET NORTH DIRECTION Starts SET NORTH DIRECTION setup LANGUAGE You can select a preferred Language of OSD display from 7 choices After selecting a language press near or enter key ENGLISH ESPAÑOL FRANÇAIS DEUTSCH ITALIANO РУССКИЙ PORTUGUÊS RELAY TYPE SETUP EDIT PASSWORD Sets the 4 characters long password If this f...

Страница 81: ...after rebooting Set Home Position When you replace the camera block or the orientation of camera is changed due to maintenance operations it is very difficult to maintain the same pan orientation Therefore all function data maintain on pan orientation such as preset scan pattern group and privacy zone mask are not useful any more accordingly However even in this case you can reuse the data if you ...

Страница 82: ... OFF AUTO AUTO AUTO AUTO ON Undefined OFF ON ON 140 sec NORMAL OFF OFF OFF Undefined Undefined Undefined Undefined Undefined AUTO ON OFF OFF Off DAY ATW2 0 0 NIGHT OFF ALC 0 OFF AUTO OFF MIDDLE 5 SEC Undefined F FAST AUTOx4 MIDDLE 4 2 MIDDLE OFF OFF OFF Undefined ON 4 3 ON ON AUTO 2400 Address Camera ID PTZ Information Action Title Preset Label Alarm I O Date Time Privacy Zone Preset Lock Power Up...

Страница 83: ...ddress DNS Configuration and Gateway tabs Under the General tab of the TCP IP Properties you will see your IP address information Start Setting Control Panel Network Configuration Tab Select the TCP IP 10 100 Protocol Click Properties Start Network and sharing center Manage network connections Properties Select either Internet Protocol Ver 4 TCP IPv4 or Internet Protocol Ver 6 TCP IPv4 Click Prope...

Страница 84: ...ork and Dial up Connection or Network Connection 1 Windows 98 ME Users 3 Windows Vista or 7 Users Start Setting Control Panel Network Configuration Tab Select the TCP IP 10 100 Protocol Click Properties Start Network and sharing center Manage network connections Properties Select either Internet Protocol Ver 4 TCP IPv4 or Internet Protocol Ver 6 TCP IPv4 Click Properties Control Panel Select Use t...

Страница 85: ...he router 2 You will have to supply your User Name and Password to log onto the router Default from factory User Name leave blank Password admin 3 Select Applications Gaming from the menu bar 4 Input port numbers in Port Range as below and click Save Setting button Both ofWeb Server Port andVideo Server Port should be added The example is as below 2 Enabled Disabled Name Protocol Type Private Port...

Страница 86: ...ed 4 Click Add Custom Service button in Port Forwarding page 5 Input proper values in Ports Custom Services page as below 6 Click Add button 7 With the same method as above add Video Server Port 8 Click Apply button to finish Port Forwarding 3 Enable Service Name Starting Ending Port Server IP Address Check it Input IP Speed Dome name Input IP Speed Dome Web Server port Starting Port should be sam...

Страница 87: ... BTL BOE FGBVMU Gateway information 5 For DNS information contact your Internet Service Provider Windows 2000 XP Users 1 Open a Command Prompt U UIF QSPNQU UZQF iJQDPOGJH BMMw XJUIPVU UIF RVPUFT 3 Near the end of the information supplied should be your current IP address subnet mask default gateway and DNS servers I can t connect In the case of a connection failure PEFN 3FCPPU PEFN 3FCPPU JOJTIFE ...

Страница 88: ... Demension Unit mm 51 5 117 7 101 8 90 9 0211 8 072 7 Specifications 10 ...

Страница 89: ... On Off On Off On Off Frame Freeze Function System Image Flip by Installation Type PAL PAL NTSC NTSC PAL NTSC 360 Endless 0 180 Auto Flip On 0 90 Auto Flip Off Preset 360 Scan 1 180 sec Manual 0 05 200 sec Zoom Proportional 255 Presets with Labels Independent Camera Setup 4 Patterns 8 Scans 8 Groups Max 20 Entities per Group 7 Rules Condition Day Time Action Preset Scan Group Pattern Image Auto Fl...

Страница 90: ...d Embedded Linux H 264 MJPEG MPEG4 VBR CBR Controllable Frame Rate and Bandwidth 4CIF CIF QCIF NTSC 4CIF Max 30 fps PAL 4CIF Max 25 fps Quality Brightness Sharpness Notification FTP e mail Alarm out JPEG recording on SD Pre Post Alarm Max 5 TCP IP UDP IP RTP UDP RTSP NTP HTTP HTTPS SSL DNS DDNS DHCP FTP SMTP ICMP SNMPv1 v2c v3 MIB 2 Digest Authentication ID PW Windows 7 Vista XP 2000 PAL NTSC 10 ...

Отзывы: