background image

11

тва для чистки внутренней поверхности дверцы.

Нагревательные элементы

•  Не чистите нагревательные элементы, они сомоочищаются при нагреве.

•  Протирайте  дно  духовой  камеры  мягкой  тканью  с  нейтральным  моющим 

средством.

полки и поддон

•  Удаляйте остатки пищи с поддона и полок перед чисткой. Для чистки поддо

-

на и решеток можно использовать нейтральное моющее средство и плас

-

тиковую лопатку.

•  Если на решетке или поддоне остались пригоревшие продукты, замочите их 

в горячей воде.

передняя панель

Протирайте переднюю панель после каждого использования прибора с помо

-

щью мягкой сухой ткани. Не используйте какие-либо моющие средства и аб

-

разивные материалы.

стекло

Для чистки стекла можно использовать соответствующие чистящие средства.

лампа подсветки

Внимание: Производите чистку лампы только после того, как прибор полностью 

остынет.

Использование  латексных  перчаток  может  упростить  процедуру  установки  и 

извлечения лампы.

Отключите прибор от электросети перед тем, как извлекать или устанавливать 

лампу.

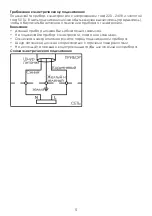
Устройство подсветки:

1.  Штуцер

2.  Лампа

3.  Плафон

Процедура замены лампы:

•  Поверните плафон против часовой стрелки на четверть 

оборота и снимете его.

•  Вывинтите старую лампу.

•  Установите новую лампу.

•  Установите плафон на место, повернув его по часовой 

стрелке.

Замечания:

•  В приборе используется лампа мощностью 25 Вт.

•  Регулярно производите чистки плафона.

Содержание EO-930

Страница 1: ...EO 930...

Страница 2: ...CAMERON 1 2 3 4 5 6 7 8 9 10 11 12 13 14 15 16 17 18 19 20 21 22 23 24...

Страница 3: ...25 26 27 28 29 30 31 32 33 34 75 C 85 C 35 3 1 2 3 4 5 6 7 8 80...

Страница 4: ...1 16 2 3 50 120 C...

Страница 5: ...220 240 50...

Страница 6: ...1 2 3 4 5 6 7 8 9 10 11 12 13 14 15 16...

Страница 7: ...1 2 3 6 1 2 3 4 5 6 1 2 3 4 OFF...

Страница 8: ...B C A A B C B C B C B C B C 10 1 2 3 4 1 2 0 45 C 10 7 8 25 0 45 0 7 C 6 5 C 8 6 C 12 11 30 C 10 7 8 C 15 14 16 50 60 C 25 20 25 0 8 1 A 35 10 15 5 10 2 4 150 220 B 13 16...

Страница 9: ...6 12 C 5 5 25 B 8 8 5 10 0 5 2 12 C 10 10 2 25 B 13 13 2 25 280 335 C 10 9 C 12 10 C 14 12 2 35 500 B 16 12 14...

Страница 10: ...10 1 2...

Страница 11: ...11 1 2 3 25...

Страница 12: ...12 1 2 2...

Страница 13: ...13 220 240 50 3400 240 2900 220 A 50 250 C 597 x 597 x 540 57 36 18 148...

Страница 14: ...14...

Страница 15: ...Built in electric oven Instruction Manual EO 930...

Страница 16: ...g curtains or drapes a safe distance from your oven 10 Always keep dish towels dish cloths pot holders and other linens a safe distance from your oven 11 Always keep wooden and plastic utensils and ca...

Страница 17: ...ored in an oven can ignite 33 Do not leave paper products cooking utensils or food in the oven when not in use 34 After broiling always take the broiler pan out of the oven and clean it Leftover greas...

Страница 18: ...en door may be removed to facilitate installation These ovens are not approved for stackable or side by installation Warning Be sure your oven is installed and grounded properly by a qualified install...

Страница 19: ...C 220 240 V 50 Hz and connected to an individual properly grounded branch circuit pro tected by a circuit breaker The voltage on the brand which located on the frame of oven WARNING ELECTRICAL SHOCK H...

Страница 20: ...d 14 Tray 15 Door element 16 Handles of oven door Mode knob GRILL MODE This method of cooking utilises the top element which directs heat downwards onto the food Ideal when additional cooking is requi...

Страница 21: ...t and meat etc FAN AND LOWER ELEMENT This method of cooking utilizes the bottom element in conjunction with the fan which helps to circulate the heat This function is suitable for sterilizing and pres...

Страница 22: ...se the function which the roasting food needs 2 Adjust the appropriate temperature to that which the food needs 3 Turn the timer knob deasil adjust the timing hour which the broiling food needs or tur...

Страница 23: ...ed in the oven as exact as pos sible Pans should not touch each other or the walls of the oven If you need to use two shelves stagger the pans so that one is not directly above the other How to set th...

Страница 24: ...half broiling Fish fillets 6 to 12 mm thick C 5 5 Handle and turn very carefully Brush with lemon butter before and dur ing cooking if desired Preheat broiler to increase browning Ham slices precooke...

Страница 25: ...ter to clean two sides of the oven and the bottom of the oven Take out the ventilation cover and using the soap and water or detergent to clean Take out the ventilation cover by losen the screws Wipe...

Страница 26: ...ood idea to wipe the control panel after each use Clean it with dry soft cloth Do not use abrasive cleansers strong liquid cleansers plastic scouring pads or oven cleansers on the control panel they w...

Страница 27: ...ing the oven section Improper shelf position being used See the Broiling Guide Food being cooked in a hot pan Use the tray and grid that came with your oven Make sure it is cool Cookware not suited fo...

Страница 28: ...An odor from the insulation around the inside of the oven is normal for the first few times the oven is used This is temporal The new oven should burning two hours under high tempera ture Fan noise A...

Отзывы: