background image

4

First Time Use of Hand Sink Cart

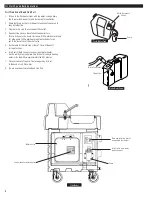
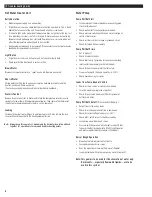
1.  Fill one of the fresh water tanks with tap water, connect pump 

line to water tank connector, and loosen cap for ventilation. 

2.  Check that drain nozzle is in the waste tank spout. Leave cap to 

hang by tether line. 

3.  Plug in electric cord to a convenient 110v outlet. 
4. Open 

hot

 side valve on faucet about one quarter turn. 

Turn switch on electric box to start pump. With water heater turned 

off

, allow pump to fill water heater until water begins to run 

out of the faucet spout, then shut valve.  

5.  Do the same for the 

cold

 side of faucet. This will 

bleed

 off 

air in water lines.  

6.  Turn Control Knob to on position on side of water heater, 

(switch will light up) and allow time for heater to begin heating 
water inside tank. Allow approximately ten (10) minutes. 

7.  Place second set of tanks in front area pushing first set 

to the back of cart. Close door.  

8.  You are now ready to use the Hand Sink Cart. 

III. Start-Up and Daily Operations

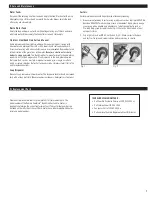
Fresh Water Tank

Waste Water Tank

Fresh Water Tank

Waste Water Tank

Fresh Water Tank

Waste Water Tank

Quick Disconnect 

Fitting

Main power switch box for 
pump and water heater

Inlet side to fresh water 
tank connector

Control knob for water heater

Water heater

Pump

Tether Line

Waste Tank Spout

Pump

Out

In

110v Model

Содержание CamKiosk KSC402

Страница 1: ...OWNER S MANUAL CAMKIOSK HAND SINK CART www cambro com This manual applies to the following CamKiosk Hand Sink Cart models KSC402 ...

Страница 2: ...ulations on the purchase of your new Cambro CamKiosk Hand Sink Cart This Owner s Manual provides you with a step by step guide to operating and maintaining your new cart If you have any further questions please contact your Cambro Sales Representative visit www cambro com or call our Customer Service Department at 800 833 3003 International customers please call 714 848 1555 I Introduction Table o...

Страница 3: ...tioning into center port and then carefully tighten collar nut 2 Snap paper towel roll into the towel holder making sure that the paper tab comes over top of roll 3 Make sure drain flex line is positioned so it can flow to either waste tank when properly placed in lower compartment See Start Up Daily Operation for details 2 Towel Holder 3 Soap Dispenser 5 Fresh Water Tanks 4 Waste Water Tanks 2 1 ...

Страница 4: ...ame for the cold side of faucet This will bleed off air in water lines 6 Turn Control Knob to on position on side of water heater switch will light up and allow time for heater to begin heating water inside tank Allow approximately ten 10 minutes 7 Place second set of tanks in front area pushing first set to the back of cart Close door 8 You are now ready to use the Hand Sink Cart III Start Up and...

Страница 5: ...ge install 1 4 x 21 2 long 3 lobe knobs through slots in top of front panel and tighten against top bridge s front section 6 Once front panel is properly positioned tighten bottom 1 4 thumb screws either side along bottom edge of panel and both cart bodies III Start Up and Daily Operations Side View B A Cap filler spout Waste Waste B A Side View Connector Fill spout with cap Fresh Fresh To reduce ...

Страница 6: ...ressure switch operation adjustment incorrect Refer to pump Shurflo service bulletin 1031 for differential and pressure adjustment procedure 110v Model Noisy Rough Operation Mounting feet are compressed too tightly Loose pump head or drive screws Does the mounting surface multiply noise flexible Is pump plumbed with rigid pipe causing noise to transmit Note This pump is to be used for the circulat...

Страница 7: ...n of the grain lines in the metal Never use steel wool or sharp knives to clean your sink The Hand Sink Cart is manufactured for hand washing capability not for food preparation If food is placed in the sink please beware that some food such as mustard mayonnaise lemon juice vinegar or salt are acidic or contain chlorides that will attack and corrode stainless steel if left in the sink for extende...

Страница 8: ...use The use or installation of any product s in non commercial applications renders all warranties express or implied including the warranties of MERCHANTABILITY and FITNESS FOR A PARTICULAR PURPOSE null and void including any responsibility for damage costs and legal actions resulting from use or installation of product s in any non commercial setting 7 Adjustments such as calibrations leveling t...

Отзывы: