Cambridge Audio Minx Xi Скачать руководство пользователя страница 10

10

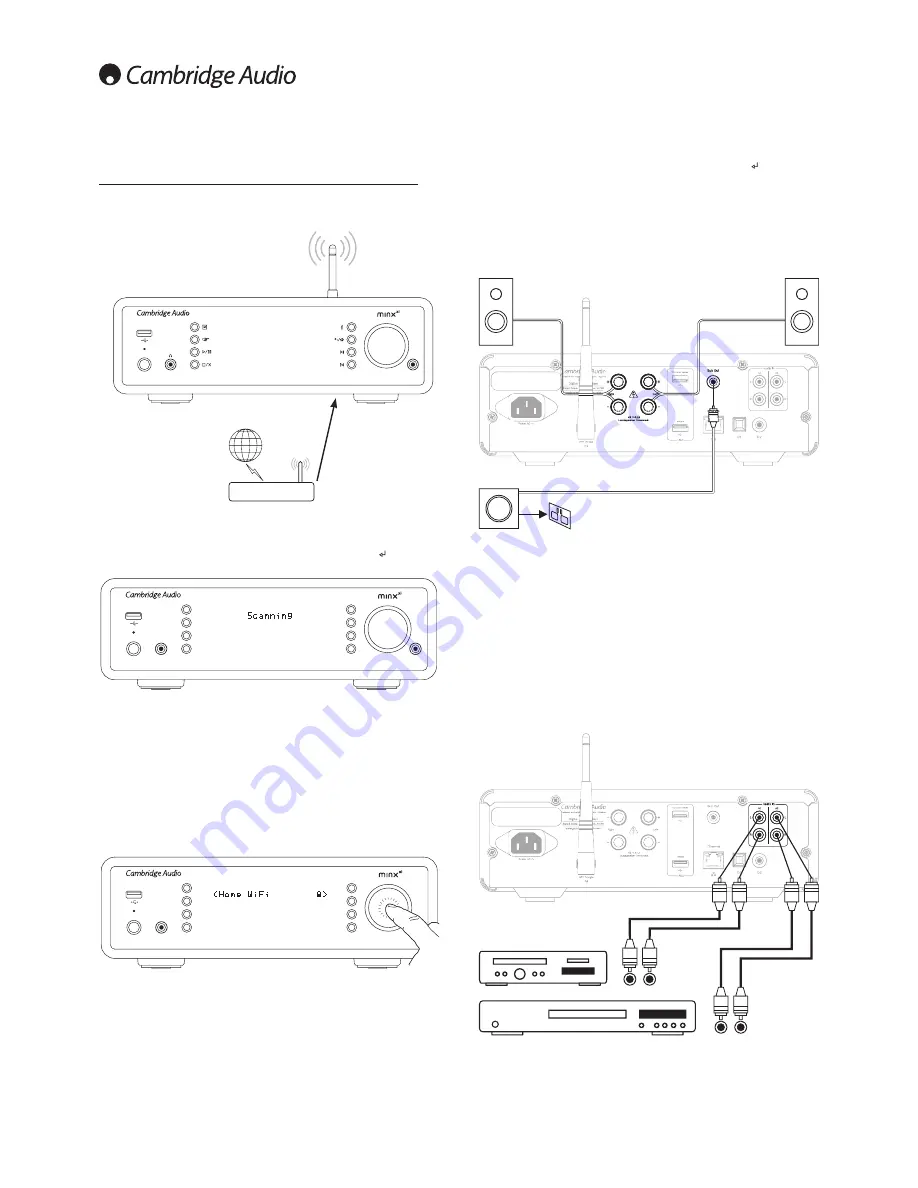
Connecting to a wireless network

IMPORTANT: Do not plug/unplug the Wi-Fi aerial dongle when the unit is on.

Place the Minx Xi in range of your wireless network (usually 10-30m of a suitable 

wireless transmitter, although this is affected by walls and the construction of your 

building) and turn it on, via the front panel switch. 

10-30m distance

Wireless broadband 

Router/Modem

Internet

The Minx Xi will automatically connect and obtain an IP address from your wireless 

network. For advanced users, if you would like to give your Minx Xi a static IP 

address, then see the 'Network config' section of the manual.

Note:

 If you make a mistake at any point, you can always press the   button to go 

back to the previous screen.

The unit will now scan for all available wireless networks and will display "Scanning". 

If  it  can't  find  one  then  the  display  will  say:  "No  Wireless  Networks  Found".  If  this 

happens then you need to either move the Minx Xi nearer your wireless access point 

or investigate if there is an issue with your wireless network.
When  the  Minx  Xi  finds  your  wireless  network,  it  displays  the  broadcast  name 

(ESSID)  for  the  access  point  –  this  is  a  name  allocated  to  the  access  point  by 

whoever set up the network, it may either be a default name for your router/

wireless or may be a more familiar name such as "Johns Wi-Fi" etc. If your Minx Xi 

finds more than one wireless network you can simply choose which one you want to 

connect to. Turn the rotary dial to see the ESSID for each wireless network.
When the ESSID for the wireless network you want to connect to is displayed on 

the  screen,  press  the  SELECT  button.  If  your  network  is  not  configured  with  an 

encryption code, the screen should say "Connecting to network" then "Network OK".

If the screen displays either "Enter WEP key" or "Enter WPA key", then the network 

is using one of the supported encryption systems: Wired Equivalent Privacy (WEP) 

or Wi-Fi Protected Access (WPA). You now need to enter your correct WEP or WPA 

code. The person who set up the wireless network in the first place will know what 

this code is (or be able to reset it to a new known code); if that person is not you, 

then you need to find out what it is.
After 3 seconds, the display goes into the code entry mode. To enter the code, use 

the rotary dial to select each character of the code in turn, pressing the SELECT 

button after entering each character.

Note:

 The WEP and WPA codes are case sensitive, so you must enter them exactly.

After entering the final character, use the rotary dial to select the   character and 

press the SELECT button. It's a little fiddly but you will only need to do this once. The 

Minx Xi will remember this code and use it automatically from now on.
The unit should now be able to connect to the network.

Speaker connections

Check the impedance of your speakers. Speakers with an impedance of between 4 

and 8 Ohms are recommended.

The  red  coloured  speaker  terminals  are  positive  (+)  and  the  black  speaker 

terminals are negative (-). Make sure correct polarity is maintained at each speaker 

connector or the sound can become weak and "phasey" with little bass.
Prepare the speaker cords for connection by stripping off approximately 10mm 

(3/8") or less of the outer insulation. More than 10mm could cause a short circuit. 

Twist the wires tightly together so there are no loose ends. Push in the terminal, 

insert the speaker cable through the hole in the side of the terminal and release 

the terminal so it clamps down on the wire.

Note:

 All connections are made using standard loudspeaker cable. If an active 

subwoofer is used, connect via a standard single RCA/phono cable (often referred 

to as a 'Sub-Link').

Analogue audio connections

Note:

 Do not plug in the mains power lead or turn the unit on until all connections 

have been made.

Audio player/recorder 

(Tape/MD/CD-R)

CD player

Out

Out

Connect to source equipment using stereo phono/RCA cables (stereo 2RCA- 2RCA). 

Tape/MD/CDR recorder/players require two sets of stereo phono/ RCA cables, one 

for recording, one for listening.

Содержание Minx Xi

Страница 1: ...Your music our passion Integrated Amplifier User s manual 2 ENGLISH ...

Страница 2: ...oduced by any mechanical electronic or other means in any form without prior written permission of the manufacturer All trademarks and registered trademarks are the property of their respective owners Copyright Cambridge Audio Ltd 2013 Cambridge Audio and the Cambridge Audio logo are trademarks of Cambridge Audio Stream Magic is a trademark of Audio Partnership Plc and is registered in the Europea...

Страница 3: ...must be installed in a manner that makes disconnection of the mains plug from the mains socket outlet or appliance connector from the rear of the unit possible Where the mains plug is used as the disconnect device the disconnect device shall remain readily operable Only use the mains cord supplied with this unit Please ensure there is ample ventilation We recommend that you do not place the unit i...

Страница 4: ... not included in this list having a gain greater than the maximum gain indicated for that type are strictly prohibited for use with this device C059 510137 A Antenna RG 178 Cable SMA Plug Reverse 3 0dBi 50Ω Wi Fi information Important safety instructions cont DECLARATION OF CONFORMITY WITH FCC RULES FOR ELECTROMAGNETIC COMPATIBILITY We Cambridge Audio of Gallery Court Hankey Place London SE1 4BB d...

Страница 5: ...ve parts in this product Warranty periods may vary from country to country If in doubt consult your dealer and ensure that you retain proof of purchase To obtain warranty service please contact the Cambridge Audio authorised dealer from which you purchased this product If your dealer is not equipped to perform the repair of your Cambridge Audio product it can be returned by your dealer to Cambridg...

Страница 6: ...is possible for the sound quality to be affected if the connections are loose 5 HD Local media Use to connect a USB storage device or another portable device that is USB HD flashdisk compatible containing music files Current limited to 1A 6 BT100 The supplied Cambridge Audio BT100 Bluetooth adaptor should be plugged in here adding wireless streaming bluetooth A2DP AVRCP audio capability directly f...

Страница 7: ...Note Plugging in headphones will automatically mute the loudspeaker output 4 Infrared sensor Receive IR commands from the supplied remote control A clear unobstructed line of sight between the remote control and the sensor is required 5 Memory Press to access the Memory features for preset recall and storage The Minx Xi can store up to 20 Presets which can be Internet Radio stations Streams from S...

Страница 8: ...n listening to an Internet Radio station or Streaming Service that has some form of interaction with the user This function will bring up an interactive menu where available This feature is commonly used allow indication that you like or don t like the current stream so the service can tailor the music served to your personal taste For Media Play back UPnP or Local this button will toggle between ...

Страница 9: ...and has two USB1 1 ports for this purpose one on the front and one on the back Here the Minx Xi simply browses the folders present on the media attached and displays them This feature is provided for convenient access to temporary storage devices It is however highly recommended that UPnP is used for continued use of stored media as the UPnP system is able to support album art sophisticated conten...

Страница 10: ... Fi Protected Access WPA You now need to enter your correct WEP or WPA code The person who set up the wireless network in the first place will know what this code is or be able to reset it to a new known code if that person is not you then you need to find out what it is After 3 seconds the display goes into the code entry mode To enter the code use the rotary dial to select each character of the ...

Страница 11: ...ed When a BT100 is plugged into the rear BT100 USB socket an extra menu item called Bluetooth appears in the main menu Selecting this allows the Minx Xi to receive wireless Bluetooth audio from most phones tablets and laptops Both the standard SBC CODEC and newer high quality AptX CODEC are supported if the sending device supports it See later section for full operational details The Minx Xi can a...

Страница 12: ...o not broadcast 24 hours per day and some stations may not always be on line Registering your Minx Xi with the Stream Magic website To access extra features on your Minx Xi such as linking premium streaming services to your Minx Xi adding non Stream Magic internet radio stations or simply editing copying re ordering or deleting presets first you will need to set up a free account with Stream Magic...

Страница 13: ...AV and Ogg Vorbis Note Not all servers support serving of all these formats Always make sure the server you choose also supports your formats of choice For example Windows Media Server does not currently serve FLAC format Alphameric Search This is a search function menu inserted by the Minx Xi into the browse tree of the UPnP servers that support an external search function Where available you can...

Страница 14: ... command is available for deleting the whole queue During Queue play back the Minx Xi displays a in the Now Playing screen Pressing stop will stop the Queue playing but not delete it Putting the Minx Xi into standby will delete the Queue To view the Queue at any time simply navigate back to Queue item in the Media menu or press the button whilst a queue is playing Podcasts The podcast services in ...

Страница 15: ...ces will cause the BT100s LED to be on even if playback is currently stopped or paused Audio Inputs menu Press and hold the button to get to the top menu Select the Audio Inputs from the main menu and then the audio input source that you wish to listen to For more information refer to Analogue and Digital audio connections Audio Inputs A1 A2 D1 D2 Front MP3 In Choose Front MP3 In A1 or A2 for anal...

Страница 16: ...to know what these are in your network Only select static IP if you know exactly what you are doing To set static IP select the Settings Network config Edit Config menu and then press SELECT The Minx Xi will now display Auto DHCP YES NO Turn the Minx Xi s rotary dial to select NO and then press SELECT This menu contains various setup configuration menus as shown below Settings Audio Settings Netwo...

Страница 17: ...ownload it or not It is a good idea to update the firmware from time to time to take advantage of any bug fixes or new features At this stage you can press the Minx Xi s button to cancel the firmware upgrade A Firmware upgrade may take several minutes Note It is very important that once the Firmware upgrade has started you do not switch off the power to the Minx Xi until the operation is complete ...

Страница 18: ...dial turn the dial to the relevant character and press the dial to select the character If necessary press the button to delete a character When finished selecting all the characters press the button to go back to the menu Stream Magic Remote Stream Magic remote is a free iPhone iPod Touch iPad Android application that allows wireless control of the Minx Xi or other Stream Magic powered Cambridge ...

Страница 19: ...ve If when attempting to connect to an encrypted network your Minx Xi displays Wireless error followed by a 5 digit number then please ensure that you enter the correct passphrase for the network If the problem persists then you may need to consult your network configuration If your Minx Xi can connect to the network successfully but is unable to play particular Stream Magic stations it may be due...

Страница 20: ...e Audio is a brand of Audio Partnership Plc Registered Office Gallery Court Hankey Place London SE1 4BB United Kingdom Registered in England No 2953313 www cambridge audio com 2013 Cambridge Audio Ltd AP31588 1 ...

Отзывы: