XD2-240 and XD4-240 Installation Guide
3
Install Mounting Hardware
1.
If the mounting plate is attached to the back of the AP, remove it by pushing it down and rotating it to the left.
There are three standard mounting techniques for the XD2-240 and XD4-240, listed below.
For
Direct Ceiling Mount
, skip to
3B—Direct Ceiling Mount without Mounting Plate on page 4
. Otherwise,
proceed with the steps below.
2.
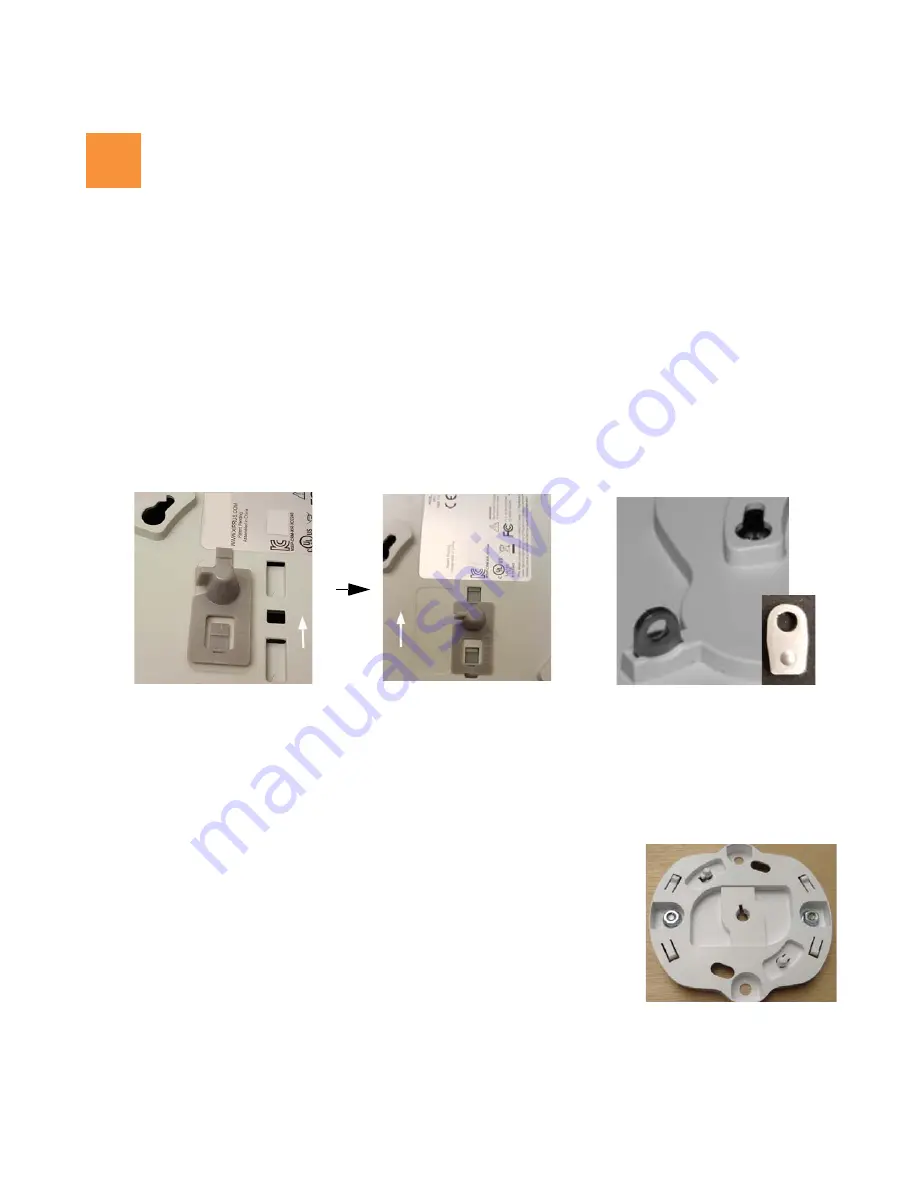
Locate the gray plastic clip that is supplied with the AP and orient it as shown below (
A
). The alignment pin
on top of this clip will be very helpful later for positioning the AP to attach it to the mounting plate.
3.
Note the arrow on the gray clip indicating the direction for inserting it. Slide the clip into the two slots in the
middle of the back of the AP (
A
,
B
) in the indicated direction until it snaps in place.
4.
To secure the AP to its mount after installation with a zip-tie or small padlock, locate the supplied locking slug
(
C
, above). Push it into the slot on the AP’s back, with the small protruding bump facing towards the nearer
mounting keyhole.
3A—Ceiling Mount with Mounting Plate
For a more secure mount, ease of dismount, and a locking option for the AP, use the
supplied mounting plate.
1.
Use the holes on the AP mounting plate to mark the placement of two or four
user-supplied screws to install in the ceiling.
2.
Drill and prepare holes for the screws as appropriate.
3.
Cut an access hole for the cable(s) in the ceiling and draw enough cable through
to attach to the AP.
4.
Align the AP mounting plate over the prepared holes. Secure the plate with the screws. Do not over-tighten.
5.
Proceed to
Connect Cables and Install AP on page 5
3A—Ceiling Mount with Mounting Plate
3B—Direct Ceiling Mount without Mounting Plate
3C—Ceiling Grid Mount with Mounting Plate
3
A
B
C


