background image

XD2-240 and XD4-240 Installation Guide

5

Connect Cables and Install AP

NOTE

: Once you connect GIG1/POE, an automatic upgrade typically starts soon after the AP has Internet connectivity. Do 

not unplug this port during the upgrade or the AP may become inoperable. The upgrade should take 10 minutes or less. 

Zero-Touch Provisioning and Ongoing Management

Most customers use the XMS management system for the initial setup and continuing management of Cambium 
Xirrus APs. XMS users set up new APs for zero-touch provisioning via the platforms below. Wait ten minutes after 
powering up the AP to automatically discover and upgrade it, then use XMS to view and manage it. 

XMS-Cloud—performs zero-touch provisioning. Your new APs appear in XMS even before you receive your 
equipment. When the email arrives with your login information, use XMS-Cloud to specify the initial settings 
for your APs. A Guided Tour will walk you through the basic steps of creating a profile containing 
configuration settings, including creating SSIDs and firewall/application control rules. Once the installed AP 
has Internet connectivity, it will automatically contact Cambium Xirrus for cloud-based zero-touch 
provisioning per your settings, install the latest applicable license, and upgrade the AP to the latest software 
version as appropriate. 

XMS-Enterprise—detects and provisions new Cambium Xirrus devices deployed in your network. Create and 
configure a default profile for newly added APs, then set up discovery for the APs’ subnetwork. New devices 
will automatically receive the configuration defined in the default profile.

If you are not using XMS, see the 

Wireless Access Point User's Guide 

to configure XD2  APs manually. The User 

Guide is available from 

support.cambiumnetworks.com

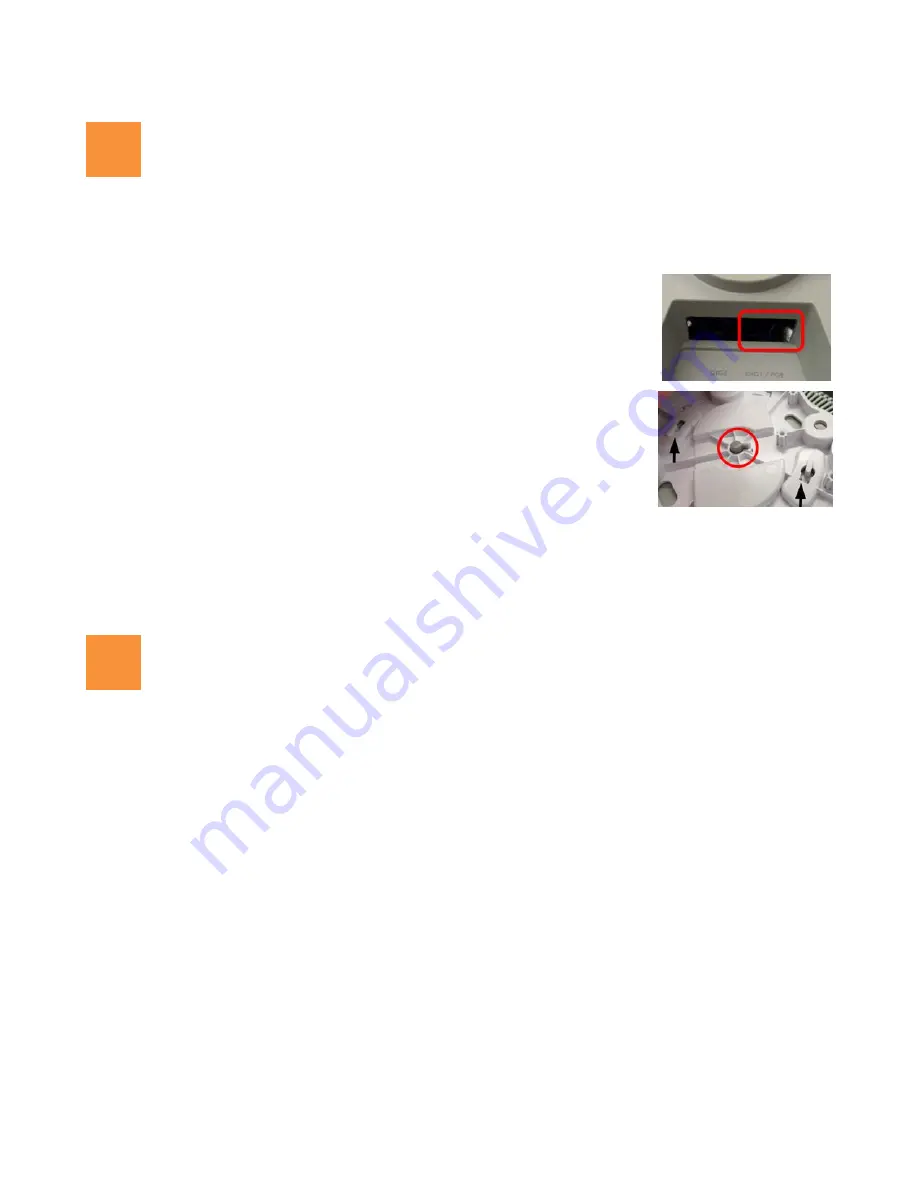
1.

Connect the cable that carries power and data to 

GIG1/PoE

 (shown in red). If you 

use a Cambium Xirrus-supplied injector, its CONNECT LED should light (for 
70W and higher injectors, it is OK if it blinks). If power is being properly 
supplied, the AP’s LEDs will light and then commence blinking in their rotating 
boot pattern. A second data connection may be plugged into 

GIG2 

(optional). 


2.

If using a mounting plate, line up the alignment pin on the AP’s gray clip 
(installed in 

Install Mounting Hardware on page 3

) with the keyed slot in the 

middle of the mounting plate. The circle in the image at left shows how the pin 
and the slot fit together, and the black arrows show the two tabs that hold the AP 
in place on the mounting plate. 

3.

Push the AP up on the mounting plate tabs (or the screw heads, if attaching 
directly to ceiling) and rotate the AP to the right (clockwise) till it snaps in place.

4.

To secure the AP to the mounting plate for tamper evidence or to deter removal, feed a customer-provided zip 
tie or other locking hardware through the hole in the top of the locking slug and the matching locking tab on 
the mounting plate. 

5.

Remove the protective plastic film from the unit.

4

5

Содержание XIRRUS XD2-240

Страница 1: ...XD2 240 and XD4 240 Installation Guide November 2019 ...

Страница 2: ...ot be copied reproduced reverse engineered distributed merged or modified in any manner without the express written permission of Cambium Furthermore the purchase of Cambium products shall not be deemed to grant either directly or by implication estoppel or otherwise any license under the copyrights patents or patent applications of Cambium or other 3rd Party supplied software except for the norma...

Страница 3: ...ting environment Cambium recommends setting and using these parameters following industry recognized security practices Security aspects to be considered are protecting the confidentiality integrity and availability of information and assets Assets include the ability to communicate information about the nature of the communications and information about the parties involved In certain instances C...

Страница 4: ...mbium Networks equipment in EU countries Disposal of Cambium Networks equipment European Union EU Directive 2002 96 EC Waste Electrical and Electronic Equipment WEEE Do not dispose of Cambium Networks equipment in landfill sites For disposal instructions refer to http www cambiumnetworks com support weee compliance Disposal of surplus packaging Do not dispose of surplus packaging in landfill sites...

Страница 5: ...traffic See below for Power details This is a 1 Gigabit port on the XD2 240 On the XD4 240 this is a 2 5 Gb port whose rate is set only by auto negotiation with the switch Optional GIG2 Connection to this second data only one gigabit port provides additional throughput Use Cat 5E or Cat 6 cable AP must be connected to PoE networks without routing cabling to the outside plant This ensures that cabl...

Страница 6: ...t with Mounting Plate on page 4 Use the mounting plate with the supplied T Bar clips for 15 16 ceiling grid For a slotted ceiling grid T slot bolts are available for attaching the T Bar Bracket to slots in the grid Wall Mount For XD4 use the XE 4010 WALL mounting kit which contains a wall mount bracket 4 hex cap screws and 5 hollow wall toggle bolt fasteners for instructions see the Wall Mount Bra...

Страница 7: ...tion until it snaps in place 4 To secure the AP to its mount after installation with a zip tie or small padlock locate the supplied locking slug C above Push it into the slot on the AP s back with the small protruding bump facing towards the nearer mounting keyhole 3A Ceiling Mount with Mounting Plate For a more secure mount ease of dismount and a locking option for the AP use the supplied mountin...

Страница 8: ...face and the head of the screw 5 Proceed to Connect Cables and Install AP on page 5 3C Ceiling Grid Mount with Mounting Plate 1 Use two of the four holes on the AP mounting plate to mark the placement of the two supplied T bar clips on the metal ceiling support grid NOTE You MUST use the mounting studs furnished with the T BAR clips You cannot use old T bar clips from XN or XS APs with the XD Seri...

Страница 9: ...s devices deployed in your network Create and configure a default profile for newly added APs then set up discovery for the APs subnetwork New devices will automatically receive the configuration defined in the default profile If you are not using XMS see the Wireless Access Point User s Guide to configure XD2 APs manually The User Guide is available from support cambiumnetworks com 1 Connect the ...

Страница 10: ...ble from the GIG1 PoE port Press the reset button all the way there should be a faint click and hold it Plug the cable back in and continue to keep the button pressed for 10 seconds This triggers the factory default reset during the boot process Specifications Dimensions WxDxH 10 x 10 x 2 5 in 25 4 x 25 4 x 6 4 cm Weight 2 lb 0 9 kg Operating Temperature 0 55 C 32 131 F 0 90 humidity non condensin...

Отзывы: