cam B1 Скачать руководство пользователя страница 18


18


Ed.

1/2012 Rev.0


ENG 


3.3 Periodic use of the oven 


Before using the oven carry out the following check-outs and arrangements:


Step 

Action 

Insert the plug in the socket located on the shunt box 


Make sure that the  magnetothermic  switch and the differential switch are both 
on. 

Turn the power socket’s disconnection switch to I/ON.
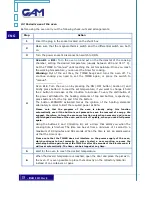
 

Oven  B1  +  B11:

  Turn  the  oven  on  and  act  on  the  thermostat  of  the  cooking 

chamber,  setting  the  desired  temperature  (usually  between  290  and  310  °  C). 
Set the TIMER to "manual" until reaching the set temperature. Once you reach 
the working temperature, you can set the timer for cooking. 

Warning:

  Out  of  the  set  time,  the  TIMER  beeps  and  turns  the  oven  off.  To 

continue  cooking  you  need  to  set  the  TIMER  again,  or  place  the  switch  to 
"manual". 
------------------------- 
Oven B1E: Turn the oven on by pressing the ON / OFF button (Section C) and 
briefly press button 3 to read the set temperature; if you want to change it hold 
the 2 button to decrease or the 3 button to increase. To vary the distribution of 
the  power  attributed  to  the  heating  elements  of  top  and  bottom,  respectively, 
press buttons 4 for the top and 5 for the bottom. 
The  button  ECONOMY  activated  forces  the  ignition  of  the  heating  elements 
alternately in order to limit the required power at 50%. 

Please  note  that  the  program  of  the  oven  is  already  using  this  function 
automatically  even  if  the  button  is not  pressed to  save  the  removal  of  energy.  We 
suggest, therefore, to force the economy function only when necessary and in case 
of prolonged downtime of the oven and turn it off quickly, when you need full power 
again. 

Using  the  buttons  2  and  3  (Section  B),  set  a  timer  that  alerts  you  when  the 
cooking time is finished. The time can be set from a minimum of 1 second to a 
maximum of 99 minutes and 59 seconds. When the time is set, an alarm warns 
us that the time is up. 

Please  note  that  the  TIMER  does  not  interfere  on  the  power  supply  of  the  oven, 
which  continues  to  heat  normally.  In  order  to  start  a  new  counting,  re-press  the 
start-stop button again to reset the TIMER or after 60 seconds of the alarm sound, it 
will reset automatically. The timer can be stopped at any time. 

Wait for the oven to reach the desired temperature.


When the desired temperature is reached, open the door and place the pizzas in 
the oven. It is even possible to place them directly on the refractory material 
instead of on containers or pans.  


Содержание B1

Страница 1: ...ELECTRIC PIZZA OVENS Models B1 B11 B1E INSTALLATION OPERATING AND MAINTENANCE ISTRUCTIONS...

Страница 2: ...atically referred to the current standards and regulations for mechanical products specifically the UNI standards and the CEI standards for electric and electronic equipment The units that are describ...

Страница 3: ...rator safety 1 7 2 Safety devices of electric equipment Wiring diagram Section 2 Installing the machine 2 1 Unpacking 2 2 Position in place 2 3 Connection to the electrical power supply 2 4 Preliminar...

Страница 4: ...n charge of installing operating adjusting servicing and cleaning the machine Provides significant information Indicates a potentially hazardous situation that may arise if the operations described ar...

Страница 5: ...n the door use the insulated handle Do not put in the oven food packaging such as sealed metal cans or other material as it may explode due to high temperature with serious consequences for both the m...

Страница 6: ...dels of different sizes to meet the diverse needs of professional customers such as the kitchens of restaurants institutions cafeterias pizzerias etc wherever it is necessary to cook preparations of f...

Страница 7: ...585 B 480 C 245 A 585 B 480 C 245 A 585 B 480 C 420 ABSORBTION kW 1 6 1 6 3 2 NET WEIGHT Kg 23 23 37 DIMENSIONS PACKING mm A 660 B 540 C 330 A 660 B 540 C 330 A 660 B 540 C 500 All models have a work...

Страница 8: ...lating material for high temperature Electric armored heating elements of durable high quality materials Single phase power supply 230V or three phase 400V AC at 50 60 Hz with tolerances according to...

Страница 9: ...that they can be perfectly handled with lifting means transport The standard equipment of all the models consists of the following An operations and maintenance instructions manual A catalogue of spar...

Страница 10: ...the age foreseen by the social laws have good general competence and manual ability for coordination and be precise have received proper technical and practical preparation training from an skilled op...

Страница 11: ...d and control general wiring connecting devices of the circuit unit made of cables suitable for harsh operating conditions and proper voltage limit The wiring diagram has been carried out according to...

Страница 12: ...ts of the structure that make direct contact with the lifting ropes belts 5 Lift the machine from the wooden bedplate pallet and unload it in the allotted site on the ground 6 If necessary use a soft...

Страница 13: ...enance purposes 3 Verify that the proximity of the area you have a system capable of distributing electricity to the power of the machine 230V 4 The oven does not require any kind of attachment to the...

Страница 14: ...ble voltage and power the distribution system has an effective earthing system and safety switch All the components and materials necessary to perform the installation must be done in full compliance...

Страница 15: ...so as to permit the installed power cable to reach the power socket do not use extension cables to make this connection Install a suitable interlocked socket of industrial type Install a disconnection...

Страница 16: ...ION C Switch on button Operating description B1E oven With the oven in working pause all the displays are off except the led of the Switch ON button On the panel there are 3 separate sections for the...

Страница 17: ...d heating elements 5 When the first cycle is completed the metal will be stabilized and will no longer produce any unpleasant odor While personally supervising the oven open the front door and keep it...

Страница 18: ...for the top and 5 for the bottom The button ECONOMY activated forces the ignition of the heating elements alternately in order to limit the required power at 50 Please note that the program of the ov...

Страница 19: ...rt the current operation by signboard wait until the oven has cooled completely it takes several hours To clean adequately the Refractory bricks Use a cloth dampened with only water or a brush with st...

Страница 20: ...ommended solution Machine does not start No power supply I Check that the plug is properly connected II check that the thermo magnetic switch has been activated ON III verify that the differential swi...

Страница 21: ...izing Protect it from dust taking care to leave the door ajar to prevent condensation from forming mounds or bad smells avoid synthetic materials and bags 3 8 Machine disposal If the machine needs to...

Страница 22: ...ring by unauthorized personnel and or personnel who are not qualified to work on the machine in a professional manner as well as for any other reason that does not depend on the manufacturer 3 During...

Отзывы: