manualshive.com logo in svg
background image


11

Vi s i t   u s   o n l i n e   a t   c a l i fo n e. co m

Other Features and Functions

Headphone Listening

Listening with Wired Headphones

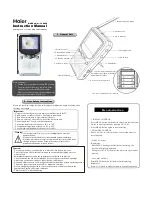
Two headphone jacks are located on the Music Maker™ - a single 3.5 mm jack (26) on the top and one 1/4” phone jack (27) 
on the rear of the cabinet. A jackbox can be plugged into either for multiple listeners. 

Califone recommends using antimicrobial headphones for group listening situatiuons.

Listening with Wireless Headphones

The Infrared Music Maker™ provides for an unlimited number of 34B-IR infrared headphone 
listeners within its 15’ wireless transmission range. Six of these headphones come with the 
6-person Wireless Listening Center (2395IRPLC-6) or can be purchased separately for use 
with the 2395IR. 

Infrared audio is line-of-sight transmission. There must be an unobstructed view from the 
headphone to the Music Maker in order for reception to be heard. Audio signals are sent 
through the air by an FM (frequency modulation) carrier. Since the transmission is from a light 
source (LED, light emitting diodes) the system will not work in bright sunlight. 

Suggestion: Best reception for all infrared headphones is when listeners form a maximum 
10-15’ semi-circle in front of the Music Maker™.

To transmit audio from radio, CD or tape simply switch (49) to infrared headphone and 
transmission begins from the red IR domes (48). Both domes must remain uncovered in order to transmit.

Audio from speakers or to headphones 

Audio will project from either the speakers OR to the wireless headphones - not to both at the same time.

Note: The internal speakers and headphone jacks are disconnected in IR mode. Only Califone 34B-IR infrared headphones 
             must be used to receive the audio (purchased separately).
Note: There is no limit on the number of headphones that can be used as long as there is nothing blocking 
             the transmission from the 2395IR.

3068-AM

2924AVP-AM

Care and Maintenance

34B-IR

califone_2395IR_manual.indd   14

9/14/07   4:34:48 PM

Содержание Music Maker

Страница 1: ...Manual califone com Infrared Music Maker Plus Multimedia Player Recorder 2395IR Infrared Music Maker Plus 2395IRPLC 6 Six Person Learning Center shown above califone_2395IR_manual indd 3 9 14 07 4 34...

Страница 2: ...andinspectitforanysignsofdamage Save all packaging materials for possible later use Report any damageclaim directlytothefreightcarrier immediately Save the product and packaging for inspection by the...

Страница 3: ...ht D or UM 1 size batteries are required When installing the batteries refer to the orientation diagram shown inside the battery compartment Place the batteries on top of the nylon ribbon This helps t...

Страница 4: ...online at califone com Front View Rear View HEADPHONE R L EXT SPK MIC REMOTE BEAT CUT 0 1 27 28 29 30 49 33 2 3 18 13 46 48 36 38 42 44 34 40 37 39 43 45 35 41 48 califone_2395IR_manual indd 6 9 14 07...

Страница 5: ...Treble Down 11 Bass Up 12 Bass Down 13 Telescoping Antenna 14 Tuner Up 15 Tuner Down 16 Preset 17 Program 18 CD Door 19 Play Pause 20 Skip Forward 21 Skip Backward 22 Stop 23 Repeat 24 Random 25 Play...

Страница 6: ...o adjust the Treble up and down respectively while BASS p 11 and BASS q 12 can be used to adjust the Bass up and down respectively Both Treble and Bass can be adjusted in the range of 5 to 5 EQ Contro...

Страница 7: ...ess preset stations simply press the PRESET button until the desired channel is found AM FM Radio Operation The 2395IR features an AM FM PLL phase locked loop stereo radio and telescopic antenna for l...

Страница 8: ...om Stop or Pause Each press will change the track number by one If the CD is playing pushing and holding the SKIP button will advance through the current track until it is over then proceed to advance...

Страница 9: ...Disc 1 Lift to open the CD door and see OPEN on the LCD display 2 Place a CD in compartment with label side up 3 Press the CD door down to close Compact Disc Play To play a loaded CD 1 Turn power ON 2...

Страница 10: ...selections in programmed order Push the button three times to clear the REPEAT function REPEAT ONE or REPEAT ALL will appear on the CD PROGRAM DISPLAY when the CD REPEAT button is pushed Dual Cassette...

Страница 11: ...utton on Deck A to prepare for recording As the RECORD button is pressed the PLAY button will follow 3 Press PAUSE again to start recording Recording from Tape B to Tape A 1 Insert a blank tape into c...

Страница 12: ...d Audio signals are sent through the air by an FM frequency modulation carrier Since the transmission is from a light source LED light emitting diodes the system will not work in bright sunlight Sugge...

Страница 13: ...CAN SKIP buttons are the same as the Tuner p Skip forward and Tuner q Skip back buttons on the boombox The REPEAT button is the same as the PRESET REPEAT button on the boombox The TIME button is the s...

Страница 14: ...is clean 4 Clean external case surfaces with a moist soft cloth Use only a mild detergent water solution Tape Head Demagnetization It is recommended that the tape heads be demagnetized from time to t...

Страница 15: ...the master volume turned up CD CD play does not begin Is the AC power cord unplugged or loose Is the CD upside down Is the CD or lens excessively dirty Is the disc holder closed properly Is the PAUSE...

Страница 16: ...POWER CORD FROM THE OUTLET WHEN LEFT UNUSED FOR A LONG PERIOD OF TIME OBJECT LIQUID ENTRY CARE SHOULD BE TAKEN SO THAT OBJECTS DO NOT FALL AND LIQUIDS ARE NOT SPILLED INTO THE ENCLOSURE THROUGH OPENIN...

Отзывы: