background image

20

iPod/iPhone Playback

Connect an optional iPod or iPhone to the unit 
by


iPod/iPhone  cabel.  Connect  the  USB  port 

to the USB connector on the front of the panel, 

and insert the video-out line in the AV-in jack.

When  connecting  a  device,  the  unit  will  read 
the  files  automatically.  The  track  information 
display on the screen once playback start.

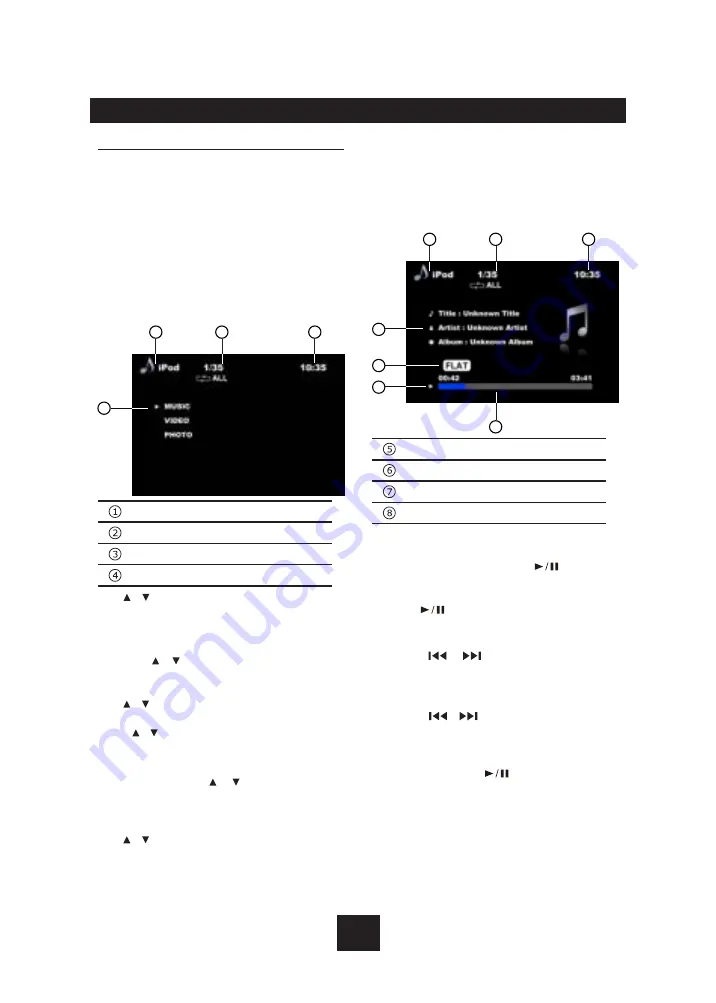
Main Menu

During  playback,  press 

ESC

  button  to  return 

to the ipod playlist menu. press 

ESC

 again to 

return to the ipod main menu.

2

4

1

3

Source indicator

Track number

Time

Category

Use   /   button on the front panel or remote 
control  to  select  “MUSIC”,  “VIDEO”  or 
"PHOTO".

Select “MUSIC”, press 

OK

 or 

ENTER

 button, 

then  use    /    button  to  select  PLAYLISTS 
/  ARTISTS  /  ALBUM  /  SONGS  /  GENRES  / 
COMPOSERS / PODCASTS.
Use   /   button and 

OK

 or 

ENTER

 button to 

select a desired option.
Press   /   button for more than 5 seconds to 
skip a whole page.

S e l e c t   “ V I D E O ” ,   p r e s s  

O K

  o r  

E N T E R


button,  then  use    /    button  to  select 
MOVIE  /  MUSIC  VIDEOS  /  TV  SHOWS 
/   V I D E O   P O D C A S T S   /   R E N T A L   / 
V I D E O I T U N E S U   /   V I D E O   P L A Y L I S T S . 
Use   /   button and 

OK

 or 

ENTER

 button to 

select a desired option.

Select “PHOTO”, press 

OK

 or 

ENTER

 button 

shown as below: 

“Unit does not support photo browsing, Please 
play the iPod photo by controlling iPod.” 

 During  video  and  photo  playback,  press  

ESC

  button  will  exit  video  mode,  and 

return  back  to  the  ipod  video  playlist  or 
ipod main menu.

2

8

5

7

6

1

3

Playback information

EQ indicator

Playback status

Elapsed time/Total time

Stop playback temporarily

-   During  playback,  press 


button  to 

pause playback.

-  The sound will be muted.
-   Press 


again to continue playback. 

Select desired track/chapter

-    Press 

  / 

  button  to  skip  to  the 

previous/next track/chapter.

Fast forward/backward

Press  the 

  / 


button  on  the  front  panel 

for  more  than  2  seconds  to  fast  backward  or 
forward track during playback.
-    During  the  fast  forward  or  backward 

operation,  press 


briefly  to  playback 

normally again. 

-   During  the  fast  forward  or  backward 

operation, the volume will be muted.    

iPod/iPhone Mode

Содержание RDD 772BTi

Страница 1: ...DVD VCD CD MP3 USB SD MMC Player Bluetooth with FM MW Tuner Operating Instructions Thank you for purchasing the RDD 772BTi ...

Страница 2: ...inished reading the instructions keep this manual in a safe place for future reference Never expose this unit amplifier and speakers to moisture or water for preventing electric sparks or fires Please don t change the fuse on the power cord without professional guidance using improper fuse may cause damage to this unit or even cause fire Please power off this unit at once and send it back to the a...

Страница 3: ...ined in the adapter or an irregularly shaped CD The unit may not be able to eject it resulting in a malfunction 2 Disc Cleaning Use a dry soft cloth to wipe the disc from center to edge only neutral detergent can be used 3 When playing a new disc New disc may have some rough spots around the inner and outer edges If such a disc is used remove these rough spots with a pencil or ball point pen etc S...

Страница 4: ...e WMA files About MP3 Supply of this product only conveys a license for private non commercial use and does not convey a license nor imply any right to use this product in any commercial i e revenue generating realtime broadcasting terrestrial satellite cable and or any other media broad casting streaming via internet intranets Button Operation Explanations Some frequent operations 1 Move cursor N...

Страница 5: ...press more than 2 seconds in BT mode Answer the incoming call Dial out 10 Cancel source select menu and return to previous menu When play back pictures videos press to show information Display off press more than 2 seconds Press any button to resume 11 Search the previous station automatically press briefly in Radio mode Search the previous station manually and each press to seek step by step pres...

Страница 6: ...ack or catch fire When throwing away or saving the battery wrap it in tape and insulate 1 Zoom DVD VCD only 2 Title DVD only 3 Power on off 4 Setup 5 Menu cursor 6 Confirm operation Dial Receive call in BT mode 7 Random playback 8 Digit buttons 9 Short press to clear the input number in BT mode Long press to iInput 10 Short press to input number 0 Long press to input 11 Select Audio Video Setting ...

Страница 7: ...USB 4 Take out USB Equipment Press SRC button and switch to non USB mode then take off the USB stick close the cap USB SD MMC Notes USB functions flash memory type MP3 music play 1 SD MMC card support 2 USB flash memory 2 in 1 SD MMC support 3 FAT 12 FAT 16FAT 32 is possible FAT 12 16 dir 200 support file 500 support FAT 32 dir 200 support file 500 support 4 File name 32 byte dir name 32 byte tag ...

Страница 8: ...nd press OK to confirm Note When some devices are not ready they cannot be selected You should stop switching when the playing source you desired has been selected and wait for some seconds the unit will auto enter the playing source mode you have selected When Parking Brake Applied 1 If PRK SW cable is connected to hand brake switch the video display of the TFT monitor will be controlled by drivi...

Страница 9: ...ed When the equalizer function is not active the unit will return to the most recently selected bass and treble levels 3 Press the knob more than 2 seconds to enter Setting mode then Use and OK key to select setting items General Setting Beep On Off The beep tone feature allows the selection of an audible beep tone to be heard each time the menu is accessed Time Mode 24 Hour Mode the clock display...

Страница 10: ...deo output only in 4 3 format in our setting menu 4 3 or 16 9 setting is for video monitor setting but not mean that DVD will output video signal in 4 3 or 16 9 format which means current our TFT is in 16 9 when we play vcd if we want to keep the video signal without distortion the video should not be set to full screen like 16 9 Mirror On Off This option allows for selection of a mirror image vie...

Страница 11: ...t contain the audio file in the selected language the dialogues you listened to will be in the default language You can change the language by pressing MUSIC AUDIO key of the remote controller DVD Menu Select one language that you are familiar with to display DVD menu Note If the DVD disc has the selected language the DVD MENU TITLE will be displayed in the selected language If the DVD disc does n...

Страница 12: ...ons broadcast the time and date within the encoded RDS signal The clock time is automatically adjusted when CT is set to ON TA Volume 00 33 Choose TA VOL level Regional On Off Choose AF function to implement or ignore the regional code of the PI and only stations in the current region can be tuned automatically REG ON AF function will implement the regional code of the PI and only stations in the ...

Страница 13: ... auto seeking Preset Mode Six numbered preset buttons store and recall stations for each band The stored stations P1 P6 for the current band can be viewed on the screen Storing Stations Auto storing 1 Select a band if needed 2 Press AMS briefly to scan the preset station P1 P6 for 5 seconds each 3 Hold AMS more than 2 seconds the 6 strongest available stations will be automatically saved in the pr...

Страница 14: ...ions are enhanced TA Traffic information can be received from the current station or stations in other network AF The frequency list of preset RDS stations is updated by EON data EON enables the radio to make fuller use of RDS information It constantly updates the AF list of preset stations including the one that currently tuned into If you preset a station around the area at your home you will la...

Страница 15: ...ff after the disc is ejected Disc Playback 1 When disc inserted display shows Loading For MP3 or disc with mixed files reading time may exceed 1 minute 2 ERROR will be displayed if error found in disc operation 3 For VCD CD VCD or CD icon will appear on the display 4 While MP3 WMA files playback MP3 WMA icon will appear on the display 5 For DVD DVD icon will appear on the display and TITLE appears...

Страница 16: ...to slide show the pictures 5 During the file playing press to stop and return to the sub root For Video Files 1 Press ESC to return to playlist menu 2 Use to select VIDEO folders 3 Press OK on the front panel or ENTER on the remote control to display all available video file folders 4 Use to enter file list and use to select desired file press OK on the front panel or ENTER on the remote control t...

Страница 17: ...only other folders In the example above the unit will display folders 3 4 6 and 8 but not 2 and 7 since they do not contain any tracks directly Folder 5 is not recognized at all since it is at the fourth level Electronic Shock Protection 10 seconds for CD DA CDA 45 seconds for MP3 recorded at 44 1kHz 128kbps 90 seconds for WMA recorded at 44 1kHz 128kbps Stop Playback Temporarily During playback p...

Страница 18: ...ss OK or ENTER button to confirm PBC Playback control for VCD 2 0 or up 1 If you insert a VCD with PBC press MENU PBC button to set the PBC On Off 2 When PBC is set to Off playback starts from the beginning of the 1st track automatically 3 When PBC is set to On the PBC menu will be displayed use navigation buttons or digit buttons to select desired track press OK or ENTER button to confirm the pla...

Страница 19: ... devices 5 Select RDD 772BTi from the pairing list on the mobile phone 6 Enter the password Default 1234 7 After pairing successfully the unit will show HFP Connected A2DP Connected If the connection doesn t establish after pairing Use button on the front panel or remote control to select HFP or A2DP then long press OK button to connect it manually Main menu Press the SRC button to switch the sour...

Страница 20: ...CAUTION Please avoid operating your connected mobile phone while audio streaming as this may cause noise or sound choppy on the song playback Audio streaming may or may not resume after telephone interrupt as this is dependent on mobile phone System will always return to Radio mode if audio streaming is disconnected Note Be sure to read the chapter Pairing before proceeding Play Pause a track 1 Pr...

Страница 21: ...R button then use button to select MOVIE MUSIC VIDEOS TV SHOWS V I D E O P O D C A S T S R E N T A L VIDEOITUNESU VIDEO PLAYLISTS Use button and OK or ENTER button to select a desired option Select PHOTO press OK or ENTER button shown as below Unit does not support photo browsing Please play the iPod photo by controlling iPod During video and photo playback press ESC button will exit video mode an...

Страница 22: ...n using no fuse or fuse with improper rating may cause damage to this unit or even fires If a proper fuse is installed and electrical problems still occur please contact with any professional car shops for inquiry DO NOT connect other equipments with the car battery to avoid battery overheating Please make sure all the wiring connections the cables of the Speakers are well insulated Otherwise this...

Страница 23: ... out Gray ISO Connector Amplifier Connector L White R Red Black Bluetooth microphone Black SWC Steering Wheel Control Fuse 15A Video out Yellow Yellow Sub out Green Camera in Green White Pink Radio Antenna Reverse Active high level input Parking SW Active low level input ...

Страница 24: ...ce the sleeve into the opening or cause it to bend or bow Check for sufficient space behind the dashboard for the unit chassis This unit can be installed in any dashboard with a suitable 183 mm W x 53 mm H opening as shown above The dashboard should be 4 75 mm 5 56 mm thick in order to be able to support the unit 3 Locate the series of bend tabs along the top bottom and sides of the mounting Devic...

Страница 25: ... 20 of horizontal Make sure the unit is mounted within this limitation Mounting bolt rubber cushion Transport screws Installation Guide Kit Installation If your vehicle requires the use of an installation kit to mount this unit follow the instructions included with the installation kit to attach the unit to the mounting plate supplied with the kit 1 Wire and test the unit as outlined in the Mounti...

Страница 26: ...back until they lock then pull the radio out If the removal keys are inserted at an angle they will not lock properly and will not release the unit hardware from the existing unit and attach them to the new unit Do not exceed M5 x 9mm maximum screw size Longer screws may damage components inside the chassis 4 Wire the new unit as outlined in the Mounting Sleeve Installation instructions 5 Mount th...

Страница 27: ...ps due to vibration Mounting angle is over 30 Mounting is unstable Adjust mounting angle to less than 30 Mount the unit securely with the supplied parts TUNER mode U n a b l e t o r e c e i v e stations The antenna is not connected properly Connect the antenna properly Poor quality reception of radio station The antenna is not fully extended or it is broken Fully extend the antenna and if broken r...

Страница 28: ...losed Please refer to your software s recommended procedures for closing a disc session Review your recording software to familiarize yourself with the correct recording burning procedures We recommend using the latest versions of ROXIOTM or NEROTM burning software In addition this unit will only recognize the CDDA Compact Disc Digital Audio MP3 and WMA formats recorded burned onto a CD R RW This ...

Страница 29: ...9MHz America Usable sensitivity 8dB μ Frequency response 30Hz 15KHz Stereo separation 30dB 1KHz Image response ratio 50dB IF response ratio 70dB Signal noise ratio 55dB AM MW Radio Frequency range 522 1620KHz Europe 530 1710KHz America Usable sensitivity S N 20dB 30dBμ Disc Player System Disc digital audio system Frequency response 20Hz 20KHz Signal noise ratio 80dB Total harmonic distortion Less ...

Отзывы: