background image

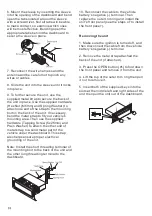
7. Reconnect the wire harness and the
antenna and be careful not to pinch any
wires or cables.

8. Slide the unit into the sleeve until it locks
into place.

9. To further secure the unit, use the
supplied metal strap to secure the back of
the unit in place. Use the supplied hardware
(Hex Nut (M5mm) and Spring Washer) to
attach one end of the strap to the mounting
bolt on the back of the unit. If necessary,
bend the metal strap to fit your vehicle's
mounting area. Then use the supplied
hardware (Tapping Screw (5x25mm) and
Plain Washer) to attach the other end of
metal strap to a solid metal part of the
vehicle under the dashboard. This strap
also helps ensure proper electrical
grounding of the unit.

Note: Install the short threading terminal of
the mounting bolt to the back of the unit and
the other long threading terminal to the
dashboard.

6. Mount the sleeve by inserting the sleeve
into the opening of the dashboard and bend
open the tabs located around the sleeve
with a screwdriver. Not all tabs will be able
to make contact, so examine which ones
will be most effective. Bending open the
appropriate tabs behind the dashboard to
secure the sleeve in place.

10. Reconnect the cable to the vehicle
battery's negative (-) terminal. Then
replace the outer trim ring and install the
unit's front panel (see the steps of 'to install
the front panel').

1. Make sure the ignition is turned off, and
then disconnect the cable from the vehicle
battery's negative (-) terminal.

2. Remove the metal strap attached the
back of the unit (if attached).

3. Press the OPEN button

to fold down

and remove it from the unit.

4. Lift the top of the outer trim ring then pull
it out to remove it.

5. Insert both of the supplied keys into the
slots at the middle left and right sides of the
unit then pull the unit out of the dashboard.

Removing the unit

(

)

the front panel

Содержание 392301000

Страница 1: ......

Страница 2: ...6 07 General perations 0 Radio perations CD MP3 perations 1 Mixed CD perations 1 USB perations 13 SD MMC ard perations 13 AUX in perations 1 Disc otes 1 Trouble hooting 1 Specifications d Location and...

Страница 3: ...stalled either from Front conventional DIN Front mount or Rear DIN Rear mount installation utilizing threaded screw Holes at the sides of the unit chassis For details refer to the following illustrate...

Страница 4: ...erminal to the dashboard 6 Mount the sleeve by inserting the sleeve into the opening of the dashboard and bend open the tabs located around the sleeve with a screwdriver Not all tabs will be able to m...

Страница 5: ...l then gently push the front panel towards the left side before pulling it out from the unit 3 Store the front panel in the protective case provided for safe keeping Removing and protecting detachable...

Страница 6: ...ck Front Left White Front Left White Black Rear Left Green Rear Left Green Black WHITE WHITE BLACK GREEN GREEN BLACK VIOLET VIOLET BLACK GRAY GRAY BLACK FRONT 4 ohm LEFT SPEAKER REAR 4 ohm RIGHT SPEAK...

Страница 7: ...utton Repeat RPT Playback Button Preset Station 1 6 Buttons Random SHF Playback Button Playing the 10 track Button Playing the 10 track Button TA Traffic Announcement Button AF List of Alternative Fre...

Страница 8: ...the desired menu item r to select the mode of the selected item g g g BEEP ON OFF beep sound on off otate the volume control g TA SEEK or TA ALARM TA SEEK mode TA ALARM mode Note PI SOUND or PI MUTE s...

Страница 9: ...ours Rotate the volume control to choose 24 hours format or 12 hours format The car audio device is equipped with confirmation beep tone The confirmation beep sound will be heard when any button is pr...

Страница 10: ...ect a radio band Auto Manual tuning BAND Automatic search mode Manual search mode In radio mode press the button repeatedly to select a radio broadcasting band you would like to hear The 3 FM bands wi...

Страница 11: ...on mode Some broadcasting stations change their program from normal broadcasting to regional broadcasting for a certain time period AMS AMS Auto store AMS AF REG Icon AF off Icon AF on Icon AF blink A...

Страница 12: ...the previous next track Playing forward and backward Playing the 10 track up or down Scanning playback 1 Turn the power on In media CD MP3 WMA USB SD MMC playback mode press the button to interrupt t...

Страница 13: ...folder If there are no root Folder in the disc the LCD will display ROOT Searching by folder number AMS c Once the folder has been selected press the ENTER button to start play the first the track or...

Страница 14: ...the player non rechargeable battery you should remove the battery from the MP3 player and then connect it to the USB port Otherwise it may cause battery burst When reading a USB device be sure not to...

Страница 15: ...ng recommendations a Use CD RWs with speed 1x to 4x and write with speed 1x to 2x b Use CD Rs with speed 1x to 8x and write with speed 1x to 2x c Do not play a CD RW which has been written more than 5...

Страница 16: ...properly connected Check wiring connection Sound skips The installation angle is more than 30 0 Adjust the installation angle less than 300 The surface of CD is extremely dirty or has been scraped Cle...

Страница 17: ...Treble at 10 kHz 10 dB Maximum Output Power 4x75 watts Current Drain 15 Ampere max Signal to Noise Ratio 55 dB Channel Separation 40 dB Frequency Response 20Hz 20 KHz Frequency Coverage 87 5 108 0 Mhz...

Страница 18: ...WWW CALIBER NL Caliber Head Office The Netherlands Fax 31 0 416 69 90 01 E mail info caliber nl...

Отзывы: