background image

6

Installation / 

Assemb

ly

Cal Flame Side Burners

LTR20091082, Rev. A

www.calspas.com

Leak Testing Procedure

Perform a leak test at least once a year whether the gas supply cyl-

inder has been disconnected or not. In addition, whenever the gas 

cylinder is connected to the side burner or whenever any part of the 

gas system is disconnected or replaced, perform a leak test.  
As  a  safety  precaution,  remember  to  always  leak  test  your  side 

burner outdoors in a well-ventilated area.  Never smoke or permit 

sources of ignition in the area while doing a leak test.  Do not use 

a flame, such as a lighted match to test for leaks. Use a solution of 

soapy water.

Prepare a leak testing solution of soapy water by mixing in a 

1. 

spray bottle one part liquid soap to one part water.

Make sure all the control knobs are in the OFF position.

2. 

Turn on the gas.

3. 

Apply the leak-testing solution by spraying it on joints of the gas 

4. 

delivery system. Blowing bubbles in the soap solution indicates 

that a leak is present.

Stop  a  leak  by  tightening  the  loose  joint  or  by  replacing  the 

5. 

faulty part with a replacement part recommended by the manu-

facturer. Do not attempt to repair the cylinder valve if it is dam-

aged. The cylinder must be replaced.

Turn all control knobs back to the full OFF position.

6. 
If you are unable to stop a leak:

Turn all control knobs back to the full OFF position.

1. 

 Shut off the gas supply to the side burner and release pressure 

2. 

in the hose and manifold by pushing in and turning any of the 

control valves one quarter turn counter-clockwise.

 On LP systems, remove the cylinder from the side burner.

3. 

Call an authorized gas appliance service technician or an LP gas 

4. 

dealer.

Do not use the appliance until the leak is corrected.

Содержание LTR20091082

Страница 1: ......

Страница 2: ...alling Side Burner with a Grill 10 Using Your Side Burner Lighting the Side Burner 12 Basic Side Burner Operation 14 Cleaning and Maintenance Stainless Steel Care and Cleaning 15 Covering Your Side Bu...

Страница 3: ...ea surrounding your new side burner should be kept clean and free from flammable liquids and other combustible materials such as mops rags or brooms as well as solvents cleaning fluids and gasoline Do...

Страница 4: ...nd pans boil overs will cause smoking and greasy boil overs may ignite Always use the proper size pan Select utensils with flat bottoms large enough to cover the burner The use of under sized utensils...

Страница 5: ...gas and airflow to the burner ports This creates a dangerous condition that can result in a fire behind the valve pan el Inspect and clean the burners periodically and follow the guide lines in the C...

Страница 6: ...r Cal Flame side burner location access to gas lines should be considered The location with the shortest gas line run is recommended When determining a suitable location consider factors such as expo...

Страница 7: ...Consult your Cal Flame dealer for information on converting your side burner Owners must not convert their side burners themselves At tempting to convert the side burner from LP to NG may re sult in...

Страница 8: ...sure all the control knobs are in the OFF position 2 Turn on the gas 3 Apply the leak testing solution by spraying it on joints of the gas 4 delivery system Blowing bubbles in the soap solution indic...

Страница 9: ...WARNING Attempting to operate the side burner unit without the gas regulator installed could cause an explosion and possible death Cylinder Specification Any LP gas supply cylinder used with this sid...

Страница 10: ...ach opening shall have a total free area of not less than one square inch per pound 7 1 cm kg of stored fuel capacity and not less than a total free area of 10 square inches 64 5 cm Ventilation openin...

Страница 11: ...during any pressure testing of the gas supply piping system at test pressures equal to or less than 0 5 psi 3 5 kPa The side burner and its individual shutoff valve must be disconnected from the gas...

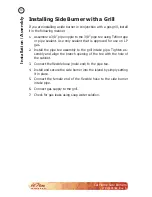
Страница 12: ...ealant Use only sealant that is approved for use on LP gas Install the pipe tee assembly to the grill intake pipe Tighten as 2 sembly and align the branch opening of the tee with the hole of the cabin...

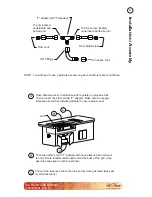
Страница 13: ...the grill Use gas rated tape seal on all connections Open barbecue door Install hose with regulator on propane tank Then connect the other end to T adapter Make sure to use gas rated tape seal when in...

Страница 14: ...side burner Do not heat sealed containers such as cans or jars on side burners Explosion may result resulting in injury or death Any sealed con tainer such as a pressure cooker must have a properly op...

Страница 15: ...closed or the back burner with its cover installed Electronically Lighting the Side Burners Open the hood 1 Keep your face as far away from the burners as possible 2 Rapidly rotate the burner knob co...

Страница 16: ...nds turn the control knobs to the OFF position Wait five minutes until the gas clears before attempting to light it again If the burner does not light after several attempts see Trouble 7 shooting Gui...

Страница 17: ...your stainless steel Although stainless steel will discolor and accumulate grime with regular use it can keep its original shine with periodic cleaning We strongly recommend using a surface protectan...

Страница 18: ...stainless steel Mild dish detergent such as Dawn Formula 409 Fantastik Sheila Shine exterior ONLY WD 40 exterior ONLY We have had best success with Sheila Shine but WD 40 works very well too Sheila Sh...

Страница 19: ...nd rub with the grain over the surface of the appliance Using a clean terry cloth or paper towel polish the appliance by rubbing with the grain until excess liquid is removed and the surface shines It...

Страница 20: ...significant rust or corrosion use a Scotch Brite scrubber Both of these products will act as a surface protectant and help resist smudges stains and rust Caution Although nitric acid also called aqua...

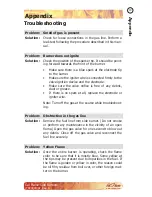
Страница 21: ...is free of any debris dust or grease If there is no spark at all replace the electrode or igniter wire Note Turn off the gas at the source while troubleshoot ing Problem Obstruction in the gas line S...

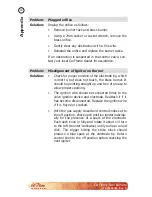
Страница 22: ...is next to but does not touch the brass burner It should be pointing straight up and free of grease to allow proper sparking The ignition wire should be connected firmly to the valve ignition device a...

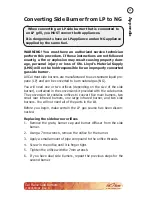
Страница 23: ...contains orifices to convert five main burners two small rear infrared burners one large infrared burner and two side burners You will not need all of the parts in the kit Before you begin make certa...

Страница 24: ...urer of the product Warranty Performance In the event of a malfunction or defect covered under the terms of this warranty a factory authorized service agent of LMS will perform the necessary repairs T...

Страница 25: ...oactive and applies to all side burners manufactured from 2000 and hereafter Legal Remedies This limited warranty gives you specific legal rights You may have other rights which may vary from state to...

Страница 26: ...result of failure to follow the operating in structions as defined in this owner s manual This Limited Warranty applies only to barbecues normally used for per sonal family or household purposes This...

Страница 27: ...Appendix 25 Cal Flame Side Burners LTR20091082 Rev A www calspas com...

Страница 28: ...er service please contact your authorized dealer immediately If you need additional information and or assistance please contact Customer Service Department 1462 East Ninth Street Pomona CA 91766 Toll...

Отзывы: