background image

4.  4Fix 4 balance legs (support) to the 

scaffold. Connect the connection tool 

between the short part of the balance 

legs to the gap between 2nd step and 

3rd step and its long part to the gap 

between 6th step and 7th step. Af-

ter making sure the tools completely 

grasp  the  carrier  profile,  tighten  the 

bakalite heads by turning. Make sure 

each balance leg wedges are in conta-

ct with the solid surface. Then place 

the 1 covered platform to the 7th step. 

Balance the scaffold according to the 

long sides and short sides by using 

water scale (Drawing 6 and 7). .


It is not mandatory to use balance legs 

for working heights lower than 2.5 m. 

However  if  the  work  applies  a  hori-

zontal  load  on  the  scaffold,  balance 

legs should be used


5.  Go on top of the platform of the 7th 

step. Place the modular frames of 

the  2nd  floor  by  passing  through 

the  modular  frames  of  the  1st  floor. 

Pass the security pins from the ho-

les of the modular frames and lock it  

(Drawing 8).

6

7

8

21


EN

Содержание ProTUBE F

Страница 1: ...1 EN Assembly and use guide PROFESSIONAL SCAFFOLDING SYSTEMS ProTUBE L S F The instructions for the assembly and use shall be followed carefully EN1004 201612 IE 1210 ...

Страница 2: ... 1 ProTUBE L Configuration Table 9 3 2 ProTUBE L6 Scaffold Assembly Method 10 3 3 ProTUBE L Wide Aluminum Scaffold System 3D Pictures 16 17 3 4 ProTUBE L Scaffold System Compounds 18 4 ProTUBE S Narrow Aluminum Scaffold System 19 1 ProTUBE S Configuration Table 19 4 2 ProTUBE S6 Scaffold Assembly Method 20 4 3 ProTUBE S Narrow Aluminum Scaffold System 3D Images 25 4 4 ProTUBE S Scaffold Systems Co...

Страница 3: ...prevention of risks towards people or objects Safety me asures for weather conditions which may negatively affect security of the ProTUBE Scaffolds Permitted load Other risks to occur as a result of abo ve mentioned assembly disassembly or transformation works The people who are responsible for the job shall be able to reach this handbook Only original Çağsan Merdiven parts should be used for asse...

Страница 4: ...y affect the balance Diagram 2 The parts and tools on the working floor of ProTUBE Scaffolds can only be manually carried If ProTUBE Scaffolds are to be pla ced on a soft surface there should be protection plates or U profiles under the wheels Diagram 3 3 Wind load should be taken into conside ration in areas that are affected by wind such as open constructions building cor ners etc Scaffold usage...

Страница 5: ... following should be considered The product is suitable for usage with ProTUBE Scaffolds ProTUBE Scaffolds allows safe ope ration in the immediate vicinity of the assembly point ProTUBE Scaffolds can be used sa fely Surface is horizontal straight and can carry necessary load amount Environmental factors such as the opening doors automatically used sunshades electricity cables above traffic and or ...

Страница 6: ...rds 2 6 Relocation of ProTUBE Scaffolds The height must be decreased to maximum 6 meters in order to move ProTUBE Scaffolds Stabilizers should be lifted maximum 10 cm in order to move ProTUBE Scaffolds Wheeled legs are liberated by lif ting the brake pedals Diagram 6 6 While moving ProTUBE Scaffolds there shouldn t be anyone and or any material on the scaffold and there shouldn t be any missing co...

Страница 7: ...b Normalwearandtearoftheproduct c Assembly or repair performed by the customer or third parties the rep lacement of spare parts provided by Çağsan Merdiven as shown in the 2nd article above is excluded 4 The faults determined during product delivery should be immediately in formed to Çağsan Merdiven If these faults are not immediately informed the guarantee shall be void In order to make a request...

Страница 8: ...crushing cracks and correct functioning of the fastening elements Platforms Check for warping crushing cracks and correct functioning of the fastening elements Check the condition of the wood Check the trapdoors for correct functi oning Toeboards Check the condition of the wood Check the toeboards for cracking Castors Check the castor for smooth running and check that the brake stops the castor ro...

Страница 9: ...12 16 20 24 Guardrail Braces H PT259H 4 9 2 2 2 2 2 2 Horizontal Braces PT259Y 2 13 2 2 8 8 14 14 Stabilizer PT276PA 4 04 4 4 4 4 4 Castor PT200TE 5 5 4 4 4 4 4 4 Toeboard PT302TM 16 17 1 1 2 2 3 3 Total Weight 133 177 279 302 410 432 120x240 cm Explanation Item Code Measurements Modular Frame 7 Steps PT223M 1355x2225x50 mm Modular Frame 5 Steps PT263M 1355x1625x50 mm Guardrail Frame PT110K 1355x1...

Страница 10: ...rizontal braces onto the 1st step and fasten it to the modular frame from the interior part Make sure the alu minum cast clamps on the corners of the connections are safely seated and locked Diagram 3 3 Place 2 diagonal braces reciprocally between the 2nd steps and 5th steps of the modular frame Make sure the aluminum cast clamps on the corners of the connections are safely seated and locked Diagr...

Страница 11: ...gap between 6th step and 7th step Af ter making sure the tools completely grasp the carrier profile tighten the bakalite heads by turning Make sure each balance leg wedges are in conta ct with the solid surface Diagram 6 and 7 It is not mandatory to use ba lance legs for working heights lower than 2 5 m However if the work app lies a horizontal load on the scaffold balance legs should be used 6 Go...

Страница 12: ... Make sure the aluminum cast clamps are safely seated and locked Diag ram 9 8 Then place the platform without trap door in line with the 3rd step of the 2nd floor while you are on the 1st floor After this process your scaffold will rise for another floor Diagram 10 9 10 12 EN ...

Страница 13: ...he 2nd floor Pass the security pint of the guardrail frames from the holes of the modular frames and lock them Diagram 11 10 Get on top of the platform with trap door on the 1st floor and carry the modular frame of the 2nd floor to the 7th step Diagram 12 Don t forget to open the wind lock while disassemb ling the platforms 11 12 13 EN ...

Страница 14: ...tal security connections of the guardrail Make sure the aluminum cast clamps are sa fely seated and locked Diagram 13 12 Place the platform you assembled on top to the corner by getting into the lower platform Remove the platform without trapdoor on the 2nd floor on which you are standing and carry it near this platform Diagram 14 13 14 14 EN ...

Страница 15: ...iagram 16 You need to repeat the steps 6 7 8 in order to increase the height of your scaffold The height of the first platform should be maximum 4 60 m and the distance betwe en the platforms should be maximum 4 20 m While changing the height act in accor dance with the configuration tables and technical diagrams Thank you for choosing Çağsan Merdi ven products 15 16 15 EN ...

Страница 16: ...16 EN ProTUBE L4 2 3 m ProTUBE L6 4 4 m ProTUBE L8 6 5 m 3 3 ProTUBE L Wide Aluminum Scaffold System 3D Pictures ...

Страница 17: ...17 EN ProTUBE L10 8 0 m ProTUBE L14 12 20 m ProTUBE L12 10 7 m 3 3 ProTUBE L Wide Aluminum Scaffold System 3D Pictures ...

Страница 18: ...lar Frame 7 Steps PT275C Diagonal Braces PT258KP Platform With Trapdoor PT276PA Stabilizer PT263M Modular Frame 5 Steps PT259Y Horizontal Braces PT258K Platform Without Trapdoor PT110K Guardrail Frame PT259H Guardrail Braces H PT200TE Castor PT302TM Toeboard ...

Страница 19: ...drail Braces H PT259H 4 0 2 2 2 Horizontal Braces PT259Y 2 0 2 2 2 Stabilizer PT276PA 4 0 4 4 Castor PT200TE 5 5 4 4 4 Toeboard PTS302TM 11 0 1 1 2 Total Weight 102 3 145 1 206 4 60x240 cm Explanation Item Code Measurements Modular Frame 7 Steps PTS223M 735x2225x50 mm Guardrail Frame PTS110K 735x1100x50 mm Platform With Trapdoor PT258KP 2575x600x80 mm Diagonal Braces PT275C 2750x50 mm Guardrail Br...

Страница 20: ...orizontal braces onto the 1st step and fasten it to the modular frame from the interior part Make sure the alu minum cast clamps on the corners of the connections are safely seated and locked Drawing 3 3 Place 2 diagonal braces reciprocally between the 2nd steps and 5th steps of the modular frame Make sure the aluminum cast clamps on the corners of the connections are safely seated and locked Draw...

Страница 21: ...h the solid surface Then place the 1 covered platform to the 7th step Balance the scaffold according to the long sides and short sides by using water scale Drawing 6 and 7 It is not mandatory to use balance legs for working heights lower than 2 5 m However if the work applies a hori zontal load on the scaffold balance legs should be used 5 Go on top of the platform of the 7th step Place the modula...

Страница 22: ...ure the aluminum cast clamps are safely seated and locked Drawing 9 7 Then carry it upwards onto the 7th step of the 2nd floor and fix it Don t forget to open the wind lock while di sassembling the platforms After this your scaffold will rise for another flo or Drawing 10 9 10 22 EN ...

Страница 23: ...g tool of the mo dular frames of the 2nd floor Pass the security pint of the guardrail frames from the holes of the modular frames and lock them Drawing 11 9 Fix the horizontal security con nections of the guardrail Make sure the aluminum cast clam ps are safely seated and locked Drawing 12 11 12 23 EN ...

Страница 24: ...awing 14 You need to repeat the steps 5 6 7 in order to increase the height of your scaffold The height of the first platform should be maximum 4 60 m and the distance betwe en the platforms should be maximum 4 20 m While changing the height act in accor dance with the configuration tables and technical diagrams Thank you for choosing Çağsan Merdiven products 13 14 24 EN ...

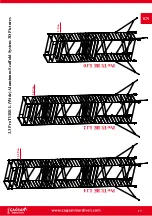
Страница 25: ...25 EN 4 3 ProTUBE S Narrow Aluminum Scaffold System 3D Ima ProTUBE S6 4 4 m ProTUBE S4 2 3 m ProTUBE S8 6 5 m ...

Страница 26: ... Systems Compounds PTS223M Modular Frame 7 Steps PT275C Diagonal Braces PT258KP Platform With Trapdoor PT276PA Stabilizer PT259Y Horizontal Braces PTS110K Guardrail Frame PT259H Guardrail Braces H PT200TE Castor PTS302TM Toeboard ...

Страница 27: ...il Braces H PTF182H 4 0 2 2 Horizontal Braces PTF182Y 2 0 1 1 Stabilizer PT276PA 4 0 4 Castor PT125TE 5 5 4 4 4 Toeboard PTF180TM 11 0 1 1 Total Weight 54 5 93 7 136 5 60x180 cm Explanation Item Code Measurements Foldable Modular Frame PTF223M 735x1925x156 mm Modular Frame 6 Steps PTF223ME 735x1800x55 mm Guardrail Frame PTS110K 735x1100x55 mm Platform With Trapdoor PTF183KP 1982x600x80 mm Diagonal...

Страница 28: ...t put Take the module to the usable position by opening it outwar ds and lock it again Drawing 2 3 3 Place the 1 horizontal connection onto the 1st step and fasten it to the modu lar frame from the interior part Fix 2 diagonal braces between the 2nd step to 5th step Make sure the aluminium cast clamps on the corners of the con nections are safely seated and locked Drawing 4 1 2 3 4 28 EN ...

Страница 29: ...een the short part of the balance legs to the gap between 1nd step and 2rd step and its long part to the gap between 6th step and 7th step After making sure the tools completely grasp the carrier profile tighten the bakalite heads by turning Make sure each balance leg wedges are in conta ct with the solid surface Drawing 7 It is not mandatory to use balance legs for working heights lower than 2 5 ...

Страница 30: ...forms After this your scaffold will rise for another flo or Drawing 9 9 Get on top of the platform you placed on the 2nd floor and put the guardrail frames into the fitting tool of the mo dular frames of the 2nd floor Pass the security pint of the guardrail frames from the holes of the modular frames and lock them Drawing 10 8 9 30 EN ...

Страница 31: ...10 Fix the horizontal security connecti ons of the guardrail Make sure the aluminum cast clamps are safely sea ted and locked Drawing 11 10 11 31 EN ...

Страница 32: ...pad in a way that it will surround the platform at the top Drawing 12 12 Your ProTUBE F360 coded product with 4 40 m stepping height is ready for usage Drawing 13 Thank you for choosing Çağsan Merdiven products 12 13 32 EN ...

Страница 33: ...33 EN 5 3 ProTUBE F Karelia Aluminum Scaffold System 3D Images ProTUBE F90 0 9 m ProTUBE F360 ProTUBE F180 3 6 m 1 8 m ...

Страница 34: ...ounds PTS223M Modular Frame 6 Steps PTS223ME Modular Frame 6 Steps PTF202C Diagonal Braces PTF183KP Platform With Trapdoor PT276PA Stabilizer PTF182Y Horizontal Braces PTS110K Guardrail Frame PTF182H Guardrail Braces H PT125TE Castor PTF180TM Toeboard ...

Страница 35: ... ...

Страница 36: ...t of this document may not be used reproduced or copied without permission in printed form or in any other electronic media Cagsan Merdiven Erisim Ekipmanları San Tic Ltd Sti Dilovası Organize Sanayi Bolgesi 3 kisim Meric Cad No 1 Muallim Koyu Gebze Kocaeli TURKEY t 90 262 759 18 08 f 90 262 759 18 78 bilgi cagsanmerdiven com tr www cagsanmerdiven com ...

Отзывы: