background image

49-2000202   Rev. 2

25

CUIDADO 

Y

 LIMPIEZA: 

Luz del Horno

Luz del Horno

NOTA: 

La tapa de vidrio deberá ser retirada sólo cuando esté 

fría. Si usa guantes de látex, tendrá un mejor agarre.
Antes de reemplazar la lámpara, desconecte la conexión 
eléctrica del horno del fusible principal o del panel del disyuntor. 
Deje que la lámpara se enfríe completamente antes de retirar la 
misma. Para su seguridad, no toque una lámpara caliente con 
una tela húmeda. Si lo hace, la lámpara se podrá romper.

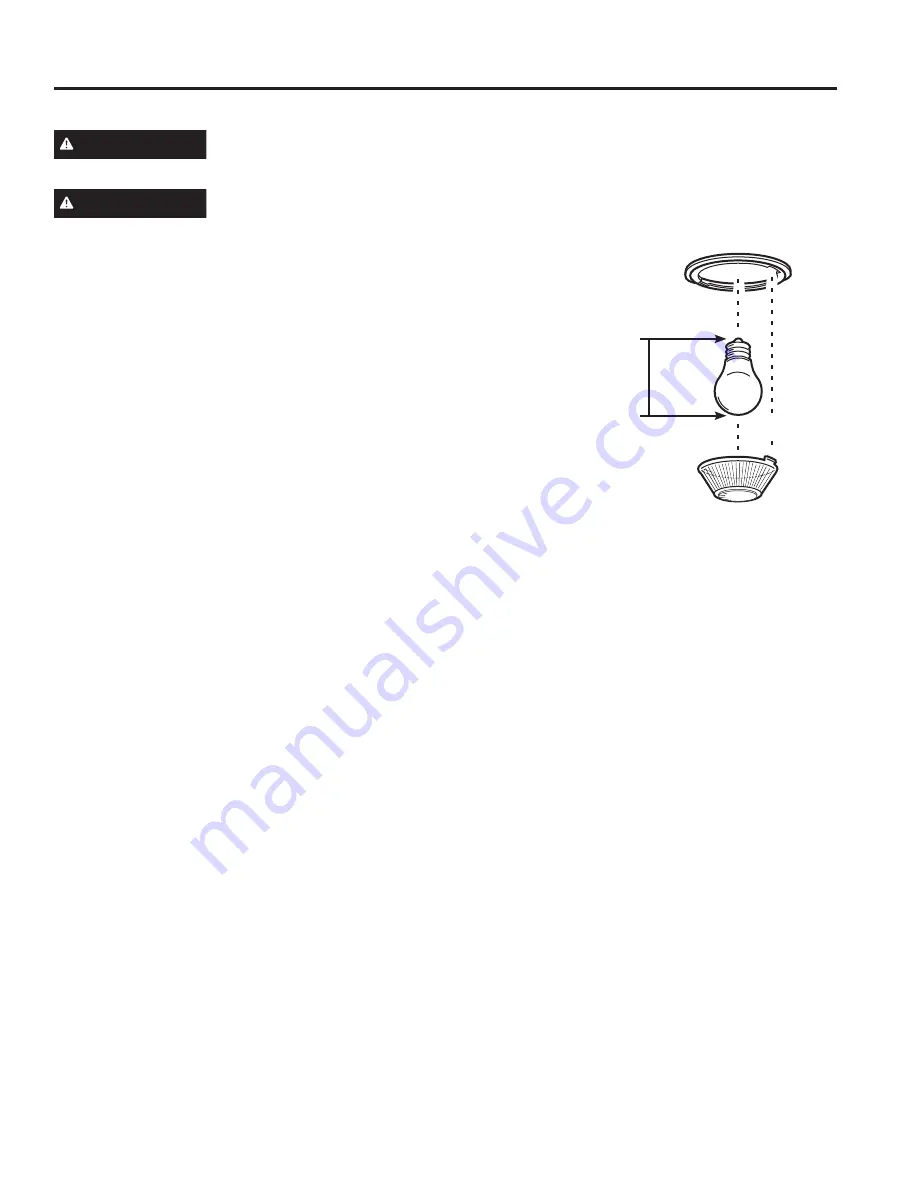
Para retirar: 

Dé a la tapa de vidrio en contra de las agujas del reloj un 
cuarto de giro hasta que las lengüetas de la tapa de vidrio 
queden fuera de las ranuras de la ficha y empuje la tapa hacia 
fuera.


Retire la lámpara.

Para reemplazar: 

Coloque una lámpara nueva de 40 watts para 
electrodomésticos. Coloque las lengüetas de la tapa de vidrio 
en las ranuras de la ficha. Dé a la tapa de vidrio un cuarto de 
giro en dirección de las agujas del reloj.

NOTA:


Ŷ /DVOiPSDUDVSDUD

electrodoméstico de 
40 watts son más 
pequeñas que las 
lámparas hogareñas 
de 40 watts.

Ŷ 9XHOYDDFRQHFWDUHO

horno una vez que la 
lámpara nueva esté 
instalada.

Ŷ 3DUDXQDPHMRU

iluminación dentro 
del horno, limpie 
la tapa del vidrio 
en forma frecuente 
utilizando una tela 
húmeda. Esto se deberá hacer cuando el horno esté 
completamente frío.

ADVERTENCIA

  PELIGRO DE DESCARGA O QUEMADURAS:

 Antes de reemplazar la lámpara de luz del horno, 

desconecte la conexión eléctrica del horno del fusible principal o del panel del disyuntor. Si esto no se 
cumple, se podrá producir una descarga eléctrica o un incendio.

PRECAUCIÓN

  RIESGO DE INCENDIO:

 La tapa de vidrio y la lámpara de luz se deberán retirar cuando estén frías. Tocar 

el vidrio caliente sin protección en las manos o con un trapo húmedo puede ocasionar quemaduras.

Reemplazo de la Lámpara del Horno

Lámpara

Ficha

Lengüeta

Longitud 
máxima 
de 

3

1

»

2

Tapa de vidrio

Содержание CGS750M

Страница 1: ...Using the Range In Case of a Power Failure 8 Surface Burners 8 Griddle 10 Oven Controls 11 Options 12 Settings 12 Sabbath Mode 14 Oven Racks 15 Aluminum Foil and Oven Liners 16 Cookware 16 Cooking Mo...

Страница 2: ...ill too Among other things registration of your appliance ensures that we can deliver important product information and warranty details when you need them Register your Caf appliance now online Helpf...

Страница 3: ...t be secured to the anti tip device properly WARNING If the information in this manual is not followed exactly a fire or explosion may result causing property damage personal injury or death Do not st...

Страница 4: ...VFUDWFKLQJ RU LPSDFWLQJ JODVV GRRUV cooktops or control panels Doing so may lead to glass breakage Do not cook on a product with broken glass Shock fire or cuts may occur R QRW OHDYH FKLOGUHQ DORQH RU...

Страница 5: ...could spread to surrounding cabinets 1HYHU OHDYH RLO XQDWWHQGHG ZKLOH IU LQJ I DOORZHG to heat beyond its smoking point oil may ignite resulting in fire that may spread to surrounding FDELQHWV 8VH D...

Страница 6: ...given off during the self cleaning cycle of any range Move birds to another well ventilated room SAFETY INFORMATION IMPORTANT SAFETY INFORMATION READ ALL INSTRUCTIONS BEFORE USING THE APPLIANCE READ A...

Страница 7: ...ng the equipment off and on the user is encouraged to try to correct the interference by one or more of the following measures 5HRULHQW RU UHORFDWH WKH UHFHLYLQJ DQWHQQD QFUHDVH WKH VHSDUDWLRQ EHWZHHQ...

Страница 8: ...ng will continue as long as the knob remains at LITE Once gas is ignited turn the knob to adjust the flame size Automatic Reignition on some models The burners on this range will automatically relight...

Страница 9: ...RWWRPHG ZRN Do not use stove top grills Top of Range Cookware Aluminum Medium weight cookware is recommended because it heats quickly and evenly Most foods brown HYHQO LQ DQ DOXPLQXP VNLOOHW 8VH VDXFH...

Страница 10: ...at your griddle by setting both center burners to 4 for 5 10 minutes before placing food on the griddle For models with a reversible griddle preheat your griddle by setting your center burner to Hi fo...

Страница 11: ...en door or pressing any key will wake and illuminate the control 6 Cancel Off Cancels ALL oven operations except the clock and timer 7 Timer Works as a countdown timer Press the Timer pad and number p...

Страница 12: ...Compatible Apple or Android devices and home WiFi network required Settings The Options and Settings pads open up more detailed menus in the display that allow access to additional functions For each...

Страница 13: ...llow the corresponding instructions included with the mating Chef Connect enabled product The range will cancel pairing mode after two minutes if no mating device is detected Select Remove to confirm...

Страница 14: ...number pads to select a different preset cooking temperature and press Start Enter 2 Since no feedback is given during temperature change an oven thermometer can be used to confirm temperature changes...

Страница 15: ...VXSSRUWV NOTE Remove unused racks when using the oven for faster preheat improved efficiency and optimal cooking performance Extension Racks on some models Extension racks have a frame that locks into...

Страница 16: ...ults These modes are described below Refer to the Cooking Guide section for rack position and other recommendations for specific modes and foods Bake The bake mode is for baking and roasting When prep...

Страница 17: ...ds mode is designed for cooking cakes breads cookies and similar foods on a single rack This mode is designed to provide lighter top browning and better volume Some foods may require slightly longer c...

Страница 18: ...ating 6HOHFW WKH GHVLUHG FRRN PRGH Bake Convection Bake or Convection Roast SDG DQG HQWHU WKH desired cooking temperature with the number pads QVHUW WKH SUREH LQWR WKH IRRG VHH 3URSHU 3UREH 3ODFHPHQW...

Страница 19: ...h modes Broil skin side down first Watch food closely when broiling For best performance when broiling center food below the broil heater or burner Boneless chicken breasts Broil Low Bake Lower 2 0RYH...

Страница 20: ...and basting liquids containing acids may cause discoloration and should be wiped up immediately Let hot surfaces cool then clean and rinse Painted Surfaces Painted surfaces include the sides of the r...

Страница 21: ...nning of this manual before using the Self Clean Mode Self Clean uses very high temperatures to clean the oven interior For a moderately soiled oven run a 3 hour self clean cycle For a heavily soiled...

Страница 22: ...enings Lift burners off when cool Wash with hot soapy water Rinse with clean water For more stubborn stains use a brush with plastic bristles NOTE Do not use steel wool or scouring pads to clean the b...

Страница 23: ...your grates in the oven if your grates have rubber bumpers Doing so will destroy the rubber bumpers and may affect the function of your surface burners Porcelain coated grates may gradually dull if co...

Страница 24: ...teel Surfaces on some models Do not use a steel wool pad it will scratch the surface To clean the stainless steel surface use warm sudsy water or a stainless steel cleaner or polish Always wipe the su...

Страница 25: ...se or circuit breaker panel Let the bulb cool completely before removing it For your safety do not touch a hot bulb with a damp cloth If you do the bulb may break To remove 7XUQ WKH JODVV FRYHU FRXQWH...

Страница 26: ...cavity and down to the locked position 5 Close the oven door Removal position Pull hinge locks up to unlock Push hinge locks down to lock Rest notch on bottom edge of hinge slot Notch Bottom edge of...

Страница 27: ...using aluminum foil on broil pan wrap tightly and add slits conforming to those in the pan to allow grease to drain Oven temperature too hot or too cold Oven temperature needs adjustment See the Cooki...

Страница 28: ...lashes in the display The self clean cycle has been selected but the door is not closed Close the oven door F and a number or letter flash in the display You have a function error code Press the Cance...

Страница 29: ...ff The oven gas shut off is located on the gas regulator near the gas line attachment to your range Locate it and flip the lever My oven door glass appears to be tinted or have a rainbow color The inn...

Страница 30: ...Caf Gas Range Limited Warranty EXCLUSION OF IMPLIED WARRANTIES Your sole and exclusive remedy is product repair as provided in this Limited Warranty Any implied warranties including the implied warran...

Страница 31: ...lable Accessories Accessories Freestanding Gas Knobs and Handles Front Control Gas Knobs and Handles Nickel Flat Rack Reinforced Nickel Flat Rack Self Clean Flat Rack Nickel Extension Rack Self Clean...

Страница 32: ...y and learn about special discounts that are available while your warranty is still in effect You can purchase it on line anytime Caf Service will still be there after your warranty expires Q WKH 86 c...

Страница 33: ...Contenido Informaci n de Seguridad 3 Uso de la Cocina En Caso de Corte de Corriente 8 Quemadores 8 Plancha 10 Controles del Horno 11 Options Opciones 12 Settings Configuraciones 12 Modo Sab tico 14 E...

Страница 34: ...tro de su electrodom stico asegura que podamos entregarle informaci n importante del producto y detalles de la garant a cuando los necesite Registre su electrodom stico Caf ahora a trav s de Internet...

Страница 35: ...ea todas las instrucciones de seguridad antes de utilizar este producto No seguir estas instrucciones puede generar un incendio una descarga el ctrica lesiones corporales o la muerte LEA Y GUARDE ESTA...

Страница 36: ...cto con un vidrio roto Es posible que se produzcan descargas incendio o cortes 1R GHMH D ORV QLxRV VRORV R IXHUD GH VX UDGLR GH DWHQFLyQ en el rea donde el electrodom stico se encuentre en uso Nunca s...

Страница 37: ...de incendio O LQKDELOLWDU HO ORTXHR GHO RQWURO GH DV HQ DOJXQRV modelos aseg rese de que los controles de superficie se encuentren en la posici n OFF Apagado Esto evitar que haya un flujo de gas no i...

Страница 38: ...no frotar da ar ni mover la junta IMPORTANTE La salud de algunas aves es extremadamente sensible a los humos emitidos durante el ciclo de limpieza autom tica de cualquier cocina Coloque las aves en ot...

Страница 39: ...equipo se aconseja al usuario que intente corregir la interferencia con una de las siguientes medidas 5HRULHQWH R UHXELTXH OD DQWHQD UHFHSWRUD XPHQWH OD VHSDUDFLyQ HQWUH HO HTXLSR HO UHFHSWRU RQHFWH...

Страница 40: ...un per odo de tiempo prolongado sin un utensilio de cocina sobre la parrilla El acabado de la parrilla se puede resquebrajar si no hay un utensilio de cocina que absorba el calor No intente desensambl...

Страница 41: ...l Calor Se pueden usar para cualquier superficie o para cocci n en el horno Conduce el calor de forma muy lenta y se enfr a de forma muy r pida Consulte las instrucciones del fabricante de utensilios...

Страница 42: ...4 durante entre 5 y 10 minutos antes de colocar comida sobre la plancha En los modelos con plancha reversible precaliente esta ltima configurando ambos quemadores centrales en Hi Alto durante entre 5...

Страница 43: ...activar n e iluminar n el control 6 Cancel Off Cancelar Apagar Cancelar TODAS las operaciones del horno excepto el reloj y el temporizador 7 Timer Temporizador Funciona como un temporizador con cuent...

Страница 44: ...QHDU RQYHFWLRQ DNH RUQHDU por Convecci n y Convection Roast Dorar por Convecci n Se requiere el uso de dispositivos y de una red WiFi hogare a que sean compatibles con Apple o Android Settings Configu...

Страница 45: ...ct La cocina cancelar el modo de emparejamiento luego de dos minutos si no es detectado ning n dispositivo para emparejar Seleccione Remove Retirar para confirmar que el producto est emparejado o para...

Страница 46: ...eclas num ricas de 1 a 5 para seleccionar una temperatura de cocci n actual diferente y presione Start Enter Iniciar Ingresar 2 Debido a que no hay ninguna indicaci n durante el cambio de temperatura...

Страница 47: ...re los estantes en desuso al usar el horno para un precalentamiento m s r pido mayor eficiencia y un rendimiento ptimo de la cocci n Estantes Extensibles en algunos modelos Los estantes extensibles cu...

Страница 48: ...comendaciones para comidas espec ficas consulte la secci n de la Gu a de Cocci n Recuerde que es posible que su nuevo horno funcione de manera diferente que aquel que est reemplazando Bake Hornear El...

Страница 49: ...HG RRGV 3URGXFWRV RUQHDGRV IXH GLVHxDGR para cocinar tortas panes galletas y comidas similares en un solo estante Este modo fue dise ado para brindar un dorado superior m s leve y un mejor volumen Alg...

Страница 50: ...UWH OD VRQGD MXVWR DUULED GH OD agalla en la zona m s carnosa paralela a columna Uso de la Sonda La sonda de temperatura s lo puede ser usada con las IXQFLRQHV DNH RUQHDU RQYHFWLRQ DNH RUQHDU SRU Conv...

Страница 51: ...atenci n a la comida al asarla Para un mejor rendimiento centre la comida debajo del elemento que emite calor para asar o del quemador Hornear Dorado por Convecci n DNH Convection Roast Inferior 2 Use...

Страница 52: ...er n limpiar de inmediato Deje que las superficies calientes se enfr en y luego limpie y enjuague Superficies pintadas Las superficies pintadas incluyen los lados de la cocina y la puerta la parte sup...

Страница 53: ...m tica Este modo usa temperaturas muy altas para limpiar el interior del horno Para un horno moderadamente sucio use un ciclo de limpieza autom tica de 3 horas S lo los estantes del horno de limpieza...

Страница 54: ...use un cepillo con cerda pl stica NOTA No use lana de acero ni estropajos para limpiar las partes del quemador ya que podr n bloquear las aberturas Nunca lave las cabezas de los quemadores en el lavav...

Страница 55: ...s de porcelana se podr n volver gradualmente speras si son expuestas de forma continua a las temperaturas de limpieza autom tica Si su horno est equipado con estantes de limpieza autom tica negros se...

Страница 56: ...xidable en algunos modelos No use virutas de acero stas da ar n la superficie Para limpiar la superficie de acero inoxidable use agua tibia con jab n o un limpiador o pulidor para acero inoxidable Sie...

Страница 57: ...las ranuras de la ficha D a la tapa de vidrio un cuarto de giro en direcci n de las agujas del reloj NOTA DV OiPSDUDV SDUD electrodom stico de 40 watts son m s peque as que las l mparas hogare as de 4...

Страница 58: ...ierre la puerta del horno Posici n de retiro Empuje los bloqueos de las bisagras hacia arriba para desbloquearlos Empuje trabas de la bisagra hacia abajo para bloquear Apoye la abertura en el extremo...

Страница 59: ...aquellos en la olla para permitir que la grasa sea drenada La temperatura del horno es demasiado caliente o demasiado fr a La temperatura del horno debe ser ajustada Consulte la secci n Modos de Cocci...

Страница 60: ...e bloqueo TRABA DE LA PUERTA titila en la pantalla El ciclo de limpieza autom tica fue seleccionado pero la puerta no est cerrada Cierre la puerta del horno XQ Q PHUR o letra titila en la pantalla Tie...

Страница 61: ...El apagado del gas del horno est ubicado en el regulador de gas cerca de la adherencia de la tuber a de gas a la cocina Ubique la misma y d vuelta la palanca La puerta de vidrio del horno parece esta...

Страница 62: ...XHULGR 6ROLFLWH HO VHUYLFLR WpFQLFR SDUD UHSDUDU R UHHPSOD DU ODV l mparas excepto las l mparas LED EXCLUSI N DE GARANT AS IMPL CITAS Su nica y exclusiva alternativa es la reparaci n del producto como...

Страница 63: ...o Perillas y Manijas del Control Frontal Estante Plano de N quel Estante Plano Reforzado de N quel Estante Plano con Limpieza Autom tica Estante Extensible de N quel Estante Extensible con Limpieza Au...

Страница 64: ...especiales que est n disponibles mientras su garant a a n est vigente La puede adquirir en cualquier momento a trav s de Internet Los servicios de Caf a n estar n all cuando su garant a caduque En EE...

Отзывы: