background image

©2020 CAE 905K803052 

27

Setup Procedure

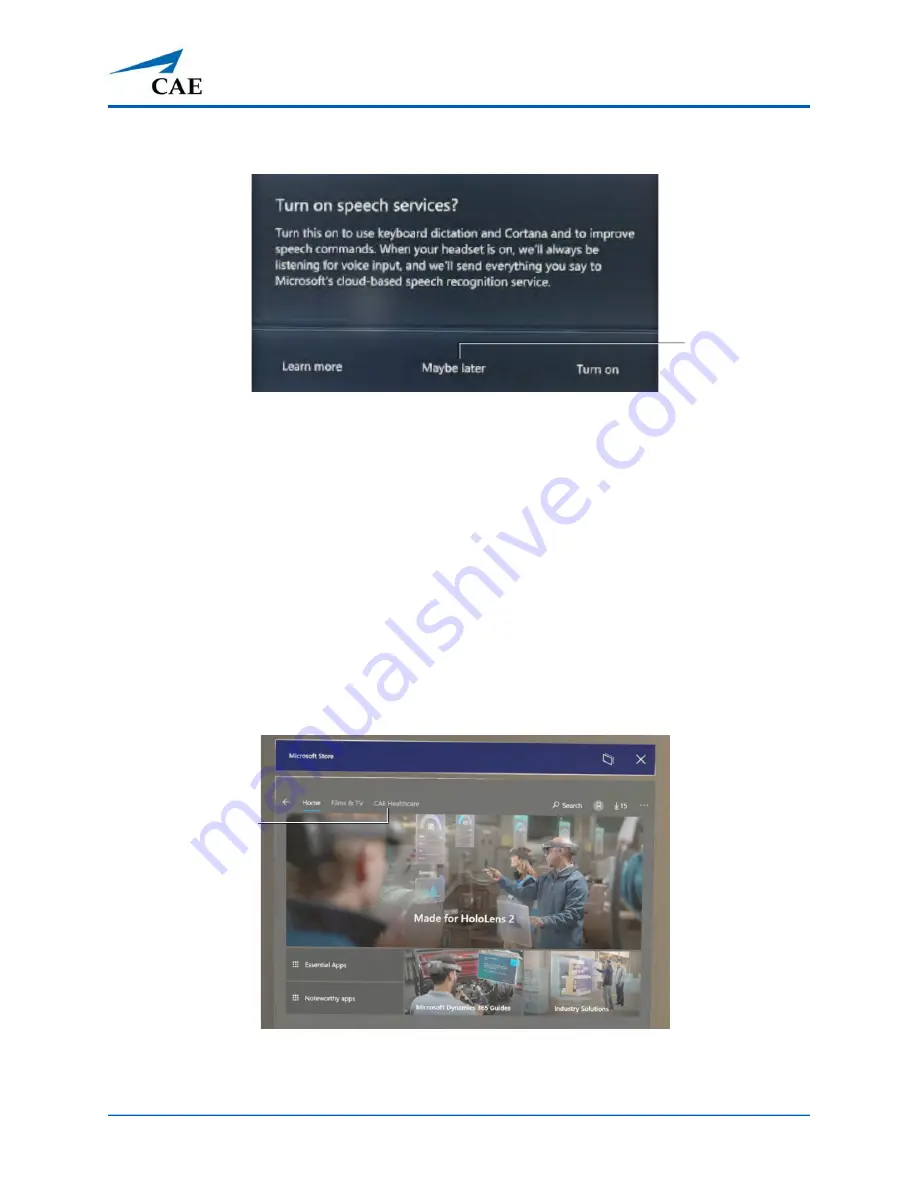
j. When prompted, do not turn on speech services. Air Tap the 

Maybe later

 button.

Speech Services Settings - Maybe Later Button

k. Repeat steps a through k until there are no more HoloLens 2 operating system updates

to download and install.

Step 9: Install and Update the 

CAE


VimedixAR App

To install the 

CAE 

VimedixAR App:

a. From the Hololens 2 home screen, Air Tap the Microsoft Store icon and use the Azure

Active Directory Account that was assigned to you at the time of your purchase to locate

the CAE Healthcare tab. If you require assistance, contact CAE Customer Service.

b. Air Tap on the CAE Healthcare tab.

Microsoft Store - CAE Healthcare Tab

c.


Air Tap on the 

CAE 

VimedixAR App, then Air Tap the 

Install


button.

Maybe later


button

CAE

Healthcare

tab

Содержание VimedixAR

Страница 1: ...Your worldwide training partner of choice User Guide with HoloLens 2...

Страница 2: ...include but are not limited to Apollo Ares AresAR Athena BabySIM Caesar CathLabVR EndoVR HPS Human Patient Simulator iStan Juno LapVR Lucina LucinaAR Luna Maestro Muse NeuroVR Orion PediaSIM Vimedix V...

Страница 3: ...mmon Menu Gesture 9 Gaze 11 Air Tap Gesture 12 Air Tap and Hold Gesture 13 Hand Ray Gesture 13 Zoom and Rotate 14 Resizing Holograms and App Windows 15 Follow Me Stop Following 15 Voice Commands 15 Bu...

Страница 4: ...d Update the CAE VimedixAR App 27 Step 10 Download Updates from Microsoft Store 29 Step 11 Configure the Start Menu 31 Step 12 Start CAE VimedixAR Pathologies 32 CAE VimedixAR User Interface UI 33 Mov...

Страница 5: ...K803052 iii Contents Exercises 54 Region Scan Exercise 54 Find Fluids Exercise 59 End the Simulation 64 Power Off the Hololens 2 64 Troubleshooting 65 Wireless Connection Issue 65 Warnings 66 Care and...

Страница 6: ...Contents iv 2020 CAE 905K803052 CAEVimedixAR THIS PAGE INTENTIONALLY LEFT BLANK...

Страница 7: ...On devices where the AC prongs are removable and where the power supply uses a universal adapter before plugging the AC adapter into a power outlet make sure the prong assembly is of the proper confi...

Страница 8: ...al images including flashing lights or patterns that may appear in virtual environments The risk of photosensitive epileptic seizures may be reduced by taking the following precautions Use the HoloLen...

Страница 9: ...ensitivities To reduce the risk of skin irritation Wipe your device dry with a cloth if it gets wet Avoid using lotions or other products under the portions of HoloLens that contact your head Do not w...

Страница 10: ...Cautions and Warnings 4 2020 CAE 905K803052 CAEVimedixAR THIS PAGE INTENTIONALLY LEFT BLANK...

Страница 11: ...ps docs microsoft com en us hololens hololens2 setup Setup Hololens 2 https docs microsoft com en us hololens hololens2 start Using Gestures https docs microsoft com en us hololens hololens2 basic usa...

Страница 12: ...Helpful Links 6 2020 CAE 905K803052 CAEVimedixAR THIS PAGE INTENTIONALLY LEFT BLANK...

Страница 13: ...rdware go to this link https docs microsoft com en us hololens hololens2 hardware Component Description Visor The visor can be lifted up while wearing the Hololens 2 Headband Tighten or expand the hea...

Страница 14: ...Equipment Overview 8 2020 CAE 905K803052 CAEVimedixAR THIS PAGE INTENTIONALLY LEFT BLANK...

Страница 15: ...olens 2 The Gesture Frame HoloLens 2 has sensors that can see a few feet to either side of the user When gestures are used they must be kept inside that frame for HoloLens 2 to detect them As the user...

Страница 16: ...lm facing you 2 You will see a wrist button appear over your inner wrist Tap this wrist button using your other hand Wrist Button 3 The Start menu or navigation menu will open 4 To close the menu repe...

Страница 17: ...he wrist button Gaze at Wrist Button then Pinch Note This applies to all menus Each time you need to open a menu use the Summon Menu gesture This gesture is shown at the following link https docs micr...

Страница 18: ...ted Gaze Air Tap Gesture Use Air Tap along with Gaze to select apps and other holograms To use Air Tap 1 Gaze at a hologram 2 Hold your hand straight out in front of you in a loose fist 3 Point your i...

Страница 19: ...or side to side to drag it to the desired location Pin unpin or uninstall an app Air Tap and hold the app icon in the Start menu or in the All apps menu then Air Tap pin unpin or uninstall Air Tap ag...

Страница 20: ...tool appears then slowly move your hand up and down or side to side To scroll faster move your hand farther from the center of the tool Grab Grab an app window or hologram to target the app title bar...

Страница 21: ...ase your fingers to place it One or both hands can be used to perform these actions Note These gestures are shown at the following link https docs microsoft com en us hololens hololens2 basic usage Fo...

Страница 22: ...launching CAE VimedixAR walk around with the HoloLens 2 on your head so it can map the surroundings Microsoft suggests doing this for between 5 and 10 minutes to look at the ceiling the floor and oth...

Страница 23: ...different from using Windows on other devices Instead of moving the cursor with a mouse you use your gaze instead of moving a mouse and hand gestures instead of clicking or tapping Use in Safe Surrou...

Страница 24: ...wly and look around to get a feel for how the virtual objects and the outside world interact For most people discomfort should decrease as you get more practice over your first few sessions Take Perio...

Страница 25: ...Plug the power supply into a power outlet to charge the HoloLens 2 When the device is charging the battery indicator lights up in a wave pattern NOTE Put the HoloLens 2 in sleep mode by briefly press...

Страница 26: ...justment left or right then loosen the overhead strap Hololens 2 Overhead Strap LED Action Indication Scrolling Center Outward HoloLens 2 is Starting All on HoloLens 2 is On and Charging battery life...

Страница 27: ...e front of the overhead strap unhook the strap and slide it through the retractable loop on the brow pad To attach the back of the overhead strap push the connection tabs into the slots until they cli...

Страница 28: ...Note LED lights near the power button indicate the current battery level For more information on the battery LED light indicators see the Charge the Hololens 2 section of this user guide c Use the Sum...

Страница 29: ...ied via email phone or standard mail Note The update process can take several hours to complete depending on the speed of your WiFi network connection Prior to starting the update process ensure that...

Страница 30: ...Settings Window Update Security Icon h Air Tap the Check for updates button even if it says You re up to date If any HoloLens 2 operating system updates are available they begin to download and instal...

Страница 31: ...Update the CAE VimedixAR App To install the CAE VimedixAR App a From the Hololens 2 home screen Air Tap the Microsoft Store icon and use the Azure Active Directory Account that was assigned to you at...

Страница 32: ...To update the CAE VimedixAR App a From the Microsoft Store Air Tap the Download icon for the VimedixAR application Note The download may take a few minutes to complete You can follow the progress of t...

Страница 33: ...h when it appears at the bottom of the Launch button Microsoft Store Launch Button d Raise your hand palm facing you to view the Interactive Panel on the User Interface Verify that the app version num...

Страница 34: ...re icon with one of the following methods Air Tap along with Gaze Use Hand Ray or Near Interaction and follow the voice command prompt by saying Microsoft Store when it appears at the bottom of the Mi...

Страница 35: ...To unpin Air Tap and hold on the unpin icon d Air Tap the Get Updates button with one of the following options Use Air Tap along with Gaze Use Hand Ray or Near Interaction and follow the voice comman...

Страница 36: ...the Unpin or Pin options respectively IMPORTANT Be careful not to select the Uninstall option when unpinning an application Step 12 Start CAE VimedixAR Pathologies To start CAE VimedixAR Pathologies s...

Страница 37: ...ong the left side and nine Hologram Control buttons along the right side They can be selected by using Air Tap along with Gaze The following information in this section explains the functionality of e...

Страница 38: ...rface UI 34 2020 CAE 905K803052 CAEVimedixAR Note The unlocked UI will be boxed in orange when it is in your grasp and boxed in blue when it is not in your grasp Unlocked UI Enabled for Transition Unl...

Страница 39: ...its left side Information Multi user Calibration Exercises Demo Help Information Menu The Interactive Panel displays the Loaded Pathology e g E FAST_Template or Normal Patient 3 and the Shared Experi...

Страница 40: ...Experience Mode in VimedixAR If the Shared Experience Mode is set to Individual control is given over the other HoloLens by selecting the Instructor option If your Shared Experience Mode is set to Ins...

Страница 41: ...ed or Calibrated and an overview of the calibration procedure steps when the Calibration button is selected You must choose which side of the manikin you want to calibrate from Interactive Panel Calib...

Страница 42: ...ibration by using Gaze Air Tap the Use Gaze button at the bottom of the Calibration menu To end the calibration Air Tap the End button at the bottom of the Calibration menu Note When connected to Vime...

Страница 43: ...luids exercises To begin the setup that is required prior to starting the Region Scan or Find Fluids exercise select the Start button located directly below the description of the respective exercise...

Страница 44: ...Demonstration Menu To start the Shared Demo select the Shared Demo button on the Interactive Panel Note The Shared Demo button is only enabled when your Shared Experience Mode is set to Instructor To...

Страница 45: ...displays the most useful voice commands that are compatible with VimedixAR when the Help button is selected Air Tap the Help button to open the Help menu Interactive Panel Help Menu Ultrasound Panel T...

Страница 46: ...on Button Icon Button Name Description Adjust Menu Locked Pins the object or menu in place Adjust Menu Unlocked Unpins the object or menu allowing it to be moved Left Cross Section Displays a cross se...

Страница 47: ...l manikin so that the anatomy is 10 cm below eye level also unlocks the zoom rotation and displacement gesture Normal Displays the anatomy selected in the Structures Visibility menu on the Vimedix sys...

Страница 48: ...CAE VIMEDIXAR User Interface UI 44 2020 CAE 905K803052 CAEVimedixAR THIS PAGE INTENTIONALLY LEFT BLANK...

Страница 49: ...f the field of view with the message Place the hologram using the tag Now place the provided T button on the table below the right ear of the Physical manikin with the arrow facing the head When the H...

Страница 50: ...n Vimedix Move Lateral Left Moves the Hologram manikin 1 cm to the left relative to the Physical manikin Vimedix Move Lateral Right Moves the Hologram manikin 1 cm to the right relative to the Physica...

Страница 51: ...ect the stand control symbol of the calibration gizmo to incline the Hologram manikin at a 45 on its left side to match the inclination of the physical manikin when it is configured with both stands T...

Страница 52: ...Calibration Procedure 48 2020 CAE 905K803052 CAEVimedixAR THIS PAGE INTENTIONALLY LEFT BLANK...

Страница 53: ...If you don t see the VimedixAR app icon in the Start menu Air Tap the All Apps icon to the right of the menu 4 Air Tap and hold the VimedixAR icon then Air Tap Pin to pin the app to the Start menu 5...

Страница 54: ...Cross Section Removes the cross sectional view of the hologram anatomy Show Layers Expands the different anatomical systems into layers above the Physical manikin Raise Anatomy Raises the anatomy sel...

Страница 55: ...emo Shared Demo Mode The Shared Demo mode option is only enabled if a user s Shared Experience Mode is set to Instructor and they are connected to Vimedix This mode gives the Instructor the opportunit...

Страница 56: ...dent It is important that each HoloLens is calibrated so that all four corners of the Fitbox are visible FitBox The FitBox disappears from each user s field of view when the Instructor selects any of...

Страница 57: ...may or may not be connected to the Vimedix system The Local Demo mode provides Individual users with the opportunity to become acquainted with some of the features of VimedixAR even if they are not c...

Страница 58: ...just Menu Left Cross Section Right Cross Section No Cross Section and Pause Probe All other buttons including Hologram Controls are disabled during Exercises Region Scan Exercise The objective of the...

Страница 59: ...panel which include the following FAST protocol regions Right Upper Quadrant Left Upper Quadrant Pelvic Pericardial Right Pleural Left Pleural Interactive Panel Instructor Mode Region Scan Parameters...

Страница 60: ...he bottom of the menu to begin the Region Scan exercise The timer starts when the Region Scan exercise begins and is visible in the middle of the Interactive Panel Interactive Panel Instructor Mode Re...

Страница 61: ...icated non scanned areas The visual aids representing the selected FAST protocol regions will also appear at this point regardless of whether they were enabled during the setup of the Region Scan Exer...

Страница 62: ...metrics Total distance traveled cm Total angular movement deg Percent scanned Interactive Panel Student Exercise Status Completed Per the instructions near the bottom the Region Scan Results also incl...

Страница 63: ...mination to locate free fluid in the shortest time possible This exercise is only performed by the Instructor and observed by the Student s Find Fluids Exercise Instructor In this Find Fluids exercise...

Страница 64: ...lt In this case the simulator randomly selects none one or several free fluid locations Selecting the Custom option allows for the selection of one or several free fluid locations To scan all free flu...

Страница 65: ...he Interactive Panel Interactive Panel Instructor Mode Find Fluids Exercise Timer 4 After locating the free fluid s select one or several of the following region s where the free fluid may be located...

Страница 66: ...ts indicate scanned areas Red points indicated non scanned areas The visual aids representing the selected FAST protocol regions will also appear at this point regardless of whether or not they were e...

Страница 67: ...ed the Interactive Panel displays the Instructor s Find Fluids Results which include the following metrics Total distance traveled cm Total angular movement deg Affected region s Interactive Panel Stu...

Страница 68: ...the upper right corner of the VimedixAR Startup window to exit and close the window 3 Glance around the environment and verify that all virtual windows have been closed Power Off the Hololens 2 You m...

Страница 69: ...nu 2 Select the Settings icon using one of the following methods Use Air Tap along with Gaze Use Gaze and follow the voice command prompt by saying Settings when it appears at the bottom of the Settin...

Страница 70: ...icon will appear prompting further action If the problem cannot be resolved please contact CAE customer service Warning Icon Warnings are displayed on the Interactive Panel under the Information tab...

Страница 71: ...the network cable The Hololens 2 is not connected to the Vimedix WiFi network Refer to the Setup Procedure section of this user guide for more information on how to verify this connection The current...

Страница 72: ...take a few seconds No pathology loaded This warning message will appear when Vimedix is turning ON or OFF When Vimedix is running load one of the following pathologies that are supported by VimedixAR...

Страница 73: ...hing the visor when possible as repeated cleaning could cause damage DO NOT use cleaners or solvent DO NOT submerge in water or apply water directly to the Hololens 2 To clean the visor Remove the bro...

Страница 74: ...h a medical 70 isopropyl alcohol Gently wipe the surface of the device Allow the device to dry completely before using To clean the brow pad Wipe the brow pad with a microfiber cloth moistened with wa...

Страница 75: ...8 00 a m to 5 00 p m ET Phone 1 877 223 6273 Email can service cae com Customer Service Europe Middle East and Africa Monday Friday from 8 00 a m to 5 00 p m CET Phone 49 0 6131 4950354 Email interna...

Отзывы: