background image

37

KRISS

3

- TECNA

3

- EVO

3

- ELISE

3

- SHELL

3

- CRISTAL

3

- GLASS - VERVE AT - PRETTY AT - TITANIA AT - VENERE AT - BREEZE AT

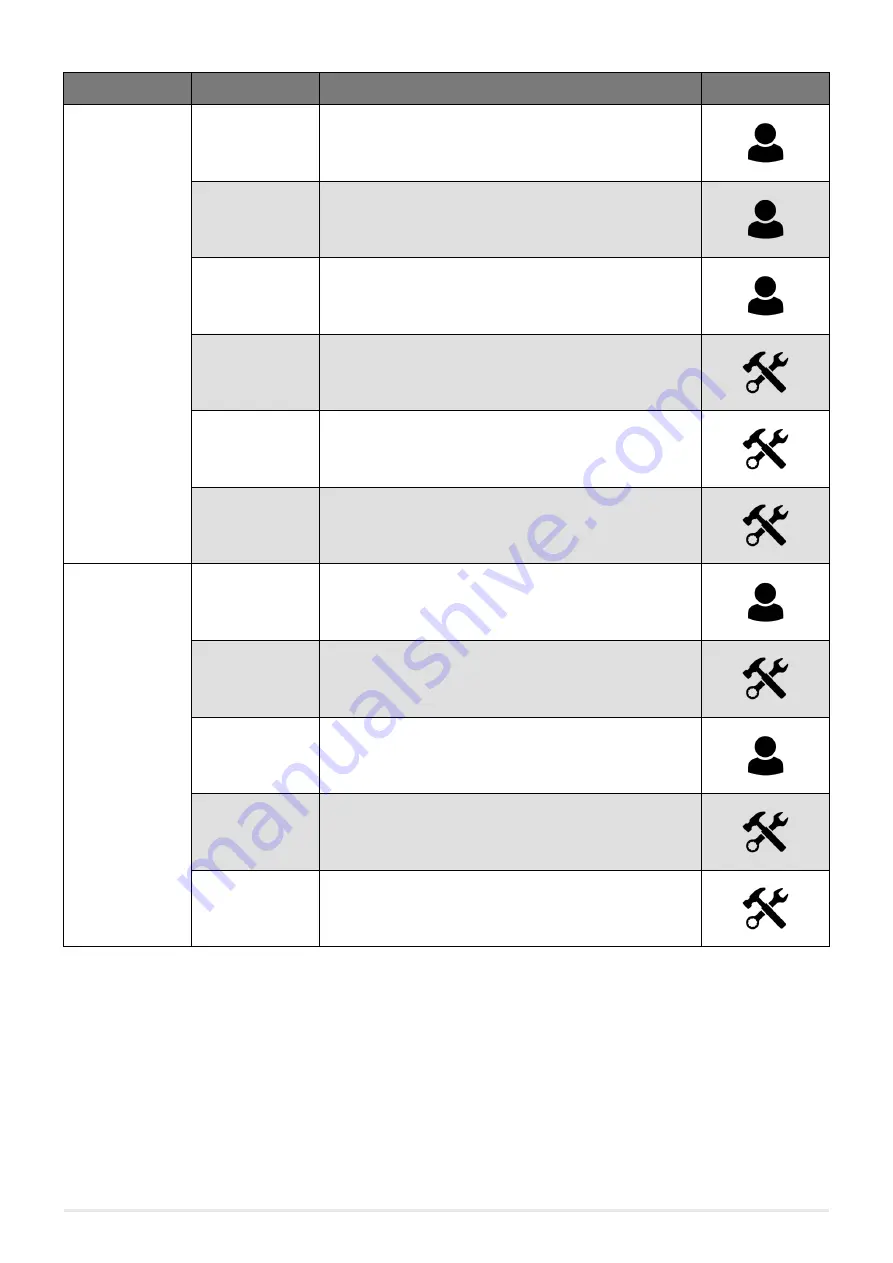
PROBLEM

CAUSE

SOLUTION

INTERVENTION

Pellets do not 

reach the combu-

stion chamber

Empty hopper

Full the hopper.

Open fire door or 

open pellet door

Close fire door and pellet door and check that there are no 

pellet grains at the gasket level.

Clogged stove

Fume chamber cleaning

Auger blocked by a 

foreign object (for 

example nails)

Clean the auger.

The auger geared 

motor is out of 

order

Replace the geared motor.

Check if on the 

display there is an 

"ACTIVE ALARM"

Have the stove checked.

The fire extinguish 

and the stove stops

Empty hopper

Full the hopper.

Auger blocked by a 

foreign object (for 

example nails)

Clean the auger.

Bad quality pellets Try other types of pellets.

Pellet drop value 

too low "phase 1" Adjust the pellet loading.

Check if on the 

display there is an 

"ACTIVE ALARM"

Have the stove checked.

Содержание KRISS3

Страница 1: ...ER MANUAL Pellet Stove EN 2019CADELsrl Allrightsreserved Tuttiidirittiriservati KRISS3 TECNO3 EVO3 ELISE3 SHELL3 CRISTAL3 GLASS VERVE AIRTIGHT PRETTY AIRTIGHT BREEZE AIRTIGHT TITANIA AIRTIGHT VENERE A...

Страница 2: ...N 11 5 2 OVERALL DIMENSIONS 12 5 3 GENERAL INSTALLATION 20 5 4 STOVE DOOR REMOVAL INSTALLATION 21 5 5 EVO3 SIDE PANELS ASSEMBLY 21 5 6 MOUNTINGTHEVERVE AIRTIGHT SIDE PANELS 22 5 7 MOUNTINGTHE GLASS DO...

Страница 3: ...the AuthorizedTechnician and or the Specialized Stove repairer WARNING symbols indicates an important note 2 PACKAGING AND HANDLING 2 1 PACKAGING Thepackagingismadeupofrecyclablecardboardboxesaccordin...

Страница 4: ...ey Flue has been drawn up in cooperation with Assocosma www assocosma org and is based on European Standards EN 15287 EN 13384 EN 1856 EN 1443 and UNI 10683 2012 It provides instructions for a good an...

Страница 5: ...himney manufacturer The chimney entrance must be placed in the same room where the appliance is installed or otherwise in the adjacent room and it must be provided with a solid and condensation collec...

Страница 6: ...se of doubts please follow the most restrictive regulations Haveyourchimneyflueandchimneypotcheckedandcleanedbyanexpertchimneysweepatleastonceaweek Thechimney sweep has to release a written declaratio...

Страница 7: ...obligatory to check that all pipes are realized in compliance with the following regulation on material selection EN 1856 1 EN 1856 2 e UNI TS 11278 All must be effected by specialized personnel or c...

Страница 8: ...cleaning the inspection plugs are sealed with its efficient gasket It is forbidden to exhaust flue gases directly from the wall towards the outside and closed spaces also at open top The fume conduit...

Страница 9: ...aterial 2 Inspectionplug 3 Chimneyinspectionentrance 4 Minimumsafetydistance 0 5mt 5 Inclination 3 6 Levelsection 1mt Old chimney flue with an inserted pipe of minimum 100 120 mm and with an external...

Страница 10: ...airinlet The room must be endowed with an external air recycling for a good climate in your ambient The air inflow from outside to the inner occurs directly through an opening on the external wall of...

Страница 11: ...ecessary to verify the minimum distances required for the combustible air inlet as for example an open door or window causes a vortex which could remove the combustible air necessary to the stove see...

Страница 12: ...e Check with local authorities if there are any restrictive regulations which regard the combustible air inlet room ventilation fume exhaust system together with chimney flue and chimney pot Check if...

Страница 13: ...ERVEAT PRETTYAT TITANIAAT VENEREAT BREEZEAT 5 2 OVERALL DIMENSIONS Fig 17 Generaldimensions Tecna3 LEGEND Fig 17 1 49 1cm 2 96 1cm 3 48 8cm 4 23 8cm 5 32 5cm 6 16cm 7 Exhaustfumesd 8cm 8 Holecombustio...

Страница 14: ...T 14 LEGEND Fig 18 1 52 8cm 2 94 1cm 3 52 8cm 4 23 8cm 5 32 5cm 6 17 3cm 7 Exhaustfumesd 8cm 8 Holecombustionairinletd 6cm 9 21 5cm Fig 19 Generaldimensions Kriss3 LEGEND Fig 19 1 52 8cm 2 94 1cm 3 52...

Страница 15: ...AL3 GLASS VERVEAT PRETTYAT TITANIAAT VENEREAT BREEZEAT Fig 20 Generaldimensions Elise3 LEGEND Fig 20 1 62cm 2 100cm 3 52cm 4 23 8cm 5 32 5cm 6 22 5cm 7 Exhaustfumesd 8cm 8 Holecombustionairinletd 6cm...

Страница 16: ...EAT 16 LEGEND Fig 21 1 55 9cm 2 100 8cm 3 55 9cm 4 19 4cm 5 32 4cm 6 21 5cm 7 Exhaustfumesd 8cm 8 Holecombustionairinletd 6cm 9 45 Fig 22 Generaldimensions Glass LEGEND Fig 22 1 49 2cm 2 96 2cm 3 54 6...

Страница 17: ...ASS VERVEAT PRETTYAT TITANIAAT VENEREAT BREEZEAT Fig 23 Generaldimensions VerveAirtight LEGEND Fig 23 1 46 6cm 2 106cm 3 51 6cm 4 23 8cm 5 32 5cm 6 17 3cm 7 21 5cm 8 Holecombustionairinletd 6cm 9 Exha...

Страница 18: ...18 LEGEND Fig 24 1 45 6cm 2 97cm 3 50 6cm 4 20 8cm 5 32 4cm 6 13 8cm 7 Holecombustionairinletd 6cm 8 Exhaustfumesd 8cm 9 17 9cm Fig 25 Generaldimensions PrettyAirtight LEGEND Fig 25 1 51cm 2 97cm 3 5...

Страница 19: ...VEAT PRETTYAT TITANIAAT VENEREAT BREEZEAT Fig 26 Generaldimensions TitaniaAirtight VenereAirtight LEGEND Fig 26 1 50cm 2 97cm 3 50cm 4 20 8cm 5 32 4cm 6 16 1cm 7 Exhaustfumesd 8cm 8 Holecombustionairi...

Страница 20: ...EREAT BREEZEAT 20 LEGEND Fig 27 1 52 3cm 2 114cm 3 57 5cm 4 27cm 5 31 8cm 6 26 7cm 7 Exhaustfumesd 8cm 8 Holecombustionairinletd 6cm 9 45 Fig 28 Generaldimensions Shell3 Up LEGEND Fig 28 1 52 3cm 2 11...

Страница 21: ...TTYAT TITANIAAT VENEREAT BREEZEAT Fig 29 Generaldimensions TitaniaAirtight VenereAirtight LEGEND Fig 26 1 50cm 2 97cm 3 50cm 4 20 8cm 5 32 4cm 6 16 1cm 7 Exhaustfumesd 8cm 8 Holecombustionairinletd 6c...

Страница 22: ...E DOOR REMOVAL INSTALLATION DOOR REMOVAL For some operations e g side panel assembly and cleaning you must remove the stove door To remove the door Open the door Use a screwdriver to rotate the lever...

Страница 23: ...Fig 34 Foldflaps Fig 35 Insertsidepanels Fig 36 Positioncover 5 6 MOUNTING THE VERVE AIRTIGHT SIDE PANELS Remove the front panel loosen the 4 screws see Fig 37 Hook the coloured panels fit the front p...

Страница 24: ...Tighten the screws on the bushes on the glass 4 screws with round heads and 2 screws with flat heads see Fig 40 Position the glass on the metal door hook the screws heads on the door s holes see Fig 4...

Страница 25: ...oldtabs Fig 46 Slidethepanelon MAJOLICA AND STONE Remove the door see STOVE DOOR REMOVAL INSTALLATION a pag 22 Loosen the rear and front screws of the side panel see Fig 47 and remove it see Fig 48 Fi...

Страница 26: ...s indicated below Loosen the 4 back screws see Fig 51 Unhook the back side panels see Fig 52 To assemble proceed in reverse order Fig 51 Removescrews Fig 52 Unhookthesidepanels To disassemble the fron...

Страница 27: ...move the right side panel Loosen the 6 back screws see Fig 55 Loosen the 4 front screws and remove the side panels see Fig 56 and Fig 57 To assemble proceed in reverse order Fig 55 Loosenscrews Fig 56...

Страница 28: ...g 69 Remove the side panels see Fig 70 To assemble proceed in reverse order Fig 61 Loosenscrews Fig 62 Removesidepanels 5 13 SHELL3 SHELL3 PS SHELL3 UP COATING REMOVAL To access the internal stove par...

Страница 29: ...rontprofileremoval rhandlh Fig 66 Rearscrewsremoval Fig 67 Removetheuppercoquefromabove Fig 68 Removethelowercoquebypullingit towardsyou 5 14 GLASS SIDE PANEL DISASSEMBLY To access the internal stove...

Страница 30: ...s see Fig 72 Open the side and release it from the teeth see Fig 73 To assemble proceed in reverse order Fig 71 Topremoval Fig 72 Removescrews Fig 73 Removingthesidepanel 5 16 ELECTRIC CONNECTION Warn...

Страница 31: ...zed technician Connect the wires from the external thermostat to the Term opt terminal on the stove board Activate the external thermostat default setting OFF as indicated below Press the menu button...

Страница 32: ...cribed in the following paragrafs Fumeoutletpipes fumeconduit chimneyflue chimneypot mustalwaysbecleaned scrubbedandcheckedbyanautho rized technician in compliance with local regulations with the inst...

Страница 33: ...Remove the gear motor by loosening the locking screw see Fig 79 Fig 80 Spiralremoval Fig 81 Bearingremoval Remove the spiral see Fig 80 If worn remove the bearing see Fig 81 and replace it To reassem...

Страница 34: ...tove brushtheexchangerwallstoletdustfallintothe lower compartment Remove the upper deflector see Fig 84 vacuum any ash and clean the internal combustion chamber walls After cleaning repeat the operati...

Страница 35: ...ecommend cleaning the G grid on the stove back see Fig 87 and theV fans to remove any dust or dirt in order to guarantee high performance see Fig 88 Every year clean the room fan to remove ash or dust...

Страница 36: ...ame Technician has the duty to check if the parame tersofthemotherboardcorrespondtothoseofthetableyouown Incaseofdoubtsregardingtheuseofthestove pleasecontactALWAYStheAuthorizedTechnicianonorderto avo...

Страница 37: ...ove Fume chamber cleaning Auger blocked by a foreign object for example nails Clean the auger The auger geared motor is out of order Replace the geared motor Check if on the display there is an ACTIVE...

Страница 38: ...ed It can be noxious to health to let the stove running without fume fan The exchanger fan continues to turn even though the stove has just cooled Faulty fume tem perature probe Replace the fume probe...

Страница 39: ...block the system When this flashing message appears upon start up it means that the preset operating hours have elapsed before mainte nance Contact the service centre 8 TECHNICAL DATAS 8 1 FUSE REPLAC...

Страница 40: ...Max 274 44 mg Nm3 274 44 mg Nm3 274 79 mg Nm3 MediumPOWDERCONTENTSat13 O2 Min Max 19 3 13 4 mg Nm3 19 3 13 4 mg Nm3 19 3 14 mg Nm3 CHIMNEY DEPRESSION Min Max 7 7 11 5 Pa 7 7 11 5 Pa 7 7 11 6 Pa ON SH...

Страница 41: ...274 79 mg Nm3 274 79 mg Nm3 274 79 mg Nm3 MediumPOWDERCONTENTSat13 O2 Min Max 19 3 14 mg Nm3 19 3 14 mg Nm3 19 3 14 mg Nm3 CHIMNEY DEPRESSION Min Max 7 7 11 6 Pa 7 7 11 6 Pa 7 7 11 6 Pa ON SHARED CHIM...

Страница 42: ...Nm3 274 79 mg Nm3 274 63 mg Nm3 MediumPOWDERCONTENTSat13 O2 Min Max 19 3 14 mg Nm3 19 3 14 mg Nm3 19 3 12 1 mg Nm3 CHIMNEY DEPRESSION Min Max 7 7 11 6 Pa 7 7 11 6 Pa 7 7 11 7 Pa ON SHARED CHIMNEY FLU...

Страница 43: ...2 Min Max 274 79 mg Nm3 274 79 mg Nm3 274 79 mg Nm3 MediumPOWDERCONTENTSat13 O2 Min Max 19 3 14 mg Nm3 19 3 14 mg Nm3 19 3 14 mg Nm3 CHIMNEY DEPRESSION Min Max 7 7 11 6 Pa 7 7 11 6 Pa 7 7 11 6 Pa ON S...

Страница 44: ...274 79 mg Nm3 274 79 mg Nm3 274 63 mg Nm3 MediumPOWDERCONTENTSat13 O2 Min Max 19 3 14 mg Nm3 19 3 14 mg Nm3 19 3 12 1 mg Nm3 CHIMNEY DEPRESSION Min Max 7 7 11 6 Pa 7 7 11 6 Pa 7 7 11 7 Pa ON SHARED C...

Страница 45: ...Min Max 274 63 mg Nm3 274 63 mg Nm3 MediumPOWDERCONTENTSat13 O2 Min Max 19 3 12 1 mg Nm3 19 3 12 1 mg Nm3 CHIMNEY DEPRESSION Min Max 7 7 11 7 Pa 7 7 11 7 Pa ON SHARED CHIMNEY FLUE NO NO FUME OUTLET DI...

Страница 46: ...NOTE...

Страница 47: ...CADEL srl 31025 S Lucia di Piave TV Via Foresto sud 7 Italy Tel 39 0438 738669 Fax 39 0438 73343 www cadelsrl com www free point it Rev 01 2018...

Отзывы: