background image

Chapter 2: Installation

2-8

HSIM-G01/G09 User’s Guide

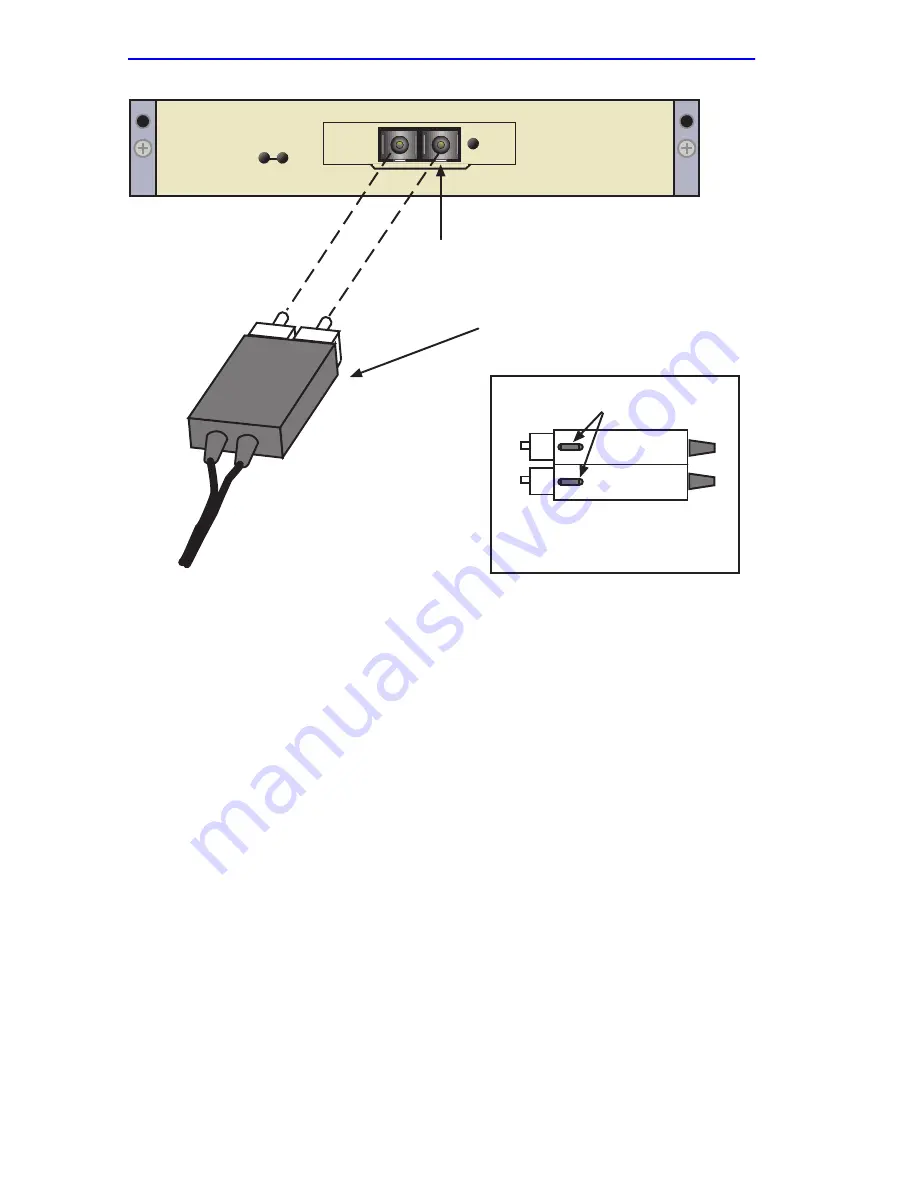
Figure 2-4

Fiber Connections

3.

At the other end of the fiber optic cable, attach the SC connector to the 
other device.

4.

Verify that a link exists by checking that the link (LNK) LED is ON 
(solid green), the port receive (RX) LED is ON (flashing amber, 
blinking green, or solid green). Refer to 

Chapter 3

 for the layout of the 

LEDs. If the RX LED is OFF and the transmit (TX) LED is not 
blinking amber, perform the following steps until it is ON:

a.

Check that the power is turned on for the device at the other end of 
the link.

b.

Verify proper crossover of fiber strands between the port on the 
HSIM-G and the fiber optic device at the other end of the fiber 
optic link segment.

c.

Verify that the fiber connection meets the dB loss specifications 
outlined in 

Appendix A

.

SC Connector

Key Latch (bottom of SC Connector)

(bottom view)

keys

SC Connector

HSIM-G

LNK

SX

Содержание HSIM HSIM-G01

Страница 1: ...HSIM G01 G09 User s Guide HSIM G LNK SX 9032398 04 ...

Страница 2: ......

Страница 3: ...ademarks or registered trademarks of their respective companies FCC NOTICE This device complies with Part 15 of the FCC rules Operation is subject to the following two conditions 1 this device may not cause harmful interference and 2 this device must accept any interference received including interference that may cause undesired operation NOTE This equipment has been tested and found to comply wi...

Страница 4: ...is equipment is used in a domestic environment radio disturbance may arise When such trouble occurs the user may be required to take corrective actions CABLETRON SYSTEMS INC PROGRAM LICENSE AGREEMENT IMPORTANT Before utilizing this product carefully read this License Agreement This document is an agreement between you the end user and Cabletron Systems Inc Cabletron that sets forth your rights and...

Страница 5: ...ES IN NO EVENT SHALL CABLETRON OR ITS SUPPLIERS BE LIABLE FOR ANY DAMAGES WHATSOEVER INCLUDING WITHOUT LIMITATION DAMAGES FOR LOSS OF BUSINESS PROFITS BUSINESS INTERRUPTION LOSS OF BUSINESS INFORMATION SPECIAL INCIDENTAL CONSEQUENTIAL OR RELIANCE DAMAGES OR OTHER LOSS ARISING OUT OF THE USE OR INABILITY TO USE THIS CABLETRON PRODUCT EVEN IF CABLETRON HAS BEEN ADVISED OF THE POSSIBILITY OF SUCH DAM...

Страница 6: ...trotechnical Standardization When operating within their performance limitations laser transceiver output meets the Class 1 accessible emission limit of all three standards Class 1 levels of laser radiation are not considered hazardous SAFETY INFORMATION CLASS 1 LASER TRANSCEIVERS LASER RADIATION AND CONNECTORS When the connector is in place all laser radiation remains within the fiber The maximum...

Страница 7: ...5022 EN 50082 1 EN 60950 Equipment Type Environment Networking Equipment for use in a Commercial or Light Industrial Environment We the undersigned hereby declare under our sole responsibility that the equipment packaged with this notice conforms to the above directives Manufacturer Legal Representative in Europe Mr Ronald Fotino Mr J Solari ___________________________________ ____________________...

Страница 8: ...Notice vi HSIM G01 G09 User s Guide ...

Страница 9: ...e 2 5 2 3 Connecting to the Network 2 6 2 3 1 HSIM G Network Connection 2 7 2 3 2 HSIM G09 Connection Using Multimode Cable 2 9 CHAPTER 3 CHAPTER 4 LOCAL MANAGEMENT 4 1 Navigating Local Management Screens 4 1 4 2 Gigabit Ethernet Configuration Screen 4 2 4 2 1 Configuring the HSIM G Port 4 4 4 2 1 1 Setting the Operational Mode 4 5 4 2 1 2 Setting the Advertised Ability 4 5 APPENDIX A SPECIFICATIO...

Страница 10: ...Contents viii HSIM G01 G09 User s Guide ...

Страница 11: ... the HSIM G01 Figure 1 1 HSIM G01 NOTE The HSIM G01 and HSIM G09 function identically with one exception the HSIM G01 uses a short wavelength laser device that connects to 50 or 62 5 micron multimode fiber optics and the HSIM G09 uses a long wavelength laser device that connects to 50 or 62 5 micron multimode fiber optics or 10 micron single mode fiber optics Both devices are referred to as the HS...

Страница 12: ...rm and how to connect to the network Chapter 3 LANVIEW LEDs describes how to use the HSIM G LEDs to monitor the HSIM performance and status Chapter 4 Local Management describes the HSIM G Local Management statistics screens and configuration Appendix A Specifications lists the operating specifications and regulatory compliance of the HSIM G 1 2 DOCUMENT CONVENTIONS The following conventions are us...

Страница 13: ...stems products in the network A description of your network environment layout cable type etc Network load and frame size at the time of trouble if known The device history i e have you returned the device before is this a recurring problem etc Any previous Return Material Authorization RMA numbers World Wide Web http www cabletron com Phone 603 332 9400 Internet mail support cabletron com FTP ftp...

Страница 14: ...r optics The HSIM G09 module supports 1000Base LX offering one SC fiber optic connector for 50 or 62 5 micron multimode fiber optics or 10 micron single mode fiber optics The HSIM G only operates in full duplex mode 1 4 2 LANVIEW Diagnostic LEDs Cabletron Systems provides a visual diagnostic and monitoring system called LANVIEW The HSIM G LANVIEW LEDs help you quickly identify transmit and receive...

Страница 15: ...le refer to the applicable interface module User s Guide 4 After removing the module from its non conductive bag visually inspect the device If you notice any signs of damage contact Cabletron Systems immediately Refer to Section 1 3 for instructions Only qualified personnel should install or service this unit NOTE Before attempting to use the HSIM G you should be familiar with the IEEE 802 3z spe...

Страница 16: ...rts of the interface module 2 Attach the antistatic wrist strap refer to the instructions outlined on the interface module User s Guide 3 If the module is in a chassis unlock the top and bottom plastic locking tabs of the module faceplate and remove the module from the chassis 4 Lay the module down with the internal components facing up 5 Refer to Figure 2 1 and remove the two faceplate mounting s...

Страница 17: ...ith the HSIM pins on the module 9 Press down firmly on the back of the HSIM G until the connector slides all the way onto the pins CAUTION When installing the HSIM G ensure that the HSIM pins on the module or device align with the HSIM G connector to prevent bending the pins This can damage both the HSIM G and the module Standoff Screws Faceplate Mounting Screws HSIM Coverplate coverplate Host Pla...

Страница 18: ...saved in step 6 12 Reinstall the interface module in the chassis 13 Reattach the network cabling to the module Figure 2 2 Installing the HSIM G NOTE Ensure that the standoffs on the interface module align with the standoff screw holes on the HSIM G Faceplate Mounting Screws 2398_hsiminstall Standoffs HSIM Connector HSIM G Standoff Screws Connector Connector Cutaway View of Connector Host Platform ...

Страница 19: ...rews 6 Remove the four standoff screws Save the screws 7 Refer back to Figure 2 2 and place the HSIM G behind the standalone device faceplate 8 Align the HSIM connector of the HSIM G with the pins on the standalone device 9 Press down firmly on the back of the HSIM G until the pins slide all the way into the HSIM connector 10 Secure the HSIM G to the module faceplate using the mounting screws save...

Страница 20: ...eck the fiber specifications in Appendix A for each HSIM G carefully before connecting an HSIM G to the network Figure 2 3 HSIM G Port Designations Ensure that the chassis cover is in place before reconnecting the power cord NOTES An odd number of crossovers preferably one must be maintained between like devices so that the transmit port of one device is connected to the receive port of the other ...

Страница 21: ...er to Section 2 3 2 before following this procedure CAUTION The HSIM G uses Class 1 lasers Do not use optical instruments to view the laser output The use of optical instruments to view laser output increases eye hazard When viewing the output optical port power must be removed from the network adapter NOTE Leave the protective fiber port covers in place when the connectors are not in use to preve...

Страница 22: ...or the layout of the LEDs If the RX LED is OFF and the transmit TX LED is not blinking amber perform the following steps until it is ON a Check that the power is turned on for the device at the other end of the link b Verify proper crossover of fiber strands between the port on the HSIM G and the fiber optic device at the other end of the fiber optic link segment c Verify that the fiber connection...

Страница 23: ...for the HSIM G09 2 Once the Launch Mode Conditioning cable is connected to the ends of the premises multimode fiber cable return to Section 2 3 1 to complete the installation to the HSIM G09 device NOTE When using premises multimode fiber cable for the HSIM G09 long wave length transceiver connect Launch Mode Conditioning cable as detailed in the following procedure This procedure is not needed wh...

Страница 24: ...Chapter 2 Installation 2 10 HSIM G01 G09 User s Guide ...

Страница 25: ...LEDs This chapter describes how to use the LANVIEW LEDs to monitor the status of the HSIM G and diagnose problems Figure 3 1 shows the location of the HSIM G LEDs Figure 3 1 HSIM G LANVIEW LEDs Transmit TX Receive RX Link LNK 2398_leds HSIM G LNK SX ...

Страница 26: ...Color Definition Transmit Green Flashing Activity port enabled Amber Blinking Port in standby Off No activity port enabled Red Flashing Transmit fault Red Diagnostic failure Receive Green Solid Indicates port has successfully negotiated with link partner If Auto Negotiate is disabled this indicates optical link Green Blinking Link port disabled Amber Flashing Link activity Port enabled Off No link...

Страница 27: ...onal A Local Management terminal is properly configured and connected to the host interface module or standalone device in which the HSIM G resides 4 1 NAVIGATING LOCAL MANAGEMENT SCREENS In order to view the specific Local Management screen for the HSIM G you must navigate through a series of Local Management screens via the host platform Figure 4 1 shows a typical hierarchy of screens that you m...

Страница 28: ...gabit Ethernet Configuration screen navigate through the Local Management screens until the Module or Device Specific Configuration Menu screen displays Use the arrow keys to highlight the High Speed Interface Configuration menu item and press ENTER The Gigabit Ethernet Configuration screen Figure 4 2 displays Password Module Configuration Menu 2398 hierarch Module Specific Configuration Menu Gene...

Страница 29: ...a physical connection from this port to another gigabit Ethernet port One of the following values displays Link There is a link signal present and a valid physical connection to another device No Link There is no link signal present and no valid physical connection to another device NA The port has not completed its auto negotiation Firmware Revision XX XX XX Gigabit Ethernet HSIM 1 Configuration ...

Страница 30: ...not support Auto Negotiation 1000Base XFD should be selected The link partners must match on both sides of the link Section 4 2 1 describes how to manually configure the HSIM G Advertised Ability Read Only Displays the current advertised ability which is 1000Base XFD 4 2 1 Configuring the HSIM G Port In normal operation an HSIM G port automatically establishes a link when set to Auto Negotiation w...

Страница 31: ... port only operates in 1000Base XFD and Auto Negotiation is disabled 3 Use the arrow keys to highlight the SAVE command Press ENTER The message SAVED OK displays and Local Management saves the changes to memory The selected mode is displayed in both the Desired Operational Mode field and the Current Operational Mode field 4 2 1 2 Setting the Advertised Ability The HSIM G auto negotiates using 1000...

Страница 32: ...Chapter 4 Local Management 4 6 HSIM G01 G09 User s Guide ...

Страница 33: ...ber cable and the HSIM G09 supports both multimode and single mode SMF fiber cable as indicated in Table A 1 below To use multimode fiber with the HSIM G09 Launch Mode Conditioning cable must be used Refer to Section 2 3 2 for details A 1 GIGABIT ETHERNET SPECIFICATIONS The following specifications for the HSIM G meet the IEEE 802 3z specifications A 1 1 HSIM G01 Specifications 1000Base SX Table A...

Страница 34: ...l Bandwidth 850 nm Range 62 5 µm MMF 160 MHz km 2 220 Meters 62 5 µm MMF 200 MHz km 2 275 Meters 50 µm MMF 400 MHz km 2 500 Meters 50 µm MMF 500 MHz km 2 550 Meters Table A 3 HSIM G09 Optical Specifications 62 5 µm MMF 50 µm MMF 10 µm MMF Transmit Power minimum 11 5 dBm 11 5 dBm 11 dBm Receive Sensitivity 19 dBm 19 dBm 19 dBm Link Power Budget 7 5 dBm 7 5 dBm 8 dBm Modal Bandwidth 1300 nm Range 62...

Страница 35: ...ensions 3 18H x 16 51W x 29 21D cm 1 25H x 6 5W x 11 5D in Weight 2 27 kg 5 lb MTBF Predicted 200 000 hours Operating Temperature 5 C to 40 C 41 F to 104 F Storage Temperature 30 C to 73 C 22 F to 164 F Operating Relative Humidity 5 to 90 non condensing Safety UL 1950 CSA C22 2 No 950 EN60950 IEC 950 and 73 23 EEC Electromagnetic Compatibility EMC FCC Part 15 EN 55022 CSA C108 8 EN 50082 1 VCCI V ...

Страница 36: ...Appendix A Specifications A 4 HSIM G01 G09 User s Guide ...

Отзывы: