background image

34

Owner’s manual

EN

CAUTION

TO  REDUCE  THE  RISK  OF  ELECTRIC 

SHOCK,  DO  NOT  REMOVE  COVER 

(OR  BACK).  NO  USER  SERVICEABLE 

PARTS INSIDE, REFER SERVICING TO 

QUALIFIED SERVICE PERSONNEL.

12) Unplug this apparatus during lighting 

storms  or  when  unused  for  long  periods 

of time.

13) Refer all servicing to qualified service 

personnel. Servicing is required when the 

apparatus has been damaged in anyway, 

such as power-supply cord or plug is dam-

aged,  liquid  has  been  spilled  or  objects 

have fallen into the apparatus, the appara-

tus has been exposed to rain or moisture, 

does  not  operate  normally,  or  has  been 

dropped.

14) Mains plug is used as the disconnect 

device, the disconnect device shall remain 

readily operable.

15) The ventilation should not be impeded 

by covering the ventilation openings with 

items,  such  as  newspapers,  table-cloth, 

curtains, etc.

16)  No  naked  flame  sources,  such  as 

lighted candles, should be placed on the 

apparatus.

17) Attention should be drawn to the envi-

ronmental aspects of battery disposal.

18) The use of apparatus in moderate cli-

mate.

19) The apparatus shall not be exposed to 

dripping or splashing and that no objects 

filled with liquids, such as vases, shall be 

placed on the apparatus.

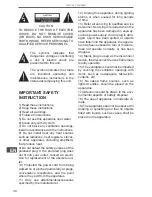
The  symbol  indicates  that 

dangerous  voltages  constituting 

a  risk  of  electric  shock  are 

present within this unit.

The  symbol  indicates  that  there 

are  important  operating  and 

maintenance  instructions  in  the 

Iiteraturaccompanying this unit.

IMPORTANT SAFETY 

INSTRUCTION

1) Read these instructions.

2) Keep these instructions.

3) Heed all warnings.

4) Follow all instructions.

5) Do not use this apparatus near water.

6) Clean only with dry cloth.

7) Do not block any ventilation openings, 

install in accordance with the instructions.

8)  Do  not  install  near  any  heat  sources 

such as radiations, heat registers, stoves, 

or  other  apparatus  (including  amplifiers) 

that produce heat.

9) Do not defeat the safety purpose of the 

polarized plug. If the provided plug does 

not fit into your outlet, consult an electri

-

cian for replacement of the obsolete out-

let.

10) Protected the power cord from being 

walked on or pinched particularly at plugs, 

convenience  receptacles,  and  the  point 

where they exit from the apparatus.

11)  Only  use  attachments/accessories 

specified by the manufacturer.

Содержание URZ4024

Страница 1: ...PL DE RO Bedienungsanleitung Instrukcja obsługi Manual de utilizare EN User s manual URZ4024 LED TV 24 URZ4032 LED TV 32 ...

Страница 2: ......

Страница 3: ...nglich bleiben 15 Die Belüftung darf nicht behindert werden indem die Lüftungsöffnungen mit Gegenständen wie Zeitungen Tischdeck en Vorhängen usw bedeckt werden 16 Keine offenen Flammen wie bren nende Kerzen dürfen auf das Gerät gestellt werden 17 Es sollte auf die Umweltaspekte bei der Batterieentsorgung geachtet werden 18 Die Verwendung von Geräten in gemäßigtem Klima 19 Das Gerät darf nicht Tro...

Страница 4: ...m vermeiden von Feuer oder der Ge fahr eines Elektroschocks darf das Gerät nicht Regen oder Feuchtigkeit ausgesetzt werden Warnung Keine Objekte in die Schlitze oder Öff nungen des Fernsehgerätes stecken oder fallen lassen Schütten Sie niemals irgen deine Art von Flüssigkeit auf das Fernse hgerät Achtung Das Stromkabel nicht unter dem Fernseh gerät einklemmen Achtung Nie auf den Fernsehgerät oder ...

Страница 5: ...ie das TV Gerät im Zimmer an einem Ort auf wo das Licht nicht auf den Bildschirm fällt Totale Dunkelheit oder eine Reflexion auf dem Bildschirm kann eine Belastung der Augen verursachen Weiche und indirekte Beleuchtung ist für angenehmes Fernsehen zu empfehlen Lassen Sie genügend Abstand zwischen TV Gerät und der Wand um ausreichende Belüftung zu gewährleisten Vermeiden Sie übermäßig warme Orte um...

Страница 6: ...leitung URZ4024 1 Legen Sie das Fernsehgerät mit dem Bildschirm nach unten auf eine flache Ober fläche Bildschirm mit einem Tuch schützen Suchen Sie den Boden des Ständers 2 Befestigen Sie den Boden auf dem Ständer durch festes anziehen der Schraube ...

Страница 7: ...leitung URZ4032 1 Legen Sie das Fernsehgerät mit dem Bildschirm nach unten auf eine flache Ober fläche Bildschirm mit einem Tuch schützen Suchen Sie den Boden des Ständers 2 Befestigen Sie den Boden auf dem Ständer durch festes anziehen der Schraube ...

Страница 8: ... Anzeige des HAUPTMENÜS 3 CH CH Im TV Modus drücken Sie CH oder CH zur Auswahl des Kanals auf wärts und abwärts Im MENÜ Modus drücken Sie CH oder CH zur Auswahl der Einstellungen 4 VOL VOL Regeln der Lautstärke MENÜ Modus drücken Sie VOL oder VOL zum Einstellen des aus gewählten Menüpunktes 5 STANDBY Drucken dieser Taste zum Einzus chalten des Gerätes aus dem Bere itschaftsmodus Erneutes drucken v...

Страница 9: ...C Netzstecker YPbPr Eingang VIDEO AUDIO Ein gang SPDIF Ausgang SCART Seitwärts AV Anschlüsse URZ4024 Anschlüsse von links nach rechts USB HDMI2 HDMI1 Kopfhörer CI PC Audio VGA RF Hinweis Stecken Sie die Kopfhörerbuchse in den Anschluss KOPFHÖRER am Gerät die Lautsprecher werden stumm geschaltet ...

Страница 10: ...O AUDIO Ein gang SPDIF Ausgang SCART Seitwärts AV Anschlüsse URZ4032 Anschlüsse von links nach rechts USB HDMI2 HDMI1 Kopfhörer CI PC Audio VGA RF Hinweis Stecken Sie die Kopfhörerbuchse in den Anschluss KOPFHÖRER am Gerät die Lautsprecher werden stumm geschaltet Antenne Adapter nicht im Lieferumfang enthalten ANT 75Ω Antenne ...

Страница 11: ...rbinden Sie die VGA und Au dio Kabel 2 Verbinden Sie das Stromkabel 3 Schalten Sie das TV Gerät ein und gehen in den PC Modus 4 PC einschalten Hinweis Diese Sequenz ist sehr wichtig Auflösung V Freq Hz H Freq Hz 800 600 60 37 88 640 480 60 31 47 1024 768 60 48 36 1280 1024 60 63 98 1360 768 60 47 7 1920 1080 60 66 64 ...

Страница 12: ...ten Bitte beachten Sie die Anleitung des Gerätes für problemloses anschließen Sie können die Eingangsanschlüsse am TV Gerät hinten wie folgt verwenden Es kann an folgende Geräte angeschlossen werden VCR Multi Disk Player D D Camcorder Videospiele oder Stereo System usw YPbPr ist mit folgenden Videoformaten kompatibel 480i 576i 480p 576p 720p 1080i Gelb Video Weiß Audio L Rot Audio R oder Pr Blau P...

Страница 13: ...ten Bitte beachten Sie die Anleitung des Gerätes für problemloses anschließen Sie können die Eingangsanschlüsse am TV Gerät hinten wie folgt verwenden Es kann an folgende Geräte angeschlossen werden VCR Multi Disk Player D D Camcorder Videospiele oder Stereo System usw YPbPr ist mit folgenden Videoformaten kompatibel 480i 576i 480p 576p 720p 1080i Gelb Video Weiß Audio L Rot Audio R oder Pr Blau P...

Страница 14: ...oder DTV Modus 13 VOL Einstellen der Lautstärke 14 ZAHLENTASTEN Für direkten Zugriff auf die Sender 15 AUDIO Auswahl der verfügbaren Audio sprachen von TV Sendungen 16 MUTE Ton aus oder einschalten Stummschaltung 17 Im USB Modus benutzt als Taste Nächste im Teletext Modus als Taste Liste 18 Im USB Modus benutzt als Taste Vorherige im Teletext Modus als Taste Halten 19 Im Teletext Modus benutzt als...

Страница 15: ...ie diesen Vorgang um eine andere Seite zu betrachten Wenn der Zähler weiter sucht bedeutet dies dass die Seite nicht übertragen wird Wählen Sie eine andere Nummer DIREKTER ZUG RIFF AUF EINE SEITE Farbige Schaltflächen sind als an der Unterseite des Bild schirms angezeigt Die 4 farbigen Tasten werden verwendet um auf die Elemente oder entsprechenden Seiten zuzugreifen Die farbigen Schaltflächen bli...

Страница 16: ... zu ändern Drücken Sie die Taste OK zum bestätigen Wählen Sie die gewünschte Menüsprache 2 Drücken Sie die Tasten zur Auswahl von DVB T DVB C und drücken die Taste OK zum bestätigen a Wenn Sie DVB T ausgewählt haben ist der nächste Schritt Auswahl von Tunertyp und Land drücken Sie die Taste OK um die Sendersuche zu beginnen ...

Страница 17: ...e beim DVB T drücken Sie die Taste OK um die Sendersuche zu beginnen 3 Die Sendersuche beginnt Dieser Vorgang kann bis zu 6 Minuten dauern Das Display zeigt den Fortschritt der Sendersuche an sowie die Anzahl der gefundenen Sender 4 Nach der vollständigen Sendersuche sind die Sender in einer vorgegebenen Reihenfolge angeordnet Wenn Sie Sender überspringen möchten ändern Sie die vorgegebene Reihenf...

Страница 18: ...Tasten zur Auswahl Automatische Sendersuche und drücken die Taste OK 3 Drücken Sie die Tasten zur Auswahl DVB T DVB C Wählen Sie DVB T und drücken die Taste OK zum bestätigen 4 Im Menü Tunertyp drücken Sie die Tasten zur Auswahl ATV DTV DTV ATV Drücken Sie die Taste und danach drücken Sie die Tasten zur Auswahl des Landes in welchem Sie den TV betreiben Drücken die Taste OK zum bestätigen ...

Страница 19: ... Fortschritt der Sendersuche an sowie die Anzahl der gefundenen Sender 6 Nach der vollständigen Sendersuche sind die Sender in einer vorgegebenen Rei henfolge angeordnet Wenn Sie Sender überspringen möchten ändern Sie die vorgege bene Reihenfolge oder benennen die Sender um wählen Sie Programm Bearbeiten im Sender Menü ...

Страница 20: ...END ERMENÜ und drücken die Taste OK 2 Drücken Sie die Tasten zur Auswahl Automatische Sendersuche und drücken die Taste OK 3 Drücken Sie die Tasten zur Auswahl DVB T DVB C Wählen Sie DVB C und drücken die Taste OK zum bestätigen 4 Drücken Sie die Tasten zur Auswahl Scan Type Symbol Ks S und drücken die Taste OK zum bestätigen ...

Страница 21: ...n Sie die Taste und danach drücken Sie die Tasten zur Auswahl des Landes in welchem Sie den TV betreiben Drücken die Taste OK zum bestätigen 6 Die Sendersuche beginnt Dieser Vorgang kann bis zu 6 Minuten dauern Das Dis play zeigt den Fortschritt der Sendersuche an sowie die Anzahl der gefundenen Sender ...

Страница 22: ...Überspringen Drücken Sie die Tasten zur Auswahl des Senders Drücken Sie die blaue Teletext taste um den Sender zu überspringen das Symbol erscheint auf der rechten Seite des Senders Wăhlen Sie den übersprungenen Sender drücken Sie erneut die blaue Teletexttaste der Sender ist wieder aktiv und das Symbol verschwindet Favoriten Drücken Sie die Tasten zur Auswahl des Senders drücken Sie die Taste FAV...

Страница 23: ...ungsanleitung DE BILDEINSTELLUNGSMENÜ Der zweite Menü Punkt ist das BILDEINSTELLUNGSMENÜ Sie können hier Bild Effekt einstellen wie Kontrast Helligkeit usw Drücken Sie um zu bewegen drücken Sie OK zum einstellen ...

Страница 24: ...nnen Klangeffekte einstellen wie Höhen Bass Balance usw Drücken Sie um zu bewegen drücken Sie OK zum einstellen ZEITEINSTELLUNGSMENÜ Der vierte Menüpunkt ist das ZEITEINSTELLUNGSMENÜ Sie können die Uhrzeit ein stellen Ein Ausschaltzeit Schlaftimer usw Drücken Sie um zu bewegen drücken Sie OK zum einstellen ...

Страница 25: ...punkt ist das OPTIONSMENÜ Sie können die Menüsprache Audio sprache Untertitelsprache usw einstellen Im Menü PVR Dateisystem können Sie einen USB Speicher für PVR einstellen HINWEIS Zurücksetzen auf die Werkseinstellungen löscht alle Sender und Passwörter ...

Страница 26: ... oder verändern HINWEIS Das werkseitige Passwort ist 6666 Sender sperren Drücken Sie um den Sender auszuwählen drücken Sie die grüne Teletexttaste um den Sender zu sperren Um die Sendersperre aufzuheben gehen Sie in das Hauptmenü geben das Passwort ein und drücken erneut die grüne Teletexttaste Kindersicherung Drücken Sie zur Auswahl der Alters Freigabestufe USB Drücken Sie die Taste Quelle und wä...

Страница 27: ...swahlmenü aufzurufen Drücken Sie zur Auswahl des gewünschten Disks und drücken OK zur Anzeige der Medien Dateien und Ordnerliste oder drücken Return um zum Auswahlmenü zurück zukehren Wählen Sie die Medien Datei durch drücken von oder das Vorschaufenster erscheint Drücken Sie um die Medien Datei im Vollbildmodus abzuspielen Während der Wiedergabe der Medien Datei Foto Musik Film oder Text Type drü...

Страница 28: ...nschten Funktionssymbol und drücken die Taste OK zum bestätigen der Funktion Drücken Sie oder die Taste EXIT um die Kontroll Leiste zu verlassen USB Wiedergabe wird für folgende Dateiformate unterstützt Foto JPEG BMP PNG Musik MP3 Text TXT Film TS MPEG2 H 264 ...

Страница 29: ...EPG Taste das folgende Menü wird angezeigt Info Benutzen Sie zur Auswahl des Senders Drücken Sie die Taste INFO Die Informa tionen des markierten Senders wird angezeigt Zeitplan Drücken Sie die gelbe Teletexttaste Die Zeitplan Liste wird angezeigt drücken Sie um die Liste auszuwählen Drücken Sie die rote Taste LÖSCHEN um die Program mliste zu löschen Drücken Sie EPG um zum EPG Menü zurückzukehren ...

Страница 30: ...rote Taste Die Sendung wird zum Aufnehmen programmiert Erinnern Drücken Sie die blaue Taste um eine Sendung auszuwählen und eine Erinnerungszeit einzustellen Der TV Bildschirm schaltet zur eingestellten Zeit automatisch auf die pro grammierte Sendung um ...

Страница 31: ...berprüfen Sie die Lautstärke Überprüfen Sie ob der Ton Ausgeschaltet ist Stummschaltung aktiv oder die Audioverbindungen nicht richtig sind Kein Bild Kein Ton Das Netzkabel ist nicht eingesteckt Netzschalter ist nicht geöffnet Überprüfen Sie die Einstellungen für Kontrast und Helligkeit Lautstärke Drücken Sie die Taste Standby an der Fernbedienung zum überprüfen Keine Farbe Normal Audio Farbeinste...

Страница 32: ...Betrachtungswinkel H R CR 10 H 160 V 150 Reaktionszeit 5ms Farbanzeige 16 7M TV System DVB T C Standard Video PAL SECAM Eingangsspannung 100 240V 50Hz Verbrauch 38W 50W Verbrauch Standby 0 5W Audio Ausgangsleistung 2x3W 2x8W RF Tuner x1 VGA x1 PC Audio In x1 Kopfhörer x1 CI x1 HDMI x2 USB x1 AV x1 Ypbpr x1 Scart x1 Coaxial x1 Die Spezifikationen können ohne Ankündigung geändert werden ...

Страница 33: ...33 Bedienungsanleitung DE ...

Страница 34: ...in moderate cli mate 19 The apparatus shall not be exposed to dripping or splashing and that no objects filled with liquids such as vases shall be placed on the apparatus The symbol indicates that dangerous voltages constituting a risk of electric shock are present within this unit The symbol indicates that there are important operating and maintenance instructions in the Iiteraturaccompanying thi...

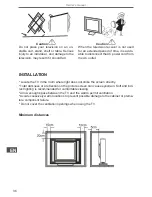
Страница 35: ...electrical compo nents Warning To prevent fire or electrical shock hazard do not expose the television receiver to rain or moisture Warning Do not drop or push objects into the tele vision cabinet slots or openings Never spill any kind of liquid on the television receiver Caution Do not trap the power supply cord under the television receiver Caution Never stand on lean on or suddenly push the tel...

Страница 36: ...C power cord from the AC outlet INSTALLATION Locate the TV in the room where light does not strike the screen directly TotaI darkness or a reflection on the picture screen can cause eyestrain Soft and indi rect lighting is recommended for comfortable viewing AIIow enough space between the TV and the wall to permit ventilation Avoid excessively warm locations to prevent possible damage to the cabin...

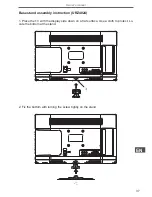
Страница 37: ... EN Base stand assembly instruction URZ4024 1 Place the TV with the display side down on a fIat surface Use a cloth to protect Lo cate the bottom at the stand 2 Fix the bottom with turning the screw tightly on the stand ...

Страница 38: ... EN Base stand assembly instruction URZ4032 1 Place the TV with the display side down on a fIat surface Use a cloth to protect Lo cate the bottom at the stand 2 Fix the bottom with turning the screw tightly on the stand ...

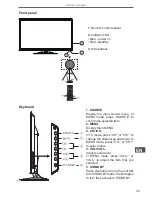
Страница 39: ... SOURCE to confirm the selected item 2 MENU Display main MENU 3 CH CH ln TV mode press CH or CH to change the channel up and down ln MENU mode press CH or CH to select items 4 VOL VOL Adjust sound level ln MENU mode press VOL or VOL to adjust the item that you selected 5 STANDBY Press this button to turn the unit ON from STANDBY mode Press it again to turn the set back to STANDBY ...

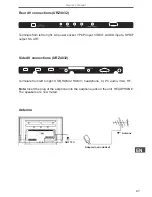
Страница 40: ...t AC power socket YPbPr input VIDEO AUDIO inputs SPDIF output SCART Side AV connections URZ4024 Terminals from left to right USB HDMI2 HDMI1 headphone CI PC audio VGA RF Note Insert the plug of the earphone into the earphone jack on the unit HEADPHONE The speakers are now muted ...

Страница 41: ... input VIDEO AUDIO inputs SPDIF output SCART Side AV connections URZ4032 Terminals from left to right USB HDMI2 HDMI1 headphone CI PC audio VGA RF Note Insert the plug of the earphone into the earphone jack on the unit HEADPHONE The speakers are now muted Antenna Adaptor not included ANT 75Ω Antenna ...

Страница 42: ...Connect VGA and audio cable 2 Connect the power cord 3 Power on the TV switch to PC mode 4 Power on the PC Note This sequence is very impor tant Resolution V Freq Hz H Freq Hz 800 600 60 37 88 640 480 60 31 47 1024 768 60 48 36 1280 1024 60 63 98 1360 768 60 47 7 1920 1080 60 66 64 ...

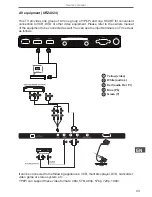
Страница 43: ...ase refer to the owners manual of the equipment to be connected as well You can use the input terminals on TV set rear as follows It can be connected to the following appliances VCR multi disc player D D camcorder video game or stereo system etc YPbPr can support these video formats 480i 576i 480p 576p 720p 1080i Yellow video White audio L Red audio R or Pr Blue Pb Green Y ...

Страница 44: ...ase refer to the owners manual of the equipment to be connected as well You can use the input terminals on TV set rear as follows It can be connected to the following appliances VCR multi disc player D D camcorder video game or stereo system etc YPbPr can support these video formats 480i 576i 480p 576p 720p 1080i Yellow video White audio L Red audio R or Pr Blue Pb Green Y ...

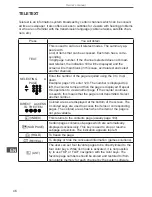
Страница 45: ... or DTV mode 13 VOL To adjust sound level 14 NUMERIC KEY For direct access to channels 15 AUDIO To select the available audio language of TV programs 16 MUTE To disable or enable the sound output 17 In USB mode used as next key in teletext mode used as list key 18 In USB mode used as previ ous key in teletext mode used as hold key 19 In teletext mode used as index 20 Press to stop play in USB mode...

Страница 46: ... the page is displayed Repeat this operation to view another page If the counter continues to search this means that the page is not transmitted Select another number DIRECT ACCESS TO THE ITEM Colored are as are displayed at the bottom of the screen The 4 colored keys are used to access the items or corresponding pages The colored are as flash when the item or the page is not yet available INDEX T...

Страница 47: ...ge the settings Press the OK button to confirm Select your desired language to be displayed on the menu 2 Press the buttons to select DVB T DVB C and then press the OK button to confirm a If you select DVB T to next step is select the Tune and country the press the OK button to start tuning ...

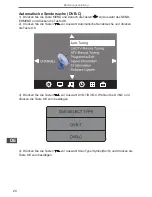
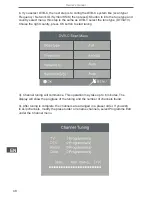
Страница 48: ...B T select the tune type DTV ATV Choise the right country press OK button to start tuning 3 Channel tuning will commence This operation may take up to 6 minutes The display will show the progress of the tuning and the number of channels found 4 After tuning is complete the channels are arranged in a preset order If you wish to skip channels modify the preset order or rename channels select Program...

Страница 49: ...ns to select Auto Tuning and then press the OK button 3 Press the buttons to select DVB T DVB C Press select DVB T and then press the OK button to confirm 4 In the Tune Type menu press the buttons to select ATV DTV DTV ATV Press the button and then press the buttons to select the country where you will operate the TV Press the OK button to confirm ...

Страница 50: ...o 6 minutes The display will show the progress of the tuning and the number of channels found 6 After tuning is complete the channels are arranged in a preset order If you wish to skip channels modify the preset order or rename channels select Programme Edit under the channel menu ...

Страница 51: ...tons to select the CHANNEL menu 2 Press the buttons to select Auto Tuning and then press the OK button 3 Press the buttons to select DVB T DVB C Press select DVB C and then press the OK button to confirm 4 Press the buttons to select Scan type Symbol Ks S press the OK button to confirm ...

Страница 52: ... the TV Press the OK button to confirm 6 Channel tuning will commence This operation may take up to 6 minutes The display will show the progress of the tuning and the number of channels found 7 After tuning is complete the channels are arranged in a preset order If you wish to skip channels modify the preset order or rename channels select Programme Edit under the channel menu ...

Страница 53: ... OK to confirm Skip Press to choose the program press teletext blue button to skip this program the will show on the right side of the program Choose the skipped program press blue button again you can cancel the skip the will disappear Favourite Press to choose the program press FAV button it will show on the right side of the program Choose the FAV program press FAV button again you can cancel t...

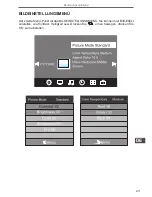
Страница 54: ...54 Owner s manual EN PICTURE MENU The second item of the MENU is PICTURE MENU You can adjust picture effect here such as contrast brightness etc Press to move press OK to adjust ...

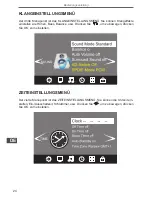
Страница 55: ... the SOUND MENU You can adjust the sound effect here such as treble bass balance etc Press to move press OK to adjust TIME MENU The fourth item of the menu is the TIME MENU You can adjust the clock power on off time sleep time etc Press to move press OK to adjust ...

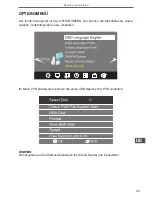
Страница 56: ... fifth item of the MENU is the OPTION MENU You can adjust the Menu language Audio language Subtitle language etc In PVR File system menu you can set up USB disk for PVR NOTE Restore factory default will clear all the programs and password ...

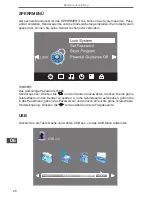
Страница 57: ... not search the channels or change any programs NOTE The default pass word is 6666 Block program Press to choose the program press teletext green button to block the program If you want unblock the program pls enter the main menu input the pass word then press green button again Parental guidance Press to choose rating USB Press the button and then select USB item to enter the USB menu ...

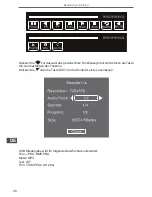
Страница 58: ...ton to enter the disk selection menu Press the to select the right disk and press OK to display media files and folder list or choose Return to back to the media type selection menu Select the media file by pressing or then the preview frame will pop up Press the to play the media file in full screen When the media file photo music movie or text type is playing press the OK or Info button con disp...

Страница 59: ...ss to select the function icon press OK button to confirm the function Press or EXIT button to exit the control bar USB playback is supported for the following formats Photo JPEG BMP PNG Music MP3 Text TXT Movie TS MPEG2 H 264 ...

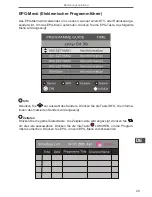
Страница 60: ...ss the EPG menu press the EPG button the following menu will be displayed Info Use to choose the programs Press INFO key you can display the highlight pro gram s information Schedule Press the teletext yellow key It can list all the reminder schedule press to choose the list Press red key DELETE to delete the schedule list Press EPG to return to EPG menu ...

Страница 61: ... Record Press the red key it can set the program to be recorded Remind Press the blue key to choose one program and set up one reminder time The TV screen will skip to the choosed program in the reminder time automatically ...

Страница 62: ...nt car motorcycle fluorescent light Normal picture Mute volume check if mute is activated or if the audio system connections are not correct No picture Mute power cord is not inserted power switch is not opened contrast and brightness volume setup press standby key on the remote control for inspecting No color Normal audio color control Picture breaking up Normal audio or weak retune channel No co...

Страница 63: ...ghtness cd m2 200 10 230 10 Contrast 1000 1 Viewing angle H R CR 10 H 160 V 150 Response time 5ms Display colors 16 7M System TV DVB T C Standard video PAL SECAM Input power voltage 100 240V 50Hz Power consumption 38W 50W Power consumption Standby 0 5W Audio output power 2x3W 2x8W RF tuner x1 VGA x1 PC Audio In x1 Headphone x1 CI x1 HDMI x2 USB x1 AV x1 Ypbpr x1 Scart x1 Coaxial x1 ...

Страница 64: ...64 Owner s manual EN ...

Страница 65: ...ot zdalne go sterowania należy wyrzucić do prze znaczonych na to pojemników 18 Nie należy stosować urządzenia w miejscach o skrajnie wysokiej niskiej tem peraturze oraz dużej wilgotności powie trza 19 Nie należy umieszczać w pobliżu urządzenia pojemników z płynami wazo nów kubków butelek itp Zalanie urzą dzenia może spowodować jego uszko dzenie oraz porażenie prądem elektrycz nym Znak błyskawicy w...

Страница 66: ...urządzenia Uwaga Aby uniknąć pożaru lub porażenia prądem elektrycznym nie należy narażać odbior nika telewizyjnego na działanie deszczu oraz wilgoci Uwaga Nie należy narażać telewizora na uderze nia i silne wstrząsy Uwaga Nie należy umieszczać żadnych przewo dów pod podstawą telewizora Uwaga Szczególną uwagę należy zwrócić na dzieci bawiące się w okolicy telewizora Uderzenie telewizora który zosta...

Страница 67: ...ić telewizor w takim miejscu aby na jego ekran nie padały bezpośrednio promienie słoneczne oraz inne silne światło Całkowita ciemność lub odbicia na ekranie podczas oglądania mogą powodować zmę czenie oczu Miękkie i pośrednie oświetlenie jest zalecane do komfortowego oglądania Należy zapewnić wystarczająco dużo miejsca pomiędzy telewizorem a ścianą aby umożliwić prawidłową wentylację rysunek poniż...

Страница 68: ...p ekranem w dół i przymocować wspornik podstawy Aby zabezpieczyć urządzenie przed porysowaniem na stole można położyć koc lub inny miękki materiał Przed przystąpieniem do montażu należy odłączyć wszystkie przewody podłączone do telewizora 2 Należy przymocować podstawę telewizora do zamontowanego wcześniej wspornika ...

Страница 69: ...p ekranem w dół i przymocować wspornik podstawy Aby zabezpieczyć urządzenie przed porysowaniem na stole można położyć koc lub inny miękki materiał Przed przystąpieniem do montażu należy odłączyć wszystkie przewody podłączone do telewizora 2 Należy przymocować podstawę telewizora do zamontowanego wcześniej wspornika ...

Страница 70: ... Przyciski boczne 1 SOURCE Wybór źródła sygnału W Menu po twierdzenie wybranej opcji 2 MENU Wyświetlenie Menu urządzenia 3 CH CH Zmiana kanału w górę dół W Menu przejście do następnej poprzedniej pozycji 4 VOL VOL Regulacja głośności W Menu zwiększenie zmniejszenie wartości 5 STANDBY Włączenie telewizora Ponow ne naciśnięcie przejście do trybu STANDBY ...

Страница 71: ...iazdo zasilania wejście YPbPr VIDEO wejścia AUDIO wyjście SPDIF COAXIAL SCART Boczne złącza AV URZ4024 Złącza od lewej do prawej USB HDMI2 HDMI1 wyjście słuchawkowe CI PC audio VGA RF Uwaga Po podłączeniu słuchawek do gniazda słuchawkowego dźwięk w głośnikach zostanie wyciszony ...

Страница 72: ... VIDEO wejścia AUDIO wyjście SPDIF COAXIAL SCART Boczne złącza AV URZ4032 Złącza od lewej do prawej USB HDMI2 HDMI1 wyjście słuchawkowe CI PC audio VGA RF Uwaga Po podłączeniu słuchawek do gniazda słuchawkowego dźwięk w głośnikach zostanie wyciszony Antena ANT 75Ω Zasilacz nie znajduje się w zestawie Antena ...

Страница 73: ...able VGA i audio 2 Należy podłączyć przewód zasi lający do telewizora 3 Należy włączyć TV i wybrać tryb PC 4 Należy włączyć PC Uwaga Kolejność wykonywanych czynności jest bardzo ważna Rozdzielczość V Freq Hz H Freq Hz 800 600 60 37 88 640 480 60 31 47 1024 768 60 48 36 1280 1024 60 63 98 1360 768 60 47 7 1920 1080 60 66 64 ...

Страница 74: ... zestaw kina domowego odtwa rzacz DVD magnetowid itp Służą do tego złącza znajdujące się z tyłu telewizora Przy kładowe połączenie przedstawione jest na poniższym rysunku YPbPr obsługuje format 480i 576i 480p 576p 720p 1080i Żółty video Biały audio L Czerwony audio R Pr Niebieski Pb Zielony Y ...

Страница 75: ... zestaw kina domowego odtwa rzacz DVD magnetowid itp Służą do tego złącza znajdujące się z tyłu telewizora Przy kładowe połączenie przedstawione jest na poniższym rysunku YPbPr obsługuje format 480i 576i 480p 576p 720p 1080i Żółty video Biały audio L Czerwony audio R Pr Niebieski Pb Zielony Y ...

Страница 76: ...rzewodnik po pro gramach 12 FAV Wyświetlenie listy ulubionych ka nałów 13 VOL Regulacja głośności 14 PRZYCISKI NUMERYCZNE Bezpo średni wybór numeru kanału 15 AUDIO Możliwość zmiany języka lek tora w zależności od nadawanego progra mu 16 MUTE Wyciszenie dźwięków 17 Następny tryb USB lista te legazeta 18 Następny tryb USB zatrzy manie telegazeta 19 Index telegazeta 20 Stop 21 INFO Wyświetlenie infor...

Страница 77: ...e czarny obraz WYBÓR STRONY Aby przejść do danej strony należy wprowadzić jej numer numer strony jest widoczny w lewym górnym rogu ekranu Służą do tego przyciski numeryczne od 0 do 9 Uwaga nie pod każdym numerem znajduje się transmitowana strona PRZYCISKI DOSTĘPU BEZPOŚREDNIEGO Znajdujące się na dole ekranu kolorowe przyciski umożliwiają bezpośredni dostęp do żądanych stron INDEX Przycisk powrotu ...

Страница 78: ... C i potwierdzić wybór przyciskiem OK dla naziemnej telewizji cyfrowej należy wybrać źródło sygnału DVB T dla telewizji kablowej DVB C DVB T używając przycisków należy wybrać typ wyszukiwania DTV tylko kanały cyfrowe ATV tylko kanały analogowe DTV ATV kanały cyfrowe i analogowe Następnie należy przejść do wyboru kraju naciskając przycisk i potwierdzić wybór przyciskiem OK ...

Страница 79: ...a i kraj analogicznie jak w przypadku DVB T i nacisnąć przycisk OK aby rozpocząć wyszukiwanie 3 Na ekranie wyświetlany jest aktualny postęp wyszukiwania oraz liczba znalezionych kanałów Operacja ta może potrwać ok 6 minut 4 Po zakończeniu wyszukiwania kanały zostaną zapisane w domyślnej kolejności Aby zmienić tą kolejność należy przejść do manu Kanał i wybrać Edycja programu ...

Страница 80: ...ocą przycisków należy wybrać Automatyczne strojenie i nacisnąć przycisk OK 3 Za pomocą przycisków należy wybrać DVB T i potwierdzić wybór przyciskiem OK 4 Używając przycisków należy wybrać typ wyszukiwania DTV tylko kanały cyfrowe ATV tylko kanały analogowe DTV ATV kanały cyfrowe i analogowe Następnie należy przejść do wyboru kraju naciskając przycisk i potwierdzić wybór przyciskiem OK ...

Страница 81: ...t aktualny postęp wyszukiwania oraz liczba znalezionych kanałów Operacja ta może potrwać ok 6 minut 4 Po zakończeniu wyszukiwania kanały zostaną zapisane w domyślnej kolejności Aby zmienić tą kolejność należy przejść do manu Kanał i wybrać Edycja programu ...

Страница 82: ... za pomocą przycisków wybrać menu Kanał 2 Następnie za pomocą przycisków należy wybrać Automatyczne strojenie i nacisnąć przycisk OK 3 Za pomocą przycisków należy wybrać DVB C i potwierdzić wybór przyciskiem OK 4 Należy ustawić typ skanowania Częstotliwość ID sieci Symbol KS S i potwierdzić ustawienia przyciskiem OK ...

Страница 83: ...nie należy przejść do wyboru kraju naciskając przycisk i potwierdzić wybór przyciskiem OK 6 Na ekranie wyświetlany jest aktualny postęp wyszukiwania oraz liczba znalezionych kanałów Operacja ta może potrwać ok 6 minut 7 Po zakończeniu wyszukiwania kanały zostaną zapisane w domyślnej kolejności Aby zmienić tą kolejność należy przejść do manu Kanał i wybrać Edycja programu ...

Страница 84: ...esunąć kanał na wybraną pozycję i potwier dzić przyciskiem OK Pomijanie Aby pominąć żądany kanał należy go podświetlić i nacisnąć niebieski przycisk kanał zostanie oznaczony symbolem i będzie pomijany przy przechodzeniu po kolejnych kanałach Aby usunąć pomijanie kanału należy ponownie nacisnąć niebieski przycisk Ulubione Aby dodać żądany kanał do grupy ulubionych należy go podświetlić i nacisnąć p...

Страница 85: ...85 Instrukcja obsługi PL MENU OBRAZ Menu umożliwia zmianę ustawień trybu obrazu kontrast jasność kolor ostrość temp koloru formatu obrazu redukcji szumów itp ...

Страница 86: ...cja obsługi PL MENU DŹWIĘK Menu umożliwia ustawienie trybu dźwięku balansu itp MENU CZAS Menu umożliwia ustawienie czasu automatycznego włączenia automatycznego wyłą czenia wyłącznika czasowego funkcja sleep itp ...

Страница 87: ...a ustawienie kraju edycję ustawień PVR oraz przy wrócenie ustawień domyślnych itp Menu ustawień PVR umożliwia wybór dysku USB do nagrywania PVR UWAGA Przywrócenie ustawień fabrycznych spowoduje nieodwracalne usunięcie wszystkich za pisanych programów oraz innych danych ...

Страница 88: ...rukcja obsługi PL MENU BLOKADA Menu umożliwia zablokowanie kanałów zmianę hasła dostępu itp UWAGA Domyślne hasło dostępu 6666 USB Aby przejść do menu USB należy nacisnąć przycisk na pilocie zdalnego sterowania ...

Страница 89: ...timediów zdjęć muzyki filmów oraz tekstu Aby rozpocząć odtwarzanie należy wybrać żądany typ i potwierdzić wybór przyciskiem OK Używając przycisków kierunkowych należy wybrać żądany plik folder Aby rozpocząć odtwarzanie wybranego pliku należy nacisnąć przycisk na pilocie Aby wyświetlić pasek sterowania należy nacisnąć przycisk OK lub Info ...

Страница 90: ...90 Instrukcja obsługi PL Aby zamknąć pasek sterowania należy nacisnąć przycisk lub EXIT Wspierane formaty multimediów Obraz JPEG BMP PNG Muzyka MP3 Text TXT Film TS MPEG2 H 264 ...

Страница 91: ...by przejść do menu EPG należy nacisnąć przycisk EPG na pilocie zdalnego sterowania Info Aby wyświetlić informacje o aktualnie podświetlonym programie należy nacisnąć zielo ny przycisk na pilocie Terminarz Aby wyświetlić listę programów do nagrania należy nacisnąć żółty przycisk na pilocie Aby usunąć program z listy należy go podświetlić i nacisnąć czerwony przycisk ...

Страница 92: ...gi PL Nagrywanie Aby włączyć nagrywanie podświetlonego programu należy nacisnąć czerwony przy cisk na pilocie Przypomnienie Aby ustawić przypomnienie podświetlonego programu należy nacisnąć niebieski przy cisk na pilocie ...

Страница 93: ... mogące powo dować zakłócenia sprzęt elektroniczny lampa fluore scencyjna silniki itp Normalny obraz Brak dźwięku czy dźwięk nie jest wyciszo ny poziom głośności usta wiony na minimum Brak obrazu Brak dźwięku przewód zasilający czy urządzenie jest włą czone jasność kontrast obrazu Brak koloru Normalny dźwięk ustawienia kolorów Zakłócenia Normalny lub słaby dźwięk należy ponownie wyszukać kanały Br...

Страница 94: ...dzenia H R CR 10 H 160 V 150 Czas reakcji 5ms Liczba kolorów 16 7M System TV DVB T C Standard video PAL SECAM Zasilanie 100 240V 50Hz Pobór mocy 38W 50W Pobór mocy czuwanie 0 5W Moc muzyczna RMS 2x3W 2x8W RF x1 VGA x1 PC Audio In x1 Wyjście słuchawkowe x1 CI x1 HDMI x2 USB x1 AV x1 Ypbpr x1 Scart x1 Coaxial x1 SPECYFIKACJA Specyfikacja produktu może ulec zmianie bez powiadomienia ...

Страница 95: ...95 Instrukcja obsługi PL ...

Страница 96: ...cata prin acoperirea orificiilor de ventilatie cu obiecte cum ar fi ziare fete de masa perdele etc 16 Nu puneti pe aparat surse de foc de schis cum ar fi lumanari aprinse 17 Bateriile uzate se vor recicla ecologic la punctele de colectare special amena jate in acest scop 18 Utilizati aparatul in climat moderat 19 Dispozitivul nu trebuie sa fie expus la stropire sau picurare iar obiecte pline cu li...

Страница 97: ...ce Avertisment Pentru a evita pericolul de incendiu sau risc de soc electric acest aparat nu tre buie expus la ploaie sau umezeala Avertisment Nu introduceți si nu scapati obiecte in fan tele sau orificiile televizorului Nu varsati nici un fel de lichid pe televizor Atentie Nu prindeti cablul de alimentare sub re ceptorul televizorului Atentie Nu va asezati pe televizor nu va sprijiniti sau imping...

Страница 98: ...televizorul in camera intr un loc in care lumina sa nu bata direct pe ecran Intunericul total sau o reflexie pe ecran poate cauza oboseala ochilor O iluminare uso ara si indirecta este recomandata pentru o vizionare confortabila Lasati o distanta suficienta intre televizor si perete pentru a asigura o ventilație adecvată Evitati locurile excesiv de calde pentru a preveni posibile deteriorari ale c...

Страница 99: ...ntru suport de baza URZ4024 1 Asezati televizorul cu ecranul in jos pe o suprafata plata Folositi un material pentru a proteja ecranul Localizati modalitatea de prindere in partea de jos a suportului 2 Fixati partea de jos prin strangerea surubului pe suport ...

Страница 100: ...ntru suport de baza URZ4032 1 Asezati televizorul cu ecranul in jos pe o suprafata plata Folositi un material pentru a proteja ecranul Localizati modalitatea de prindere in partea de jos a suportului 2 Fixati partea de jos prin strangerea surubului pe suport ...

Страница 101: ...ta 2 MENIU Afisarea MENIULUI principal 3 CH CH Pe modul TV apasati tasta CH sau CH pentru a selecta canalul Pe modul Meniu apasati tasta CH sau CH pentru a selecta pozitiile 4 VOL VOL Reglati nivelul sunetului Pe modul MENIU apasati tasta VOL sau VOL pentru a regla elementul selectat din meniu 5 STANDBY Apasati acest buton pentru a porni aparatul din modul de asteptare Apasati inca o data pentru a...

Страница 102: ...apta Cablu de alimentare AC intrare YPbPr VIDEO intrari AUDIO iesire SPDIF SCART Conexiuni AV Lateral URZ4024 Conectori de la stanga la dreapta USB HDMI2 HDMI1 casti CI intrare audio PC VGA RF Nota Conectati mufa castilor in conectorul pentru casti de pe dispozitiv boxele sunt oprite ...

Страница 103: ...re AC intrare YPbPr VIDEO intrari AUDIO iesire SPDIF SCART Conexiuni AV Lateral URZ4032 Conectori de la stanga la dreapta USB HDMI2 HDMI1 casti CI intrare audio PC VGA RF Nota Conectati mufa castilor in conectorul pentru casti de pe dispozitiv boxele sunt oprite Antena Adaptor nu este inclus ANT 75Ω Antena ...

Страница 104: ...pozitivul VGA si ca blul audio 2 Conectati cablul de alimentare 3 Porniti televizorul setati pe mod ul PC 4 Porniti calculatorul Nota Aceasta secventa este fo arte importanta Rezolutie V Freq Hz H Freq Hz 800 600 60 37 88 640 480 60 31 47 1024 768 60 48 36 1280 1024 60 63 98 1360 768 60 47 7 1920 1080 60 66 64 ...

Страница 105: ...a consultati manualul dispozitivului pentru a putea conecta dispozitivul Pu teti folosi terminalele de intrare ale televizorului situate in partea din spate dupa cum urmeaza Acesta poate fi conectat la urmatoarele aparate VCR DVD camere video jocuri video sau sistem stereo etc YPbPr este compatibil cu urmatoarele formate video 480i 576i 480p 576p 720p 1080i Galben video Alb audio L Rosu audio R sa...

Страница 106: ...a consultati manualul dispozitivului pentru a putea conecta dispozitivul Pu teti folosi terminalele de intrare ale televizorului situate in partea din spate dupa cum urmeaza Acesta poate fi conectat la urmatoarele aparate VCR DVD camere video jocuri video sau sistem stereo etc YPbPr este compatibil cu urmatoarele formate video 480i 576i 480p 576p 720p 1080i Galben video Alb audio L Rosu audio R sa...

Страница 107: ... Reglarea nivelului de sunet 14 TASTA NUMERICA Pentru accesul direct la canale 15 AUDIO Pentru selectarea limbajului audio disponibil al programelor TV 16 SILENTIOS Pentru dezactivarea sau activa rea iesirii sunetului 17 Pe modul USB folosita pentru optiu nea NEXT urmator pe modul teletext ca si tasta de listare 18 Pe modul USB folosita pentru optiu nea PREVIOUS anterior pe modul teletext ca si ta...

Страница 108: ...o alta pagina In cazul in care calculatorul continua cautarea acest lucru inseamna ca pagina nu este transmisa Selectati un alt numar ACCES DIRECT LA O ANUMITA POZITI Zona colorata este afisata in partea de jos a ecranului Cele 4 taste colorate sunt folosite pentru a accesa pozitiile sau paginile corespunzatoare Zonele colorate palpaie atunci cand pozitia sau pagina respectiva nu este inca disponi...

Страница 109: ...setarilor Apasati tasta oK pentru confirmare Selectati limba dorita pentru a fi afisata in meniu 2 Apasati butoanele pentru a selecta optiunile DVB T DVB C si apasati tasta OK pentru confirmare a Daca selectati optiunea DVB T selectati apoi Tune Type si Tara apasati apoi tasta OK pentru a porni sincronizarea ...

Страница 110: ...optiunii DVB T selectati tipul cautarii DTV ATV Alegeti tara dorita apasati tasta OK pentru a porni sincronizarea 3 Va incepe sincronizarea canalelor Aceasta operatiune poate dura pana la 6 minute Pe afisaj va aparea derularea sincronizarii si numarul canalului gasit 4 Dupa ce reglarea este completa canalele sunt aranjate intr o ordine prestabilita Daca doriti sa sariti peste canale modificati ord...

Страница 111: ...asati butoanele pentru a selecta optiunea Cautare Automata si apoi apasati tasta OK 3 Apasati butoanele pentru aselecta optiunea DVB T DVB C Apasati optiunea DVB T si apoi tasta OK pentru confirmare 4 In meniul Tune Type tip cautare apasati butoanele pentru a selecta optiunea ATV DTV DTV ATV Apasati butonul si apoi butoanele pentru a selecta tara Apasati tasta OK pentru a confirma ...

Страница 112: ...ute Pe afisaj va aparea derularea sincronizarii si de numarul canalului gasit 6 Dupa ce reglarea este completa canalele sunt aranjate intr o ordine prestabilita Daca doriti sa sariti peste canale modificati ordinea prestabilita sau redenumiti canalele selectati optiunea Editare Program din meniul Canalelor ...

Страница 113: ...ati apoi tasta OK 2 Apasati butoanele pentru a selecta optiunea Cautare Automata Auto tuning si apoi apasati tasta OK 3 Apasati butoanele pentru a selecta optiunea DVB T DVB C Apasati optiunea DVB C si apoi tasta OK pentru confirmare 4 Apasati butoanele pentru a selecta optiunile Tipul Scanarii Simbol Ks S apasati tasta OK pentru confirmare ...

Страница 114: ... confirma 6 Cautarea canalelor va incepe Aceasta operatiune poate dura pana la 6 minute Pe afisaj va aparea derularea sincronizarii si de numarul canalului gasit 7 Dupa ce reglarea este completa canalele sunt aranjate intr o ordine prestabilita Daca doriti sa sariti peste canale modificati ordinea prestabilita sau redenumiti canalele selectati optiunea Editare Program din meniul Canalelor ...

Страница 115: ...oi apasati tasta OK pentru confirmare Omitere Apasati pentru a selecta programul apasati butonul albastru al teletextului pentru a omite acest program simbolul va fi afisat pe partea dreapta a programului Alegeti programul omis apasati din nou butonul albastru puteti anula omiterea simbolul va disparea Favourite Apasati pentru a selecta programul apasati butonul FAV simbolul va afisat in partea dr...

Страница 116: ...are RO MENIU IMAGINI A doua pozitie din MENIU este optiunea MENIU IMAGINI Puteti regla efectul imaginii aici cum ar fi contrastul luminozitatea etc Apasati tasta OK pentru a misca imag inea apasati tasta OK pentru a regla ...

Страница 117: ...fectul sunetului treble bass balance etc Apasati butoanele pentru mutare apasati tasta OK pentru reglare MENIUL SETARII OREI A patra pozitie din MENIU este optiunea MENIUL SETARII OREI Puteti regla aici ora durata pornire oprire durata sleep etc Apasati butoanele pentru a deplasa curso rul apasati tasta OK pentru reglare ...

Страница 118: ...ENIUL OPTIUNI Puteti seta limba Meniului limbaj Audio limbaj Subtitrarii etc In meniul sistemului de Fisiere PVR puteti seta memoria USB pentru PVR Personal Video Recording inregistrari video personale NOTA Resetarea la valorile din fabrica va sterge toate canalele si parolele ...

Страница 119: ...a canale sau schimba programe NOTA Parola prestabilita este 6666 Blocare programe Apasati butoanele pentru a alege programul apasati butonul verde al telextului pentru a bloca programele Daca doriti sa deblocati programele acc esati meniul principal introduceti parola apoi apasati butonul verde din nou Numai cu acordul parintilor Apasati butoanele pentru a alege nivelul de rating USB Apasati buton...

Страница 120: ...Apasati butoanele pentru a selecta discul dorit si apasati tasta OK pentru a afisa fisierele media si lista de foldere sau apasati tasta Return pentru a reveni la meniul de selectare Selectati fisierul media apasand tasta sau si va apare fereastra de previzual izare Apasati tasta pentru a selecta fisierul media in redare pe modul ecran complet In timpul redarii fisierului media imagine muzica film...

Страница 121: ...ta pictograma functiei dorite si apasati tasta OK pentru a confirma selectia facuta Apasati tasta sau tasta EXIT pentru a parasi bara de control Redarea USB este suportata pentru urmatoarele formate Foto JPEG BMP PNG Muzica MP3 Text TXT Filme TS MPEG2 H 264 ...

Страница 122: ... meniul EPG apasati butonul EPG urmatorul meniu va fi afisat Info Folositi tasta pentru a alege canalele Apasand tasta INFO se vor afisa informatiile postului selectat Program Apasati tasta galbena teletext Pentru a afisa lista programelor apasati tastele pen tru a alege lista Apasati tasta rosie STERGERE pentru a sterge lista de programe Apasati tasta EPG pentru a reveni la meniul EPG ...

Страница 123: ...i tasta rosie puteti seta programul ce urmeaza a fi inregistrat Memento Apasați butonul albastru pentru a selecta un program si a stabili un timp de memento Ecranul televizorului va sari automat la programul ales pentru a fi redat la ora stabilita ...

Страница 124: ...ine normala Fara sunet Verificati volumul Verificati dacă sunetul este oprit mut sau daca conexiunile audio sunt efectuate corect Fara imagine Fara sunet Cablul de alimentare nu este conectat Comutatorul de alimentare nu este pornit Verificati setarile de contrast si luminozitate volum Verificati butonul de standby al telecomenzii Fara culoare Sunet normal Verificati reglarea culorilor Imagine nec...

Страница 125: ...ibilitate H R CR 10 H 160 V 150 Timp raspuns 5ms Culori 16 7M Sistem TV DVB T C Sistem TV PAL SECAM Tensiune alimentare 100 240V 50Hz Putere consumata 38W 50W Putere consumata stand by 0 5W Putere audio de iesire 2x3W 2x8W Tuner RF x1 VGA x1 Intrare audio PC x1 Casti x1 CI x1 HDMI x2 USB x1 AV x1 Ypbpr x1 Scart x1 Coaxial x1 Specificatiile sunt supuse schimbarilor fara notificare prealabila ...

Страница 126: ...126 Manual de utilizare RO ...

Страница 127: ......

Страница 128: ...www cabletech pl ...

Отзывы: