Cables to Go KNV104D Скачать руководство пользователя страница 13


24 


For OSD model: 

After connection completes, you should re-activate the 
OSD menu to check if the 

Master

 recognizes the 

Slaves

.    A triangle mark (

) is placed to the right of 

the port name indicating the port is connected to a 

Slave


not

 a computer.  A number to the left of the 

triangle mark indicates the 

Slave

 model, i.e. 8

 for 

KNV108 or KNV108D. 


Change Configuration while Running


Devices at any '

PC

 x' port can be changed at any time after initial 

power-up.  If you change any one of the “

PC 1

” to “

PC 8

” ports 

connection from a computer to a 

Slave

 or vice versa, or replace the 

devices of a port; the OSD will update this change the next time it is 
activated.  

[NOTE: Any new device, a computer or a Slave, must be 

turned off before it is connected to the Master.]


25 


------------------

------------------

------------------

------------------

Multi-access KVM Switch


KNV2108D & KNV2116D 


Overview 

 
The advanced multi-access KNV2108D and KNV2116D have all the 
features of KNV108D and KNV116D respectively.  Both models 
have two Console ports facilitate you to access multiple computers 
from 

one out of two

 locations, local and remote.  Thanks to the 

high-drive circuit design, you may connect high quality cables at 
Console and PC sides for up to 100ft (30M), a definite plus for server 
room applications.    Now you can access all computers either in the 
server room when you have to physically access the computers such 
as software upgrade, or away from the server room for everyday use. 
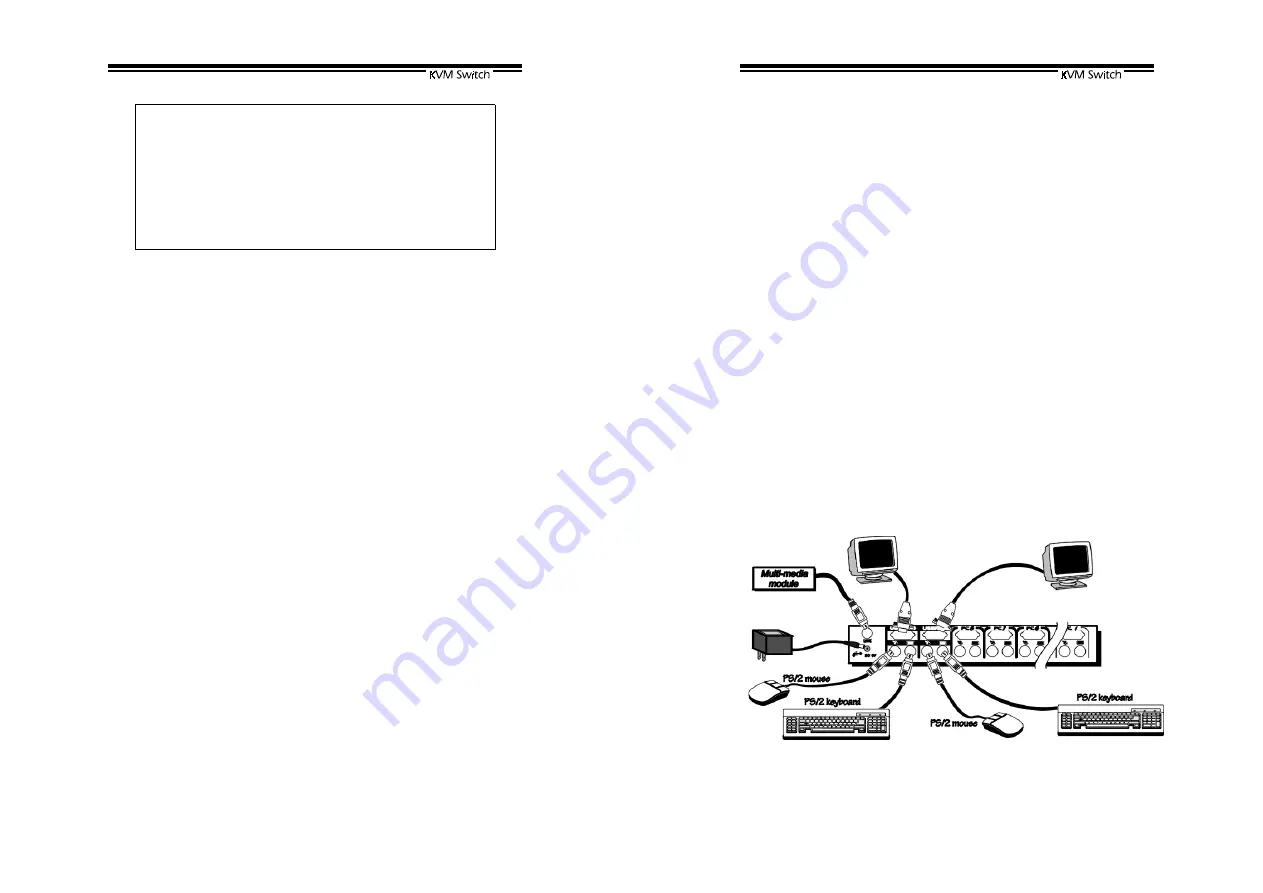


Connections 


Connect two keyboards, mice and monitors to the two 

CONSOLE


ports.  The built-in PS/2 mouse signal translation enables you to 
connect PS/2 mice of different type to the 

CONSOLE

 ports, i.e., a 

generic PS/2 mouse for one 

CONSOLE

 and a scroll mouse for 

another. 


Содержание KNV104D

Страница 1: ...Installation is as easy as connecting cables between the KVM Switch and your computers Operation is as simple as pressing push button entering hot key command and navigating through the user friendly...

Страница 2: ...system capability Auto scan automatically selects computers sequentially Supports Microsoft IntelliMouse Pro Hot key functions allow easy computer access Keyboard states automatically saved and resto...

Страница 3: ...8 ports KNV108 KNV116D of a Master unit Cascade configuration expands system ability allowing you to select computers connected to the Master or Slaves There is only one Master which has a mouse a key...

Страница 4: ...in about the monitor type please consult the monitor user s manual Connect a PS 2 mouse and a keyboard to the CONSOLE port marked with a mouse and a keyboard respectively as shown in figure 3 NOTE Onl...

Страница 5: ...fore turning on any other devices For single KVM Switch 1 Apply a power adapter to the Master 2 Turn on computers For cascade 1 Apply a power adapter to the Master 2 Apply power adapters to all Slaves...

Страница 6: ...k mount bracket 11 Figure 7 shows how to assemble rack cable support then screw it to the back and inside the rack cabinet vertical post Figure 7 Assembling rack cable support Then keyboard mouse moni...

Страница 7: ...and switch accordingly 13 Operation Operation Operation Operation Front Panel Push Buttons You may select a computer by pressing the front panel push button directly by issuing hot key commands or by...

Страница 8: ...he right of a name indicates the port is cascaded to a Slave the number at the left of the triangle mark shows the number of ports the Slave has i e 8 for KNV108 ENTER key brings you one level down an...

Страница 9: ...n in the middle of the screen Again using the UP and DOWN arrow keys to view options then press ENTER to select it You can press ESCAPE to exit at any time 17 Auto Scan In this mode the KVM Switch aut...

Страница 10: ...Hotkey Menu can be turned Off if you prefer not to see it when the left CTRL key is hit twice The non volatile memory stores the Hotkey Menu setting CH Display Auto Off After you select a computer th...

Страница 11: ...n computers one by one at a fixed interval left Ctrl left Ctrl F 1 When Auto Scan detects any keyboard or mouse activity it 21 suspends the scanning till activity stops it then resumes with the next c...

Страница 12: ...connected to a computer A power adapter with DC 9V 500mA output rating must be connected to the Master Figure 10 Slave console connection The maximum number of computers controlled by a master slave c...

Страница 13: ...onnected to the Master 25 Multi access KVM Switch KNV2108D KNV2116D Overview The advanced multi access KNV2108D and KNV2116D have all the features of KNV108D and KNV116D respectively Both models have...

Страница 14: ...connect CONSOLE port of another KVM Switch to PC 1 PC 8 port Refer to the chapter Cascade Configuration for more detail There are rules to apply for Master Slave configuration When KNV2108D is a Mast...

Страница 15: ...C is turned on Scan mode works for power on computers only Scan type is eye mark selected but no power up PC is eye mark selected in OSD Turn on computers Set proper Scan Type in OSD and determine whi...

Страница 16: ...or representation expressed or implied with respect to the contents or use of this documentation and especially disclaims its quality performance merchantability or fitness for any particular purpose...

Отзывы: