background image

26

26

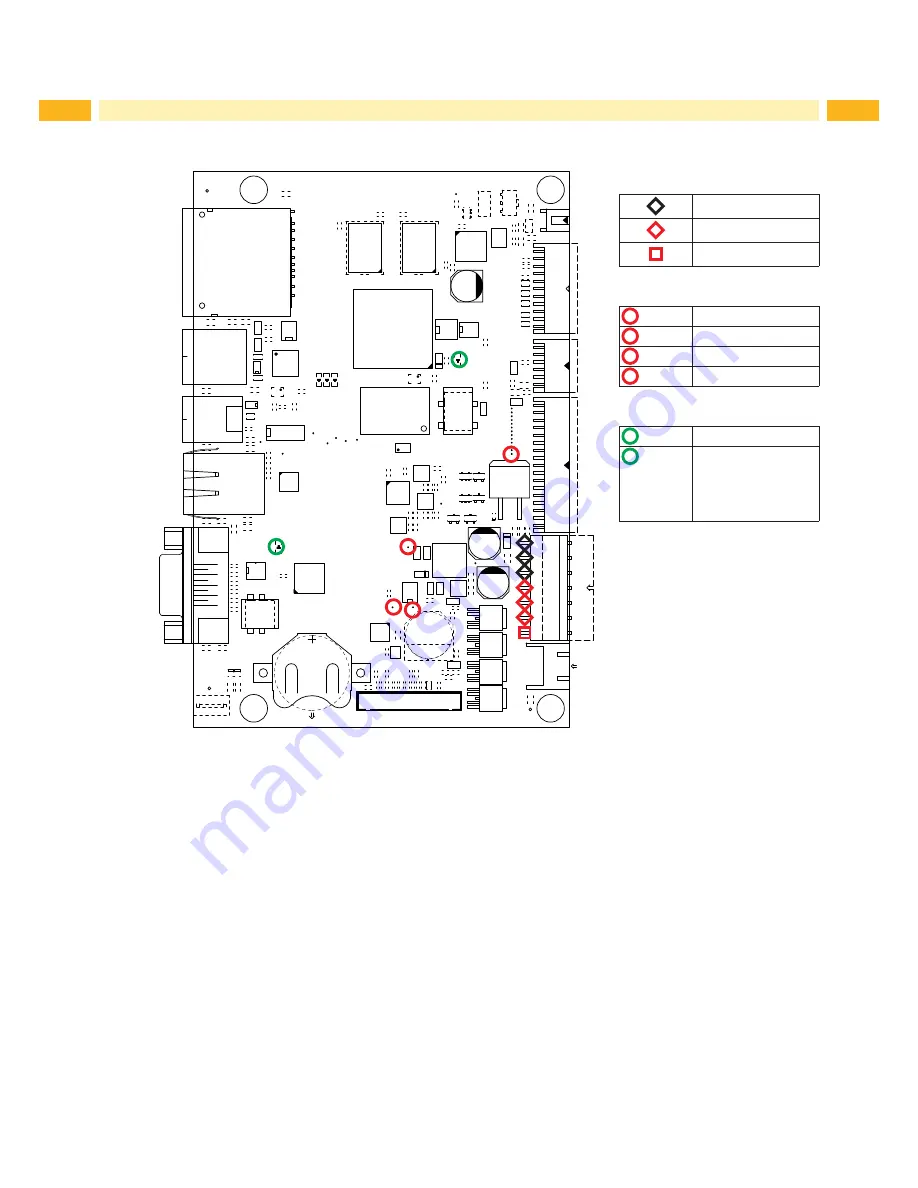
Layout Diagram PCB CPU

1

L6

12

R

130

L57

C185

R

323

B6

22

C3

91

R37

P6

R

131

R33

R

159

2

R

304

V19

1

G

B

+

C1

3

K

R

61

R220

V1

1

G

X1

V

M

R

305

TOP21

N

R22

C14

R

268

L2

7

1

V1

R

64

L12

AC

C16

V

18

9

C205

C208

10

R

270

C

341

L

B3

A1

C73

C

255

20

C

211

4

R169

5

C192

C

256

L43

L15

C214

1

R70

1

15

C2

46

C193

+

C

215

V12

A

A

P9

N6

TOP25

C2

59

R96

C194

L

C216

E

C26

D

L21

K

TOP16

AA

C264

R

D4

C217

U1

V24

T

R97

V1

5

L60

C

272

L50

3

C

224

C

221

TOP7

R60

D

L70

L61

C262

13

C276

CO

N1

C

223

R170

P

K

1

23

R1

L62

R140

C

17

C279

C

201

8

L31

C289

R84

4

K

L63

C8

C280

U7

18

C202

CD

R107

R

126

C6

C

C1

0

3

1top

W

P

C

203

C232

1

R141

U8

C

K

TOP11

P

R89

H

R4

C1

1

B

uch

se

L29

TOP5

H

C

210

N

R72

AE

R68

R

65

T

C235

L83

R

237

W

R5

C

212

C

291

2

R

74

R4

2

R

73

L5

6

G

1

C242

C

292

1

R168

R122

TOP26

16

L13

C234

#FD2

Gn

25

C2

82

C324

R

99

F1

C240

11

TOP17

C2

86

L73

R213

21

P5

L3

V14

A

2

F

R

19

9

C243

C321

+

E

R119

R219

F

TOP1

U

L

L56

M

R

56

R120

D3

L64

R87

AB

C252

R

572

TOP20

C198

8

L53

C1

2

9

R88

R25

L10

K

R

573

C200

19

R

100

R

574

R48

4

L37

L24

R

101

B2

N5

D15

14

R

575

CO

N1

0

L38

TOP14

24

D2

P8

2

1

R47

1

R

137

TOP9

J

R

568

R116

D

TOP4

C153

C

R

27

U3

J

R

66

C

263

D13

Y

C342

C113

P

F2

K

R

571

C

15

4

R

R29

L48

R

69

TOP15

C

270

C

314

2

L2

C

348

C155

C

L18

C

265

12

C116

R102

N

R6

K

2

TOP23

C

15

6

22

C293

L71

L3

3

3

C1

48

C

260

R121

C266

C

15

2

7

C1

L51

C1

49

C

320

CO

N2

17

L93

P2

R142

C

16

1

R

132

L34

C9

L39

C

258

B

U2

2

C1

84

GN

D

R123

R

256

R

35

CO

N1

2

C

16

2

A

R59

B

N

R117

G

R215

1

R7

5

C

261

G

R125

L68

M

C2

C28

C163

AC

D14

R71

CO

N4

R

108

V

R136

C187

C3

07

R

166

1

L90

V13

V7

C

16

4

C5

5

R280

F

R77

C3

08

L25

R160

C

213

C

160

15

C

207

2

R253

V21

R

139

C4

2

C

204

1

R163

C169

L42

L80

TOP6

C

268

CO

N1

7

10

C15

R

209

R78

C271

3

L14

#FD3

C

170

N1

R

98

C196

20

1

P4

CO

N9

C

225

C209

C309

1

U4

R171

L66

H1

R

31

C

17

1

K

8

L1

C

313

25

R85

E

C310

T

R172

K

B5

C27

C

351

C

17

2

R150

L30

C

352

L

R2

C

325

C

220

C311

L59

R

227

V9

C

168

AA

C

112

7

R

58

R303

R3

C

302

C312

C

15

8

8

C

183

C175

R158

J

TOP19

C

199

C267

V10

18

C

304

K

C345

C

15

9

R254

L9

C180

C

17

6

L58

C

206

3

V

20

2

C322

C346

C

16

6

R255

E1

C181

C

17

7

13

C3

N4

C323

C347

C

16

7

23

V25

R

20

R245

P7

C182

C

17

8

R

23

B1

C285

14

H

R

76

C

C349

C1

14

TOP22

G2

R247

CO

N5

C

150

C

17

4

B

R

62

R

26

H

C4

W

N

L16

V2

C230

C237

C350

R4

1

P

L28

R566

V17

C

151

R

63

H7

B4

C283

C335

AD

C

231

C239

R567

B

C222

R

301

TOP13

11

D5

M

L89

R1

55

A2

H4

L17

TOP8

21

1

C

338

C2

75

L72

L40

C241

1

D1

6

R

298

C

186

C327

L74

C274

C339

L49

TOP3

16

C245

P1

TOP24

C278

H5

E

C

340

1

1bot

GN

D

1

L20

G6

C300

R

299

C2

88

C6

6

M

F

R

24

F

L

CO

N3

CO

N1

1

AB

C

303

H6

C7

7

C

343

U

R11

L69

L67

A

R

294

R

300

R55

C157

4

C

344

1

E

2

14

C301

TOP12

C

165

C290

L23

R

1

L36

24

R134

C

277

C

197

+

C

173

C296

L75

R

236

9

1

C295

R

109

R

36

C179

19

C297

P3

L87

L32

R

295

R4

4

N2

1

D

7

C

219

AE

D

R

L35

L84

J

R4

5

R

32

N3

J

C

287

#FD1

P

AD

TOP2

1

Y

R

34

C269

K

CO

N8

L26

C

299

3

C72

7

R

30

R151

H

R

569

R54

L4

V3

CON7

17

R21

1

T

Ye

TOP10

R111

R152

TOP18

2

R

570

L52

L85

CON1

3

Measuring points of CON9:

GND

+24V

+V

MOT 

(+24V)

Measuring point on the PCB:

 TOP2

+24V

 TOP3

+5V

 TOP25

+24V TPH

 TOP26

+V

MOT 

(+24V)

LED on the PCB:

 H1

+3,3V

 H7

LED FPGA
on during start 
procedure blinking 
after the start 
procedure

Fig. 18 

Layout diagram PCB CPU

Содержание MACH 4.3S/200B

Страница 1: ...Made in Germany Service Manual MACH 4S Label Printer ...

Страница 2: ...ducts discrepancies between documentation and products can occur Please check www cab de for the latest update Terms and conditions Deliveries and performances are effected under the General conditions of sale of cab Service Manual for the following product Germany cab Produkttechnik GmbH Co KG Postfach 1904 D 76007 Karlsruhe Wilhelm Schickard Str 14 D 76131 Karlsruhe Telefon 49 721 6626 0 Telefax...

Страница 3: ... 2 9 Changing the Drive of the Cutter 15 2 10 Changing the Blade of the Cutter Unit 16 2 11 Changing the Circuit Board 17 2 12 Changing the Power Supply 18 3 Adjustments 19 3 1 Measuring the Winding Force 19 3 1 1 Testing the Winding Force of the Clutch and Break of the Ribbon 19 3 1 2 Measuring the Breaking Force of the Unwinder 20 3 2 Setting the Winding Force 21 3 3 Adjusting the Print Mechanis...

Страница 4: ...isk which if not avoided may result in death or serious injury Caution Draws attention to a danger with low risk which if not avoided may result in minor or moderate injury Attention Draws attention to potential risks of property damage or loss of quality i Note Advices to make work routine easier or on important steps to be carried out Environment Gives you tips on protecting the environment Hand...

Страница 5: ...allic parts X X Do not wear clothing with metal X X Do not wear jewelry X X Do not wear glasses with a metal frame Warning Loose clothing can get caught in rotating parts of the device and can lead to injury X X When operating the device avoid wearing clothing that can get caught in rotating parts 1 2 Safety Markings Warning Waring of injury due to missing or damaged safety markings X X After main...

Страница 6: ...f power units Altering anything to do with the circuitry Check that the device is not live Check the work area for any potential hazards such as damp or wet floors defective extension cords or protective conductors Additional precautions when dealing with open voltage supply Request a second person to stay in the vicinity and operate the emergency powers or mains switch if and when required Only u...

Страница 7: ...e removed from the device When changing the to the other panels the dispensing edge must be mounted 2 6 on page 12 3 2 1 4 5 2 3 Fig 1 Changing the control panel 1 Fold the control panel 4 down 2 Steady the device with one hand and pull the control panel along axis 3 sturdily releasing it from its retainer 2 3 Take hold of the control panel over the second axis and pull it until it is released fro...

Страница 8: ...te until the device has discharged 1 1 1 2 3 1 Fig 2 Dismounting the cover The printer cover can be dismounted completely including the front lid 1 Open the printer cover 2 and remove the roll and material retainer 2 Loosen 4 screws 1 3 Remove the cover 3 with the lid 2 To mount the cover and lid follow the above order in reverse To make the implementation of the parts easier fold the printing mod...

Страница 9: ...uit board 5 Disconnect the ground wire 6 from the from CPU circuit board by undoing the screw 5 6 After loosening the two screws 2 slide and raise the print mechanism backwards until it with the screws 2 can be lifted out of the adjustment slots 7 7 Slide the new printing mechanism with the bracket 9 into the guides 8 Place the adjustment slots 7 onto the screws 2 pushing the unit forward until th...

Страница 10: ... 3 4 1 Connector data 2 Connector power 3 Threaded holes 4 Heating element Fig 4 Assembly of the printhead Attention Damaging the printhead by electrical discharge or mechanical influences X X Set up the printer on an grounded conduit X X Ground yourself with e g an anti static bracelet X X Do not touch the connectors 1 2 X X Do not touch the heating element 4 with hands or hard objects 2 Changing...

Страница 11: ...s 12 of the printhead retainer 6 6 First remove the power cable 16 and then the data cable 15 Installing the printhead 7 Connect the data cable 15 then the power cable 16 to the new printhead 8 Fasten the printhead 13 with the screws 12 to the printhead retainer 6 9 Place the printhead retainer 6 with the loop into the guide 11 and push it upward against the springs 10 where the springs should lan...

Страница 12: ... 5 and remove the dispensing edge 3 from the roller locking mechanism 4 5 Insert the dispensing plate 3 into the roller locking mechanism 4 of the new print roller and push the new roller locking mechanism 6 onto the print roller and the dispensing edge Attention When exchanging the control panel B or P with control panel C 2 2 on page 7 the dispensing edge must be removed prior to the exchange X ...

Страница 13: ...er on its side 3 Undo the snap ring 3 and remove clutch 4 form disks 5 7 friction disk 6 springs 9 and tension wheel 11 Mounting 1 Place the springs 9 into the frame 10 2 Place and hold the tension wheel 11 into the frame 3 Set the form disks 7 in line with the retainers 8 of the frame 4 Place the friction disk 6 form disks 5 and clutch 4 as illustrated 5 Push the clutch and tension wheel against ...

Страница 14: ...e retainer 6 Push the mounting assistance against the printhead assembly group and turn it counter clockwise until the lock washer 7 releases and can be taken out 5 Take off the retainer 6 spring 12 from disks 9 11 friction screw 10 and pivot arm 5 6 Set the new parts according to the illustration Attention X X Place the lock washer 7 with its markings to the outside 7 Turn the lock washer 7 with ...

Страница 15: ... 3 3 Disconnect the plug 7 4 Undo and remove the nuts 11 screws 9 with connecting rods and bearings 5 Unlock the eccentric 10 from the shaft 6 6 Lift out shaft 6 with the drive 8 from the base plate 12 7 Pull the drive 8 from shaft 6 8 To reconstruct the assembly follow these instructions in the reverse order Place the drive into the adjustment slot of the base plate 10 Attention X X Align the pin...

Страница 16: ...move the bottom blade 4 Loosen the three screws 8 and take off the top blade and the material guide 10 5 Screw a new top blade and paper guide 11 to the base plate 6 Screw a new bottom blade to the bracket 12 i Note If only the top blade 9 needs to be replaced the camp 12 with the bottom blade 6 can be hinged up from the top blade by turning the screw 7 with a hexagonal key 2 5 mm Danger Danger of...

Страница 17: ...e printer from the power supply 3 Disconnect all interface cables from the back of the printer 4 Remove all removable storage mediums 5 Remove the printer cover 2 3 on page 8 6 Disconnect all push on connectors 3 7 9 from the CPU circuit board 7 Remove the four screws 2 of the circuit board 8 Insert the new CPU circuit board 1 with the previous four screws 2 whilst connecting the ground wire 8 9 R...

Страница 18: ...issipated 1 2 2 2 3 Fig 12 Changing the power supply 1 Remove the printer from the power supply 2 Dismount the cover with the lid 2 3 on page 8 3 Remove the CPU circuit board 2 11 on page 17 4 Pull off the push on connectors 3 5 Undo three screws 2 6 Dismount the power supply 1 7 Insert the new power supply 1 and fasten it with screws 2 8 Connect the push on connector 3 9 Reassemble the CPU circui...

Страница 19: ...ring tip must be placed in the grove of the ribbon retainer for a true result 2 Close the printhead assembly group and employ the spring scale connecting it to the rewinder with the test device 3 inserted 3 To measure the clutch force wind the string around the test device 3 numerous times as illustrated in A 4 Connect the spring scale 10 N 1 to the end of the string and move it upwards vertically...

Страница 20: ...ribbon retainer for a true result 2 Open the printhead assembly group and insert the ribbon retainer 2 with the inserted test device 3 onto the rewinder 3 To measure the breaking force wrap the string around the test device 3 as illustrated in C 4 Connect the spring scale 10 N 1 to the end of the string and pull it upwards vertically until the test device starts to turn 5 Pull until the test devic...

Страница 21: ...ve the cover 7 3 Hold the ribbon retainer push holder 2 towards the frame 1 turning it to the desired position and let go taking note that the straps of the locks 3 are all the way in the provided gaps 4 Test the winding force again and compare it to the these to the test values and correct if necessary 5 refasten the cover 7 with three screws 8 i Note The numbers of the retainer 2 are not setting...

Страница 22: ...zontal settings 1 Turning the screw clockwise will move the printhead forward Turning the screw counter clockwise will move the printhead backwards For an optimal image the heat element must be set to align to the highest point of the pressure roller In this position the print image blackening is at its best Besides that this setting allows the realignment of horizontal lines with the dispensing e...

Страница 23: ...s light By doing misalignments become easy to spot 9 Test via a grind print increasing the pressure of the side of the printhead where the image is lighter This is achieved by turning the screw 6 counter clockwise by about a quarter revolution or until the printed image appears evenly printed 10 Turn screw 1 counter clockwise and push the printhead backwards until the printed image almost disappea...

Страница 24: ...y change the interface cable In case of complete outage exchange the CPU circuit board A peripheral device does not work Check if the peripheral device is connected via programming Ensure the USB cable of the peripheral device is working and exchange it if necessary Test the peripheral device Exchange the CPU circuit board Table 1 Failure of device functions 4 2 Permanently Occurring Hardware Erro...

Страница 25: ...25 5 Block Diagram Printer Nr 1 MACH 4S 300 5977444 MACH 4S 600 5977380 MACH 4 3S 200 5977382 MACH 4 3S 300 5977383 Fig 17 Block diagram ...

Страница 26: ... C2 C28 C163 AC D14 R71 CON4 R108 V R136 C187 C307 R166 1 L90 V13 V7 C164 C5 5 R280 F R77 C308 L25 R160 C213 C160 15 C207 2 R253 V21 R139 C42 C204 1 R163 C169 L42 L80 TOP6 C268 CON17 10 C15 R209 R78 C271 3 L14 FD3 C170 N1 R98 C196 20 1 P4 CON9 C225 C209 C309 1 U4 R171 L66 H1 R31 C171 K 8 L1 C313 25 R85 E C310 T R172 K B5 C27 C351 C172 R150 L30 C352 L R2 C325 C220 C311 L59 R227 V9 C168 AA C112 7 R5...

Страница 27: ...ive of the cutter 15 Changing the power supply 18 Changing the printhead 10 Changing the print mechanism 9 Changing the print roller 12 D Dismounting the cover 8 F Failure of device functions 24 G General safety 5 M Measuring the breaking force of the unwinder 20 Measuring the winding force 19 P Permanently occurring hardware errors 24 S Safety markings 5 Settings 23 Setting the winding force 21 T...

Отзывы: