51
English
Practical measuring suggestions
17
Anodized aluminum and other
metal surfaces
The measuring unit is equipped
with an extended measuring range
for measuring samples with a very
high reflectance.
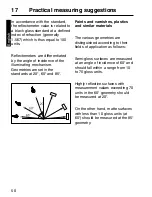
The reflectance of non-metallic
surfaces increases with the angle
of incidence. The reflective
properties of metals do not always
behave in this manner. Because of
double reflection, the light is
partially reflected on the coating
and partially on the metal
underneath. For a complete
understanding of the reflective
properties of such surfaces, it is
recommended to measure them at
all geometries.
In addition to the reference to a
black glass standard (gloss units),
it is also common in the area of
metals to relate the reflectometer
value to the amount of irradiated
light and to express it as a %
(reflectance). You can select this in
the Scale menu.
Notes
Proper measurements are only
possible on level surfaces.
Measurements on dirty, scratched
or otherwise distorted areas of the
test specimen are not meaningful
except as a way of determining the
degree of such imperfections by
means of a gloss measurement.
Since it cannot be assumed that
the gloss capacity is not constant
over the entire surface of the test
specimen, the reflectometer value
can be measured at several diffe-
rent places and the standard
deviation can be determined.
If the sample exhibits structures or
directionally dependent gloss
properties, the structural features
and the direction of the incident
light should be specified for the
measurement in the test report.
Samples that must be measured
several times over the course of an
examination (for example
weathering samples) should be
marked accordingly to ensure that
the measurement is made at the
same point during repeated tests.
Содержание micro-TRI-gloss ?
Страница 172: ... RAN AIS ...
Страница 173: ... RAN AIS ...
Страница 174: ...260 017 521 EDF 0401 ...

