background image

Safety instructions


Straw blower 

Translation of the Original Operating Manual 

19 


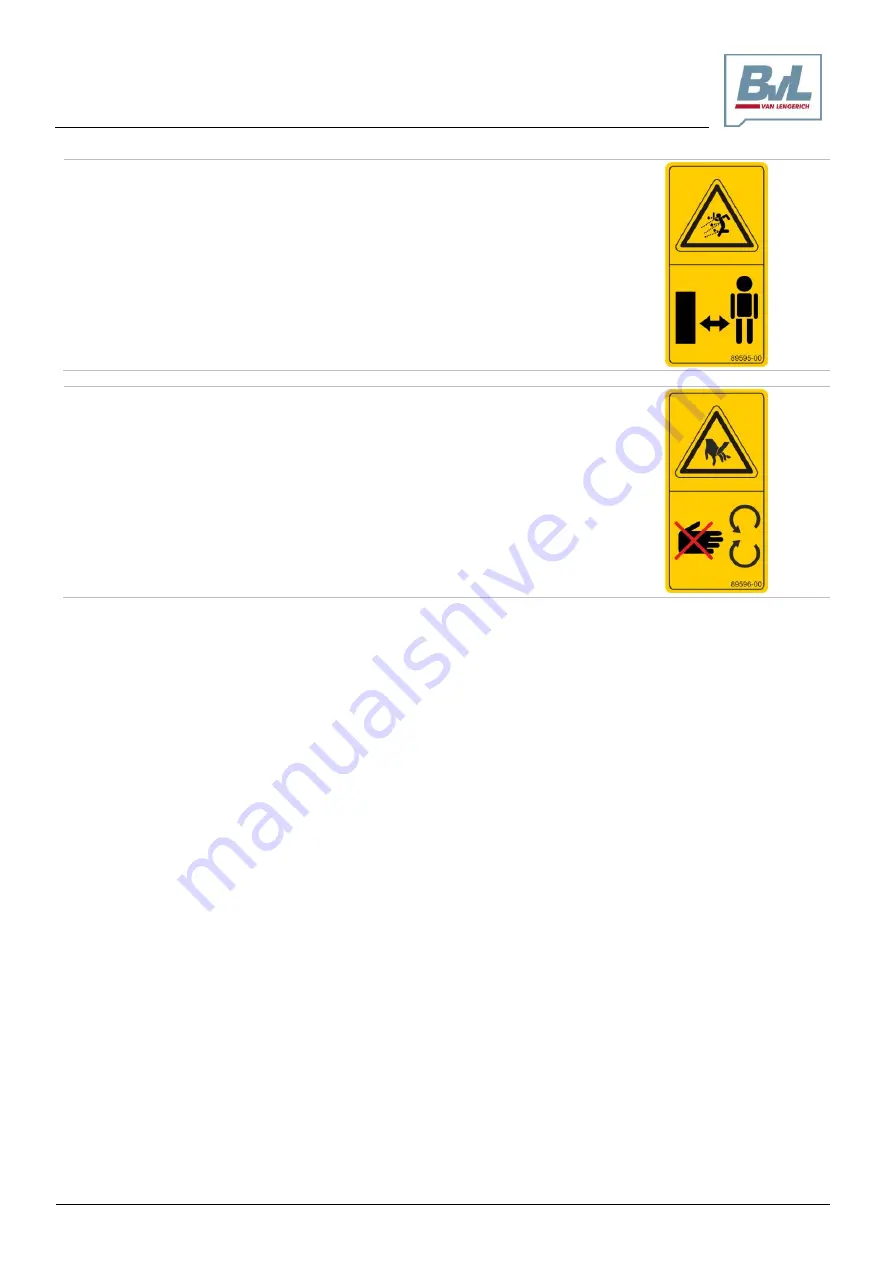
89595 

Risk from materials or foreign objects that are flung off or out of the 
machine when staying in the danger area of the machine! 

These hazards may cause serious injury to the entire body. 


Keep at a safety distance to the danger area of the machine. 


Make sure that everyone keeps at a safe distance to the danger area of 
the machine while the diesel engine is running 


89596 

Risk from moving parts! 

Risk from moving parts. 


Do not open or remove guards during operation. 


Содержание V-COMFORT TURBO plus

Страница 1: ...E Supplement1 Ma chine Supplement2 Year of manufacture BA thi s manual PCS ItemNo 93 945 DocuType Op erating manual Operating manual www bvl group de V COMFORT TURBO plus Supplement to the V MIX opera...

Страница 2: ...ghts reserved Reprints even in excerpts only with the written permission of Bernard van Lengerich Maschinenfabrik GmbH Co KG Manufacturer s address Bernard van Lengerich Maschinenfabrik GmbH Co KG Ope...

Страница 3: ...anual of the V Mix User review Dear reader Our operating manuals are revised on a regular basis You help us increase the user friendliness of our operating manuals by sending us your tips and recommen...

Страница 4: ...s 13 2 3 5 Warranty and liability 13 2 4 General safety instructions 14 2 4 1 General information on safety and accident prevention 14 2 4 2 Use of the machine 14 2 4 3 Cleaning maintenance and repair...

Страница 5: ...6 2 2 Switching the machine off 34 7 Cleaning maintenance and repairs 35 7 1 Cleaning 36 7 1 1 Cleaning with high pressure sprayers steam cleaners 36 7 2 Lubricating 37 7 2 1 Lubrication schedule 37 7...

Страница 6: ...anual This operating manual describes how to operate clean service and repair the machine provides important information on how to handle the machine in a safe and efficient way If you have any questi...

Страница 7: ...r action 1 2 Instruction for action 2 Lists Unordered lists are displayed as lists with bullet points Example Item 1 Item 2 Item numbers in illustrations Figures included in round brackets refer to th...

Страница 8: ...ns Regardless using the machine carries certain risks and may impair the life and limb of the operator or third parties for the machine itself other material assets Observe the following to ensure the...

Страница 9: ...les o work gloves o safety shoes o protective suit o skin protection etc 2 2 2 Responsibilities of the operator Before commencing work all personnel designated to work with on the machine are required...

Страница 10: ...Activity Person specially trained to perform this activity 1 Instructed person 2 Person with professional training specialty workshop 3 Loading transport X X X Commissioning X X Setup adjustment X X O...

Страница 11: ...manual including all accompanying documents Ensuring that all activities are performed by trained specialty personnel only Ensuring that all spare parts used comply with specifications Ensuring that n...

Страница 12: ...you have the written permission of the manufacturer to do so In case of unauthorized structural modifications as well as unauthorized attachments and retrofitting o the Declaration of Conformity and t...

Страница 13: ...nd Delivery apply as a general rule The owner of the V Mix machine has received these terms no later than by the time the contract was concluded Warranty and liability claims are excluded in cases of...

Страница 14: ...ided in the chapter the action related safety instructions laid out in the other chapters must be observed as well Keep everyone away from the immediate area of the machine before putting the machine...

Страница 15: ...the machine be aware of the existence of residual energy Components containing residual energy are identified by warnings For detailed information refer to the corresponding chapters in this operatin...

Страница 16: ...f the imminent danger DANGER DANGER DANGER indicates a situation of immediate danger that will result in severe injury or death WARNING WARNING WARNING indicates a situation of potential danger that m...

Страница 17: ...ing the hazard and enclosed by a triangular safety symbol 2 pictogram intended to help avoid the hazard The pictogram is composed of an image providing information on how to avoid the hazard Explanati...

Страница 18: ...or severed from the movements of parts that are accessible and moving while work is in progress This hazard may cause serious injury including the loss of body parts Wait until all moving parts of the...

Страница 19: ...aying in the danger area of the machine These hazards may cause serious injury to the entire body Keep at a safety distance to the danger area of the machine Make sure that everyone keeps at a safe di...

Страница 20: ...instructions and warnings Failure to observe the safety instructions and warnings may result in personal injury as well as danger to the environment and the machine including o Risk of personal injury...

Страница 21: ...with direct ejector Throw distance up to 20 m tangential with direct ejector Sound pressure level max 104 dB A NOTICE When the straw blower is mounted at the front the weight of the overall machine V...

Страница 22: ...apter while directly at the machine This is the best way to become familiar with the machine 4 1 Straw blower overview The straw blower has been mounted to a V Mix mixer wagon at the factory and is us...

Страница 23: ...opened by a control on the control panel see Chapter 6 1 1 1 Operating elements and controls on the control panel Figure 4 Fig 4 2 Discharge gate The opening width of the dosing gate 1 defines the qu...

Страница 24: ...e trap 2 The rubber guard 3 offers a flexible seal for the transition to the mixing hopper channeling the suction of the blower to the door leading to the mixing hopper The rubber guard prevents any i...

Страница 25: ...and a modular top section with a corresponding door Attached to the centrally mounted gearbox 4 which is powered by the main drive is the impeller 2 The drive train between the two gearboxes 4 is enc...

Страница 26: ...inal Operating Manual Straw blower 4 1 4 Ejector The ejector is used to distribute the straw Cylinder 1 is designed to adjust the angle of the end cover 2 Cylinder 3 is designed to adjust the tilt ang...

Страница 27: ...the correctly installed guards in the safety position WARNING Risks of personal injury from crushing entanglement and catching may arise when moving parts of the machine are unprotected during operati...

Страница 28: ...otective hood 1 covering the drive shaft prevents people from reaching into the machine during operation Fig 4 9 Maintenance cover 4 2 2 Rubber guard The rubber guard 2 prevents anyone from reaching i...

Страница 29: ...must always ensure the presence of all complete and fully functional safety equipment before starting the machine When putting the machine into operation observe the additional information provided i...

Страница 30: ...ks of personal injury from crushing entanglement and entrapment may arise if the machine is operated with drive elements that are unprotected Do not put the machine into operation unless the guards ar...

Страница 31: ...N To switch the power supply on turn the main switch to the ON position Main switch position OFF To switch the power supply off turn the main switch to the OFF position Discharge gate switch Open clos...

Страница 32: ...and operation 32 Translation of the Original Operating Manual Straw blower 6 1 2 Bowden cable The Bowden cable is used to switch the straw blower on and off Fig 6 2 Bowden cable 1 Bowden cable 2 Lever...

Страница 33: ...nce of the blower ejector see Chapter 6 1 1 1 Operating elements and controls on the control panel Figures 5 and 6 3 With the PTO shaft drive switched off flip the lever of the Bowden cable see Chapte...

Страница 34: ...e indicator see Fig 4 3 Dosing gate opening width page 23 2 Wait until the blower is completely empty 3 Switch off the PTO shaft drive of the tractor Refer to the operating manual of the tractor for a...

Страница 35: ...machine Wait until the machine has come to a complete standstill before entering the danger area of the machine Before removing clogs secure the machine against unintended start up WARNING Risks of p...

Страница 36: ...of cleaning agents Touch up any paint damage immediately to prevent rust formation 7 1 1 Cleaning with high pressure sprayers steam cleaners Make sure to observe the following steps when using a high...

Страница 37: ...dealer for more information 7 2 1 Lubrication schedule Pos Component Activity Quantity Interval 1 Double joint of the drive connection 2 cardan joints with cap bottom lubrication Lubrication nipple l...

Страница 38: ...Oh every 50 Oh thereafter Replace self locking nuts every time they have been loosened Gearbox Check oil level daily Change gear oil for the first time after 100 h then every 1 000 h however no less t...

Страница 39: ...once per year whichever interval comes first Dispose of the used oil as stipulated by law If you experience problems with disposal contact your oil supplier If possible the oil change should take pla...

Страница 40: ...ot shown in the figure at the bottom of the gearbox 8 Allow oil to drain Wait until no more oil runs out of the oil drain screw 9 Screw in and tighten the plug 2 again apply suitable sealant 10 Unscre...

Страница 41: ...ing torques for bolt joints Tightening torques Nm depending on grade of the bolts nuts Thread O 8 8 10 9 M4 3 04 4 31 M5 6 03 8 48 M6 10 3 14 71 M 8 25 5 35 3 M 10 50 01 70 61 M 12 87 28 122 58 M 14 1...

Страница 42: ...reaching into the machine Fault Cause Remedy Machine without movement Power supply interrupted Check the drive train of the machine Unusual noises Beginning bearing damage Check replace bearings Movin...

Страница 43: ...Remove all the bolts progressively in order to reduce the spring thrust evenly and gradually Abb 9 2 Disassembly 3 Remove the Belleville spring and remove the metal spacer band 4 Remove all the compo...

Страница 44: ...om coming into contact with the thrust disc when tightening the bolt Abb 9 6 Assembly 3 Insert the 8 screws with their head resting on the flanged yoke 4 Tighten all the nuts until they are in contact...

Страница 45: ...n Clamping screw Setting Nm Disc spring Order No Setting Nm Disc spring Order No 400 367FT220A 900 367FT320A 500 367FT220C 1000 367FT320C 600 367FT220D 1100 367FT320D 800 367FT220E FT34 and FT34R Fric...

Отзывы: