background image

27

a.  You will get the best results when the subject is within the 
ideal  flash  range,  no  closer  than  10’  (3m)  from  the  camera. 
Subjects may appear too light at closer distances.

4.   Daytime photos or videos appear too bright

a.  Make sure that the camera is not aimed at the sun or other 
light sources during the day. 

5.   Photos with streaked subject

a.  In some cases with low lighting conditions and fast moving 
subjects, the 5MP or 8MP resolution settings may not perform 
as well as the 3MP setting. 
b.  If  you  have  multiple  images  where  fast  moving  subjects 
produce streaks on the photo, try the 3MP setting instead.

6.   Red, green or blue color cast

a.   Under  certain  lighting  conditions,  the  sensor  can  become 
confused resulting in poor color images.
b.   If  this  is  seen  on  a  consistent  basis,  then  the  sensor  may 
need servicing. Please contact Bushnell customer service.

7.   Short video clips—not recording to the length set

a.   Check to make sure that the SD card is not full.
b.  Make sure that the camera has good batteries in it.  Near the 
end of the battery life, the camera may choose to record shorter 
video clips to conserve power.

Date/Time Stamp not appearing on images

1.  Make sure that the “Time Stamp” parameter is set to “On”.

Photos Do Not Capture Subject of Interest

1.  Check  the  “Sensor  Level”  (PIR  sensitivity)  parameter  setting. 

For warm environmental conditions, set the Sensor Level to “High” 
and for cold weather use, set the sensor for “Low”.

2. 

Try to set your camera up in an area where there is not a heat source 
in the camera’s line of sight.

3. 

In some cases, setting the camera near water will make the camera 
take  images  with  no  subject  in  them.  Try  aiming  the  camera  over 
ground.

Содержание Trophy Cam 119435

Страница 1: ...TROPHY CAM I N ST R U C T I O N M A N UA L Model s 119435 119445 119455 Lit 98 1559 1 10 ...

Страница 2: ...2 ...

Страница 3: ...3 TABLE OF CONTENTS PAGE ENGLISH Français Español Deutsch ITALIANO Português 5 31 32 64 65 97 98 133 134 166 167 199 ...

Страница 4: ...em to be functioning properly or if you are having photo video quality issues please check the Troubleshooting FAQ section on pages 25 28 Problems are often due to something simple that was overlooked or require only changing one setting to solve If your problem continues after trying the solutions in the Troubleshooting FAQ section please call Bushnell Customer Service at 800 423 3537 In Canada c...

Страница 5: ...settings The Trophy Cam is equipped with built in infrared LEDs that function as a flash so that it delivers clear photos or videos in black white even in the dark and it can take color photos or videos under sufficient daylight The Trophy Cam is designed for outdoor use and is resistant against water and snow Applications The Trophy Cam can be used as a trail camera for hunting or scouting game I...

Страница 6: ...ra and the OK key switches the camera to the Playback REPLAY mode These secondary functions are indicated by icons or text above the key as shown in Fig 2 Fig 2 Button and Switch Guide Fig 1 Connections TV Out USB Port SD Card Slot DC In ON SETUP OFF LED IR Flash Motion Low Battery Indicator Lens Lock Hole PIR Sensor FRONT VIEW LCD Screen Power Mode Switch UP Video DOWN Photo LEFT MENU OK Replay R...

Страница 7: ...only see right starting at slot 1 Battery life will be shorter with 4 batteries but the camera will operate normally Whether you use 4 or 8 be sure to insert each battery with correct polarity negative or flat end against the long spring of each battery slot Bushnell recommends using eight new lithium AA Energizer brand or alkaline AA batteries NiMh Rechargeable batteries can also be used but they...

Страница 8: ... the SD card when the power switch is in the ON position The Trophy Cam uses a standard SD Secure Digital memory card to save photos in jpg format and or videos in asf format SD and SDHC High Capacity cards up to a maximum 16GB capacity are supported Before inserting the SD card into the card slot after opening the camera s front cover please make sure that the write protect switch on the side of ...

Страница 9: ...ut what the 3 way switch and those control keys do If nothing else you ll probably want to at least set the date and time so the camera will imprint them or not it s your option on your photos as they are taken learn how to set the camera to shoot video clips instead of still photos if you like and read some tips about mounting it on a tree THE OFF ON AND SETUP MODES The Trophy Cam has three basic...

Страница 10: ...ill take photos or videos automatically according to its current parameter settings when it is triggered by the PIR sensor s detection of activity in the area it covers You can either move the power switch directly from OFF to ON mode or stop at the SETUP position first to change one or more settings then move the switch to ON after you have finished doing so SETUP Mode In the SETUP mode you can c...

Страница 11: ...eo depending on how the camera was set will be saved to the SD card or internal memory if no card is inserted The number of images taken counter on the bottom left of the LCD will increase by one If the display indicates SD PROTECTED when you press the SHOT key switch the camera OFF remove the SD card and slide its protect switch off Press the OK key to replay review or playback photos videos on t...

Страница 12: ...rameter and pressing the UP or DOWN key lets you select a different setting for the currently displayed parameter Once you have selected your preferred new setting for a parameter press the OK button to save the new setting actually change it When have are finished changing the settings of one or more parameters press MENU again to exit the SETUP menu MENU can also be pressed anytime you want to c...

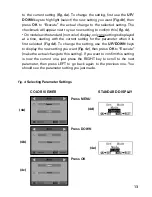
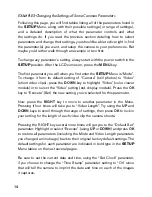
Страница 13: ...color display only one setting is displayed at a time starting with the current setting for the parameter when it is first selected Fig 4d To change the setting use the UP DOWN keys to display the new setting you want Fig 4e then press OK to Execute make the actual change to this setting If you want to confirm this setting is now the current one just press the RIGHT key to scroll to the next param...

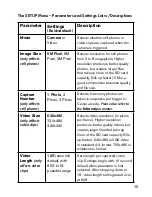
Страница 14: ...ight Video color viewer models or to select the Video setting std display models Press the OK key to Execute Set the new setting you ve selected for this parameter Now press the RIGHT key to move to another parameter in the Menu Pressing it four times will take you to Video Length Try using the UP and DOWN keys to scroll through the range of settings then press OK to lock in your setting for the l...

Страница 15: ... how many photos are taken in sequence per trigger in Camera mode Please also refer to the Interval parameter Video Size only affects video clips 640x480 720x480 320x240 Selects video resolution in pixels per frame Higher resolution produces better quality videos but creates larger files that take up more of the SD card capacity fills up faster 640x480 is VGA video in standard 4 3 format 720x480 i...

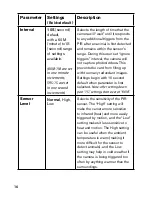
Страница 16: ... prevents the card from filling up with too many redundant images Settings begin with 10 second default when parameter is first selected Note after setting down past 1S settings start over at 60M Sensor Level Normal High Low Selects the sensitivity of the PIR sensor The High setting will make the camera more sensitive to infrared heat and more easily triggered by motion and the Low setting makes i...

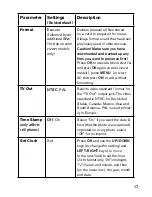
Страница 17: ...NU or select NO then press OK to exit without formatting TV Out NTSC PAL Selects video standard format for the TV Out output jack The video standard is NTSC for the United States Canada Mexico Asia and South America PAL is used primar ily in Europe Time Stamp only affects still photos Off On Select On if you want the date time that the photo was captured imprinted on every photo select Off for no ...

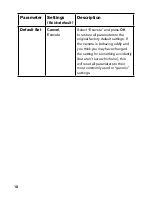
Страница 18: ... and press OK to restore all parameters to the original factory default settings If the camera is behaving oddly and you think you may have changed the setting for something accidently but aren t sure which one this will reset all parameters to their most commonly used or generic settings ...

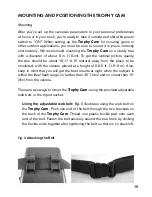
Страница 19: ...t 5 meters away from the place to be monitored with the camera placed at a height of 5 6 5 ft 1 5 2 m Also keep in mind that you will get the best results at night when the subject is within the ideal flash range no farther than 45 14m and no closer than 10 3m from the camera There are two ways to mount the Trophy Cam using the provided adjustable web belt or the tripod socket Using the adjustable...

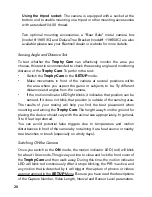
Страница 20: ...can be sensed If it does not blink that position is outside of the sensing area The results of your testing will help you find the best placement when mounting and aiming the Trophy Cam The height away from the ground for placing the device should vary with the animal size appropriately In general 3 to 6 feet is preferred You can avoid potential false triggers due to temperature and motion disturb...

Страница 21: ... are several different ways this can be done Reviewing Images on the Trophy Cam LCD Models with Color Viewer only Put the power switch in SETUP mode switch to OFF first Push the OK Replay key to enter image review mode Use the UP DOWN keys to scroll through your photos or videos The right corner of the display will indicate JPG for still photos and a film icon for video files Press the RIGHT Shot ...

Страница 22: ...ut leaving SETUP mode Press the MENU key You will see the first Delete screen which lets you selects the option to delete only the currently displayed photo video or all photos videos see below Highlight the Delete Current or Delete All option then press OK Next select Yes and press OK to erase only the last displayed photo or video if you selected Delete Current or every photo and video file on t...

Страница 23: ...er included with the PC s operating system to view images saved on the SD card in the folder DCIM 100EK113 Each new image or video will be numbered incrementally in order of the time it was captured For example you will see file names such as PICT0001 JPG or PICT0001 ASF Through the file format suffix you can distinguish whether the file is a still photo with suffix jpg or a video with suffix asf ...

Страница 24: ... will also be listed as a Removable Disk if you open the My Computer window on Macs an icon will appear on your desktop The Trophy Cam s photo files are named PICT0001 JPG etc and are located in the DCIM 100EK113 folder on this Removable Disk Video file names will end with ASF You may copy the photos videos to your hard drive as you would any file just copy paste or drag the file names or icons to...

Страница 25: ... taking images or won t take images 1 Please make sure that the SD card is not full If the card is full the camera will stop taking images 2 Check the batteries to make sure that they are new alkaline or lithium AA batteries See note above about short battery life 3 Make sure that the camera power switch is in the On position and not in the Off or Setup modes 4 Make sure that you are using a good ...

Страница 26: ...n back up to Setup Still Photo and or Video Quality Problems 1 Night photos or videos appear too dark a Check the battery indicator icon to see if battery power is full The flash will stop operating near the end of the battery life b You will get the best results when the subject is within the ideal flash range no farther than 45 14m from the camera Subjects may appear too dark at greater distance...

Страница 27: ...ages b If this is seen on a consistent basis then the sensor may need servicing Please contact Bushnell customer service 7 Short video clips not recording to the length set a Check to make sure that the SD card is not full b Make sure that the camera has good batteries in it Near the end of the battery life the camera may choose to record shorter video clips to conserve power Date Time Stamp not a...

Страница 28: ...on to ensure the proper mode avoid positions between two modes b Do not move the switch directly from On to Setup always move the switch all the way down to Off first then back up to Setup 2 LCD screen shows a faint black line after turning from Setup to On a The LCD will turn off when you slide the switch to the On position In some cases this black line will appear and then fade in about 1 second...

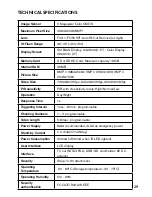
Страница 29: ...tivity PIR with 3 sensitivity levels High Normal Low Operation Day Night Response Time 1s Triggering Interval 1sec 60min programmable Shooting Numbers 1 3 programmable Video Length 5 60sec programmable Power Supply 8xAA recommended 4xAA as emergency power Stand by Current 0 3mA 7mAh day Power Consumption 200mA 530mA when IR LED lighted User Interface LCD display Interface TV out NTSC PAL USB SD ca...

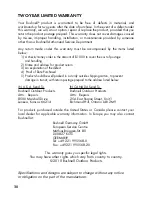
Страница 30: ...e Purchased 5 Product should be well packed in a sturdy outside shipping carton to prevent damage in transit with return postage prepaid to the address listed below IN U S A Send To IN CANADA Send To Bushnell Outdoor Products Bushnell Outdoor Products Attn Repairs Attn Repairs 8500 Marshall Drive 25A East Pearce Street Unit 1 Lenexa Kansas 66214 Richmond Hill Ontario L4B 2M9 For products purchased...

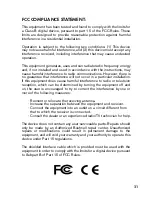
Страница 31: ...pment does cause harmful interference to radio or television reception which can be determined by turning the equipment off and on the user is encouraged to try to correct the interference by one or more of the following measures Reorient or relocate the receiving antenna Increase the separation between the equipment and receiver Connect the equipment into an outlet on a circuit different from tha...

Страница 32: ...TROPHY CAM N OT I C E D U T I L I S AT I O N Nos de modèle 119435 119445 119455 Lit No 98 1517 1 10 Français ...

Страница 33: ...ité avec les photos vidéos veuillez consulter la section Diagnostic Questions Fréquemment Posées aux pages 57 à 61 de cette notice Les problèmes ont souvent une cause simple qui n a pas été remarquée ou demandent seulement un changement de réglage pour être résolus Si votre problème persiste après avoir essayé les solutions de la section Diagnostic Questions Fréquemment Posées nous vous recommando...

Страница 34: ...ment dans la seconde qui suit pour prendre des photos ou des séquences vidéo selon la configuration établie au préalable Le Trophy Cam est équipé de LED infrarouge intégrées qui fonctionnent comme un flash pour fournir des photos ou des vidéos en noir et blanc dans l obscurité et peut prendre des photos ou des vidéos en couleur lorsqu il y a assez de lumière du jour Le Trophy Cam est conçu pour êt...

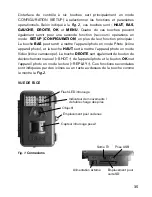
Страница 35: ...areil photo en mode Photo icône appareil photo et la touche HAUT sert à mettre l appareil photo en mode Vidéo icône caméscope La touche DROITE sert également de bouton de déclenchement manuel SHOT de l appareil photo et le bouton OK met l appareil photo en mode lecture REPLAY Ces fonctions secondaires sont indiquées par des icônes ou un texte au dessus de la touche comme le montre la Fig 2 Fig 1 C...

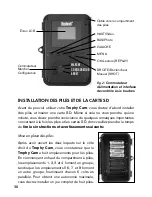
Страница 36: ...e minute vous devez prendre conscience de quelques remarques importantes concernant à la fois les piles et les cartes SD donc veuillez prendre le temps de lire les instructions et avertissements suivants Mise en place des piles Après avoir ouvert les deux loquets sur le côté droit du Trophy Cam vous constaterez que le Trophy Cam a huit emplacements pour les piles En commençant en haut du compartim...

Страница 37: ... En option vous pouvez branchez une source de courant externe de 6V à la prise DC in située sous le Trophy Cam Il est recommandé d utiliser une source d électricité ayant une sortie de courant supérieure à 1 000 mA Cependant lors d une utilisation par temps clair lorsque le flash n est pas nécessaire le Trophy Cam peut fonctionner avec beaucoup moins de courant 400 mA Veuillez utiliser un câble d ...

Страница 38: ...acement pour carte l étiquette de la carte vers le haut voir ci dessus Un déclic indique que la carte est installée avec succès Si le mauvais côté de la carte est vers le haut vous ne pourrez pas l insérer sans forcer il n y a qu une seule manière d insérer correctement les cartes Si la carte SD n est pas installée correctement l écran LCD n affichera pas d icône carte SD en mode SETUP CONFIGURATI...

Страница 39: ...rbre LES MODES MARCHE ARRÊT ET CONFIGURATION Le Trophy Cam a trois modes de fonctionnement de base mode ARRÊT Commutateur d alimentation en position OFF mode MARCHE Commutateur d alimentation en position ON l écran LCD est éteint mode CONFIGURATION Commutateur d alimentation en position SETUP l écran LCD est allumé Mode ARRÊT OFF Le mode ARRÊT est le mode de sécurité permettant toute une série d a...

Страница 40: ...N SETUP pour changer l un des réglages ou plus puis passer à MARCHE ensuite Mode CONFIGURATION SETUP Dans le mode CONFIGURATION vous pouvez vérifier et changer les réglages du Trophy Cam en utilisant l écran LCD intégré ou un moniteur branché au jack de sortie TV Ces réglages qui se trouvent dans le menu CONFIGURATION vous permettent de changer la résolution des photos ou des vidéos l intervalle d...

Страница 41: ... pour tester l appareil veillez à ce que vous soyez en mode SETUP CONFIGURATION appuyez sur la touche DROITE et quelques secondes plus tard une photo ou une séquence vidéo selon le réglage de l appareil sera sauvegardée sur la carte SD ou la mémoire interne si aucune carte n est insérée Le compteur nombre de photos prises en bas et à gauche de l écran LCD augmentera de un Si l écran indique SD PRO...

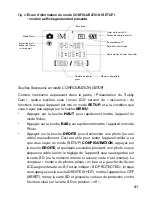
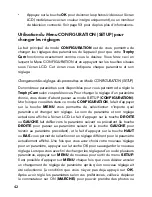
Страница 42: ...ON le fait d appuyer sur la touche MENU vous permettra de sélectionner n importe quel paramètre et changer son réglage Le nom du paramètre et son réglage actuel sera affiché à l écran LCD Le fait d appuyer sur la touche DROITE ou GAUCHE fait défiler vers le paramètre suivant ou précédent la touche DROITE pour passer au paramètre suivant et la touche GAUCHE pour revenir au paramètre précédent et le...

Страница 43: ...d abord les touches HAUT BAS pour mettre en surbrillance sélectionner le nouveau réglage que vous désirez Fig 4b puis appuyez sur OK pour valider Execute le nouveau réglage La coche apparaîtra à côté de votre nouveau réglage pour le confirmer Fig 4c Sur les modèles à affichage standard monochrome un seul réglage peut être affiché à la fois en commençant par le réglage actuel du paramètre lorsqu il...

Страница 44: ... paramètres existant du Menu SETUP CONFIGURATION ainsi que leurs réglages possibles ou plage de réglages une description détaillée de ce que contrôle le paramètre et le but des réglages Si vous avez lu la section précédente détaillant comment sélectionner les paramètres et changer leurs réglages vous devriez être en mesure de trouver le s paramètre s que vous désirez et régler l appareil selon vos...

Страница 45: ...r à Video Length durée des vidéos Utilisez les touches HAUT et BAS pour faire défiler la plage des réglages puis appuyez sur OK pour valider votre réglage de la durée de chaque séquence vidéo que l appareil prendra Le fait d appuyer sur la touche DROITE plusieurs fois supplémentaires vous fera passer au paramètre default set réglages par défaut Mettez le en surbrillance ou sélectionnez Execute en ...

Страница 46: ... du fichier Capture Number Nombre de Photos concerne les photos seule ment 1 Photo 2 Photo 3 Photo Sélectionne combien de photos sont prises en rafale à chaque déclenchement en mode Appareil photo Veuillez vous référer au paramètre Intervalle Video Size Résolution Vidéo concerne les séquences vidéo uniquement 640x480 720x480 320x240 Sélectionne la résolution vidéo en pixels par image Une résolutio...

Страница 47: ...age de réglage disponible de 60 mn minute à 1 s seconde 60 mn 1 mn sont réglés par incréments d une minute 59S 1S sont réglés par incrément d une seconde Sélectionne la durée pendant laquelle l appareil attendra avant de répondre à des déclenchements supplémentaires du capteur infrarouge passif après qu un animal ait été initialement détecté et reste dans les limites de la portée du capteur Pendan...

Страница 48: ...bilité faible pourra être utile lorsqu il fait froid et si l appareil se déclenche trop souvent par la présence de quelconque élément plus chaud que l espace environnant Format Formater Execute Valider suivi d une étape No Yes Non Oui sur les modèles à affichage couleur uniquement Efface supprime tous les fichiers sauvegardés sur la carte pour la préparer pour sa réutilisation Formatez toujours un...

Страница 49: ...mprimer Set Clock Réglage Horloge Set régler Appuyez sur OK et utilisez les touches HAUT BAS pour changer le réglage et les touches GAUCHE DROITE pour passer au champ suivant pour régler les heures format 24h uniquement 00 minuit 12 midi et les minutes puis sur la rangée du bas l année le mois et la date Default Set réglages par défaut Cancel annuler Execut valider Sélectionnez Execute et appuyez ...

Страница 50: ...e monter le Trophy Cam en utilisant soit la sangle réglable fournie soit le filetage situé sous l appareil pour fixation sur pied En utilisant la sangle réglable fournie Voir la Figure 5 Enfilez l une des extrémités de la sangle dans l un ou l autre des supports à l arrière du Trophy Cam Fixez une des parties de la boucle en plastique à chaque extrémité de la sangle Attachez solidement la sangle a...

Страница 51: ...de détection Les résultats de vos essais vous aideront à déterminer la meilleure position lorsque vous monterez et pointerez le Trophy Cam La hauteur de positionnement au dessus du sol devra varier de manière appropriée en fonction de la taille de l animal En général de 90 centimètres à 1 80 mètres Vous pouvez éviter les déclenchements intempestifs dus à la température et aux perturbations de la d...

Страница 52: ...r les choses suivantes Les piles ou l alimentation externe sont elles installées branchées en respectant la polarité et la puissance de l alimentation est elle suffisante La carte SD a t elle assez d espace disponible et le curseur de protection contre l écriture situé sur la carte SD est il sur off Le commutateur d alimentation est il en position ON MARCHE Ne le laissez pas sur SETUP CONFIGURATIO...

Страница 53: ... le commutateur d alimentation en mode SETUP CONFIGURATION mettez le d abord sur OFF ARRÊT Appuyez sur la touche OK La dernière photo prise apparaîtra sur le moniteur vidéo Pour les séquences vidéo appuyez sur la touche SHOT DROITE pour commencer la lecture puis encore une fois pour arrêter Appuyez sur la touche HAUT pour la photo ou la vidéo précédente et la touche BAS pour la suivante Lorsque vo...

Страница 54: ...rés Il est également possible d effacer tous les fichiers de la carte en utilisant le paramètre Format formater Visionnage direct sur la carte SD C est la méthode la plus simple pour visionner des images Vous n avez qu à retirer la carte SD du Trophy Cam En rentrant chez vous il vous suffit de mettre cette carte dans l emplacement prévu à cet effet soit dans votre ordinateur ou votre télévision si...

Страница 55: ... Par exemple vous verrez des noms de fichiers comme PICT0001 JPG or PICT0001 ASF Grâce au suffixe du format de fichier vous pouvez distinguer si le fichier est une photo avec le suffixe jpg ou une vidéo avec le suffixe asf Un logiciel supplémentaire pourra être nécessaire pour visionner les fichiers vidéo ASF sur un Mac Le Trophy Cam supporte 3 types de formats de système de fichiers FAT12 FAT16 e...

Страница 56: ...Cam sont appelés PICT0001 JPG etc et se trouvent dans le dossier DCIM 100EK113 sur ce Disque amovible Les noms des fichiers vidéo se termineront par ASF Vous pouvez copier les photos vidéos sur votre disque dur comme vous le feriez pour n importe quel fichier copiez collez simplement ou glissez posez vers votre disque dur ou sur votre bureau Après que les photos aient été copiées sur votre disque ...

Страница 57: ...teindre 16 Go Notre expérience indique que les cartes SD de mauvaise qualité peuvent réduire la durée de vie des piles de votre Trophy Cam L appareil arrête de prendre des photos ou n en prend pas 1 Veuillez vous assurer que la carte SD n est pas pleine Si tel est le cas l appareil arrêtera de prendre des photos 2 Vérifiez les piles pour vous assurer que ce sont des piles AA alcalines ou au lithiu...

Страница 58: ...t en respectant la polarité Placez toujours l extrémité négative plate de chaque pile en contact avec le côté ressort de son emplacement à l intérieur de l appareil 3 Après avoir changé le commutateur de la position OFF à la position SETUP ou ON veillez à ce qu il soit en bonne position pour activer le mode qui convient évitez les positions intermédiaires commutateur placé entre deux modes 4 Ne me...

Страница 59: ...tée idéale du flash pas plus de 3 mètres de l appareil Les sujets pourront sembler trop clairs à des distances plus courtes 4 Les photos ou les vidéos prises en plein jour semblent trop claires a Assurez vous que l appareil n est pas pointé vers le soleil ou autres sources de lumière pendant la journée 5 Les photos sont striées a Dans certains cas dans des conditions de lumière basse et avec les s...

Страница 60: ...ecteur sur Low basse 2 Essayez d installer votre appareil dans un endroit où il n y a pas de source de chaleur dans la ligne de vue de l appareil 3 Dans certains cas quand il est installé près d un plan d eau il est possible que l appareil prenne des photos ne contenant aucun sujet Essayez alors de pointer l appareil vers le sol 4 Evitez d installer l appareil sur de petits arbres susceptibles de ...

Страница 61: ... que vous soyez passé de SETUP CONFIGURATION à ON MARCHE a L écran LCD s éteint lorsque vous mettez le commutateur en position ON MARCHE Dans certains cas cette ligne noire apparaîtra puis s estompera une seconde après Ceci est normal et l appareil fonctionnera correctement 3 L écran s allume mais s éteint aussitôt a Assurez vous d avoir inséré correctement la carte SD L appareil ne garde pas les ...

Страница 62: ...f PIR à 3 niveaux de sensibilité Élevée Normale Faible Fonctionnement Jour Nuit Temps de réponse 1s Intervalle de déclenchement Programmable 1s 60 mn Nombres de prises de vue Programmable 1 3 Durée des vidéos Programmable 5 60s Alimentation 8xAA recommandées 4xAA alimentation d urgence Consommation en stand by 0 3 mA 7 mA jour Consommation 200 mA 530 mA lorsque LED IR allumé Interface utilisateur ...

Страница 63: ... de la défaillance constatée 4 Preuve de la date d achat 5 Le produit doit être soigneusement emballé dans un carton d expédition pour évit er qu il ne soit endommagé durant le transport avec renvoi en port payé à l adresse indiquée ci dessous AUX USA envoyer à AU CANADA envoyer à Bushnell Outdoor Products Bushnell Outdoor Products Attn Repairs Attn Repairs 8500 Marshall Drive 25A East Pearce Stre...

Страница 64: ...fastes à la réception de la radio ou de la télévision ce qui peut être déterminé en mettant l appareil en marche ou à l arrêt on off l utilisateur est encouragé à tenter de corriger l interférence grâce à l une ou plusieurs des mesures ci dessous Réorientez ou repositionnez l antenne de réception Augmentez la séparation entre le matériel et le récepteur Branchez l appareil sur la prise d un circui...

Отзывы: