background image


26

If you require any technical guidance or find that your product is not operating as intended, a simple solution can often be found in the 

Troubleshooting


section of these instructions,

How to use your TV

How to use your TV

Let’s get started

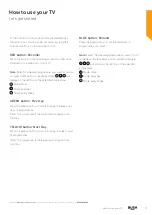
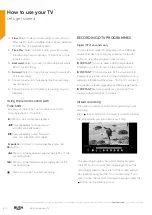
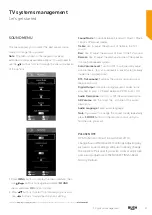
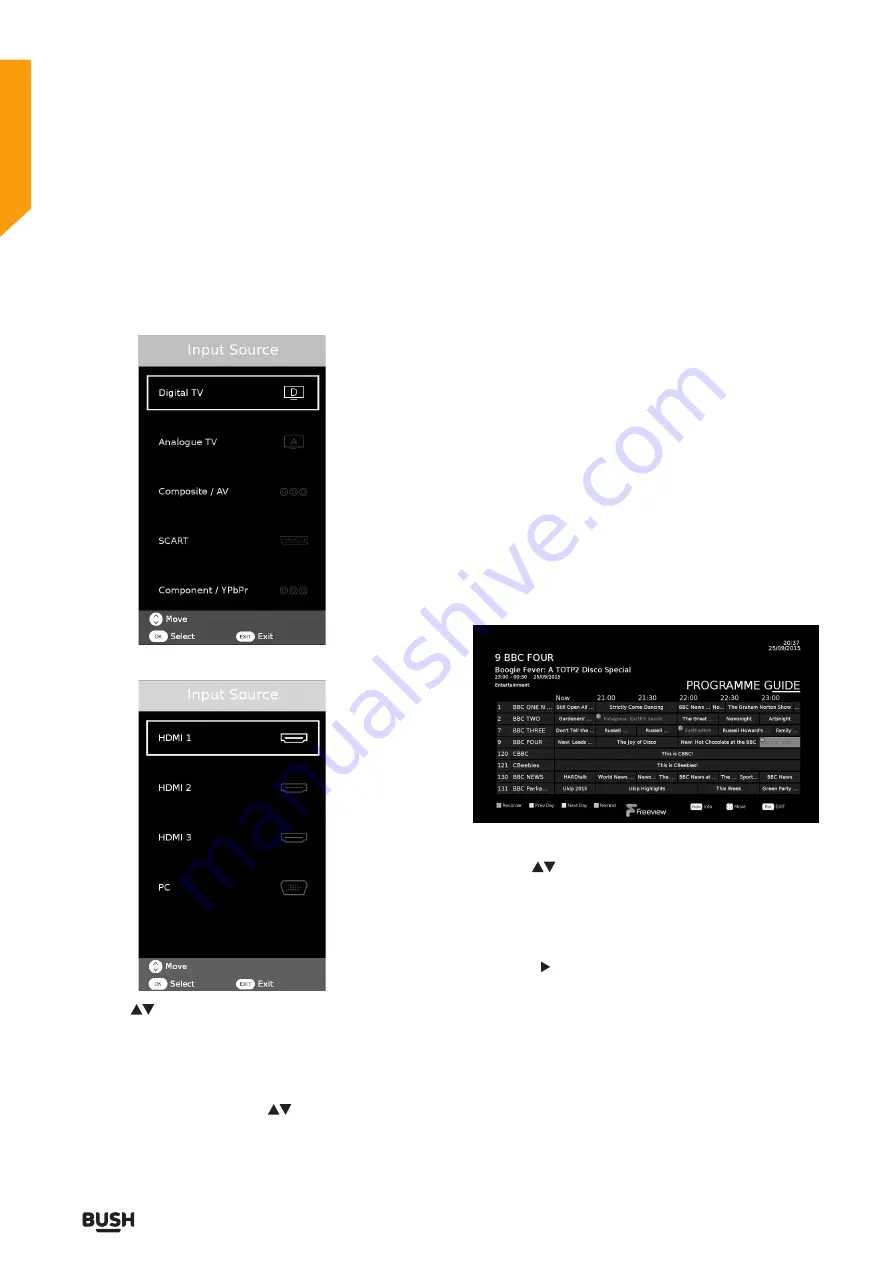
SELECTING INPUT SOURCE

You can connect multiple devices to  your TV to improve 
your watching and listening pleasure.
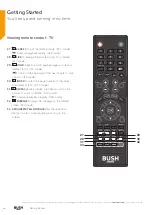
1.  Press the 

SOURCE

 button on the TV or on the remote

     control to display the source menu.

2.  Use the 

 buttons to select the source you wish 

       to watch or listen to and then press OK button to 

       confirm. 

Note: 

Not all sources will be displayed when the menu 

is open. You will need to use the 

 buttons to scroll 

through the list to view all of the sources.

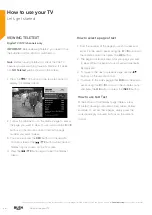
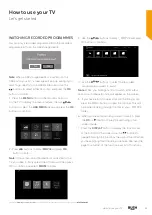
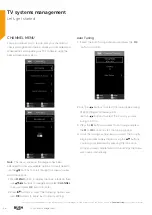
USING THE ELECTRONIC PROGRAMME 
GUIDE (EPG)

Digital TV (DTV) channels only

Your TV has an Electronic Programme Guide (EPG) to
help you navigate through all your possible viewing
options. The EPG supplies information such as 
programme listings, start and end times for all available
services. In addition, detailed information about the
programme is often available in EPG (the availability and
amount of programme information will vary,depending
on the particular broadcast).This function can only be
used when the information is broadcast by the
broadcasting companies.The EPG displays the

programme details for the next 7 days.

1.  Press the 

EPG

 button on the remote control to display

    the Electronic Programme Guide window. 

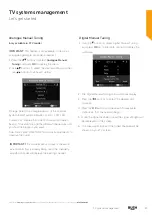
2.  Use the 

 buttons to select the station you wish

    to watch or listen to, then press the 

OK

 button to tune

    to that station. Press the 

EPG

 button again to exit

    the Electronic Programme Guide window.

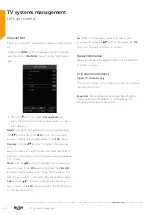
3. Press the     button to enter the programme listings

    to look through all of the programmes available over 

    the next 7 days.

Содержание LE-55GV350-B1

Страница 1: ...Instruction manual LE 55GV350 B1 ...

Страница 2: ...ed Help and Guidance We re here to help you get the most from your TV Should you require any guidance a simple solution can often be found online at www argos support co uk If you still require further assistance call one of our experts on 0345 604 0105 If you require any technical guidance or find that your TV is not operating as intended a simple solution can often be found in the Troubleshootin...

Страница 3: ...G 26 Viewing Teletext 28 Using The Time Shift Function 29 Recording DTV Programmes 30 Watching Recorded Programmes 31 5TV systems management Picture Menu 36 Sound Menu 37 Channel Menu 38 Lock Menu 42 Time Menu 43 Network Menu 45 Settings Menu 45 6Entertainment Features Using The Usb Features 50 Viewing Movies 51 Listening to Music 52 Viewing Photos 53 Viewing Files 54 7 Other information Specifica...

Страница 4: ......

Страница 5: ...5 Safety information 1 ...

Страница 6: ...ord plug should be easily accessible In case of storms and lightning when going on holiday or when the TV is not used for a long period of time disconnect the power cord from the mains power socket Do not place the TV furniture etc on the power cord or pinch the cord Handle the power cord by the plug do not unplug the TV by pulling the power cord Never touch the power cord plug with wet hands as t...

Страница 7: ...cal recycling centre Replacement parts When replacement parts are required make sure that the service technician has used replacement parts which are specified by the manufacturer or have the same specifications as the original one Unauthorised substitutions may result in fire electrical shock or other hazards Servicing Warning Risk of exposure to radiation from class 1 class 3b visible and invisi...

Страница 8: ...etc no naked flame sources such as lighted candles should be placed on the apparatus attention should be drawn to the environmental aspects of battery disposal If you require any technical guidance or find that your product is not operating as intended a simple solution can often be found in the Troubleshooting section of these instructions Safety information Safety information Important Please re...

Страница 9: ......

Страница 10: ......

Страница 11: ...11 Getting Started 2 ...

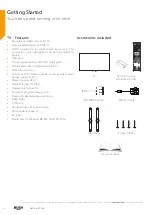
Страница 12: ...rogrammes from VHF UHF analogue 400 programmes for digital mode DTV OSD menu system Scart socket for external devices such as video video games audio set etc Stereo sound system Teletext fastext TOP text Headphone connection Automatic programming system Forward or backward manual tuning Sleep timer Child lock AVL Automatic Volume Limiting PLL Frequency Search PC input Plug Play for Windows 98 ME 2...

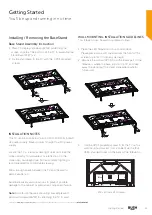
Страница 13: ...oft and indirect lighting is recommended for comfortable viewing Allow enough space between the TV and the wall to permit ventilation Avoid excessively warm locations to prevent possible damage to the cabinet or premature component failure Note For safe use the wall mounting bracket please 4 aluminum screws M6 12 for attaching the TV to wall WALL MOUNTING INSTALLATION GUIDELINES This television ca...

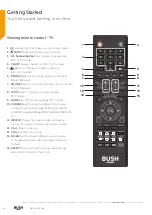
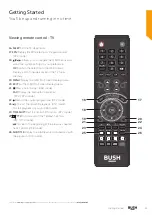
Страница 14: ...ovie Personal 7 S MODE Select sound mode Standard Music Movie Sports Personal 8 TV RD Select TV program or Radio program DTV mode 9 LANG Select DTV audio language DTV mode 10 SOURCE Select among the different input signal sources Digital TV Analogue TV Composite AV SCART Component Ypbpr HDMI 1 HDMI 2 HDMI 3 PC 11 DISPLAY Display the present screen information such as the current channel and the in...

Страница 15: ...ory 19 MENU Display the OSD On Screen Display menu 20 EXIT Exit the OSD On Screen Display menu 21 Press once to stop USB mode FAV Display the Favourite Channel list ATV DTV mode 22 Record the current programme DTV mode 23 To start the timeshift playback DTV mode To start playback or pause USB mode 24 TIMESHIFT Start the time shift function DTV mode 25 TTX Turn on and off the Teletext function ATV ...

Страница 16: ...n such as the answer to a quiz in teletext ATV mode To advance playback rapidly USB mode 32 SUBPAGE Displays the subpage on the teletext screen ATV mode 33 RED GREEN YELLOW BLUE Press these buttons directly to select corresponding function on the screen CH LIST P MODE S MODE LANG X TTX CANCEL FAV TV RD SUBTITLE TIMESHIFT SIZE SUBPAGE HOLD REVEAL INDEX 27 28 29 30 32 31 33 If you require any techni...

Страница 17: ...gnal sources 3 MENU button Display the OSD on screen display menu Aerial connection Connect the aerial or cable TV plug to AERIAL INPUT ANT socket located on the back of the TV Power connection Please note After unpacking allow the TV to reach ambient room temperature before connecting the TV to the mains power socket Connect the power cord plug to the mains power socket or online at www argos sup...

Страница 18: ...AAA R3 X2 Batteries Switching the TV On and Off Switching the TV On With power cord plug connected to the mains power socket and TV in Standby mode To switch the TV on from standby mode either a The Remote control Press the button b The TV Press the button at the bottom of the TV Switching the TV Off Either press the button on the remote control or press the button at the bottom of the TV the TV w...

Страница 19: ... For Your TV Set up your Sky Q remote to control your TV To set up your Sky Q remote to control the volume power and input source on your new TV press Menu select Settings then Setup then Remote control Select your Sky Q remote and follow the on screen instructions 1 Make sure your SKY box is connected to your TV 2 Turn your TV and SKY box on 3 Press TV on your SKY remote control handset 4 Hold do...

Страница 20: ......

Страница 21: ...21 Connections 3 ...

Страница 22: ... you plug all your cables into the back of the TV before mounting on the wall Insert or remove the CI module only when the TV is SWITCHED OFF You should refer to the module instruction manual for details of the settings The Each USB input of your TV supports devices up to 500mA Connecting devices that have current value above 500mA may damage your TV By connecting an HDMI cable to your TV you have...

Страница 23: ... into a wall socket and turn the power on if required 4 In standby mode press the button on the bottom of the TV or on the remote control to turn the TV on The red LED indicator on the front of the TV will turn blue then you will go to the First Time Installation menu 5 Language is preset to English 6 Press buttons to select country and use buttons to set the desired country 7 Press buttons to sel...

Страница 24: ......

Страница 25: ...25 Standard features How to use your TV 4 ...

Страница 26: ...els only Your TV has an Electronic Programme Guide EPG to help you navigate through all your possible viewing options The EPG supplies information such as programme listings start and end times for all available services In addition detailed information about the programme is often available in EPG the availability and amount of programme information will vary depending on the particular broadcast...

Страница 27: ...ce twice triple will display on the left top of the selected programme Mode Once Mode Everyday Mode Every Week GREEN button Prev Day Press the yellow button to scroll through the previous 7 days of programmes Note This only works if the broadcaster supports this function YELLOW button Next Day Press the yellow button to scroll through the next 7 days of programmes Note This only works if the broad...

Страница 28: ...ain to exit the Teletext menu How to select a page of text 1 Find the number of the page you wish to view and enter it in the search panel using the 0 to 9 buttons on the remote control then press the OK button 2 The page counter will search for your page you wish to view When the page is found it will automatically be displayed 3 To move to the next or previous page use the buttons on the remote ...

Страница 29: ... the programme press the II button on the remote control to show the PVR Time Shift progress bar 3 Use the buttons to select the button on the progress bar then press the OK button to start watching the programme will be displayed in the top left of the TV screen showing you are watching a programme in Time Shift 4 Press the button to stop the Time Shift recording and return to the live TV broadca...

Страница 30: ...t recording If you require any technical guidance or find that your product is not operating as intended a simple solution can often be found in the Troubleshooting section of these instructions RECORDING DTV PROGRAMMES Digital DTV channels only You can record digital TV programs onto a USB drive using either direct recording by pressing the red dot button or using the program timer function IMPOR...

Страница 31: ... to enter Note if more than one USB device is connected to the TV you need to firstly select one of them and then press OK to confirm and select MOVIE to enter 3 Use the buttons to select _MSTPVR and press OK button to confirm 4 Use the buttons to select the recorded programme you wish to watch Note When you highlight a film to watch after a few seconds a thumbnail movie will appear on the screen ...

Страница 32: ...hoose form NONE ONE SEQUENCE RANDOM TimePlay Allows you to select a time to start watching the programme from Enlarge Allows you to enlarge the screen image programme Use the buttons to move around the enlarged image Shrink Allows you to shrink the screen image of the programme Playlist Shows you a full list of films you can watch Press the EXIT button to close the submenu Info Shows information a...

Страница 33: ......

Страница 34: ......

Страница 35: ...35 TV systems management 5 ...

Страница 36: ...2 Press buttons to select the following options and use buttons to adjust each option s setting Picture Mode Choose between Dynamic Standard Movie Personal modes Contrast Adjusts the difference between light and dark levels in the picture Brightness Increases or decreases the amount of white in the picture Colour Adjust the value of colour Sharpness Adjust the level of crispness in the edges betwe...

Страница 37: ...ound Bass Use to adjust the amount of bass in the TV s sound Balance Use to adjust the relative volume of the speakers in a multiple speaker system Auto Volume Level Turn On Off to automatically adjust volume levels e g volume levels in adverts are generally louder than programmes DTS TruSurround Switches the virtual surround sound feature on or off Digital Output Use when a digital audio connecti...

Страница 38: ... following options and use buttons to adjust each option s setting If you require any technical guidance or find that your product is not operating as intended a simple solution can often be found in the Troubleshooting section of these instructions Auto Tuning 1 Select the Auto Tuning submenu and press the OK button to confirm 2 Use the buttons to select the tuning type among DTV ATV Digital TV A...

Страница 39: ...nt channel information Search To search through the different frequencies until you find the program you want Fine Tune select FINE TUNE to do small adjustments to improve the signal IMPORTANT If the number about to save is the same as a channel that is already being used the manually adjusted channel will replace the existing channel Digital Manual Tuning 1 Use the button to select Digital Manual...

Страница 40: ...ve in the EPG menu and press the YELLOW button on the remote control Move the channel to the position you want it in and press the yellow button again Skip Use the buttons to highlight the channel you want to skip in the EPG menu and press the BLUE button on the remote control If you require any technical guidance or find that your product is not operating as intended a simple solution can often b...

Страница 41: ...ol Note If there is no USB storage device fItted to the TV a warning message No USB device detected will be show press the EXIT button on the remote control to close the Recorded List menu Schedule List Use the button to select Scheduled List from the menu and press the OK button to display the menu You can now see a full list of all of the programmes you have scheduled and also interact with the ...

Страница 42: ... interface then use buttons to navigate and select LOCK menu and press OK button to enter 2 Press buttons to select the following options and use buttons to adjust each option s setting If you require any technical guidance or find that your product is not operating as intended a simple solution can often be found in the Troubleshooting section of these instructions System Lock Select to turn On O...

Страница 43: ...required to watch the program Scroll through the list of available ages using the buttons Choose the age rating you want and press the OK button to confirm Key lock Use to lock the remote control you must enter the password before the remote control will function Turn key lock on and off by pressing the OK button TIME MENU 1 Press MENU button to display the main interface then use buttons to navig...

Страница 44: ...s After you have finished setting the On Time press the MENU button to return to the main TIME menu If you require any technical guidance or find that your product is not operating as intended a simple solution can often be found in the Troubleshooting section of these instructions Sleep Timer This feature will automatically turn the TV into sleep mode after a set time if no control buttons are pr...

Страница 45: ...ns to select IP Config and press OK button to enter the sub menu and select either Auto or manual setup using the buttons Network Info Press either the button or the OK button to view all the relevant information concerning your network setup Network test Press either the button or the OK button to open the submenu Once the menu is open you can check if your network is working Notes The Network on...

Страница 46: ...is the language certain items are played in depending on availability Press the button to select the Audio Language Press the OK button to the sub menu then use the buttons to select either Primary or Secondary then press the button Select your preferred language from the selection using the buttons press the OK button to confirm Press the MENU button to return to the SETTINGS menu Subtitle Langua...

Страница 47: ... button to start Speed Check Use this feature to check the speed of your USB drive by pressing the OK button First Time Installation Use the button to select First Time Installation then press the OK button This will now rescan all available TV and radio channels Software Update USB Insert the USB drive with the update on it into one of the USB ports on your TV then turn your TV on by pressing the...

Страница 48: ......

Страница 49: ...Entertainment Features 6 ...

Страница 50: ...mains adapter is connected to the mains supply as the total current consumption may exceed 500mA the maximum the TV can supply If you require any technical guidance or find that your product is not operating as intended a simple solution can often be found in the Troubleshooting section of these instructions The file system only supports FAT32 format If you want to keep recorded DTV programmes the...

Страница 51: ...ect the different functions available on the function bar press the OK button to select the function List of functions Previous Press to watch the previous programme in the playlist Next Press to watch the next programme in the play list Play Pause Press to play pause the programme Stop Press to play back of the programme FB Press repeatedly to rewind at x2 x4 x8 x16 x32 speeds FF Press repeatedly...

Страница 52: ...nction bar press the OK button to select the function If you require any technical guidance or find that your product is not operating as intended a simple solution can often be found in the Troubleshooting section of these instructions List of functions Previous Press to skip to previous track Next Press to move to next track Play Pause Press to play pause the programme Stop Press to stop the tra...

Страница 53: ...ilable on the function bar press the OK button to select the function List of functions Previous Press to view the previous photo Next Press to view the next photo Play Pause Press to play pause the programme Stop Press to go back to the menu Rotate Press to rotate clockwise Rotate Press to rotate anti clockwise Enlarge Press to shrink the image Shrink Allows you to shrink the screen image of the ...

Страница 54: ...nected to your TV then press the OK button Use the buttons to navigate through the folders and press the OK button to open the folder When you find the text file you want to see to press the OK button Press the EXIT button to go back to the main USB menu If you require any technical guidance or find that your product is not operating as intended a simple solution can often be found in the Troubles...

Страница 55: ......

Страница 56: ......

Страница 57: ...Other information 7 ...

Страница 58: ...y Mode W 0 5W Maximum Power W 85W Standby Mode After 4 Hours Digital reception MHEG 5 ENGINE compliant with ISO IEC 13522 5 UK engine Profile 1 for UK Object carousel support compliant with ISO IEC 135818 6 and UK DTT profile for UK Frequency range 474 850 MHz for UK models 170 862 MHz for EU models Transmission standard DVB T MPEG 2 Demodulation COFDM with 2K 8K FFT mode FEC all DVB modes Video M...

Страница 59: ... the terminal that is marked with the letter N The brown wire must be connected to the terminal that is marked with the letter L If the power lead is damaged it must be replaced by a qualified electrician Energy label This is called the product Fiche the information needs to be presented in the following order also this maybe in the form of a copy of the label in colour or black and white the labe...

Страница 60: ......

Страница 61: ...61 Product support 8 ...

Страница 62: ...same time In such a case disconnect one of the devices No picture 1 No Picture means that your TV is not receiving a transmission Have you selected the correct button on the remote control Try once more Also make sure the correct input source has been selected 2 Is the aerial connected properly 3 Are the plugs connected tightly to the aerial socket 4 Is the aerial cable damaged 5 Are suitable plug...

Страница 63: ...oil bag must be kept away from children Information for Users on Disposal of old Equipment and Batteries European Union only These symbols indicate that equipment with these symbols should not be disposed of as general household waste If you want to dispose of the product or battery please consider the collection systems or facilities for appropriate recycling Notice The sign Pb below the symbol f...

Страница 64: ...sually a sticker or metal plate on the rear of your product This will be shown on your receipt Local call rates applies Lines open 8am 7pm Monday to Saturday and 10am 4pm Sunday Calls to Argos enquiry lines may attract a charge and set up fee from residential lines depending on your call plan tariff Mobile and other providers costs may vary see www bt com pricing for details For security and train...

Страница 65: ...u are responsible for ensuring that this product is disposed of properly If you are creating instructions you may find the following links helpful www environmentlaw org uk www hse gov uk waste waste electrical Product support or online at www argos support co uk If you still require further assistance call one of our experts on 0345 604 0105 For DTS patents see http patents dts com Maunfactured un...

Страница 66: ...alid if the product is If you provide us with information about another person you confirm that they have appointed you to act for them to consent to the processing of their personal data including sensitive personal data and that you have informed them of our identity and the purposes as set out in the Important Data Privacy notice displayed overleaf for which their personal data will be processe...

Страница 67: ...67 Contact www argos support co uk Helpline 0345 604 0105 ...

Отзывы: