background image

Using your Set top box

Let’s get started

Using your Set top box

17

section of these instructions,  or online at 

www.argos-support.co.uk 

If you still require further assistance, call one of our experts on 

0345 604 0105.

Adjusting the volume

Adjust the volume level using the VOL+/- buttons.

Mute

Press the MUTE button to silence audio output.  
Press again to resume audio output

Subtitles and audio descriptions

A great number of Freeview channels are broadcast 
with subtitles for the hard of hearing or deaf. If a 
programme has subtitles available the channel banner 
will display the 

SUB

 symbol.

1. 

Press the SUB button to display the subtitle option.

2. 

Use the   /   navigation buttons to select the 
language. Then press the OK button.

3. 

To disable subtitles repeat steps 1-2, but select 
‘OFF’ in step 2.

Some programmes have a secondary audio track for 
people who are partially sighted or blind, to allow 
them to hear what is happening in the programme. If a 
programme has an audio description option available 
the channel banner will display the 

AD

 symbol.

1. 

Press the AD button to display the audio 
description options.

2. 

Use the   /   navigation buttons to select the 
language. Then press the OK button.

3. 

To disable audio descriptions repeat steps 1-2, but 
select ‘OFF’ in step 2.

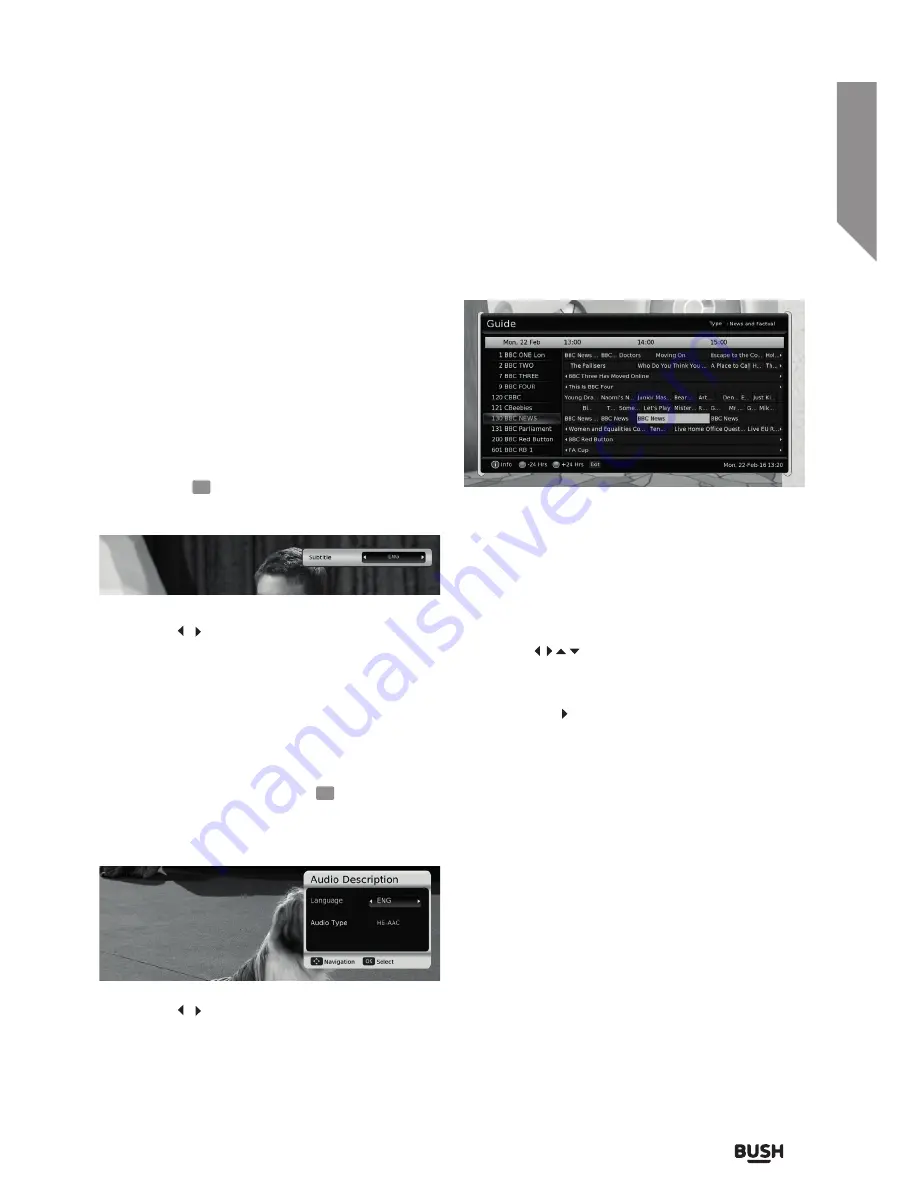
Using the Electronic Program Guide

Open the guide by pressing the EPG button on the 
remote.

The program guide displays a list of 12 channels along 
with the program schedule for the next 2 1⁄2 hours.

The current channel and program marker is highlighted 
with a yellow block. The genre displayed along the top 
right of the guide and the selected day/ date along the 
top left.

• Use 

the 


navigation buttons to highlight 

any current or future program and press the INFO 
button for details.

• Pressing 

the  button repeatedly so that the 

highlight marker proceeds past the displayed 2 1⁄2 
hours will load the next set of programs.

Along the bottom left of the guide is a key showing 
the usage of the colour buttons found on the remote 
control.

•  Pressing the GREEN button will skip the guide 

forward 24 hours to the same time the next day. 

•  Pressing the RED button will jump back 24 hours 

(only available when the highlight marker has 
advanced 24 hours+).

•  Press the CH+/- buttons to scroll downwards or 

upwards through the list in blocks of 10 channels for 
quick viewing.

•  Exit the program guide by pressing the EPG button 

once more.

Содержание FREEVIEWHD DV3 T2

Страница 1: ...Instruction manual CDVBT2 Set top box...

Страница 2: ...instructions Don t worry there s nothing too technical coming up Just simple step by step guidance to get you up and running quickly Sound good Then let s get started Help and Guidance We re here to h...

Страница 3: ...ance 30 Disposal 31 Guarantee 32 3 4 5 Safety information Safety information 6 Getting to know your Set top box Ready Let s begin 8 Accessories 8 Functions and features 9 Preperations 11 Connecting a...

Страница 4: ...This page is left intentionally blank...

Страница 5: ...1 Safety information...

Страница 6: ...ician for replacement In order to disconnect the apparatus from the mains completely switch off the outlet and remove the mains plug completely Do not bend stretch or pull the supply cable in order to...

Страница 7: ...Getting to know your Set top box 2...

Страница 8: ...contain important information which will help you get the best from your Set top box and ensure safe and correct installation and operation If you require any further assistance our technical experts...

Страница 9: ...V 1A Getting to know your Set top box You ll be up and running in no time 1 STANDBY button Press to switch the Set top box ON or OFF 2 LED POWER indicator Red OFF Green ON 3 IR sensor Remote control s...

Страница 10: ...settings Aud Press to adjust audio settings List Press to display a channel list for quick selection TV Radio Press switch between TV and Radio modes Mute Press to silence the audio output EPG Displa...

Страница 11: ...n guide to connect the Set top box to a TV with an HDMI input Ensure all devices are switched OFF before attempting any connections 1 Connect the coaxial cable from your aerial to the RF IN socket on...

Страница 12: ...and insert the jack into the DC INPUT on the rear of the set top box 4 When all the connections are made you can switch the power on for all devices If you have a TV with an internal tuner you can op...

Страница 13: ...Using your Set top box 3...

Страница 14: ...This page is left intentionally blank...

Страница 15: ...e schedules and basic operations Turning on the set top box 1 Press the STANDBY button on the remote or the set top box to power the box on 2 Press the STANDBY button on the remote or the set top box...

Страница 16: ...search 1 While viewing the channel list press the BLUE button to display the channel search interface 2 Use the navigation and OK buttons to type the name of a channel As you type the channel list wil...

Страница 17: ...o description options 2 Use the navigation buttons to select the language Then press the OK button 3 To disable audio descriptions repeat steps 1 2 but select OFF in step 2 Using the Electronic Progra...

Страница 18: ...ical order To the right is a list of genre s with a reference digit to the left 5 Use the buttons to select each channel for which a favourite is to be set and press the relevant digit on the remote t...

Страница 19: ...a new scan is performed 5 Using the buttons select a channel and press one of the option buttons 1 2 or 3 Repeat for any other channels you wish to edit 6 Press the OK button to store the settings Tel...

Страница 20: ...s from 0 100 Press the OK button to store the setting HD Resolution Adjust the screen resolution Press the OK button to store the setting Aspect ratio Adjust the screen aspect ratio Press the OK butto...

Страница 21: ...updates other than the aerial used for the set top box System con guration Version Select this option to display the current software version details Press MENU to return back to the System Configura...

Страница 22: ...ve made using the channel organiser will remain Any new channels located will be added to the existing database After Pressing the OK button you will be asked for the default password 0000 before proc...

Страница 23: ...Other information 4...

Страница 24: ...This page is left intentionally blank...

Страница 25: ...Right channel Stereo Sampling frequency 32 44 1 48KHZ Outputs 1 x SCART 1 x HDMI 1 x RF Loop through 1 x RF coaxial 1 x Ethernet Power requirements Mains inout voltage 100 240V 0 5 A Max 50 60Hz Powe...

Страница 26: ...This page is left intentionally blank...

Страница 27: ...Product support 5...

Страница 28: ...r aerial may not be strong enough to locate the Freeview channels Seek professional advice Your aerial may be damaged or need realigning Seek professional advice No picture or sound The HDMI SCART cab...

Страница 29: ...work after moving house The house may be in a different Freeview location and requires re tuning See the installation section of this manual for details I ve changed the password and forgotten it The...

Страница 30: ...you a fast and efficient service please have the following information ready Model Ref Serial number Date of purchase Local call rates applies Lines open 8am 7pm Monday to Saturday and 10am 4pm Sunday...

Страница 31: ...ing to your local rules and do not dispose of your old products with your normal household waste The correct disposal of your old product will help prevent potential negative consequences for the envi...

Страница 32: ...l It must be used solely for domestic purposes The guarantee will be rendered invalid if the product is re sold or has been damaged by inexpert repair Specifications are subject to change without noti...

Страница 33: ...section of these instructions or online at www argos support co uk If you still require further assistance call one of our experts on 0345 604 0105...

Страница 34: ...If you require any technical guidance or find that your product is not operating as intended a simple solution can often be found in the Troubleshooting...

Страница 35: ...section of these instructions or online at www argos support co uk If you still require further assistance call one of our experts on 0345 604 0105...

Страница 36: ...Contact www argos support co uk Helpline 0345 604 0105...

Отзывы: