Bush CTT939 Скачать руководство пользователя страница 9

Page 8

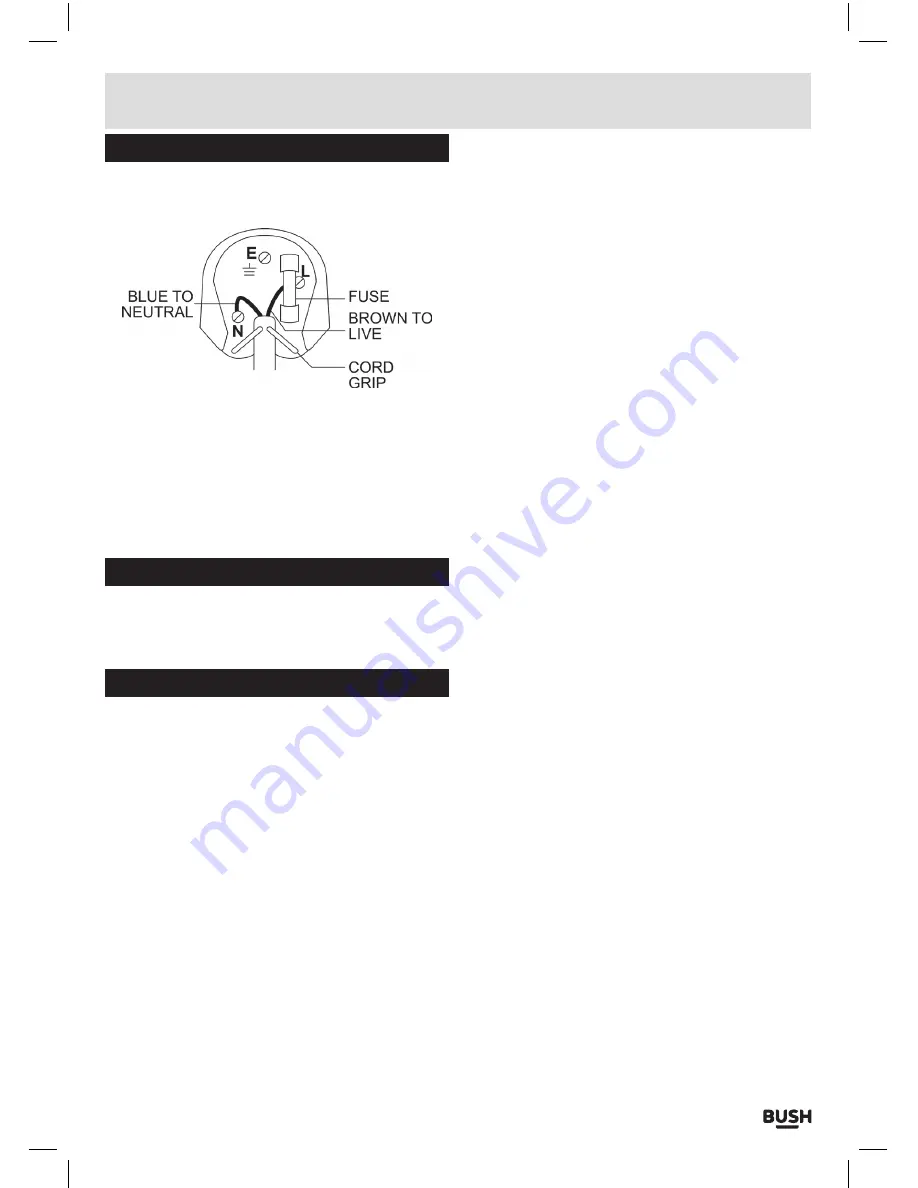
UK Mains plug information

For your convenience a mains plug with a fuse (3 
Amp) has been fitted to this appliance. For your safety 
please observe the following information.

• 

The unit is designed to operate on AC mains supply 

230 volts

,

 50 Hz .

• 

The wires in the mains lead are coloured in 

accordance with the following code:


   BLUE   

- NEUTRAL 

   BROWN   

- LIVE 

Under no circumstances should the Neutral or Live 
wires be connected to the ‘E’ (Earth) terminal.

Technical specifications

Supply Voltage, Mains:  . . . . . . . . . . . . . 230-240V~50Hz
Max. Power Consumption: . . . . . . . . . . . . . . . . . . . . . . 6W
Unit dimensions: . . . . . . (W) 428 x (D) 377 x (H) 122 mm

Care & maintenance

Care and cleaning

• 

All care and cleaning operations should be carried out 

with the unit unplugged from the mains power .

• 

Occasionally wipe the cabinet with a lint free duster . 

Never clean the unit with liquids or solvents .

Содержание CTT939

Страница 1: ...Instruction Manual CTT939 ...

Страница 2: ... Buttonsandfunctions 5 Playbutton 5 Ejectbutton 5 Cuebutton 5 Pitchadjust 5 Stop startalignment 6 Autostopalignment 6 Startpositionalignment 6 Transferringtoacomputer 6 Preparationforconnectiontoacomputer 6 Connectingtoacomputer 6 Settingupthedeviceonacomputer 7 Settingtherecordinglevels 7 Recording 7 UKMainspluginformation 8 Technicalspecifications 8 Care maintenance 8 Product Code CTT939 ...

Страница 3: ... notoperatenormally orhasbeendropped Donotattempttoservicethisproductyourself Openingorremovingcoversmayexposeyouto dangerousvoltagesorotherhazards Topreventriskoffireorelectricshock avoid overloadingwalloutlets extensioncords orintegral conveniencereceptacles Usesuitablepowersources Plugtheproductintoa suitablepowersource asdescribedintheoperating instructionsorasmarkedontheproduct Themainsplugis...

Страница 4: ...of controls 1 Dustcover 2 PLAYbutton 3 EJECTbutton 4 ON OFFpowerbutton 5 CUELEVERUP DOWNbutton 6 SPINDLEadaptor 7 STROBEilluminator 8 COUNTERWEIGHT 9 SPEEDSELECTOR 10 PITCHadjustment 11 RECORDSIZEadjustment 12 RCALINELEVELoutputsockets 13 USBoutputsocket 14 MAINScable 15 AUTOSTOPalignmentscrew 16 30CM 12 alignmentscrew 17 17CM 7 alignmentscrew 9 10 11 15 16 17 8 2 3 5 4 14 6 1 12 13 7 ...

Страница 5: ...esposition1 4 Nowrotatetheentirecounterweightanti clockwise andinwardsuntilyoureachtherecommended pressure NOTE Therecommendedpressureofthe supplied stylusis4 6grams Ifyoupurchase areplacement styluspleasetake noteofthe recommended pressureandsetaccordingly Connections 1 USBOUTPUT cablesupplied ConnectthiscabletoaUSBinputonaPCorMAC computer totransfervinylrecordstodigitalfiles 2 RCALINELEVELOUTPUT...

Страница 6: ...usingtheSIZE SELECTcontrol 11 firsttoensurethestylus is locatedin thecorrect position Eject button 1 Presstostopplaybackandreturnthetonearmback totherestposition Cue button 1 Pressingthisbuttoninwardsliftsthetonearmabove therestpositionsothetonearmcanbelocated anywhereabovetherecord 2 Pressingthebuttononcemorelowersthetonearm allowingthestylustogentlycontacttherecordand beginplaybackfromthecustoml...

Страница 7: ... Start position alignment Ifthetonearmdoesnotalignwiththestartposition correctlyfollowthebelowstepstofinetune 1 Usingasmallcrossheadscrewdriveradjusteach alignmentscrewaccordingtothesizeofrecord NOTE Pleaserefertotheengraveddiagramsnext toeachadjustmentscrewforthe adjustment directions CLOCKWISE TOWARDS CENTRE ANTI CLOCKWISE TOWARDS OUTER RemembertosettheSIZESELECTadjustertothe correctsize whentes...

Страница 8: ...TheinputleveliscontrolledbytheRECORDING LEVELslidecontrolwithinAudacity Theoptimum recordinglevelshouldbebetweenthemarkersA B Recording 1 Tobeginrecordingmakesurethetonearmisinthe restpositionandpressthePLAYbutton 2 2 Asthetonearmbeginstolowertotherecordpress theREDRECORDbuttoninAudacitytobegin recording 3 Whentherecordortrackhasfinishedpressthe BEIGESTOPbutton 4 Atthispointyoucannowsavethefile Un...

Страница 9: ...cordancewiththefollowingcode BLUE NEUTRAL BROWN LIVE UndernocircumstancesshouldtheNeutralorLive wiresbeconnectedtothe E Earth terminal Technical specifications SupplyVoltage Mains 230 240V 50Hz Max PowerConsumption 6W Unitdimensions W 428x D 377x H 122mm Care maintenance Careandcleaning Allcareandcleaningoperationsshouldbecarriedout withtheunitunpluggedfromthemainspower Occasionallywipethecabinetw...

Страница 10: ...toandswitchtothatinput modeonyourstereosystem Nosoundwhenconnectedto acomputer Thedevicewasnotrecognised whenconnected Thesoftwareplaythorughoption wasnotticked Therecordinglevelbarwasnot clicked Re bootthecomputerandtryagain Seepage7 Settingupthedeviceona computersection5 fordetails Seepage7 Settingtherecording levelssection2 fordetails Thestartorstoppositionis notaccurate Thetonearmalignmentisno...

Страница 11: ...guarantee does not cover accidental damage misuse cabinet parts knobs or consumable items The product must be correctly installed and operated in accordance with the instructions contained in this manual It must be used solely for domestic purpose The guarantee will be rendered invalided if the product is re sold or has been damaged by inexpert repair Specifications are subject to change without n...

Отзывы: