


17
Installationandwiring
Type 8228
8.3 installing a 8228 with a 2'' clamp
process connection in the pipe
Danger
risk of injury if the stainless steel adapter of the device is
loose.
A device with a clamp connection is not tight if the adapter is
loose.
▶
Do not loosen the adapter of the device.
The device is installed in a pipe as of DN32.
→
Choose a location on the pipe such as:
- the building of air bubbles is prevented,
- the sensor is completely and continuously immerged in the
fluid.
→
Install in the pipe a fitting with a 2'' clamp connection according
to ASME BPE for the device.
→
Mount the fitting on the pipe obeying the instructions of the
Operating Instructions of the fitting used (not delivered).
Fig. 8 shows an example for the fitting (mark 5)
→
Mount the fitting on the pipe obeying the instructions of the
operating instructions of the fitting used.
→
Fit the display module (see chap. 7.2) to calibrate the conduc-
tivity sensor and to parameter the device.
→
Calibrate the conductivity sensor (see chap. 9.7).
→
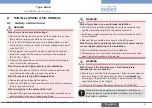
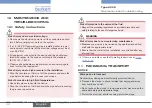
Install the device in the fitting as shown in Fig. 8.
3
1
2
5
4
→
Select a seal (mark 4) that is com-
patible with the 2'' clamp connection
of the device and with the fluid.
→
Put the seal (mark 4) on the fitting
(mark 5).
→
Insert the device (mark 1) in the
fitting (mark 5):
- the electrical connections must be
parallel to the pipe,
- the sensor (mark 2) must be posi-
tioned in the fluid vein.
→
Tighten the clamp collar (mark 3) by
hand.
Fig. 8:
Installation of a 8228 with 2'' clamp connection in the pipe
→
Wire the device according to instructions in chap. 8.4.
English
Содержание 8228 ELEMENT
Страница 32: ...www burkert com ...