BURG-WACHTER TSE 4001 Скачать руководство пользователя страница 5

TSE HOME 4001

English |


10 

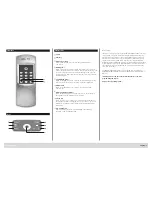
Keypad battery replacement

1

  Remove the cover by pressing its detent notches 

on both sides

 with  

a pointed tool towards inside and pulling it up.  


2

  Insert the batteries into the keypad.  

Please check the correct polarity of the cells. 


3

  Place the cover on the keypad. 


When inserting the new batteries, please check the correct polarity, 
which is indicated in the battery compartment of the keypad.

Keypad installation

1

  Choose a place for fixing the keypad. Place the keypad within a maximum 

distance of approx. 10 m from the lock and carry out an opening test by 
entering the pincode. After a successful test, the keypad can be fixed using 
either the screws (3.9 x 22 and/or 3.9 x 12) or the attached adhesive pad. 
When using the screws, please remove the batteries before installation. 

Please install the keypad at a place, where it is protected against 
weather influences! 


2

  If required, replace the batteries and engage the housing cover  

onto the device box. 


3

  Carry out a function test of the unit while the door is open.  

In order to do so, enter the valid pincode several times.

Installation instructions for TSE cylinder

The installation of the TSE cylinder is described below.
Please read this Manual carefully before the assembly and then store it at  
a safe place.
The cylinder is provided with a special detent system, offering you a 
possibility of using the cylinder for doors up to a thickness of 120 mm  
(60/60 mm, measured at the central fixing screws). No prior adjustment  
is necessary.

Attention:
Attention should be paid to prevent the door knob from being 
bumped, as the knob might be damaged.

The lock should not be greased or oiled.

The fixing of the knobs is provided with one incorporated hex screw  
in each knob.

Attention:
Never pull the outer knob completely from the shaft, as this will 
damage the electronics! The hex screw that fixes the knob onto the 
shaft must be loosened only slightly and it must always remain in the 
plastic knob, providing protection against pulling out the knob!

Outer side 


Inner side

Outer knob 


Inner knob

Schematic 
representation 
of an assembled 
cylinder.

Cover

Fixing screw

Hex screw for fixing the 

knob onto the shaft

Содержание TSE 4001

Страница 1: ... 15 58300 Wetter Germany Elektronisches Türschloss BA MA TSE Set 4001 dp mri dn 11 2011 Montage und Bedienungsanleitung Installation and User Manual Instruction de montage et mode d emploi Montage en gebruiksaanwijzing HOME Genial sicher Genial einfach ...

Страница 2: ... In most cases this is a sign of low batteries in the keypad or in the cylinder Please replace the batteries immediately I Key confirmation Any successful key operation is confirmed with a brief flashing of the green central confirmation LED Structure Dear customer thank you very much for choosing the BURG WÄCHTER TSE 4001 electronic locking system This system has been developed and manufactured u...

Страница 3: ...dministrator code Factory setting 123456 you absolutely need to change this In the following description the administrator code is referred to as pincode 1 Commissioning When the TSE 4001 pincode is first put into operation it is necessary to perform a certain procedure as the system is delivered from the factory in a special power saving mode Press On the green ready for opening icon flashes brie...

Страница 4: ...nels Enter the programming mode using the current opening code Type 72X X indicates the radio channel numbers 1 to 12 also 01 etc are allowed then press the Enter key The combination 72 stands for RC RF channel When the action has been performed successfully the green ready for opening LED goes on while the red entry denied one goes on in case of error 8 Registering the keypad Press On type in 82 ...

Страница 5: ...ut a function test of the unit while the door is open In order to do so enter the valid pincode several times Installation instructions for TSE cylinder The installation of the TSE cylinder is described below Please read this Manual carefully before the assembly and then store it at a safe place The cylinder is provided with a special detent system offering you a possibility of using the cylinder ...

Страница 6: ...ry knob and the door mounting is at least 1 mm Then fix the knob using the hex key 5 Shift the interior knob into the required position on the shaft and fix it with a distance of at least 1 mm from the strike plate by using the hex bolt Make sure that the interior knob is shifted on the shaft in a way that the fixing screw inside the knob faces the shaft with the little holes at the side 6 The fun...

Отзывы: