background image

SecuTronic

I Englsih

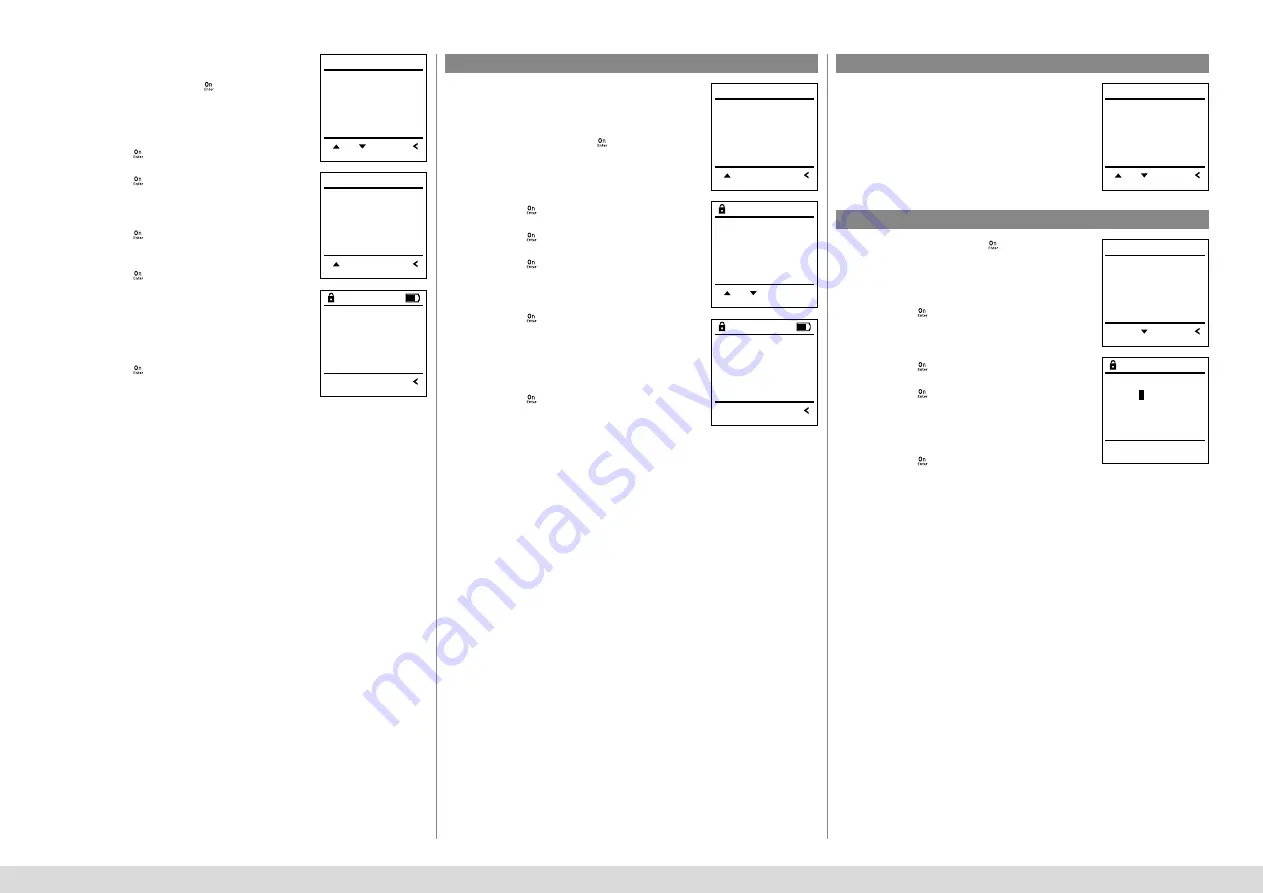
Sub-menu Administrator / User / Assign / Assign 

fingerprint

•  Switch on the lock using the













­

€

‚

 key.

•  Then press 













­

€

‚

.

•  The “

Main menu

“ appears.

•  Scroll with the 1 or 2 key until the menu  

item “

Administrator

“ is highlighted.

•  Confirm with













­

€

‚

.   

•  “

Main menu / Administrator

“ appears.

•  Confirm with













­

€

‚

.   

•  “

Main menu / Administrator / User

“ appears.

•  Scroll with the 1 or 2 key until the “Assign“  

menu item is highlighted.

•  Confirm with













­

€

‚

.


•  Scroll with the 1 or 2 key until the  

Create fingerprint

“ menu item is highlighted.

•  Confirm with













­

€

‚

•  Enter the administrator code to acquire  

the authorisation for programming.

•  “

Main menu / Administrator / User / Assign

“ appears.

•  You can use the keys 1 or 2 to scroll until  

the user is marked whose fingerprint is  

supposed to be assigned.

•  Confirm with













­

€

‚

.


•  “

Create fingerprint

“ appears.

•  Move the finger from the top to bottom  

centrally and a number of times over the sensor. 

•  The display will either prompt you to repeat 

the process (for error messages, see page 15), 

or the message “USER.XXXX FP was successfully 

created“ will appear. 

•  Press any key.

Deleted users no longer have access to the safe. 

However, these remain in the history.

Sub-menu Administrator / User / Delete

•  Switch on the lock using the 













­

€

‚

 key.

•  Then press 













­

€

‚

.

•  The “

Main menu

“ appears.

•  Scroll with the 1 or 2 key until the menu  

item “

Administrator

“ is highlighted.

•  Confirm with 













­

€

‚

.   

•  “

Main menu / Administrator

“ appears.

•  Confirm with 













­

€

‚

.   

•  “

Main menu / Administrator / User

“ appears.

•  Confirm with 













­

€

‚

•  “

Main menu / Administrator / User / Delete

“ appears.

•  Scroll with the 1 or 2 key until the menu  

item “

Delete

“ is highlighted.

•  Confirm with 













­

€

‚

•  Enter the administrator code to acquire the 

authorisation for programming.

•  You can use the keys 1 or 2 to scroll until the 

user is marked whose code is supposed to  

be deleted.

•  Confirm with 













­

€

‚

•  “

Data has been deleted

“ appears.

•  Press any key.

Menu Administrator / User / Delete

Menu Administrator / Time functions

Menu Administrator / Time functions / Set time

Time and date can be set, as well as whether the 

system should automatically switch between  

Central European Summer/Winter Time. The delay 

time prevents quick opening in the event of  

a robbery.

•  Switch on the lock using the 













­

€

‚

 key.

•  Then press 













­

€

‚

.

•  The “

Main menu

“ appears.

•  Scroll with the 1 or 2 key until the menu  

item “

Administrator

“ is highlighted.

•  Confirm with 













­

€

‚

.   

•  “

Main menu / Administrator

“ appears.

•  Scroll with the 1 or 2 key until the menu  

item “

Time functions

“ is highlighted.

•  Confirm with 













­

€

‚

.   

•  “

Administrator /Time functions

“ appears.

•  Confirm with 













­

€

‚

.   

•  Enter the administrator code to acquire  

the authorisation for programming.

•  The time (24-hour format) can be set via  

the keypad.

•  Confirm with 













­

€

‚

.


•  “

Data has been saved

!“ appears.


•  Press any key.

Create

  Assign

Delete

FUNC:

1: 

2: 

U S E R

Assign Code

  Assign Finger

1: 

FUNC:

U S E R

USER.0003 FP

created!

FUNC:

Dataset has

been deleted!

FUNC:

Time entry

H.M     00.00

FUNC: M

USER.0001 CD

FUNC: M

1: 

2: 

Create

  Delete

1: 

FUNC:

U S E R

User

  Timer functions

Programming

Processes

FUNC:

1: 

2: 

A D M I N

  Time entry

Date entry

Autom. ST/WT

Delay time

FUNC:

2: 

T I M E R   F U N   . . .

Содержание SecuTronic

Страница 1: ...w burg biz Download www burg biz Download www burg biz Download www burg biz Download www burg biz Download www burg biz Download www burg biz Download www burg biz Download www burg biz Download www burg biz Download www burg biz Download www burg biz Download www burg biz Download www burg biz Download www burg biz Download www burg biz Download www burg biz Download www burg biz Download www bu...

Страница 2: ...play runs countsdown It is not possible to open the safe during this period even with a valid user or administrator code Please take care to ensure codes do not fall into the wrong hands Therefore store the codes in a safe location so that they can only be accessed by author ised persons In the event you lose a code the lock must be set to a new code The factory code must be changed as soon as the...

Страница 3: ...int Assign Assign code Assign fingerprint Delete Time functions Set time Set date Automatic ST WT Delay time Programming Database update Firmware update Reorganise Processes Display Save Setup Register FP reset Generate AES key Info System info System check Description of the menu functions Code Change menu Change the administrator code and the user codes We would like to point out that for securi...

Страница 4: ...nfirm with Mainmenu Administrator User Create appears Scroll with the 1 or 2 key until the Create fingerprint menu item is highlighted Confirm with Enter the administrator code to acquire the authorisation for programming Createfingerprint appears Move the finger from the top to bottom centrally and a number of times over the sensor The display will either prompt you to repeat the process for erro...

Страница 5: ...ministrator User appears Confirm with Mainmenu Administrator User Delete appears Scroll with the 1 or 2 key until the menu item Delete is highlighted Confirm with Enter the administrator code to acquire the authorisation for programming You can use the keys 1 or 2 to scroll until the user is marked whose code is supposed to be deleted Confirm with Datahasbeendeleted appears Press any key Menu Admi...

Страница 6: ...rator Programming Menu Administrator Programming Firmware update Menu Administrator Programming Reorganise Menu Administrator Programming Database update A firmware update installs the latest software version Reorganise sorts the database This function is not enabled at present Please ensure that the batteries are full before updating the firmware Please copy the new firmware version to a FAT 32 f...

Страница 7: ...hanism Switch on the lock using the key The press The Mainmenu appears Scroll with the 1 or 2 key until the menu item Administrator is highlighted Confirm with Administrator appears Scroll with the 1 or 2 key until the menu item Setup is highlighted Confirm with Scroll with the 1 or 2 key until the menu item FP reset is highlighted Confirm with Enter the administrator code to acquire the authorisa...

Страница 8: ...the time of production and adhere to our own quality standards The guarantee only covers defects which can be proved to have resulted from production or material defects at the time of purchase The warranty ends after two years further claims are excluded Defects and damage caused by e g transport incorrect operation improper use wear etc are excluded from the warranty The batteries are not includ...

Страница 9: ...www burg biz BURG WÄCHTER KG Altenhofer Weg 15 58300 Wetter Germany www burg biz SecuTronic SWI HBG SECUTRONIC TRSE 12H FP EN 29042020 ...

Отзывы: