


ne-cut-manual-e
Page 8 / 10
Tighten the attachment screws of the holder just slightly and move the holder with the lower blade
evenly against the template that lies before the upper blade. Tighten the attachment screws hand
firm. Now loosen the counter nuts of the headless screws and turn these screws till they touch the
holder.
Take the template out of the cutting gap.
Now cut small stripes of the thinnest material you want to cut (film material e.g.) all along the blade
from the left to the right. At places where the material was not cut but only bend, turn in the nearest
headless screw for some degrees and repeat the cut.
Repeat this action until your sheet was nicely cut all along the blade.
Do not turn the headless screws too far, thus you may damage the blades. If the
screws happen to be too far in, you have to loosen all screws and start the procedure
once again. When you are done do not forget to tighten the attachment screws!
Front Scale
This adjustment is always necessary when the table was disassembled
(change of blades). To assure a perpendicular cut walk through the fol-
lowing steps:
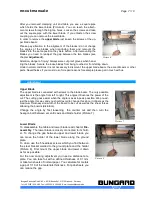
Check if the screws between table and ground plate are tightened. Pull
the machine over the edge of the table until you can reach the front
most attachment screw of the ruler. Loosen this screw carefully (see
picture 9). Take a perpendicular test board, push it against the upper
blade and knock with a small plastic hammer against the ruler till the
hole side of the ruler touches the board.
Tighten the attachment screw and make a test cut. Check the angle
again. If you notice that the scale of the ruler does not fit anymore you
will have to move the table itself. Or you can loose the other attachment
screw of the ruler as well and move the ruler.
Rear Back Stop
After assembling the slide beam of the counter bare, take a
preferable broad piece of board, push it against the rear
counter bare and cut it. Prove the parallelity of this cut with a
precise caliper gauge on the left and on the right. If the cut is
not parallel, do the following:
Take a jaw wrench and loosen the backmost of the two nuts
underneath the counter bare.
To adjust the angle of the counter bare take an Allen key and
turn the headless Allen key screws on the left and on the
right of the counter bare (see picture 3).
On the side where you turn
out
the headless screw, the size
of the cut will become
smaller
. On the side where you turn
in
the screw the gap accordingly will become
bigger
. Normally you will have to do a couple of test cuts till both sides are exactly equal.
At last tighten the nut from underneath the counter bare again and measure the size of the cut. Check if
the zero position mark fits to the size of the cut. If not, loosen the screws of the metal plate and shift the
zero position to its proper place.
Bungard Elektronik GmbH & Co. KG, Rilkestraße 1, 51570 Windeck – Germany
Tel.: +49 2292 / 9 28 28-0, Fax: +49 2292 / 9 28 28-29
, E-mail: [email protected]
Picture 10
Picture 9


