background image

15

Filter Maintenance:

The intake system should be cleaned at least once every three months; in dusty climates the filter 
should be cleaned more often. Use a prefilter to extend time between cleaning

Cleaning the intake 

is a two part process, the first part of the process involves the physical cleaning of the filter with soap 
and water and the second part involves oiling the filter. To properly clean the filter, a Bully Dog clean-
ing kit should be used. Cleaning kits are available at any Bully Dog 
dealer.  


PART 1, CLEANING THE FILTER:

1. Remove filter from filter housing. Clean the filter housing if 

necessary.

2. Begin the cleaning process by ridding the filter of any dirt by 

lightly tapping it. Then brush away any loose particles with a 
soft-bristle brush. This step can usually be avoided with the 
use of a prefilter.

3. Spray cleaner generously over entire filter and let soak for 

10 minutes.

4. Thoroughly rinse the filter with regular tap water (avoid 

high-pressure hoses). Flush from the inside out or clean side 
to the dirty side to prevent dirt from entering the filter.

5. Let the filter air dry before oiling, do not use any method to speed up the drying process. Using 

a blow dryer or compressed air can cause the filter to disfigure which would then allow particles 
to pass through the filter.

PART 2, OILING THE FILTER:

1. Apply a small amount of oil to the soft bristle brush and spread the oil over the filter. Be sure to 

apply a small amount of force so not to damage the filter element. 

2. Continue applying oil to the filter using a soft bristle brush until the entire filter is covered in an 

even amount of oil, just enough to give the filter a solid blue color. Apply enough oil to make the 
filter a solid and uniform blue, but do not go beyond that. 

3. Allow oil to sit for 20 minutes. Re-oil any dry spots that appear. Do not oil filter excessively. Exces-

sive oiling can cause damage to intake sensors.

Filter Maintenance

Part # 229000

Содержание 51202

Страница 1: ...INSTALLATION MANUAL Applications Rapid Flow Part Number Ford 3 5L F150 11 51202 Not legal for sale or use in California on pollution controlled vehicles...

Страница 2: ...VIEW PG 6 REMOVING THE STOCK INTAKE PGS 7 9 INTAKE INSTALLATION PREP PGS 10 11 INTAKE INSTALLATION PGS 12 14 FILTER MAINTENANCE PG 15 PREFILTERS PG 16 TROUBLE SHOOTING PG 17 INTRODUCTION Thisinstructi...

Страница 3: ...e 5 50002 Silicone 100 mm ID x 76mm 3ply 51202 5 Silicone 80mm ID x 76 mm with Hump 3ply 51202 6 Silicone tube 9 5 mm ID x 500 mm 2 ply 51202 7 Worm drive 4 5 max or 114mm 53252 7 Worm drive 4 max or...

Страница 4: ...arts will be referred to during installation by the names used in this section The Lid This simple to install lid replaces the stock lid and conceals and protects the high flow air filter that comes w...

Страница 5: ...e air box and the turbo inlet tubes SiliconTubing High quality 3 ply silicon tubing Band Clamps Connects and holds all tubing in place AirBoxInletside SiliconeCoupler BreatherHose SiliconeCoupler Turb...

Страница 6: ...included is an ISO 5011 certified eight layer oil filter The air filter is secured onto the end of the air intake tube using the filter clamp and a flat head screwdriver SecurityTorx Bit This bit is...

Страница 7: ...Intake system should total about 20 minutes The assembly diagram below shows how the parts of the intake fit together in sequence Stock Intake Overview Diagram The stock intake can be seen in the pic...

Страница 8: ...perly first pull the red tab located on the bottom side of the sensor outward to release the locking mechanism Disconnect the sen sor plug from the mounted sensor 2 Loosen both band clamps on the stoc...

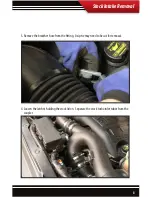
Страница 9: ...Remove the breather hose from the fitting A zip tie may need to be cut for removal 4 Loosen the latches holding the stock lid on Separate the stock turbo inlet tubes from the coupler StockIntakeRemov...

Страница 10: ...9 StockIntakeRemoval 5 Remove the entire assembly together 6 Remove the stock filter...

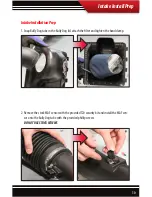
Страница 11: ...Bully Dog tube in the Bully Dog lid attach the filter and tighten the band clamp 2 Remove the stock MAF sensor with the providedT20 security bit and install the MAF sen sor onto the Bully Dog tube wi...

Страница 12: ...11 IntakeInstallPrep 3 Slide silicon couplers and clamps onto the appropriate ends of the Bully Dog tube...

Страница 13: ...ntakeInstallation 2 Secure stock latches onto the Bully Dog lid IntakeInstallation 1 Guide the Bully Dog lid tube assembly into the engine bay Slide the tabs on the Bully Dog lid into the stock box sl...

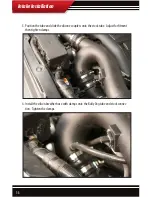
Страница 14: ...Position the tube and slide the silicone couplers onto the stock tube Adjust for fitment then tighten clamps 4 Install the silicon breather hose with clamps onto the Bully Dog tube and stock connec t...

Страница 15: ...14 IntakeInstallation 4 Reconnect MAF sensor plug...

Страница 16: ...ire filter and let soak for 10 minutes 4 Thoroughly rinse the filter with regular tap water avoid high pressure hoses Flush from the inside out or clean side to the dirty side to prevent dirt from ent...

Страница 17: ...00 8foryourintake The time between scheduled filter maintenance can be extended Using a prefilter will prevent all large debris from getting into the ribs of the filter When using the prefilter only f...

Страница 18: ...ogairintaketube becauseitisadifferentshape Check the year of the vehicle the 2011 and 2012 Ford F150 3 5L ecoboost have different air intake sensors which are dramatically different in shape and size...

Страница 19: ...18...

Страница 20: ...lter Checkoutmoreofour ADRENALIN PUMPING products Cleaning Kits Doc 51202V3 0 FreeTechnical Support at 1 940 783 9915 See More at bullydog com GT Diesel is not legal for sale or use in California on p...

Отзывы: