


CEQUENT
™
PERFORMANCE PRODUCTS, INC. •
F3838-00 REV A (3576) 10/14
19
Tape
Maintenance
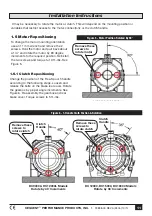
3.1 Wire Rope Replacement
1. Disengage the clutch T-handle.
2. Un-spool the entire rope, and remove it from the drum.
3. Place the replacement rope through the roller fairlead opening, pass around the drum per Table 4 and
insert it into the hole on the drum core. Tighten the set-screw downwards to secure the wire rope.
4. A minimum of five (5) wraps of wire rope and ten (10) wraps of synthetic rope around the drum is
necessary to support the rated load.
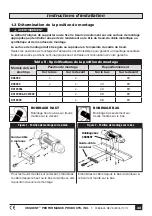
3.2 Synthetic Rope Replacement
1. Disengage the clutch T-handle, remove existing rope and replace hawse fairlead if necessary.
2. Un-spool the rope from the drum. Remove the set-screw from the drum.
3. Cut the end of the rope at 45° and apply 2-3 wraps of electrical tape to hold the cut strands in place.
This will ease assembly.
4. Thread rope through a hawse fairlead and around the drum per Table 4, insert the rope through the
hole on the drum with 6” – 8” to spare.
5. Place rope across the drum and tape the end down to hold it in place. See Figure 18 Lightly tighten
the set-screw to squeeze the rope, do not over tighten.
6. A minimum of ten (10) wraps of rope around the drum is necessary to support the rated load.
Figure 17 - Wire Rope Replacement
Figure 18 - Synthetic Rope Replacement
Engaged
Lift and
turn to
disengage
• Check the wire/synthetic rope.
Before winching, make
sure the rope is wound on the drum evenly. If there is mixed
winding, it is essential to rewind it evenly.
• Be careful to keep the rope under tension. Never guide a
wire/synthetic rope onto the drum with your hand, use a
hand saver cable strap.
Содержание DC12000
Страница 24: ...Notes...
Страница 48: ...Remarque...