background image

72

Classe100 X16E

User and installation manual

21

22

23

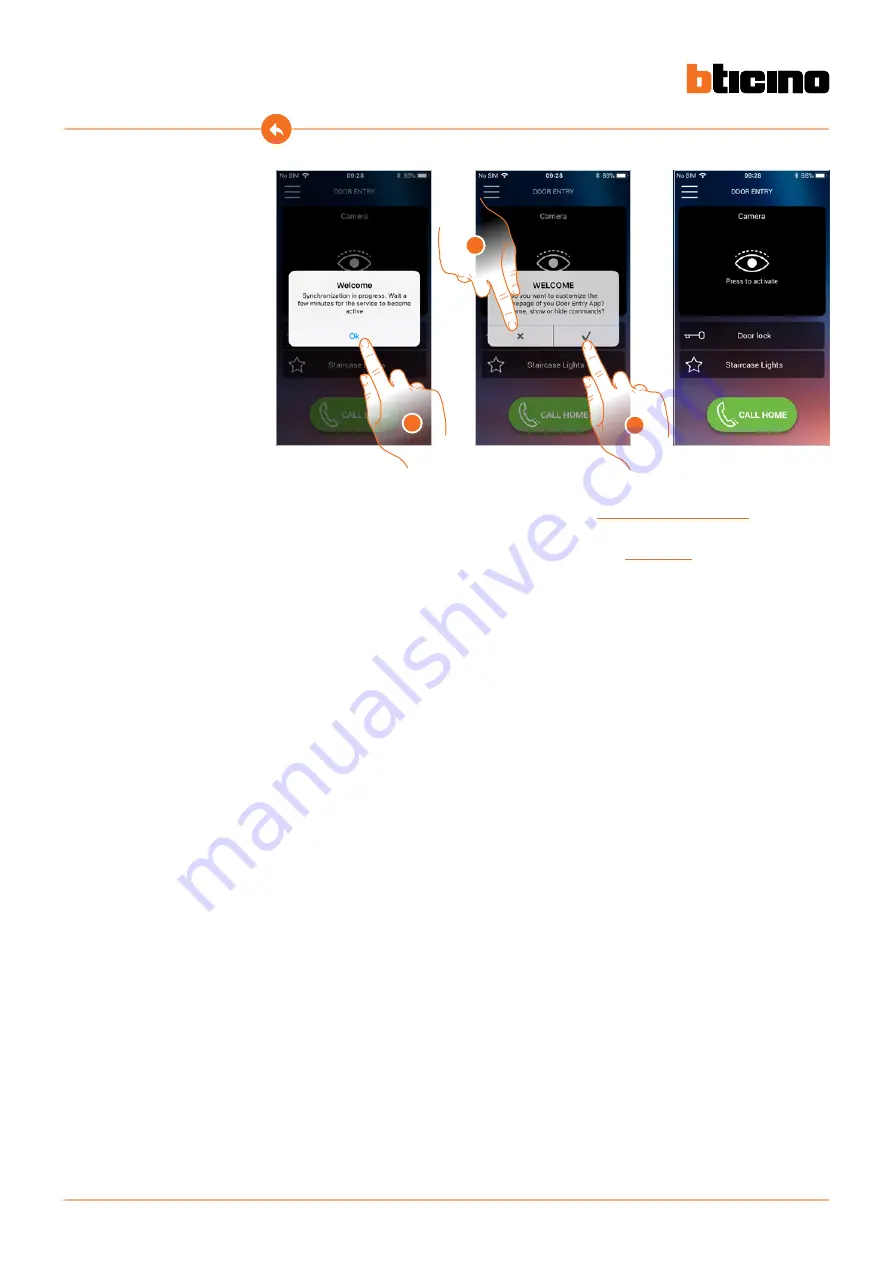
Or

21.  Touch to continue.

22.  Touch to immediately customise the Home Page (see 

Home Page customisation

).

23.  Touch to delay it to a later date. You will be directed to the 

Home page

.

Содержание Classe100 X16E

Страница 1: ...User and installation manual www bticino com Classe100 X16E...

Страница 2: ...Classe100 X16E User and installation manual...

Страница 3: ...ramming of the programmable keys 24 Use from the device 31 Functions 31 Answer a call 31 Call another room or apartment intercom 32 PE or cameras direct auto switching on 34 Door lock release 36 Pagin...

Страница 4: ...during the call press the joystick to display the audio video parameter adjustment icons 3 Move the joystick up down to select the type of parameter for which you want to modify the value see the foll...

Страница 5: ...Quick guide 5 Classe100 X16E User and installation manual 4 5 5 Touch to end the call 4 Touch to open the main Entrance Panel door lock...

Страница 6: ...amera to another is also possible without enabling the audio 2 If necessary touch to activate the audio communication 3 Touch to display another Entrance Panel or camera using the scrolling service Wh...

Страница 7: ...Quick guide 7 Classe100 X16E User and installation manual 4 4 Touch to end camera display mode or wait for the automatic switch off time to elapse...

Страница 8: ...A 2 Key A lights up to indicate that the call is active 1 For example touch programmable key to activate the communication with the Internal Unit e g configured as 2 Note the programmable key to use f...

Страница 9: ...nternal Unit answers the key starts flashing Touch it to end the call or establish communication with the Internal Unit Note if during the conversation a call is received from the Entrance Panel the c...

Страница 10: ...e 4 Touch to continue 5 Touch to confirm The user will no longer be able to manage the system using that smartphone To re associate the smartphone simply repeat the authentication process 1 Touch to o...

Страница 11: ...sociate is the only one left the system will suggest a tutorial to reset the device 1 Touch to open the pull down menu 2 Touch to open the user section 3 Scroll to dissociate a user and therefore all...

Страница 12: ...ment as main user The main user has been dissociated To return to manage the system through the App you will have to reset Classe100 X16E using the specific procedure complete the authentication repea...

Страница 13: ...entry Classe100X App 1 Touch to open the pull down menu 2 Touch to open the setting section 3 Touch to customise the Home page 4 Touch to modify the description of the main EP door lock 5 Enter the n...

Страница 14: ...rogrammable keys In addition to the Staircase Light key it is also possible to show on the homepage the Entrance Panels Cameras A and Door Locks B corresponding to the programmable keys of your Classe...

Страница 15: ...cino plays no part in this The customer must install the Door Entry CLASSE100X app on his smartphone so that he can use some services which BTicino supplies as extras to the normal basic functions of...

Страница 16: ...e units near harmful gases metal dusts or similar is forbidden Fastening the units on unsuitable surfaces is forbidden Danger of electrical shock Risk of devices falling because the surface on which t...

Страница 17: ...tching On Call Home Bell exclusion notification LED When on red flashing it means that the call ringtone is disabled Programmable touch keys Use these keys for intercom calls activate Entrance Panels...

Страница 18: ...ll is terminated it switches off Staircase light touch key Use this key to switch the Staircase Light on Communication enabling key Use this key to answer a call when a call is received the key starts...

Страница 19: ...itch 5 ON OFF micro switch to enable the additional power supply 6 2 WIRES SCS BUS connection clamps 7 Clamps for the connection of an external call to the floor pushbutton P M BTICINO V le Borri 231...

Страница 20: ...x 502E 503E 1 max 5 mm 2 Installation Dimensional data and recommended installation heights Wall mounted installation Recommended height unless different regulations are specified Caution Installation...

Страница 21: ...21 Classe100 X16E User and installation manual 4 3 1 3 2 1 Installation on the tabletop bases 344692 optional...

Страница 22: ...22 Classe100 X16E User and installation manual 3 X 2 1 2...

Страница 23: ...The configurators connected to the P sockets of the device identify the associated EP which is the first Entrance Panel that switches itself on when the pushbutton is pressed the first time as well a...

Страница 24: ...2 and MOD 5 or activation of door lock actuators 346230 346260 configured with P 2 M 20 Key functions described above Professional studio M 40 Key functions described above Pager M 80 Key functions d...

Страница 25: ...1 N 2 N 2 N 3 N 3 N 2 EP door lock release configured with P 1 directly without call or activation of the actuator 346210 configured with P 1 and MOD 5 or activation of door lock actuators 346230 346...

Страница 26: ...partment interface N 1 N 2 N 2 N 5 N 3 N 2 N 4 N 2 N 5 N 2 Intercom inside the apartment in systems with apartment interface 346850 or intercom among apartments in systems without apartment interface...

Страница 27: ...ibed above Pager M 84 Key functions described above Professional studio Pager M 05 EP door lock release configured with P 1 directly without call or activation of the actuator 346210 configured with P...

Страница 28: ...l the handsets with the same address EP door lock release configured with P 1 directly without call or activation of the actuator 346210 configured with P 1 and MOD 5 or activation of door lock actuat...

Страница 29: ...activation of door lock actuators 346230 346260 configured with P 2 M 30 Key functions described above Professional studio M 40 Key functions described above Pager M 50 Key functions described above...

Страница 30: ...apartments in systems with apartment interface 346850 N 2 Intercom among apartments in systems with apartment interface 346850 N 3 Intercom among apartments in systems with apartment interface 346850...

Страница 31: ...the joystick to display the image sound brightness contrast colour adjustment menu see Audio video parameter adjustment 2 Touch to answer the call The LED switches off To end the call touch the A key...

Страница 32: ...in your home or in other apartments The programmable key to use for calling a certain Internal Unit is set by the installer see Programming of the programmable keys Key A lights up to indicate that t...

Страница 33: ...Internal Unit answers the key starts to flash communicate with the Internal Unit or touch to close the call Note if during the conversation a call is received from the Entrance Panel the conversation...

Страница 34: ...ssible to directly display a camera or Entrance Panel The programmable key to use for calling a certain Entrance Panel is set by the installer see Programming of the programmable keys 1 Touch to displ...

Страница 35: ...ing service When switching from one camera to the next the A key lights up To end camera display mode wait for the switching off time to elapse or press the B key 4 To display a specific Entrance Pane...

Страница 36: ...ck touch for example programmable key It is possible to open the main Entrance Panel door lock using the door lock key Using the programmable keys it is also possible to open the system door locks The...

Страница 37: ...he microphone of the Classe100 X16E through the speakers of the sound system This function is enabled during the configuration by the installer see Programming of the programmable keys 1 Touch to open...

Страница 38: ...ng between the handset and the acoustic device we recommend a position in front of the device at a distance of 25 35 cm Inductive loop Note the presence of metal and background noise generated by elec...

Страница 39: ...ce is enabled during the configuration by the installer see Programming of the programmable keys 1 If the LED flashes the entrance door is open 2 If the LED is off the entrance door is closed Note the...

Страница 40: ...g the door lock control key This service can be enabled during the configuration by the installer see Programming of the programmable keys and activated using the specific menu see enable disable Prof...

Страница 41: ...Entrance Panel and Internal Unit are in voice communication This service is enabled during the configuration by the installer see rear view When this service is active the door lock key or one of the...

Страница 42: ...ngs menu You must use the joystick on the side of the device to navigate on the menu and select the settings SYMBOL ACTIONS TO BE PERFORMED SERVICE Press Confirm access the Adjustments mode 5 sec Pres...

Страница 43: ...oor Entry CLASSE 100X App Move the joystick up down to select the page among You can download the Door Entry CLASSE100X App from the Stores he page disappears after the first association with the App...

Страница 44: ...se100 X16E User and installation manual Wi Fi settings page where it is possible to enable disable reset the Wi Fi perform the first association to the app and reset the device Device info EXIT Exit t...

Страница 45: ...ick to adjust the volume The ringtone is played at the set volume level 2 2 2 Move the joystick up down to select the volume level 1 8 4 4 4 Move the joystick up down to select another setting or the...

Страница 46: ...he joystick to change mode ON A 2 2 2 Move the joystick up down to select another setting or the last page to exit When a call is received from the entrance panel this function automatically activates...

Страница 47: ...corresponding page Press the joystick to select the page of interest Note to connect the device to the Wi Fi network and to the app you must first associate the Classe100 X16E to the Door Entry CLASSE...

Страница 48: ...ropriate procedure Enable disable the Wi Fi Network Now the Wi Fi network is no longer active but the device is still authenticated to it OFF In this page you can display the Wi Fi network to which th...

Страница 49: ...ice is connected or the network password 1 Press the joystick to reset the Wi Fi network RESET 1 3 Press the joystick to confirm 3 2 Move the joystick down to select the confirmation icon 2 Now the de...

Страница 50: ...deleted Note this procedure resets the device to complete the system reset refer to the Settings Reset video internal unit section Device reset This page can be used to reset the device 1 Press the j...

Страница 51: ...joystick to display the information 1 A Wi Fi network name to which the Classe100 X16E is connected B Network parameters C Firmware version D MAC address E E Configurator value see Configuration Wi Fi...

Страница 52: ...to modify the value see the following table Audio video parameter adjustments During a connection to an Internal Unit Entrance Panel or when using the Call home function with Door Entry CLASSE100X app...

Страница 53: ...4 4 4 Move the joystick up down to select the desired level 6 6 6 Move the joystick up down to select another parameter or the last page to exit 3 3 Press the joystick to modify the level 5 5 Press t...

Страница 54: ...y press and hold down the joystick for about 5 seconds to activate the display and access the Settings menu Associate a ringtone to an event EXIT Exit the menu Settings Settings menu ON Enable disable...

Страница 55: ...tick to associate the first event 01 0 2 2 A B 2 Move the joystick up down to select the type of call for which you want to set the ringtone see the following table The page shows the type of call A a...

Страница 56: ...CALL ringtone selection INTERCOM CALL ringtone selection EXTERNAL INTERCOM CALL ringtone selection interface 346850 only 15 4 4 4 Move the joystick up down to select the ringtone to be associated the...

Страница 57: ...Introduction You can interact with your Classe100 X16E using the free Door Entry CLASSE100X app After registering and authenticating you must make the association with the device at this point you ca...

Страница 58: ...not reply Account registration You must first register to be able to use the Door Entry CLASSE100X app and thus use the interface functions with your Classe100 X16E After opening the app follow the re...

Страница 59: ...0 X16E User and installation manual 6 8 7 6 Enter a password and fill the fields with your details 7 Tick to accept the terms and conditions of use laid down in the associated text obligatory 8 Touch...

Страница 60: ...access Note after three failed access attempts wrong password in an hour the system blocks the account for 15 minutes After registering with the portal you can authenticate by entering email and passw...

Страница 61: ...ccount The code is 196466 Best regards Legrand Address verification code This message was sent from an e mail address that is not checked Do not reply 5 4 Forgotten password 1 Touch to activate the pa...

Страница 62: ...s must contain at least one letter and one number it must be different from the last 5 passwords used 7 Enter the password again 8 Touch to confirm The Home Page will be displayed so that the authenti...

Страница 63: ...Select the topic on which you require clarifications Sending log In this section you can send a notification about a problem you have found 1 Touch to enter the Sending log section 2 Describe the pro...

Страница 64: ...sse100 X16E to your home Wi Fi network and activate the connection between the two devices You can also invite other users so that they can use the connected Classe100 X16E functions 2 First of all co...

Страница 65: ...65 Classe100 X16E User and installation manual 5 6 5 From stand by press the joystick to activate the display 6 Touch to continue...

Страница 66: ...App 8 7 Move the joystick down to select the Wi Fi settings page 8 Press the joystick to access the page This screen is displayed to indicate that your Classe100 X16E has never been associated The sc...

Страница 67: ...67 Classe100 X16E User and installation manual 9 OFF SOFT_AP 9 Touch to activate the temporary Wi Fi network created by your C100X16E This screen appears followed by a qrcode...

Страница 68: ...68 Classe100 X16E User and installation manual 10 11 10 Touch to continue 11 Using the smartphone scan the QR Code...

Страница 69: ...Wi Fi 04 Wi Fi 05 Wi Fi 06 Wi Fi Other 14 15 14 Select the temporary network which the C100X16E creates to connect to the smartphone e g BTICINO_cc9bdf 15 Your C100X16E is now connected to the tempora...

Страница 70: ...Home1234 Wi Fi Home 18 19 16 17 IP 192 168 1 203 16 Now select the home Wi Fi network to which the C100X16E will be connected 17 Enter the home Wi Fi network password 18 Touch to confirm 19 Touch to...

Страница 71: ...n is confirmed by the confirmation screen Classe100 X16E is now connected to the home Wi Fi network 20 Touch to continue Note The disconnection of Classe100 X16E from the Wi Fi network or the reset of...

Страница 72: ...6E User and installation manual 21 22 23 Or 21 Touch to continue 22 Touch to immediately customise the Home Page see Home Page customisation 23 Touch to delay it to a later date You will be directed t...

Страница 73: ...the cameras or Entrance Panels C Door lock activation D Staircase light activation E Call your Classe100 X16E Note the DOOR ENTRY APP operation with screen off background may be compromised by the app...

Страница 74: ...y the cameras and Entrance Panels configured by your installer see Configuration Display the cameras or Entrance Panels 1 Select the desired camera or Entrance Panel 2 Touch to display A Name of camer...

Страница 75: ...pear 4 Touch to activate the microphone and communicate with the Entrance Panel 5 Touch to cycle to the next camera 6 Touch to stop the image capturing A Call quality indicator indicates if the condit...

Страница 76: ...cks Staircase Lights A Door lock of the associated Entrance Panel B Other door locks A Staircase light activation 1 Drag to the right to switch the staircase light on A When it becomes green the light...

Страница 77: ...n appears both systems will receive a push notification To receive a video door entry call The first three smartphones which receive the call will see the video image directly before answering the oth...

Страница 78: ...the call comes by dragging the switch When it becomes green the door lock has been activated If it remains red the command has not been performed correctly 5 Touch to end the call 1 Touch to call the...

Страница 79: ...79 Classe100 X16E User and installation manual 3 2 2 When the Classe100 X16E call answers the audio communication is activated 3 Touch to end the call...

Страница 80: ...Settings section C Closes the pull down menu D Opens the Account section E Opens the FAQ and Sending log page F Opens a screen with some information on the APP version etc H Log out This pull down men...

Страница 81: ...s section can be used display the associated users and the devices with which you want to interact using your Classe100 X16E dissociate users or devices to invite other users to associate their accoun...

Страница 82: ...3 Touch to confirm the invitation 4 Invite sent touch to close The invited user will receive an e mail with the invitation to check your system Invited users that already have a Legrand account will...

Страница 83: ...2 3 Dissociate a smartphone 1 Scroll to dissociate a smartphone 2 Touch to continue 3 Touch to confirm The user will no longer be able to manage the system using that smartphone To re associate the sm...

Страница 84: ...r and therefore all the devices associated with the same 2 Touch to continue 3 Touch to confirm 4 Touch to indicate the new main user 5 Touch to confirm You will be redirected to the Home page The mai...

Страница 85: ...the Home Page set the Wi Fi connection reset and update your Classe100 X16E Settings 1 Touch to open the setting section A Update the Classe100 X16E firmware B Customise the Home page C completes the...

Страница 86: ...at any time to update the firmware of your Classe100 X16E On entering the section if an update is available a key will be displayed to install it otherwise the version currently in the Classe100 X16E...

Страница 87: ...s object and the objects corresponding to the programmable keys of your Classe100 X16E Note The number and the types of objects available for customisation depend on the way your installer has configu...

Страница 88: ...Wi Fi network This procedure can be used to reset the connection on another network e g router replacement reset the connection with the home network changing the password e g new network password Wh...

Страница 89: ...89 Classe100 X16E User and installation manual 3 Wi Fi Home 4 3 Press the joystick to access the page 4 Move the joystick to select the Reset page...

Страница 90: ...nstallation manual 5 RESET 6 5 Press the Joystick to reset the Wi Fi network and connect Classe100 X16E to another network or to the same network with a different password 6 Move the joystick down to...

Страница 91: ...se100 X16E User and installation manual 7 8 8 Touch to continue 7 Press the joystick to confirm The device can now be connected to the Wi Fi network The page will show the QR code to create a new conn...

Страница 92: ...92 Classe100 X16E User and installation manual 9 9 Frame the QR code with your smartphone and continue the procedure as shown in Association of the device item 12...

Страница 93: ...ts to Classe100 X16E will be deleted the connection of Classe100 X16E to the Wi Fi network will be deleted all the Home Page customisations set through the App will be deleted the system configuration...

Страница 94: ...94 Classe100 X16E User and installation manual 2 3 2 Move the joystick to select the Settings page 3 Press the joystick to access the page...

Страница 95: ...95 Classe100 X16E User and installation manual Wi Fi Home 4 5 RESET 4 Move the joystick to select the device Reset page 5 Press the joystick to reset the Classe100 X16E...

Страница 96: ...96 Classe100 X16E User and installation manual 6 7 6 Move the joystick down to select the confirmation icon 7 Press the joystick to confirm...

Страница 97: ...tallation manual 8 8 Press to perform the reset At the end of the procedure the authentication page appears It is possible to use your Classe100 X16E for functions that do not require association with...

Страница 98: ...u can also modify your authentication password Account 1 Touch to manage your account A Is used to display and change the terms and conditions of your account B Change your account password C Delete y...

Страница 99: ...word use the Forgotten password procedure touch to start Delete the account In this section you can cancel your account definitively 1 Touch to delete the account 2 At the end of the procedure the aut...

Страница 100: ...Spa reserves at any time the right to modify the contents of this booklet and to communicate in any form and modality the changes brought to the same BTicino SpA Viale Borri 231 21100 Varese www btic...

Отзывы: