background image

73

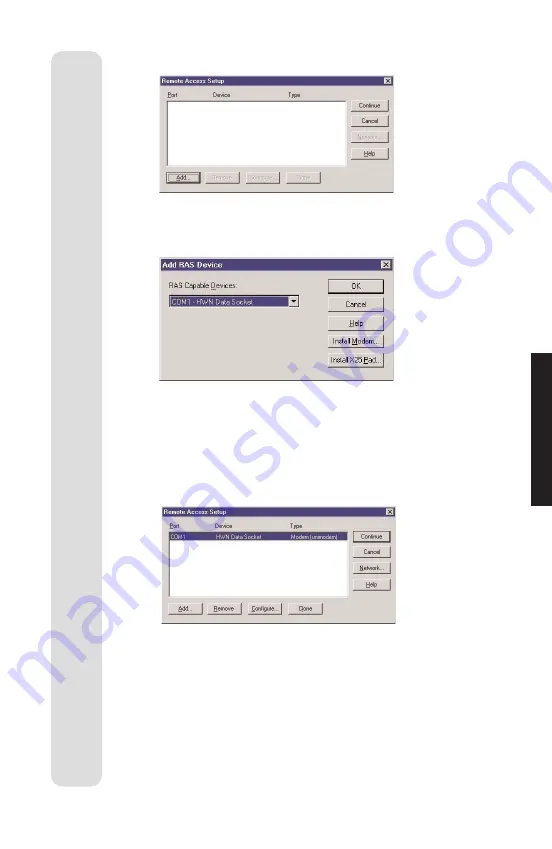
Double Click on 

Remote Access Service

Click on 

Add…

The Add RAS Device dialog will be displayed.

If there is already an entry for the COM port to which the
Airway Data Socket is attached, remove it by highlighting
the entry and clicking 

Remove

.

From the list of 

RAS Capable Devices

select 

Data Socket

and click 

OK

In the 

Remote Access Setup

window click 

Continue

and

then 

Close

. Windows NT will display a number of messages

regarding Binding Configuration, Storing and Review.

To complete installation of the Data Socket, remove the
Airway CD and restart your PC.

You are now ready to register the Data Socket, go to

Registering the Data Socket with your Controller, page 75.

C

OMPUTER

Содержание Airway

Страница 1: ... designed for making emergency telephone calls when the power fails Alternative arrangements should be made for access to emergency services Caller Display features require subscription to your network s caller display service User Guide ...

Страница 2: ...ts to the controller 27 Configuring your system 30 Giving an extension a name 31 Setting specific lines for incoming and outgoing calls at an extension 32 Call barring 34 Remove an extension from the system 35 Call Forwarding 36 Setting tone or pulse dialling 39 Dialling Prefix 40 Adjusting hold and transfer times 41 Setting Time Date 43 Viewing System Information 44 Changing Password 45 Accept a ...

Страница 3: ...tering a Data Socket with your Controller 75 Starting the Airway network 77 Connecting your controller to the Internet 78 Folder and Printer sharing 82 Configuring your Airway System from a PC 84 Installing Dial up Networking and TCP IP 90 Installation with Windows 95 and 98 90 Installation with Windows NT 99 Using other handsets 102 Making and receiving calls 103 General information 105 Cleaning ...

Страница 4: ... connecting to incoming phone lines M Ma ai in ns s p po ow we er r s so oc ck ke et t B Ba ac ck k u up p b ba at tt te er ry y c co om mp pa ar rt tm me en nt t Takes a PP3 9V battery Controller I IS SD DN N l li in ne e s so oc ck ke et t For connecting to ISDN2 line if Airway ISDN card fitted Data socket Serial connection socket For connecting a PC Mains power socket ...

Страница 5: ...the menus Scrolls down through the screens TALK Dials a number Selects a highlighted item Starts or confirms an action END CALL Lets you hang up end an action go back one screen and delete a character When a menu is open press for two seconds to go back to the standby screen When editing an entry press for two seconds to delete all characters PWR Switches the handset ON ...

Страница 6: ...5 Airway C hargi n g Charging contacts CHARGER ...

Страница 7: ...T R U C T U R E F O R Network Time Date System Info Extensions Configure Edit Name Lines out Ring in Call barring Remove Call Forward Signalling Tone Pulse Dial Prefix Press MENU Settings Controller Enter password ...

Страница 8: ... O L L E R Password ISDN Ans Machine Reg Mode On Timers Hold Transfer Mode Point to point Point to Multipoint MSNs Lines Greetings Turn On Off Ans delay Time saver Remote use Answer Only Turn delay On Off Support Call Reset Config ...

Страница 9: ...About this guide The System Guide describes how to install and set up the system It covers How to install and use the Controller How to register a handset How to register a corded phone or fax machine How to install a Data Socket on a computer How to change system settings using an Airway Handset How to change system settings using the Airway Web Pages How to access the Internet Troubleshooting Ai...

Страница 10: ... 2 NiMH Battery pack 1 2 9V battery 1 1 Data Socket 1 1 Plug mounted 13 amp mains adaptors 3 4 Telephone line cords 2 4 CD ROM 1 1 Serial cable 1 1 Self adhesive protective feet Wall plugs and screws for wall mounting Handset user guides 1 2 System user guide 1 1 1 2 3 4 5 6 7 8 9 0 PWR W X Y Z A B C D E F G H I J K L M N O P Q R S T U V Men u Dia l Num ber 012 345 678 9 Airwa y Ä Airw ay Charg i ...

Страница 11: ...d screws for wall mounting 1 system user guide For your records The Controller s serial number is located on the label underneath the Controller Write down the serial number in the space provided you will need this information should you wish to call the BT Airway Helpdesk For warranty purposes proof of purchase is required so please keep your receipt Date of purchase Place of purchase Serial numb...

Страница 12: ...ord in 0000 Note that the password will reset to 0000 if the controller s power supply and battery are disconnected Enter your 4 digit system password here You may find it helpful to note down the telephone number of each line You will need this information to set some of the features specific to individual lines YOUR TELEPHONE NUMBERS Line 1 Line 2 Line 3 Line 4 ISDN MSN1 MSN2 MSN3 MSN4 MSN5 MSN6...

Страница 13: ... intensive care medical equipment and should not be used by people with pacemakers Never dispose of batteries in a fire There is a serious risk of explosion and or the release of highly toxic chemicals The product may heat up when the batteries are being recharged This is normal However we recommend that you do not place the product on antique veneered wood to avoid damage Do not submerge any part...

Страница 14: ...te the controller Generally the higher the better You can either wall mount the Controller see page 121 or place it on a stable flat surface such as a desk or tabletop If placing the Controller on a flat surface stick the self adhesive feet to the underside of the Controller Make sure it is at least 1 metre away from other electrical products to avoid interference Range Airway has a range of up to...

Страница 15: ...e modern phone sockets call BT and ask for a BT engineer to come and fit the correct type This is a chargeable service Plug the supplied telephone line cords into your telephone wall sockets 2 Plug the other end of the telephone line cords into the controller These are marked Line 1 and Line 2 plus Lines 3 and 4 on the 4 line system Line 1 To telephone wall sockets Line 2 Line 1 socket Line 2 sock...

Страница 16: ... socket Line 2 socket Line 1 socket 4 line controller 3 Install the back up battery Remove the Controller cover Insert the 9V battery Replace the cover In the event of a mains power failure the back up battery keeps your Airway controller working for around 30 minutes SETTING UP ...

Страница 17: ...d on the green lights on the line sockets will flash briefly then stay on if there is a telephone line connected to the socket 5 To install an Airway ISDN card or Airway Answering Machine Card This section only applies if you have purchased the Airway ISDN or Answering Machine card Unplug the controller from the power Remove the controller cover and take out the back up battery SETTING UP ...

Страница 18: ...ard to ensure that it is properly seated in the slot Replace the battery and controller cover Reconnect the power cable 2 3 1 Slot into position Pull upright Push down Airway ISDN Remove the card from its electrostatic bag and insert it into an empty expansion slot on the Controller The label should face the edge of the Controller with the sockets SETTING UP ...

Страница 19: ...et Setting up the Handset The Airway Handset User Guide contains full details on using the handset This guide tells you how to set up your system with a handset Note The screen on your handset may look slightly different from the illustrations in this manual depending on how many lines and option cards you have Important The handset that comes with your starter pack is already registered to the Co...

Страница 20: ...e rechargeable battery pack in the handset 2 Connect the charger to the mains power Plug the mains cable into the charger Place the handset into the charger and plug into the mains power When switched ON the green charging light comes on C hargi n g SETTING UP ...

Страница 21: ... fully charged Battery indicator 4 Switch the handset on Press and hold down the PWR button for a few seconds until the display comes on If the handset is registered with the Controller the display will look like this Note The charge capacity of the batteries will reduce with time as they gradually wear out so reducing the talk standby time of the handset Fully discharging the batteries at least o...

Страница 22: ... item Starts or confirms an action Lets you hang up end an action go back one screen and delete a character Press for two seconds to go back to the standby screen at any time When editing an entry press for two seconds to delete all characters Function buttons Using the handset Menu The Main Menu When the handset is not being used the standby screen is displayed SETTING UP ...

Страница 23: ...es connected to the Controller Press to return to the standby screen Menu Press to display the main menu Press to select Directories Press to scroll down to the directory you want Press to select Press to return to previous screens Menu Directories Menu Sel Sel SETTING UP ...

Страница 24: ...way is connected to a switchboard you may need to dial a number often 9 to get an outside line followed by the number you want 0 9 Call To choose the line you want to use This allows you to keep specific lines free for incoming calls Press to display the main menu Scroll down to the line you want to use Press to select the line Dial the number you want Menu Sel 0 9 SETTING UP ...

Страница 25: ...al Press to select Scroll down to the extension you want to call Press to call the extension Menu Sel Sel To end a call Press to hang up End To answer a call When the telephone rings the display shows Press to answer the call Or If the handset is placed in the charger just lift it out and talk You do not need to press any buttons Internal Line 1 Line 2 Line 3 Line 4 Ä Sel SETTING UP ...

Страница 26: ...ct Scroll down to Controller Press to select Enter the system password Original password 0000 Press to confirm Scroll down to Reg Mode On Press to select You now have 90 seconds to register the new handset Menu Sel Sel Sel OK 0000 Note If it is the first handset to be registered switch off the power to the controller Switch the power on again You now have 90 seconds to register the handset SETTING...

Страница 27: ...0000 BASE NOT FOUND or FULL If you receive this message check the following Is the Controller plugged into the mains power properly Did you enter the password correctly The original password is 0000 Are you within range of the Controller The maximum range is 300 metres outdoors and 50 metres indoors Have you already registered the full 16 handsets and sockets to the Controller Each Airway handset ...

Страница 28: ...or fax machine must have and buttons Airway phone sockets are available separately Connect the telephone connection adaptor to the Airway phone socket Plug the line cord from the telephone fax machine you are going to use for registration into the socket on the telephone connection adaptor SETTING UP ...

Страница 29: ... the Controller From an already registered handset put the Controller into registration mode From an already registered handset Press to display the main menu Scroll down to Settings Press to select Scroll down to Controller Press to select Enter the system password Original password 0000 Press to confirm Scroll down to Reg Mode On Menu Sel Sel OK 0000 SETTING UP ...

Страница 30: ...he Socket is registered to the Controller The Phone Socket is now ready to use The first phone socket installed will be assigned the extension number 50 the second will be 51 and so on All Airway handsets registered to the Controller will now display the Phone Socket and its extension number under Internal on the Main Menu PWR PWR 0000 Sel Note To make an internal call dial the 2 digit extension n...

Страница 31: ...l handsets can be barred from making certain types of call All this can be set up from any Airway handset registered to the Controller In addition many features can also be set up via a PC connected to an Airway Data Socket see page 60 Note Whenever you want to make changes to the system settings you need to enter the system password for your Controller This is a security measure which helps preve...

Страница 32: ...nfigure Scroll down to the extension number you want Press to select Press to select Edit Name Press to delete the existing name Enter the new name Press to confirm Menu Sel Sel Sel Sel Sel Sel Sel Del OK OK 0000 A Z To enter a name Giving an extension a name You can enter a name for each handset and phone socket registered to your Controller For example these could be the user s name or the locat...

Страница 33: ...acters Once to insert a dash Twice to insert a period Three times to insert a space To go back a space To enter a name with your handset keypad 5 JK L 6 MN O 6 MN O 4 GH I 0 0 0 OK Del To set specific lines for incoming and outgoing calls at an extension By default extensions are set to make and receive calls on all lines Press to display the main menu Scroll down to Settings Press to select Scrol...

Страница 34: ... the extension number you want Press to select Scroll down to Lines out or Ring in Press to select Scroll down to the line you want A tick appears beside the line when it is selected Press to deselect it and the tick disappears Press again and the tick reappears To return to previous screens Sel Sel Sel Sel Sel Sel OK 0000 Sel Lines Out Line 1 Line 2 Line 3 Line 4 CONFIGURING ...

Страница 35: ...ion number you want You can prevent an extension from being able to make certain types of call by selecting one of the pre set options Call Barring options Yes means the call can be made Internal calls System directory National calls International Emergency calls External calls Operator calls calls Level 3 Yes No No No Level 2 Yes Yes No No Level 1 Yes Yes Yes No None Yes Yes Yes Yes 34 Call Barri...

Страница 36: ...roller Press to display the main menu Scroll down to Settings Press to select Scroll down to Controller Press to select Enter the system password Original password 0000 Press to confirm Press to select Network Press to select Extensions Scroll down to Remove Press to select Scroll down to the extension number you want to remove Press to select Press to confirm de registration To remove an Extensio...

Страница 37: ...ct Scroll down to Controller Press to select Enter the system password Original password 0000 Press to confirm Press to select Network Scroll down to Call Forward Press to select Scroll down to the line you want calls forwarded from Press to select Scroll down to Edit Number Press to select Enter the number to which you want calls forwarded Enter Line 1 Fwd Number Menu Sel Sel Sel Sel Sel Sel OK 0...

Страница 38: ...eed to first enter an additional dialling prefix normally 9 Ask your switchboard operator for details To forward calls on a specific line Enter the 2 digit line number Press the MENU button Press to enter a pause digit Enter the phone number to which calls should be forwarded Press to confirm OK 0 9 0 9 0 9 Menu Sel OK Outgoing line numbers 4 line system 2 line system Line 1 01 01 Line 2 02 02 Lin...

Страница 39: ... select Scroll down to Controller Press to select Enter the system password Original password 0000 Press to confirm Press to select Network Scroll down to Call Forward Press to select Scroll down to the line you want forwarded A tick will indicate if the line is already forwarded Press to select Press to turn on Press again to turn off Press to return to previous screen Menu Sel Sel Sel Sel Sel Se...

Страница 40: ...wn to Controller Press to select Enter the system password Original password 0000 Press to confirm Press to select Network Scroll down to Signalling Press to select Scroll down to the line you want to change Press to select Scroll down to Tone or Pulse Press to select A tick appears beside the selected item Press to return to previous screen Line 1 Tone Pulse Menu Sel Sel Sel Sel Sel Sel OK 0000 C...

Страница 41: ...make a call Press to display the main menu Scroll down to Settings Press to select Scroll down to Controller Press to select Enter the system password Original password 0000 Press to confirm Press to select Network Scroll down to Dial Prefix Press to select Scroll down to the line you want Press to select Enter the appropriate dial prefix The Controller will dial it automatically before every exte...

Страница 42: ...nd that you do not set up line prefixes and that you include the prefix in your directory entries This also applies if you wish to use Automatic Line Selection with a mixture of external numbers and switchboard extension numbers To adjust the length of time calls can be kept on Hold or on Transfer The Hold Timer determines how long a call is kept on hold before the handset that placed it on hold i...

Страница 43: ... Scroll down to Hold or Transfer Press to select Delete any existing number entered Enter the number of seconds you want between 20 and 360 seconds or 0 to switch the timer off Press to return to the Timers menu To return to standby Timers Hold Transfer Sel Sel OK Sel Sel Del 0000 Hold 20 360s 0 to disable timer 60 Transfer 20 360s 0 to disable timer 60 OK 0 9 CONFIGURING ...

Страница 44: ...down to Controller Press to select Enter the system password Original password 0000 Press to confirm Scroll down to Time Date Press to select Press to delete the existing entry If you do not wish to change the entry press Enter the time in 24 clock format e g 0930 9 30am 1724 5 24pm Press to confirm Display shows Enter Date Press to delete the existing entry OK To set the Time and Date Enter Time ...

Страница 45: ...may be requested if you phone the Airway Helpline Press to display the main menu Scroll down to Settings Press to select Scroll down to Controller Press to select Enter the system password Original password 0000 Press to confirm Scroll down to System Info Press to select Press to return to previous screen Software Version 1 68 17 28 43 11 2 Menu Sel Sel OK OK Sel 0000 CONFIGURING ...

Страница 46: ...t Scroll down to Controller Press to select Enter the system password Original password 0000 Press to confirm Scroll down to Password Press to select Enter the new four digit password To confirm Enter the new password again To confirm Be sure to write your new password down and keep it in a safe place Note that the system password will return to its original setting if the controller power supply ...

Страница 47: ...ve selected this option Press to display the main menu Scroll down to Settings Press to select Scroll down to Controller Press to select Enter the system password Original password 0000 Press to confirm Scroll down to Support call Press to select Menu Sel Sel OK Sel 0000 Note The controller will wait for up to 10 minutes to accept the next incoming call as a support call To reset the system before...

Страница 48: ...ll also need to re enter all of the configuration settings and re enter all system directory entries Press to display the main menu Scroll down to Settings Press to select Scroll down to Controller Press to select Enter the system password Original password 0000 Press to confirm Scroll down to Reset config Press to select Press to confirm Or Press to cancel To reset the Controller Menu Sel Sel Sel...

Страница 49: ...n point to multipoint mode your 2 ISDN channels can make and receive calls using up to six separate phone numbers in addition to your normal phone line numbers These are called Multiple Subscriber Numbers MSNs Airway treats MSNs like all other lines So you can assign an MSN number to an individual handset for incoming and outgoing calls If you want to have more than one number on an ISDN line cont...

Страница 50: ...nfirm Scroll down to ISDN Press to select Press to select Mode Press to change Mode Menu Sel Sel Sel Sel Yes OK 0000 To enter your point to point ISDN number into the system Press to display the main menu Scroll down to Settings Press to select Scroll down to Controller Press to select Enter the system password Original password 0000 Press to confirm Scroll down to ISDN Menu Sel Sel OK 0000 ISDN ...

Страница 51: ...played your system is in point to multi point mode Follow the steps under To change ISDN mode to set point to point mode then return to this section Sel Sel OK OK OK 0 9 0 9 0 9 To add an MSN into the system Press to display the main menu Scroll down to Settings Press to select Scroll down to Controller Press to select Enter the system password Original password 0000 Press to confirm Scroll down t...

Страница 52: ...e to set point to point mode then return to this section Sel Sel OK To change an MSN Press to display the main menu Scroll down to Settings Press to select Scroll down to Controller Press to select Enter the system password Original password 0000 Press to confirm Scroll down to ISDN Press to select Scroll down to Msns Press to select Scroll down to the MSN you want to change Press to select Menu S...

Страница 53: ...ngs Press to select Scroll down to Controller Press to select Enter the system password Original password 0000 Press to confirm Scroll down to ISDN Press to select Scroll down to Msns Press to select Scroll down to the MSN you want to delete Press to select Scroll down to Delete Press to delete Menu Sel Sel OK Sel Sel Sel Sel 0000 ISDN ...

Страница 54: ...hone The Airway handset User Guide and the Airway Answering Machine User Guide contain instructions on how to playback messages This guide describes how to configure the Answer Machine in your controller In order to switch on the answer machine or change any settings you will need the System Password Features include Up to 20 minutes record announcement time Answering of all incoming lines connect...

Страница 55: ...ystem password Original password 0000 Press to confirm Scroll down to Ans Machine Press to select Press to select Lines Scroll down to the line you want Press to switch the answer machine on or off for that line When on a tick is displayed next to the line Press to return to the previous screens To select which lines are answered Menu Sel Sel OK Sel Sel Sel 0000 Note If Call Forwarding is turned o...

Страница 56: ...password 0000 Press to confirm Scroll down to Ans Machine Press to select Scroll down to Greetings Press to select Scroll down to the Greeting you want Press to select Scroll down to Re Record Playback or Delete Press to select If you select Re Record the answering machine instructs you to record your message after the tone To stop recording Menu Sel Sel OK Sel Sel Sel Sel 0000 ANSWERING MACHINE ...

Страница 57: ...een On and Off To turn the Answering Machine On Off Menu Sel Sel OK Sel Sel 0000 To set the number of rings before a call is answered The Answer Delay is the number of rings before the answering machine answers a call You can choose from 2 to 9 rings The original setting is 4 Press to display the main menu Scroll down to Settings Press to select Scroll down to Controller Press to select Enter the ...

Страница 58: ... the Answering Machine will answer after only 2 rings if you have new messages If no new messages have been recorded the Answering Machine answers after the number of rings specified under Answer Delay Press to display the main menu Scroll down to Settings Press to select Scroll down to Controller Press to select Enter the system password Original password 0000 Press to confirm Scroll down to Time...

Страница 59: ...ges The original setting is on Press to display the main menu Scroll down to Settings Press to select Scroll down to Controller Press to select Enter the system password Original password 0000 Press to confirm Scroll down to Ans Machine Press to select Scroll down to Remote Use Press to switch On or Off A tick is shown when On To turn Remote Access On Off Menu Sel Sel OK Sel Sel 0000 ANSWERING MAC...

Страница 60: ...hine plays the Answer Only greeting and then disconnects without allowing the caller to leave a message Press to display the main menu Scroll down to Settings Press to select Scroll down to Controller Press to select Enter the system password Original password 0000 Press to confirm Scroll down to Ans Machine Press to select Scroll down to Ans Only Press to select When on a tick is displayed Menu S...

Страница 61: ...ystem can act as a computer network in order to share resources between your PCs Each PC you want to add to your Airway system must be installed separately Note This guide assumes that you have a basic user s understanding of PCs and MS Windows Serial Cable Airway Data Socket Before you start Make sure you have the following items from your Airway Starter Pack Data Socket mains power adaptor Airwa...

Страница 62: ...owser e g Microsoft Internet Explorer or Netscape Navigator 10MB of free disk space CD ROM drive A free serial port If you are unsure of your PC s specification or compatibility please refer to your PC manual or equipment supplier Installation instructions Windows 95 or 98 turn to page 62 Windows NT turn to page 66 COMPUTER ...

Страница 63: ...ing the Airway CD connecting the data socket to your PC and restarting the system With older versions of Windows 95 you will be asked to upgrade Dial Up Networking version 1 3 Insert the Airway CD into the CD ROM drive of your PC Windows should autorun the installation software If the software does not start after a few seconds the autorun feature has been turned off on your system Double click on...

Страница 64: ...for the Airway Data Socket to operate Do not connect the Serial cable yet Click NEXT to continue The installation software will check your system and determine any additional steps that may have to be completed for the Airway Data Socket to function Follow the instructions on screen For information on installing TCP IP networking and Dial up networking turn to page 90 of this guide The installatio...

Страница 65: ... Now choose how you want the Airway software to be started on your PC Click Next to continue The installation is now ready to begin Select Next to continue The files will now load onto the system COMPUTER ...

Страница 66: ...need to be restarted for the changes to take effect Remove the CD Click Finish Windows will shut down and restart The installation process will now complete automatically You are now ready to register the Data Socket go to Registering the Data Socket with your Controller page 75 2 Connect the data socket to your PC COMPUTER ...

Страница 67: ...ay technology The Airway software and Data Socket must be installed manually Insert the Airway CD into the CD ROM drive of your PC If the software does not automatically run after a few seconds the autorun feature has been turned off on your system Double click on the My Computer icon on the desktop to display the window below Click on the drive containing your Airway installation CD Click on the ...

Страница 68: ...s that may have to be completed for the Airway Data Socket to function Follow the instructions on screen For information on installing TCP IP networking and Remote Access Service turn to page 90 of this guide The installation software will then show where it will install the Airway software on your PC Click Next to continue or Browse if you wish the software to install in a different location Now ...

Страница 69: ...n is now ready to begin Click Next to continue The files will now load onto the system The screen on page 69 will show any additional installations that will need to take place before the Airway Data socket will be properly installed COMPUTER ...

Страница 70: ... continue 2 Install the data socket on your PC When the screen below appears Connect the Airway Data Socket to your PC and the mains power supply Click OK Restart your PC for the changes to take effect by Removing the CD and Clicking Finish COMPUTER ...

Страница 71: ...If no other modems have been installed you will see the Install New Modem window as shown below If there are other modems then click Add Ensure that Don t detect my modem is ticked and click Next to continue In the Manufacturers window click on Airway and highlight Airway Data Socket in the Models window Click Next to continue COMPUTER ...

Страница 72: ...71 Highlight the COM port that your Airway Data Socket and serial cable are connected to and click Next to continue Click Finish to continue COMPUTER ...

Страница 73: ...72 3 Configure Dial Up Networking Restart your computer When restarted select Start then Settings then Control Panel and double click the Network icon Screen shows Select the Services tab COMPUTER ...

Страница 74: ...Remove From the list of RAS Capable Devices select Data Socket and click OK In the Remote Access Setup window click Continue and then Close Windows NT will display a number of messages regarding Binding Configuration Storing and Review To complete installation of the Data Socket remove the Airway CD and restart your PC You are now ready to register the Data Socket go to Registering the Data Socket...

Страница 75: ...king Delete the Airway Networking icon From the desktop Right click on the My Computer icon and select properties Click on the Device Manager tab Double click on Modem Click on Airway Data Socket to select it Click Remove Now open the control panel by clicking My Computer on the desktop or by clicking Start then Settings then Control Panel Double click on the Add Remove Programs icon Click on Airw...

Страница 76: ...a Starter pack including a Controller then it is pre registered to that Controller To register a Data Socket with your Controller Open the Airway software Select the Start menu then Programs then Airway and then the Airway program Or Click on the shortcut on your desktop When the software is running the Airway icon is displayed in the system bar at the bottom right of your desktop Right click on t...

Страница 77: ... require access to the internet Click the Register with controller hyperlink to display the data socket registration screen Use a handset to put the Controller into Registration Mode see Turning Registration Mode On page 25 Enter the System password or access code on the registration screen original setting 0000 COMPUTER ...

Страница 78: ...rinters and other resources 77 Click Register Registration happens automatically and can take up to 30 seconds Wait for the Airway software to disconnect and reconnect to the Controller to complete the process If the Airway software does not disconnect automatically click on the Airway icon and disconnect reconnect manually Starting the Airway Network Once the Data socket is registered with the Co...

Страница 79: ...l up your Internet Service Provider ISP The Gateway can store the details of five different ISPs You can only connect to one ISP at a time Your PCs must be connected to the Airway network by Airway Data Sockets in order to make use of the Internet Gateway Connecting your Controller to the Internet Plug in an external Analogue Modem Choose one of the following options a Using an external modem on a...

Страница 80: ... s user manual Connect the other end of the serial cable to the serial port on the Controller Connect the modem to the controller and telephone line b Using an external modem with a dedicated phone line If you use a modem frequently it may be more convenient to dedicate one phone line for its sole use Connect one end of the modem serial cable to the modem as described in the modem s user manual Co...

Страница 81: ...rovider ISP complete the on screen Internet Configuration pages Right click on the Airway icon in the system bar on your desktop to bring up the Airway menu Click on ISP Settings Details of your existing ISP dial up connections will be displayed Click on the tick box for those ISP details you want to use with the Airway Controller and select which one you would prefer to use as the default Enter t...

Страница 82: ...N card for Internet access For more information on Internet configuration see page 84 87 As it is the controller that dials the Internet and not your PC your browser may need to be set for connection to a local area network LAN or to Never dial a connection when using your Airway system as a network For example if you are using Microsoft Internet Explorer this option is found by clicking on the To...

Страница 83: ...n default 5 minutes Using the Internet Note Sometimes your browser may report that a selected page cannot be found This may be because the browser has timed out whilst the controller is dialling the ISP Try selecting refresh or reload from your browser If more than one PC user is connecting to the Internet at the same time you may find it takes longer to load pages and send documents Folder and Pr...

Страница 84: ...led you will be able to choose the share level or user level you want See page 46 for details on enabling file sharing Double click Network Neighbourhood Double click the icon for the computer that controls the folder or printer you want If the computer you are looking for is not in your workgroup or domain start by clicking Entire Network and then double click the appropriate workgroup or domain ...

Страница 85: ... specific extensions from making certain types of call To configure your Airway system With the Airway Network running Right click on the Airway icon in the system tray on your desktop to bring up the Airway menu Click on the Controller option Enter the System Password Original setting 0000 The Web browser displays the Airway Main Menu screen Your PC is only connected to the Controller and not to ...

Страница 86: ...that the changes have been made Click OK to return to the main menu Data Sockets View enter or change the name of your data sockets Click the appropriate Delete button to remove the Data socket from your system Click the appropriate Change button to rename the Data socket Type the new name for the Data Socket Click Store Changes Click OK to return to the main menu Set up Lines Call Forwarding Tone...

Страница 87: ...ls on a specific line Enter the 2 digit line number Press P on your keypad to enter a Pause Enter the phone number to which calls should be forwarded Click Store changes Display confirms the settings have been saved Click OK 4 line system 2 line system Line 1 01 01 Line 2 02 02 Line 3 03 Line 4 04 ISDN1 if fitted 05 05 ISDN2 if fitted 06 06 Timers Hold Timer sets how long you can keep a call on ho...

Страница 88: ...hange or delete any of the entries Note that you may need to subscribe to the appropriate services from your network provider in order to use them Click the appropriate button to delete or change the setting Date and Time You can change the date and time stored in the Controller Internet Connection This page is used to set up your account data for your Internet Service Providers ISPs see page 80 T...

Страница 89: ...y reset strings or dialling prefixes If you are using an analogue modem select NO next to Use ISDN card for Internet access If you are using an Airway ISDN card select YES next to Use ISDN card for Internet access DNS addresses Normally your ISP server will automatically copy in the DNS addresses However it is possible that you may have to manually enter the Primary and Secondary DNS IP addresses ...

Страница 90: ...lick OK to return to the main menu Using 128kbit s involves making 2 telephone calls You will be charged for both calls Change Password You can change the password for your Airway system Enter and confirm the new password System Information This option displays the version number of your Airway software You will need to know this if you contact the Airway Helpdesk Reset You can reset your Controll...

Страница 91: ...w to install them and how to set up Windows networking You will need your original Windows disks for this Installation with Windows 95 and 98 The Airway Data Socket communicates with other devices using Dial Up Networking 1 Check and install if necessary Dial Up Networking Follow these steps to check that Dial Up Networking is installed If it isn t this shows you how to do it Click on the Start me...

Страница 92: ...ws Setup tab click on Communications and click the Details button Screen displays If Dial Up Networking is ticked it is installed Click the Cancel button and go to 2 Configure Dial Up Networking for TCP IP NETWORKING ...

Страница 93: ...PC and begin at 2 below 2 Configure Dial Up Networking for TCP IP The Airway Data Socket uses the TCP IP protocol to communicate with other devices Check that TCP IP is installed On Windows 98 TCP IP is automatically installed Make the Windows desktop visible Right click the Network Neighbourhood icon and select Properties from the menu to bring up the Network window or Click on the Start menu sel...

Страница 94: ... not then add it as follows Click on the Add button to bring up a window containing the options Select Protocol and then the Add button Next choose Microsoft from manufacturers list and then TCP IP from the list of network protocols Click OK to return to the Networks window NETWORKING ...

Страница 95: ...Data Socket is Client for Microsoft Networks If Client for Microsoft Networks is shown in the list Click on the drop down arrow in the Primary Network Logon box and then click on Client for Microsoft Networks to select it Go to 4 If it is not install Client for Microsoft Networks as follows Select the Add button A window containing the following options will appear NETWORKING ...

Страница 96: ...etc you should remove them by clicking the Remove button unless they are needed 4 File and Print Sharing Airway lets you share your PC s files or an attached printer with other PCs on the network Click the File and Print Sharing button in the Networks window and tick the options you want then click OK To enable all computers on your network to communicate with each other you need to enter their de...

Страница 97: ...to communicate with each other they need to belong to the same workgroup name Select the Configuration tab to check settings of installed components Click on TCP IP and click the Properties button Select the Bindings tab and ensure that File and printer sharing for Microsoft Networks is ticked Click OK NETWORKING ...

Страница 98: ...97 The TCP IP Properties screen is displayed Right Click on the words File and printer sharing for Microsoft Networks to highlight them Now select Properties NETWORKING ...

Страница 99: ...is the computer that controls the File and Print Sharing features You can set one or all of your PCs connected to Airway as the Browse Master Select Enabled from the Value list Click OK Click OK to exit the Network window Restart Windows by clicking Yes NETWORKING ...

Страница 100: ...ve Administrator access rights Check with your system administrator Windows NT will add additional files so have your Windows NT System Disk ready Select Start Select Settings Select Control Panel Double click the Network icon to bring up the following window 1 Install Remote Access Service NETWORKING ...

Страница 101: ... is installed you will see it listed Go to 3 Installing TCP IP If it is not displayed then it needs to be added Click Add to install it Click on the item Remote Access Service and select OK Windows NT will display the Remote Access Setup dialog NETWORKING ...

Страница 102: ...b If TCP IP protocol is installed you will see it listed If it is not displayed then it needs to be added Select Add to install Select the TCP IP protocol and click OK to continue Follow any additional screen prompts You will need to have your Windows NT System Disk available to load additional files Ensure that you remove the disk before re starting your PC 3 Installing TCP IP NETWORKING ...

Страница 103: ...ets to the Controller 1 Put the Controller into registration mode From an already registered handset Press to display the main menu Scroll down to Settings Press to select Scroll down to Controller Press to select Enter the system password Original password 0000 Press to confirm Scroll down to Reg Mode On Press to select You now have 90 seconds to register the new handset Menu Sel Sel Sel OK 0000 ...

Страница 104: ... press the Call button The call will be made on the first available line Press the Call button to get dial tone then dial the number To make an external call on the first available line This is available on handsets equipped with an Internal call feature Press the Internal call button often shown as INT Select the line you want by dialling the 2 digit line number as shown below You should hear the...

Страница 105: ...SDN1 if fitted 05 05 ISDN2 if fitted 06 06 For handsets equipped with an Internal call feature it should be possible to make internal calls Press the Internal call button often shown as INT Dial the 2 digit number of the extension you wish to ring To make an internal call HANDSETS ...

Страница 106: ...vice beyond the initial 12 month period Please contact the Airway Helpline on 0845 602 1790 for details Outside the 1 year guarantee period If your Airway product needs repair after the warranty period has ended the repair must meet the approval requirements for connection to the telephone network We recommend that you call the Airway Helpline on 0845 602 1790 and ask for details of our recommende...

Страница 107: ...telephone line no matter how many handsets or Airway sockets are registered to it Any other instrument provided by BT may be assumed to have a REN of 1 unless stated otherwise A total REN of 4 is allowed per telephone line For example if one telephone line is connected to one of the line sockets on the Airway controller and to three separate extension telephones each with a REN of 1 then the total...

Страница 108: ...pment has been approved in accordance with Council Decision 98 482 EC for pan European single terminal connection to the public switched telephone network PSTN However due to differences between the individual PSTNs provided in different countries the approval does not of itself give an unconditional assurance of successful operation on every PSTN network termination point In the event of problems...

Страница 109: ...eck the following simple solutions The handset battery runs out too quickly After a time you may find that the handset battery is running out of charge more quickly This is a standard sign of wear and the battery will need replacing Spare batteries are available from the Airway Helpline on 0845 602 1790 BT accepts no responsibility for damage caused to your Airway handset by using any other type o...

Страница 110: ...ords are plugged into the controller and the telephone wall sockets Check that the handsets are set to ring in on the line numbers that are connected to telephone wall sockets There is dial tone but I cannot make a call Check the level of call barring set for the extension The controller may be set to the wrong signalling method To change between TONE and PULSE dialling see page 39 I have forgotte...

Страница 111: ...roller www pages select Internet check that Use ISDN card for Internet access is set to YES if you are using ISDN and NO if you are using an analogue modem check that the telephone number that you are dialling is correct for connecting to your service provider If you have any doubts about the settings that are used by your ISP contact your ISP directly for advice Still Having Problems If you are s...

Страница 112: ...irway data network bandwidth 242 kbit s 12 channels Data Socket interface V 24 Serial port maximum 115 kbit s Recommended maximum number of data sockets 4 Maximum number of registrations to controller 16 Internet access protocol RFC 1661 Basic PPP definition Authentication RFC 1994 CHAP and PAP Range Up to 300 metres outdoors uninterrupted line of sight Up to 50 metres in buildings Power supply 23...

Страница 113: ...x 52mm x 33 mm Charging cradle 197mm x 68mm x 70mm Data socket 117mm x 72mm x 35mm Weight 2 line controller 355g 4 line controller 365g Handset 195g with battery Charging cradle 125g Data socket 110g PC System requirements Pentium processor or greater 16 MB RAM or greater 10Mb spare hard drive space CD ROM drive Microsoft Windows 95 or 98 or NT O S World Wide Web browser e g Microsoft Internet Exp...

Страница 114: ...are protected by United Kingdom copyright law and international copyright treaty provisions This Licence is not a sale of the Program s recorded on the CD or any copyright in them 2 You may use the Program s on a single machine this licence covers all users on that machine or remove the Program s from one machine and load them onto another and make copies of the Program s for the sole purpose of b...

Страница 115: ...fects in materials and workmanship under normal use and service for a period of 90 days from the date of delivery as evidenced by the receipt BT s entire liability and your only remedy under this warranty is at BT s option either return of the purchase price or replacement of the CD which is returned to BT postage paid with a copy of the receipt This limited warranty does not apply to CDs which fa...

Страница 116: ...ng machine 53 59 answering mode 59 on off 56 outgoing message 55 remote access 58 select lines 54 set number of rings 56 time saver 57 Approval 107 Batteries charging 20 installing 17 19 Call barring 34 Call forwarding 36 Calls answer 24 barring 34 choose line 23 end 24 external 23 forwarding 36 ...

Страница 117: ... Windows 95 and 98 62 Installing with Windows NT 66 register with controller 75 Date 43 Dial up network check 90 configure 72 configure for client for Microsoft Networks 94 installing with Windows 95 and 98 90 TCP IP 92 Dialling prefix 40 DNS addresses 88 External analogue modem 78 External call 23 Extension call barring 34 name 31 specific lines 32 remove 35 File sharing 82 83 95 Folder sharing 8...

Страница 118: ...nect controller to 75 external analogue modem 78 using 82 Installing answer machine card 16 17 back up battery 15 ISDN card 17 remote access service 99 data socket with Windows 95 98 62 data socket with Windows NT 66 ISDN card 16 change mode 49 connecting 18 connections 89 enter number 49 MSN 50 51 setting up 48 Making a call 23 Menu structure 6 7 117 INDEX ...

Страница 119: ...7 Power cable 16 Power failure 106 Print sharing 83 95 Pulse dialling 39 PC configuring Airway System 84 forward calls 86 Range 13 Registering data socket with controller 75 new handset 26 phone sockets to controller 27 registration mode 25 Remote Access Service install with Windows NT 99 Reset controller 47 Returning your product 105 Safety 12 Set time date 43 118 INDEX ...

Страница 120: ... tone pulse dialling 39 set dialling prefix 40 System password 45 TCP IP dial up networking 92 installing 101 Technical information 106 Technical specification 111 Telephone line cords 14 Time 43 Tone dialling 39 Uninstalling Airway software 74 Unpacking 9 View Airway System information 44 Wall mounting 120 121 119 INDEX ...

Страница 121: ...oss with a pencil Insert wall plugs and mounting screws into the wall leaving enough of the screw out to hold the controller Connect the mains adaptor to the controller Put the controller on the wall so the mounting screws align with the holes on the underside of the controller Slide the controller into position WALL WALL PLUG SCREW 38 mm WALL MOUNTING ...

Страница 122: ...121 Wall mounting template Use this template when mounting the controller on to the wall 99 mm WALL MOUNTING ...

Страница 123: ...122 ...

Страница 124: ......

Страница 125: ...ation forms any part of any contract British Telecommunications plc 2000 Registered Office 81 Newgate Street London EC1A 7AJ Registered in England No 1800000 Airway System 3 00 1 Windows is a registered trademark of Microsoft Corporation Adobe and Acrobat are trademarks of Adobe Systems Inc Airway is a registered trademark of British Telecommunications plc Designed by The Art Design Partnership Li...

Отзывы: