34
ECONOMI$ER IV CONTROL MODES
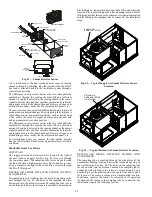
Determine the EconoMi$er IV control mode before set up of the
control. Some modes of operation may require different sensors.
The EconoMi$er IV accessory is supplied from the factory with
a supply-air temperature sensor and an outdoor-air temperature
sensor. This allows for operation of the EconoMi$er IV with out
-
door air dry bulb changeover control. Additional accessories can
be added to allow for different types of changeover control and
operation of the EconoMi$er IV and unit.
Outdoor Dry Bulb Changeover
The standard controller is shipped from the factory configured
for outdoor dry bulb changeover control. For this control
mode, the outdoor temperature is compared to a selectable set
point on the OAT sensor. If the outdoor air temperature is
above the set point, the EconoMi$er IV will adjust the outdoor
air dampers to minimum position. If the outdoor air tempera
-
ture is below the set point, the position of the outdoor air
dampers will be controlled to provide free cooling using out
-
door air. When in this mode, the Free Cool LED next to the
outdoor enthalpy set point (ABCD) potentiometer will be on.
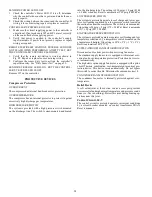
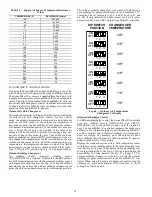
The changeover temperature set point is controlled by the dip
switches on the sensor. See Fig. 60 for the switch positions cor
-
responding to the temperature changeover values. The ABCD
potentiometer on the controller should be turned fully clock
-
wise (CW) to the “D” position. See Fig. 61 for damper leakage.
Outdoor Enthalpy Changeover
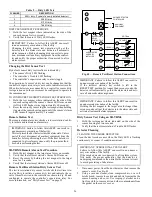
For enthalpy control, accessory enthalpy sensor
(P/N: HH57AC078) is required. Replace the standard outdoor
dry bulb temperature sensor with the accessory enthalpy sensor
in the same mounting location. See Fig. 62. When the outdoor
air enthalpy rises above the outdoor enthalpy changeover set
point, the outdoor-air damper moves to its minimum position.
The outdoor enthalpy changeover set point is set with the out
-
door enthalpy set point potentiometer on the EconoMi$er
®
IV
controller. The set points are A, B, C, and D. See Fig. 63 and
64. The factory-installed 620-ohm jumper must be in place
across terminals S
R
and SR+ on the EconoMi$er IV controller.
Fig. 60 — Outdoor Air Temperature
Changeover Set Points
Differential Enthalpy Control
For differential enthalpy control, the EconoMi$er IV controller
uses two enthalpy sensors (HH57AC078 and CRENT
-
DIF004A00), one in the outside air and one in the return air
duct. The EconoMi$er IV controller compares the outdoor air
enthalpy to the return air enthalpy to determine EconoMi$er IV
use. The controller selects the lower enthalpy air (return or out
-
door) for cooling. For example, when the outdoor air has a
lower enthalpy than the return air, the EconoMi$er IV opens to
bring in outdoor air for free cooling.
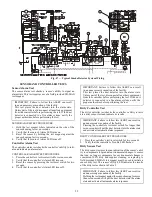
Replace the standard outside air dry bulb temperature sensor
with the accessory enthalpy sensor in the same mounting loca
-
tion. See Fig. 53 on page 30. Mount the return air enthalpy sen
-
sor in the return air duct. See Fig. 62. Wiring is provided in the
EconoMi$er IV wiring harness. See Fig. 57 on page 32. The
outdoor enthalpy changeover set point is set with the outdoor
enthalpy set point potentiometer on the EconoMi$er IV con
-
troller. When using this mode of changeover control, turn the
enthalpy set point potentiometer fully clockwise to the D
Table 12 — Supply Air Sensor Temperature/Resistance
Values
TEMPERATURE (F)
RESISTANCE (ohms)
-58
220,250
-40
100,000
-22
53,010
-4
29,091
14
16,500
32
9,795
50
5,970
68
3,747
77
3,000
86
2,416
104
1,597
122
1,080
140
746
158
525
176
376
185
321
194
274
212
203
230
153
248
116
257
102
266
89
284
70
302
55
1 2 3
ON
OFF
1 2 3
ON
OFF
1 2 3
ON
OFF
1 2 3
ON
OFF
1 2 3
ON
OFF
1 2 3
ON
OFF
1 2 3
ON
OFF
1 2 3
ON
OFF
48°F
53°F
55°F
58°F
63°F
68°F
73°F
78°F
DIP SWITCH
POSITION
CHANGEOVER
TEMPERATURE
Содержание 547K
Страница 94: ...94 APPENDIX D WIRING DIAGRAMS Fig I 547K 04 06 Power Wiring Diagram 208 230 1 60 ...
Страница 95: ...95 APPENDIX D WIRING DIAGRAMS Fig J 547K 04 07 Power Wiring Diagram 208 230 3 60 ...
Страница 96: ...96 APPENDIX D WIRING DIAGRAMS Fig K 5047K 04 07 Power Wiring Diagram 460 575 3 60 ...


