background image

Bandit

Copyright 9/07 

PAGE 

MODEL 1850   

SPRING LOCK FOR HOOD PIN OPERATION


The patented spring lock for hood pin, is installed for safety purposes.  It is designed to help keep 

the hood pin from being removed if the chipper disc is turning.  NEVER ATTEMPT TO PUSH THE 

SPRING LOCK FOR HOOD PIN DOWN OR REMOVE THE HOOD PIN, UNTIL AFTER THE ENGINE 

AND CHIPPER DISC HAVE BOTH COME TO A COMPLETE STOP.


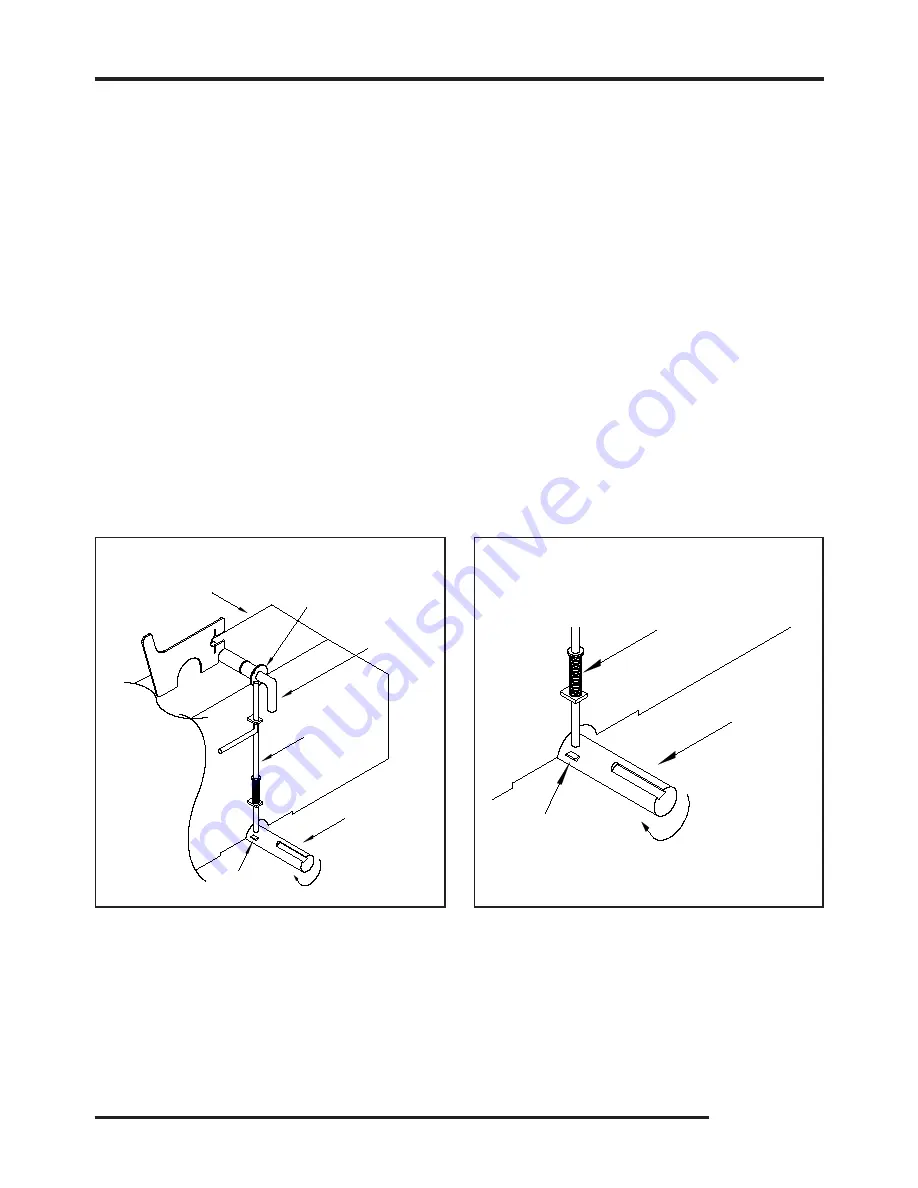
The spring lock is located on the side of the chipper hood.  The top of the spring lock should be 

directly behind the hood pin washer when the hood pin is properly installed in place holding the chipper 

hood in the closed position (see figure 1).


With the chipper hood shut and hood pin in place the spring lock helps keep the hood pin from 

sliding out or from being removed if the chipper disc is turning.  There is a shaft cam block installed 

on the chipper shaft which will not allow the spring lock to be pulled down if the chipper disc is turning 

(see figure 2).  When the chipper disc is turning, if the spring lock was to be pulled down or recessed 

it would simply hit the shaft cam block bouncing the spring lock back into position not allowing for the 

removal of the hood pin.

CONTROLS

Shaft

Shaft Cam Block

Spring Lock For 

Hood Pin

Hood Pin 

Washer

Feed Direction

Shaft Cam 

Block

Shaft

  FIGURE


Hood Pin 

Spring Lock For 

Hood Pin

  FIGURE


Содержание 1850

Страница 1: ...______ Address __________________ City State _________________ Phone No _________________ Delivery Date ______________ Engine Make ______________ Serial No _________________ Clutch Make _______________ Model _________ S N _______ Copyright 9 07 1850 ATTENTION Depending on what replacement parts you are ordering we will need the following information CHIPPER COMPONENTS Serial Number Model Number of...

Страница 2: ...ngs ca gov diesel Respirar gases de escape de motores diesel le expone a quÍmicos conocidos por el estado de California como causales de cáncer y defectos congénitos u otros daños reproductivos Para mayor informaciÓn visite www P65warnings ca gov diesel Siempre encienda y opere el motor en áreas bien ventiladas Si está en un área cerrada ventile escape hacia el exterior No modifique ni altere el si...

Страница 3: ...er has been instructed and understands to always remove the ignition key and completely disconnect battery from cables wait for the chipper disc drum to come to a complete stop and to install the disc drum lock before performing any type of maintenance on the machine Allow all the time necessary for the disc drum to come to a complete stop before opening the disc drum housing or starting any maint...

Страница 4: ...__________________________________ 5 Did all welds appear to be of high quality _________________________________________________ 6 Was the overall machine to your liking ___________________________________________________ 7 What problems have you experienced ___________________________________________________ 8 Have any components regularly loosened that caused problems __________________________...

Страница 5: ...ON COOLANT 75 ELECTRICAL SECTION 76 REPLACEMENT PARTS SECTION 83 INFEED HOPPER COMPONENTS 84 CONVEYOR COMPONENTS 88 CHIPPER COMPONENTS 90 CHIPPER KNIFE HARDWARE 94 ANVIL HARDWARE 95 DISCHARGE COMPONENTS 96 HYDRAULIC COMPONENTS 98 FRAME ACCESSORY COMPONENTS 122 FUEL HYDRAULIC TANK COMPONENTS 126 LOADER COMPONENTS 128 REMOTE CONTROL COMPONENTS 141 CAB COMPONENTS 142 OPTIONAL COMPONENTS 146 SERVICE R...

Страница 6: ...res as defined in this manual prior to operating the product It is the responsibility of the owner or employer to insure that the operator is trained and practices safe operation while using and servicing the machine It is also the owner s responsibility to provide and follow a regularly scheduled preventative maintenance and repair program on the product using only factory approved replacement pa...

Страница 7: ......

Страница 8: ...ld 2 Hinged chipper hood under handle 3 Top of throat 4 Tongue and a frame side 5 Top of frame 6 W O on top of tongue 7 W O in hydraulic compartment Track units Note The engine information is located on the engine block The clutch information is located on the clutch plate SERIAL NUMBER LOCATIONS 1 2 4 3 1 4 5 6 7 ...

Страница 9: ...nd animals clear of working area Never operate equipment that is in need of repair or adjustment Before starting the machine take a minute to check a few things The machine should be in an area restricted from people passing by This area around the machine must be free of all objects that can obstruct your movement when working with the machine The machine should be checked for loose tools or fore...

Страница 10: ...lugging the discharge chute Pay attention to the direction of the discharge chute before chipping Never stand in front of the chipper discharge chute Never direct the chute towards anyone or anything that could cause an accident or problems Always stop chipping and warn anyone that comes near the discharge area Failure to do this could result in severe injury Wood chips flying out of the discharge...

Страница 11: ...refuel while the machine is running Never refuel in the shop or building Always refuel in a well ventilated area away from sparks or open flames DO NOT SMOKE Extinguish all smoking materials Wipe up all spilled fuel before restarting the engine Do not fill above 1 2 12 7 mm from top of tank To obtain the most from your machine for the least amount of cost it is a good practice to set up and follow...

Страница 12: ...s instructions for operation service and adjustments Some styles require clutch engagement to be maintained so that it takes a lot of force others will require very little force and some are push button electric manual lever or hydraulic activation Each different style clutch PTO is a very expensive item that will fail if not correctly maintained and adjusted It will be quite costly if a few minut...

Страница 13: ...is securely in its place Be sure to check tire pressure before you begin to transport the machine Close the folding pan if equipped for the infeed hopper and make sure spring latches are locked into place If machine is equipped with a vise make sure to secure in place and clamp jaws closed Close and secure any of the following if equipped tool box battery box engine cowl doors and side panels radi...

Страница 14: ...OT entangle feet or hands in undercarriage travel system DANGER NEVER sit stand lay climb or ride anywhere on this machine while it is running operating or in transit You will be injured DANGER Use EXTREME CAUTION when traveling over non level surface This machine can tip over or tip backwards on non level surface You will cause engine damage machine damage and possible personal injury DANGER WARN...

Страница 15: ...pment options Overall Model 1850 Height 9 4 2 8 m Length 21 2 6 5 m Width 7 5 2 3 m Dimension Model 1850 w Loader Height 9 4 2 8 m Length 24 7 3 m Width 8 5 2 6 m Not Shown Model 1850 Track Height 11 10 3 6 m Length 21 6 4 m Width 8 8 2 6 m Not Shown NOTE Measurements are to highest longest or widest points not always as illustration is labeled Model 1850 1850 w Loader Model 1850 Track Fuel Tank C...

Страница 16: ...se are general locations DECAL LOCATIONS MODEL 1850 INSIDE CAB If Equipped 17 20 23 55 57 58 11 44 33 47 48 4 7 18 34 51 1 15 25 2 46 6 22 31 32 9 13 14 1 22 21 27 22 5 28 41 11 36 35 49 3 10 50 22 24 26 29 30 37 38 39 42 40 43 1 15 12 22 4 8 53 54 56 59 16 17 19 20 23 45 55 22 ...

Страница 17: ... INST 04 Arrow 16 INST 05 Yoke Lift Up Down 17 INST 07 Discharge Swivel Right Left 18 INST 08 Winch Control Out In 19 INST 09 Selector Winch Feed 20 INST 10 Stabilizer Down Up 21 INST 11 Motor Coupler Guard 22 INST 12 Grease Daily Arrow 23 INST 15 Flipper Down Up 24 INST 16 Grease Weekly Arrow 25 SPINST 25 Pull To Reverse 26 INST 39 Oil Daily Arrow 27 INST 40 Avoid Feed Coupler Problems 28 INST 43...

Страница 18: ...se are general locations DECAL LOCATIONS MODEL 1850 INSIDE CAB If Equipped 17 20 23 55 57 58 11 44 33 47 48 4 7 18 34 51 1 15 25 2 46 6 22 31 32 9 13 14 1 22 21 27 22 5 28 41 11 36 35 49 3 10 50 22 24 26 29 30 37 38 39 42 40 43 1 15 12 22 4 8 53 54 56 59 16 17 19 20 23 45 55 22 ...

Страница 19: ...ler or manufacturer for general locations 53 SPD 15 Do Not Operate Loader Arm 54 SPD 17 Do Not Run Or Operate 55 INST 32 Joystick Controls 56 INST 110 Window Washing Instructions 57 INST 125 Selector Winch Feed 58 INST 126 Winch In Out 59 N 10 Always Fold Loader Additional Decals for Machine Equipped With A Track Undercarriage Consult dealer or manufacturer for general locations 60 SPD 19 Minimum ...

Страница 20: ...with a decal attached be sure and replace the decal 4 Replacement decals are available and can be purchased from the manufacturer or your Bandit Dealer 5 Combination English Spanish decals are typically standard Other foreign language decals are available and may be purchased Mail translated decals required to Bandit Industries Inc THE CLUTCH HANDLE SHOULD NOT BE ENGAGED OR DISENGAGED AT SPEEDS AB...

Страница 21: ...Bandit Copyright 9 07 PAGE 19 MODEL 1850 DECALS ...

Страница 22: ...Bandit Copyright 9 07 PAGE 20 MODEL 1850 DECALS ...

Страница 23: ...d on to resume feeding Due to required components and equipment options a machine may have various types or brands of autofeed systems Each chipper is shipped with the original manufacturer s manual for the autofeed system it is equipped with For the approximate autofeed settings on all optional autofeed systems refer to page 24 of the chipper manual For part numbers on the hydraulic portion of th...

Страница 24: ...nes it will have a connector with a light screwed to it When the solenoid is activated indicated by the light in the connector the feedwheel s are reversed by the autofeed plus system See Figure 3 Normally seen on bigger machines such as 280 1850 1890 1990 2090 etc and special options This will normally be located on the infeed hopper of the machine It can recognized by a valve with two solenoids ...

Страница 25: ... and or cartridge Check fuse on dump valve signal wire if equipped Checkcontinuityonthedumpvalvewire normallygreenwire Check autofeed tachometer settings Check autofeed tachometer settings Check for stretched or out of adjustment throttle cable This would not engine reach full RPM Check HI RPM setting on gauge to make sure it is not set too close to full RPM of engine HI setting should be 150 to 2...

Страница 26: ... SETTINGS FOR ALL AUTO FEED SYSTEMS REFERENCE ONLY NOTE Refer to the Completion Check Sheet that is shipped with the machine for the correct engine rpm If needed contact your local dealer or Bandit Industries TROUBLE SHOOTING GUIDE cont NOTE Autofeeds with dump blocks can be unplugged and run manually Autofeeds with dual output block will need a jumper plug This can be a good test to determine if ...

Страница 27: ...IF YOU ARE IN THE AREA OF INFEED HOPPER ALWAYS BE PREPARED TO OPERATE AND WITHIN EASY REACH OF THE FEED CONTROL HANDLE ADJUST PIVOT TENSION WITH THE TIGHTNESS OF INSIDE FRICTION NUTS SECURE ADJUSTMENT WITH OUTSIDE JAM NUTS ADJUSTING TENSION FOR CONTROL HANDLE PIVOT NORMAL WEAR REQUIRES PERIODICAL ADJUSTMENT OF PIVOT TENSION FEED CONTROL HANDLE SHOULD PIVOT WITH LITTLE EFFORT BY HAND LUBRICATE PIVO...

Страница 28: ... 4 Engine Controls Adjusters Loader Optional 5 Electric Engine Throttle Adjuster if equipped 6 Bandit Lever Throttle Adjuster if equipped 7 Clutch Handle 8 Chipper Belts Pump Belts 9 Lug Nuts 10 Hydraulic Control Valves 11 Rear Stabilizer Optional 12 Infeed Pan 13 Infeed Hopper 14 Feedwheel Control Bar 15 Hydraulic Winch Area Optional 16 Yoke Lift Cylinder 17 Swivel Discharge 18 Discharge Hydrauli...

Страница 29: ...ch lock pin pull the clutch handle up and pull the winch control valve handle out towards the operator The winch also has a spool rotation lock make sure this is disengaged to free wheel cable out of the spool Note If the winch control is an electric switch push the switch out towards the material to make the winch reel out and push the switch away from the material to make the winch pull material...

Страница 30: ...e joystick console can move closer or further from the operator s seat STABILIZER CONTROL 3 4 if equipped To make the stabilizer raise up push the stabilizer control handle up To make the stabilizer extend push the stabilizer control handle down DISCHARGE SWIVEL CONTROL 5 To make the discharge swivel to the right push the discharge swivel control handle up To make the discharge swivel to the left ...

Страница 31: ...e yoke up down switch is located on top of the right hand joystick To make the yoke go up push the switch on the left side To make the yoke go down push the switch on the right side JOYSTICK OPERATING PROCEDURES CONTROLS TRACK OPERATION Before beginning to operate the machine make sure you are seated comfortably and are seat belted into the seat WHEN OPERATING THE LOADER THE JOYSTICKS OPERATE IN T...

Страница 32: ...l to be reeled in Attach cable securely to wood material that you want pulled to chipper 5 Make sure everyone is clear and then retract the clutch lock pin and then pull the clutch handle up to engage the winch clutch See Figure 1 Make sure handle is locked in position 6 Use the winch control valve or the radio remote control if applicable to now pull the wood material towards the machine 7 Once t...

Страница 33: ... chipper engine disable plug is not properly installed then the engine will not start or run If the chipper engine disable plug becomes disconnected while the chipper engine is running the engine will be shut down or be disabled from running This is for safety purposes to ensure that the hood pin is not removed and the chipper hood is not opened while the engine is running The chipper engine disab...

Страница 34: ... in place holding the chipper hood in the closed position see figure 1 With the chipper hood shut and hood pin in place the spring lock helps keep the hood pin from sliding out or from being removed if the chipper disc is turning There is a shaft cam block installed on the chipper shaft which will not allow the spring lock to be pulled down if the chipper disc is turning see figure 2 When the chip...

Страница 35: ...gines may have a choke adjustment pull the choke lever out to choke the engine Push the choke lever in for normal engine operations 5 Throttle Adjustment if equipped Some engines may have a knob or a handle for the throttle adjustment Typically you would pull the knob out or turn the handle to increase the engine R P M s To decrease you would push in the knob or turn the handle the opposite way 6 ...

Страница 36: ...als and brake lights All must be operating properly before transporting the machine Also check brakes if equipped to make sure they are operating correctly 14 Do not transport unless discharge is clamped pinned and bolted securely into place in the transport position pointed over the tongue 15 Check tires for correct pressure cuts or damaged rims 16 Check lug nuts and retorque if necessary Check n...

Страница 37: ...l the transport chain is tight 7 Place all hydraulic controls in the off position 8 Turn off engine wait for the chipper disc drum to come to a complete stop and you must have the ignition key in your possession 9 Place the joystick swing out in the transport position if equipped 10 Make sure running lights turn signals and brake lights are visible when loader is in the transport position 11 Make ...

Страница 38: ...NG OR UNLOADING THE MACHINE INSPECT AND CONFIRM THE FOLLOWING STEPS When loading or unloading the self propelled machine on the trailer use care and caution The maneuvering of the equipment must be slow smooth and intentional not fast and jerky 1 Make sure the trailer and towing vehicle are parked on a flat surface They must be stable on the surface with the brakes locked and or the wheels choked ...

Страница 39: ...ears of trouble free operation Before attempting any type of maintenance disengage clutch install clutch lock if equipped turn off engine wait for the disc drum to come to a complete stop install the disc drum lock pin disconnect battery and make sure the ignition key is in your possession Consult your engine manual for proper break in procedures Various engines require somewhat different procedur...

Страница 40: ...e wear and impact cracks If a problem is found contact the chipper manufacturer or an authorized Bandit dealer Also check the chipper housing at this time Check the chipper base belly band and hoods for wear or damage Also inspect the chipper bearings 8 Check chipper disc drum to turn Very carefully manually with a pry bar or wood bar turn the chipper disc drum a full revolution This is to ensure ...

Страница 41: ...between fins Use pressurized water spray to clean Do not rely on air pressure The oil cooler will only appear to be clean 24 Check air cleaner or precleaner Clean or replace element following engine manual recommendations 25 Check clutch Check for proper lubrication and engagement tension adjustment frequently adjust and lubricate per PTO clutch manufacturers manual Bandit Industries Inc does not ...

Страница 42: ... repair or replace as needed 3 Inspect feedwheel motor connections Check and maintain correct torque on feedwheel motor connections See pages 48 49 4 Check feedwheel teeth for sharpness Replace if needed 5 Check chipper bearings and chipper sheave Check retighten all bearing bolts bearing lock collars and also belt sheave bushings to correct torques 6 Tire air pressure if equipped Fill each tire t...

Страница 43: ...t 4 6 5 8 Hitch Mount Bolts 5 8 11 NC 220 298 Loader Pivot Pin Nut 1 3 4 5 NC 100 136 Loader Cylinder Pivot Pin Nut 1 1 4 7 NC 75 102 BOLT TORQUE CHART THESE TORQUES ARE BASED ON DRY CLEAN THREADS DESCRIPTION BOLT SIZE TORQUE FT LBS TORQUE Nm Before tightening bolts be sure you have the correct size bolt for the correct amount of torque Use only factory approved knives and hardware MAINTENANCE SEC...

Страница 44: ...sions 15 Check and or adjust belt tension on chipper and hydraulic pump belt drives 16 Check hydraulic pump and motor shafts for fit and tightness 17 Check and always maintain hydraulic level at 7 8 full 18 Check all hoses fittings lines and tanks for damage and fluid leaks 19 Check hydraulic control valves and insure they operate and shift correctly 20 Check fuel level Running out and repriming i...

Страница 45: ...plates for discharge as needed 3 Replace high pressure oil filter s if equipped after first 10 hours then quarterly or every 400 hours O K Repaired YEARLY CHECK LIST 1 Change hydraulic oil and flush the hydraulic tank 2 Replace hydraulic suction screen s annually or every 2000 hours O K Repaired WEEKLY CHECK LIST 1 Check anvil clearance tightness and wear 2 Check alternator and fan belts on engine...

Страница 46: ...be checked with a string or straight edge 5 Torque the two engine mounting bolts see Torque Chart for the correct torque on the opposite side of the engine from the engine adjusters 6 Loosen the jam nuts on the engine adjuster on the radiator end of the engine 7 Torque the engine mount bolt and then tighten the engine adjuster jam nuts on the radiator end 8 Hand tighten the remaining engine mount ...

Страница 47: ...aximum of 11 16 deflection with 22 to 25 lbs of force up through 275 Hp Main Drive belts maximum of 7 8 deflection with 28 lbs of force for 300 Hp and up Pump Drive belts maximum of 1 8 deflection with 25 lbs of force SPACE MAINTENANCE SECTION BELT TENSION FIGURE 1 RADIATOR END OF ENGINE CLUTCH END OF ENGINE ENGINE MOUNTING BOLTS ENGINE MOUNTING BOLTS CHECK SHEAVE ALIGNMENT WITH STRAIGHT EDGE OR S...

Страница 48: ...adjuster hex nuts Once the nuts have been loosened use the anvil adjustment handle to move the anvil This is a two person job one to move the anvil and the other to check the clearance Once the knife is set to the correct clearance 110 2 8 mm to 120 3 mm retighten bolts The anvil adjustment handle can be removed if it is stopping the anvil from reaching the correct knife clearance If removed keep ...

Страница 49: ...sting spring tension have the top feedwheel in the lowered position Use the Clevis Pin with Clip to adjust the tension Make sure that the Clevis Pin is installed properly and that the Clip is secured tightly in place With the pin in position 1 the Easy Climb System will have approximately 6 152 mm of travel before you start spring tension Use this position when chipping the maximum diameter materi...

Страница 50: ...d 8 Make 1 more pass torquing the locking screws to 52 ft lbs 71 Nm No screws should turn at this point or repeat step 7 C Removal Procedure 1 Make sure there are no torque or thrust loads on the coupler feedwheel shaft or feedwheel motor 2 Loosen the locking screws in several stages by using 1 2 turns following a clockwise or counter clockwise direction until the coupling can be moved on the shaf...

Страница 51: ...ft 4 Slide the coupler onto the feedwheel shaft 5 Apply Loc Tite 609 green on the feedwheel motor shaft 6 Install the motor with the torque arm installed and key into the feedwheel shaft 7 Position the coupler so the keyway in the feedwheel shaft is covered by the solid portion of the coupler See figures below 8 Apply Loc Tite 271 red on the coupler nut 9 Tighten the coupler bolt and torque to 250...

Страница 52: ...r remove the drive belts or hydraulic lines Once the hydraulic pump is removed from the bearing block inspect the internal splines of the bearing block and the external splines of the hydraulic pump The tops of the splines should be flat If the splines are pointed they are wore and need to be replaced If the splines are good pack the internal splines of the bearing block with an EP 2 Lithium type ...

Страница 53: ... use a degreaser 2 Install both feedwheel bearings on the feedwheel shaft with the Grip Tight bearing on the hydraulic motor side and the set screw bearing on the opposite side Do not lock the bearings on the shaft at this time allow the feedwheel to shift freely for installation 3 Position the feedwheel in the yoke mount and install all 8 feedwheel bearing bolts with a thread locking compound app...

Страница 54: ...tlet end of the chute Then two people must remove the chute Do not attempt this with one person because the chute can fall causing injury If used properly a hoist can be used to assist in the removal of the chute 5 Never allow one person to turn the chipper disc drum when someone else is working inside the chipper housing More than likely the chipper disc drum will turn hard then loosen causing it...

Страница 55: ...Simply sand the edges of the damaged paint area mask off the surrounding area and apply primer and paint to the dry clean and warm surface This will help keep the damaged area from spreading or getting worse 3 If you are unable to sand and mask the area there are containers of primer and paint available A small brush can be used to touch up the area 4 Also primer and most colors of paint are avail...

Страница 56: ...r clearance between the shoe and drum surfaces will be set up initially from our factory to assure proper operation during the normal break in period No further adjustment will be necessary until the vehicle completes the recommended break in period of 200 miles 322 km Since all brakes of this type must be burnished or run in before their full effectiveness can be achieved the MFG maintenance manu...

Страница 57: ...e wide temperature swings of spring and fall To find the closest Petro Canada Hydrex XV dealer call 1 888 284 4572 Multi Viscosity motor oils are not recommended to mix with Petro Canada Hydrex XV hydraulic oil AW oils may mix with Petro Canada Hydrex XV hydraulic oil The following are specifications and authorizations of compatible oils Only a high quality anti wear AW hydraulic oil containing fo...

Страница 58: ...l viscosity needed is based on oil temperature during operation and not air temperature Compare your fluid specifications with the specifications below to verify compliance When choosing a hydraulic fluid these maximum and minimum specifications must be met Minimum Viscosity during operation 12 cSt Maximum No Load Viscosity at start up 2000 cSt Hydraulic fluids vary in their resistance to oxidatio...

Страница 59: ...el GPM LPM Joystick GPM LPM Track Relief PSI BAR Top Feedwheel Relief PSI BAR Bottom Feedwheel Relief PSI BAR Loader Swing Relief PSI BAR Main Boom Up Relief PSI BAR Main Boom Down Relief PSI BAR Jib Boom Out Relief PSI BAR Jib Boom In Relief PSI BAR Grapple Rotate Relief PSI BAR Grapple Open Close Relief PSI BAR Yoke Lift Up Relief PSI BAR Yoke Lift Down Relief PSI BAR Swivel Discharge Relief PSI...

Страница 60: ...ic system to warm up Cavitation is not covered under warranty Do not increase the feedwheel relief valve settings beyond specified PSI bar This will cause damage to hydraulic components Do not set any other hydraulic component past it s specified pressure or this will cause damage to the hydraulic components Keep hydraulic oil clean Dirty oil will cause excessive wear and loss of hydraulic power R...

Страница 61: ...re checking to activate a reading on the pressure gauge 5 Pressure gauge should read maximum of specified PSI bar ONLY LEAVE BALL VALVE CLOSED FOR 4 5 SECONDS TO SET PRESSURE OR YOU MAY DAMAGE HYDRAULICS 6 Use an allen wrench to readjust relief pressure setting if needed and then retighten jam nut 7 Repeat steps 1 through 6 for the bottom feedwheel main relief block 8 Check for hydraulic leaks 9 R...

Страница 62: ...hine is equipped with main relief blocks and if that is the pressure to be checked see page 57 59 4 Start engine and adjust engine to full throttle 5 When checking one of the valve bank functions you will need to bottom out the cylinder or stop the motor from turning to activate a reading on the pressure gauge Pilot pressure for joysticks should be present at all times 6 Pressure gauge should read...

Страница 63: ... springs pushes the relief valve ball against it until pressure builds 2 POPPIT VALVE This ball opens and closes to relieve excess pressure on hydraulic system 3 RELIEF SPRING This spring tensions the amount of pressure required to open the relief valve ball This spring weakens and must be checked and or readjusted every month for best performance 4 SLOTTED SET SCREW Turn clockwise to increase pre...

Страница 64: ...r cylinder disconnected 5 Start engine and adjust engine to full throttle to activate reading on pressure gauge 6 Only operate the valve for that component to activate pressure gauge Pressure gauge should read the maximum specified PSI bar for that component see page 57 ONLY RUN ENGINE FOR 4 5 SECONDS TO SET PRESSURE OR YOU MAY DAMAGE HYDRAULICS 7 Readjust relief pressure setting if needed if not ...

Страница 65: ...e 6 Replace worn leaking internally 7 Low hydraulic oil level 7 Fill 7 8 full minimum 8 Plugged oil screen 8 Replace 9 Binding such as worn bearings etc 9 Repair 10 Control lever improperly shifting valve 10 Readjust valve must open completely Hydraulic oil very 1 Dull knives 1 Replace knives hot causing 2 Low oil level 2 Fill 7 8 full minimum system to 3 Pump is worn 3 Replace operate slowly 4 Re...

Страница 66: ... hydraulic pressure adjustment procedure section of the valve setting manual to find the correct procedure for adjusting relief valve pressure settings pgs 59 62 Cleaning relief valve 1 Remove plug from feedwheel valve control valve see illustration of hydraulic of relief valve components pg 61 components with 2 Unscrew slotted set screw completely out of the valve engine shut off 3 Remove poppit ...

Страница 67: ...aulic motor back to the control valve at the valve Some machines will be equipped with a flow divider between the hydraulic motor and the control valve 4 Place the end of the hose in a clean 5 gallon 19L pail 5 Plug the open port in the control valve 6 Unhook the other hose in the control valve and install a Tee fitting into the control valve and attach the hose to the Tee fitting 7 Install a pres...

Страница 68: ...ump the clutch may have to be engaged if the pump is belt driven 8 Have a second person lift the hydraulic hose far enough out of the tank inlet to observe the flow of oil going into the tank Observe the pressure gauge reading to make sure a high pressure does not exist 9 Increase the engine speed slowly to full rpm and at the same time observe the pressure This should still remain low 10 SLOWLY t...

Страница 69: ...uge reading to make sure a high pressure does not exist 8 Increase the engine speed slowly to full rpm and at the same time observe the pressure and flow rate The pressure should still remain low Make a note of the flow rate gpm or Lpm at full engine rpm 9 SLOWLY turn the needle valve on the flow control in and observe the pressure increase on the pressure gauge 10 Continue closing the flow contro...

Страница 70: ...bris and shop rags 3 16 Tee handle hex driver 1 2 drag link drive socket Jawed vice General Procedure Disassembly 1 Secure valve in vice or suitable method to firmly hold valve 2 Note the orientation and placement of all components during disassembly 3 Using the 3 16 Tee handle hex driver remove 2 two socket head cap screws which hold the spring cover to the valve body Set aside for re use 4 The d...

Страница 71: ...IZERS HYDRAULIC SECTION 1850 BOTTOM FEEDWHEEL MOTOR CONTROL VALVE PUMP SUCTION SCREEN TANK FILTER CONTROL VALVE MAIN RELIEFS AUTOFEED VALVE YOKE LIFT CYLINDER SHUT OFF VALVE TOP FEEDWHEEL MOTOR CONTROL VALVE AUTOFEED VALVE CONTROL VALVE TONGUE JACK CYLINDER VALVE BANK REAR STABILIZER CYLINDERS FLIPPER CYLINDER DISCHARGE MOTOR CHECK VALVE CHECK VALVE ...

Страница 72: ...ON SCREENS TANK FILTER CONTROL VALVE MAIN RELIEFS SHUT OFF VALVES TOP F EEDWHEEL MOTOR CONTROL VALVE AUTOFEED VALVE CONTROL VALVE TONGUE JACK CYLINDER VALVE BANK FLIPPER CYLINDER DISCHARGE MOTOR PUMP LOADER VALVE BANK JIB BOOM CYLINDER MAIN BOOM CYLINDER GRAPPLE CYLINDERS YOKE LIFT CYLINDER REAR STABILIZER CYLINDERS GRAPPLE ROTATE MOTOR LOADER SWING MOTOR JOYSTICKS HIGH PRESSURE FILTER AUTOFEED VA...

Страница 73: ... RIGHT J OYSTICK RETURN MANIFOLD TRACK 2 SPEED FEEDWHEEL MOTORS DISCHARGE MOTOR LOADER SWING MOTOR VALVE BANK VALVE BANK RIGHT TRACK MOTOR LEFT TRACK MOTOR OIL COOLER TRACK PUMP HIGH P RESSURE FILTER HOT OIL SHUTTLE CONTROL VALVES AUTOFEED VALVE SUCTION SCREEN SUCTION SCREEN CONTROL VALVES JOYSTICK CONTROL MANIFOLD CONTROL VALVES AUTOFEED VALVE HOT OIL SHUTTLE MAIN RELIEFS FEEDWHEEL PUMP HIGH P RE...

Страница 74: ...Knives are dull or worn to minimum size C Obstruction in discharge chute Patches welded into the chute can cause obstruction of chip flow Anything causing an obstruction will cause the chute to plug D Chipping rotting material that has little substance can also plug the discharge chute E Worn fan blades 4 Chipper Bearings Running Too Hot A Improper lubrication purge bearings once a day with EP 2 L...

Страница 75: ...unting hardware and torque knife mounting hardware to the specified torque Replace knife mounting hardware after 5 times of tightening KNIFE GRINDING AND FILING NOTICE Many times a chipper knives cutting edge point can be brought back to a good edge with a 10 Flat Bastard Mill File This can reduce the amount of regrinding Typical Knife Grinding Angles Bolt In Knives 30 to 31 Angle Knives should be...

Страница 76: ...ure welds excessive wear impact cracks and elongated bolt holes on disc chippers or the condition of the knife bolt threads on drum chippers If a problem is found contact your local dealer or Bandit Industries 8 Clean out the knife pocket at this time Remove all debris from the pocket and knife bolt holes 9 Sharpen rotate or replace the chipper knife Knives should be professionally ground maintain...

Страница 77: ...eals by pumping in to much grease Wipe off excess grease Excessive grease will attract dirt Most of the failures related to bearings are diagnosed as Contamination Contamination is caused by improper lubrication Especially important is proper lubrication when the chipper is setting idle The bearings must be fully purged when shut down Then the bearings must be again fully purged each thirty 30 day...

Страница 78: ...FEED STOP 5 BLK GROUND 12 PNK B BLK GROUND 1 RED 12V 1 BLU DEFLECTOR UP 5 BLU F 1 ORG FEED REVERSE BLU BLK DEFLECTOR DOWN 8 BLU BLK H 1 BLU BLK FLIPPER DOWN ORG BLK FEED FORWARD 4 ORG BLK J ORG FEED REVERSE 9 ORG FEED REVERSE 4 1 ORG FEED REVERSE 1 BLU FLIPPER UP 1 ORG BLK FEED FORWARD 1 ORG BLK FEED FORWARD ORG K 2 BLK GROUND 2 BLK GROUND 2 BLK GROUND 2 BLK GROUND 2 BLK GROUND 2 BLK GROUND 2 BLK ...

Страница 79: ...LK BLK 2 BRN BLK 2 1 1 1 YEL BLU BRN BLK BLK 2 BLK 2 BLK 2 BOTTOM FEED YOKE FLIPPER SWIVEL RIGHT UP UP LEFT DOWN DOWN FWD FWD REV REV TOP FEED 1 1 1 1 BOT FEED REVERSE TOP FEED REVERSE TOP FEED FORWARD BOT FEED FORWARD SWIVEL LEFT FLIPPER DOWN YOKE DOWN YOKE UP FLIPPER UP SWIVEL RIGHT 900 2908 15 CONNECTORS 3 PLACES 900 2908 15 CONNECTORS 3 PLACES 900 2908 15 CONNECTORS 2 PLACES 900 2908 15 CONNEC...

Страница 80: ...BLK GROUND 10 RED BLU BEEPER 4 BRN 2ND OUTPUT 2 GRN 1ST OUTPUT 3 RED POWER 9 RED BLK E STOP 7 1 BLK GROUND 8 WHT BLK THROTTLE UP 5 GRN YEL THR DN C WHT A RED B GRN YEL RED BLK 3 4 WHT BLK GRN YEL 15A 8 5 6 RED WHT ECM SWITCHED VOLTAGE YEL THROTTLE SIGNAL A PUR THROTTLE SIGNAL B 1 2 RED POWER BLK GROUND 90 2910 01 TO THROTTLE RELAY ASSY 999 800053 900 2913 88 TO JOHN DEERE ENGINE HARNESS JOHN DEERE...

Страница 81: ... D THIS MUST BREAK THE SWITCHED VOLTAGE NOT STACK ONTOP OF ITS TERMINAL CAT ENGINE RC HARNESS FOR USE WITH 900 2912 36 WHOLE TREE CHIPER HARNESS AND RADIO CONTROL HARNESS 15A PIN 8 WHT THROTTLE UP PIN 5 GRN THROTTLE DOWN PIN 9 RED BLK E STOP TO BLU LOW SIDE OF ENIGINE THROTTLE SW A TO YEL BLK HIGH SIDE OF ENIGINE THROTTLE SW B ENGINE COMPARTMENT CONNECTOR RED A WIIRE HAS FORK TERMINAL AND IS CONNE...

Страница 82: ...Bandit Copyright 9 07 PAGE 80 MODEL 1850 SPECIFIC SCHEMATIC FUNCTION MAY VARY DEPENDING ON OPTIONS OR COMPONENT MANUFACTURE 1850 WITH RADIO REMOTE TETHER 900 2912 82 ELECTRICAL SECTION ...

Страница 83: ...Bandit Copyright 9 07 PAGE 81 MODEL 1850 SPECIFIC SCHEMATIC FUNCTION MAY VARY DEPENDING ON OPTIONS OR COMPONENT MANUFACTURE 1850 WITH RADIO REMOTE RECIEVER TRANSMITTER OUTPUT ELECTRICAL SECTION ...

Страница 84: ...OLD STYLE 6 Wire Main Cable Color Code Black BL Brakes White W Ground Green G Right Turn Yellow Y Left Turn Brown BR Running Lights Red R Breakaway Switch WIRING FOR STANDARD 6 PRONG PLUG AND 6 WIRE MAIN CABLE EFFECTIVE ON MACHINES BUILT AFTER 11 01 04 6 WIRE MAIN CABLE COLOR CODE OLD STYLE ELECTRICAL SECTION RT LT S A TM GD BR BR G Y TAILLIGHT TAILLIGHT 3 LIGHT MARKER BAR BR BATTERY BREAKAWAY SWI...

Страница 85: ... reserves the right to make changes in models size design installations and applications on any part without notification All nuts bolts washers and many other components can be ordered by physical description When ordering any replacement parts you should have the serial number S N and model of the machine to ensure that you receive the correct replacement part See page 6 for typical serial numbe...

Страница 86: ...Bandit Copyright 9 07 PAGE 84 MODEL 1850 INFEED HOPPER COMPONENTS NOTE Parts may not be exactly as shown LEE TITE COUPLER PRE 5 07 ...

Страница 87: ...Backer Plate 21 a 900 1904 07 900 1904 07 Feedwheel Bearing b 900 4900 19 900 4900 19 Top Feedwheel Bearing Bolt c 900 4911 04 900 4911 04 Bottom Feedwheel Bearing Bolt 22 900 1912 99 900 1912 99 Taperlock Keyless Coupler Start 5 07 23 a 937 300516 937 300516 Bottom Feedwheel Coupler Guard Taperlock Start 5 07 b 980 0508 57 980 0508 57 Coupler Guard Mount Taperlock Start 5 07 24 a 955 1013 99 955 ...

Страница 88: ...Bandit Copyright 9 07 PAGE 86 MODEL 1850 INFEED HOPPER COMPONENTS NOTE Parts may not be exactly as shown LEE TITE COUPLER PRE 5 07 ...

Страница 89: ...55 0502 45 Top Feedwheel Chain Guard 2 03 To 1 06 d 955 1016 61 955 1016 61 Top Feedwheel Chain Guard Track or Cab Unit 2 03 To 1 06 e 955 0500 73 955 0500 73 Top Feedwheel Chain Guard Pre 2 03 f 955 1016 91 955 1016 91 Top Feedwheel Chain Guard Track or Cab Unit Pre 2 03 46 a 955 0500 27 937 0501 10 Top Feedwheel Assembly b 955 1000 87 937 1007 63 Top Feedwheel Tooth c 955 1002 07 937 1007 41 Top...

Страница 90: ...Bandit Copyright 9 07 PAGE 88 MODEL 1850 NOTE Parts may not be exactly as shown CONVEYOR COMPONENTS DRIVE SET UP PRE 5 07 ...

Страница 91: ...ushion 12 900 1904 07 900 1904 07 Bearing For Infeed Conveyor Head Shaft 13 955 2001 15 955 200104 Infeed Conveyor Head Shaft Assembly Start 5 07 14 a 955 2001 16 955 200105 Bottom Feedwheel Ass y Taperlock Coupler Start 5 07 b 955 1001 52 937 1007 50 Bottom Feedwheel Tooth c 955 3006 82 955 300667 Bottom Feedwheel Shaft For Taperlock Coupler Start 5 07 15 a 900 1904 07 900 1904 07 Feedwheel Beari...

Страница 92: ...Bandit Copyright 9 07 PAGE 90 MODEL 1850 CHIPPER COMPONENTS NOTE Parts may not be exactly as shown ...

Страница 93: ...r Knife Nut 12 955 0501 64 2 Knife Chipper Disc Ass y 13 955 0501 19 Fan Blade Assembly 14 914 300039 Hood Hinge Tube Start 12 04 15 a 955 300386 Hood Hinge Pin Start 12 04 b 955 0501 18 Hood Hinge Assembly Pre 12 04 c 955 1005 59 Hood Hinge Pin Only Pre 12 04 16 955 0500 40 Chipper Hood Hinged Half 17 a 980 0509 04 Chipper Hood Engine Disable Plug Kit Includes Hood Pin Mounts b 900 2904 13 6 Pron...

Страница 94: ...Bandit Copyright 9 07 PAGE 92 MODEL 1850 CHIPPER COMPONENTS NOTE Parts may not be exactly as shown ...

Страница 95: ...pper Sheave 36 Hydraulic Pump Belts If Applicable 37 900 3921 02 Chipper Bearing Grease Line 13 38 a 900 1906 32 Rear Chipper Bearing Start S N 510 1 00 b Rear Chipper Bearing Pre S N 502 1 00 39 a 900 4910 34 Rear Chipper Bearing Bolt 3 4 10NC x 4 1 2 Hex Head Start 1 00 b 900 4910 38 Rear Chipper Bearing Bolt 3 4 10NC x 5 1 2 Hex Head Pre 1 00 c 900 4903 21 3 4 Mill Carb Washer 4 Required d 900 ...

Страница 96: ...hown 7 900 9901 63 Replacement Blades For Knife Saver Not Shown Part Numbers For Miscellaneous Knife Parts NOTE Parts may not be exactly as shown LOCATION PART NUMBER DESCRIPTION 1 900 9901 18 1 2 x 4 1 2 x 7 1 4 Chipper Knife 2 900 9901 19 1 2 x 4 1 2 x 5 1 8 Chipper Knife 3 900 4903 92 5 8 11NC x 3 Chipper Knife Bolt 4 900 4903 93 5 8 11NC Chipper Knife Nut NOTE Torque Knife Bolts to 180 ft lbs ...

Страница 97: ... 2 1 2 Hex Head Bolt 7 900 4902 79 3 4 10NC x 1 3 4 Hex Head Bolt 8 900 4907 04 5 8 11NC Hex Nut 9 900 4907 10 5 8 Flat Washer 10 a 955 1009 59 Anvil Puller Block b 955 1016 60 Anvil Puller Block Supersized Feed System 11 a 900 4902 17 5 16 18NC x 2 Hex Head Bolt b 900 4902 18 5 16 18NC Hex Nut 12 981 1006 25 Anvil Gauge 13 955 0502 47 Anvil Hardware Only Includes 2 Through 9 11 14 955 0500 06 Anv...

Страница 98: ... 18 Check Valve For Flipper Cylinder 10 960 0006 42 Straight Section Cylinder Lug 11 981 1001 63 Discharge Deflector Hinge 12 980 0126 48 Flipper Lug 13 955 200093 Hydraulic Flipper Assembly Enclosed 14 900 3930 71 Cylinder Lug Pin 3 4 Dia x 2 1 2 Cotter Pin 1 4 x 1 1 2 15 900 3928 16 Hydraulic Flipper Cylinder 16 938 300578 Optional Clean Out Door Optional On All Discharges 17 a 900 4910 73 5 16 ...

Страница 99: ...Crank Adj Height Hinge Assembly Includes s 6 8 10 955 0502 34 Straight Section Hand Crank Adj Height Discharge 11 900 3925 18 Check Valve For Flipper Cylinder 12 960 0006 42 Straight Section Cylinder Lug 13 981 1001 63 Discharge Flipper Hinge 14 980 0126 48 Flipper Lug 15 980 0510 02 Hydraulic Flipper Assembly Enclosed 16 900 3930 71 Cylinder Lug Pin 3 4 Dia x 2 1 2 Cotter Pin 1 4 x 1 1 2 17 900 3...

Страница 100: ... 07 PAGE 98 MODEL 1850 HYDRAULIC COMPONENTS TYPICAL MODEL 1850 HYDRAULIC SCHEMATIC Options May Vary NOTE Parts may not be exactly as shown 0 8 9 8 7 0 9 6 7 6 6 8 Examples of straight fittings PIPE FITTING JIC SAE O RING ...

Страница 101: ... Discharge Flipper Control Valve b N A 900 3934 68 Swivel Discharge Flipper Rear Stabilizer Valve Not Shown 15 N A 900 3907 99 Reversing Autofeed Plus Valve 16 a 900 3913 41 900 3936 39 Winch Selector Control Valve Replaces 900 3920 58 b N A 900 3936 40 5 16 Replacement Stud For Selector Valve 900 3936 39 c 900 3924 48 900 3924 48 1 4 ReplacementStudForSelectorValve 900 3920 58 900 3913 41 17 900 ...

Страница 102: ... MODEL 1850 HYDRAULIC COMPONENTS TYPICAL MODEL 1850 WITH LOADER HYDRAULIC SCHEMATIC Options May Vary NOTE Parts may not be exactly as shown 6 7 8 0 9 9 6 7 6 8 7 8 7 0 8 0 9 Examples of straight fittings PIPE FITTING JIC SAE O RING ...

Страница 103: ...94 Tongue Jack Check Valve 14 a 900 3934 24 900 3934 24 Tongue Jack Cylinder Welded b 900 3912 12 900 3912 12 Tongue Jack Cylinder Tie Rod Ends 15 a N A 900 3934 84 High Pressure Filter Assembly if equipped b N A 900 3931 99 High Pressure Filter Element Only 16 a N A 900 3934 68 Swivel Discharge Flipper Rear Stabilizer Valve b N A 900 3909 81 Swivel Discharge Flipper Control Valve Not Shown 17 See...

Страница 104: ... MODEL 1850 HYDRAULIC COMPONENTS TYPICAL MODEL 1850 WITH LOADER HYDRAULIC SCHEMATIC Options May Vary NOTE Parts may not be exactly as shown 6 7 8 0 9 9 6 7 6 8 7 8 7 0 8 0 9 Examples of straight fittings PIPE FITTING JIC SAE O RING ...

Страница 105: ... 3901 70 Cross Over Relief 28 a 900 3937 00 N A Main Boom Cylinder Start 5 98 b 900 3905 32 N A Main Boom Cylinder Pre 5 98 29 a 900 3937 01 N A Jib Boom Cylinder Start 5 98 b N A 900 3924 07 Jib Boom Cylinder Pre 5 98 30 See Pages 136 137 See Pages 136 137 Grapple Rotator Motor 31 Valve Bank 32 a N A 900 3933 18 Grapple Cylinder Welded Dual Cylinder Grapple b 900 3917 21 N A Grapple Cylinder Tie ...

Страница 106: ...4 MODEL 1850 7 8 6 7 0 6 6 7 8 8 9 9 0 7 8 0 9 0 9 TYPICAL MODEL 1850 TRACK HYDRAULIC SCHEMATIC Options May Vary NOTE Parts may not be exactly as shown HYDRAULIC COMPONENTS Examples of straight fittings PIPE FITTING JIC SAE O RING ...

Страница 107: ...1 N A Ball Valve 1 2 21 N A 900 3903 38 Swivel Discharge Flipper Control Valve 22 a 900 3914 15 N A Hot Oil Shuttle b 900 3915 92 N A Relief Cartridge For Hot Oil Shuttle c 900 3915 91 N A Cartridge For Hot Oil Shuttle 23 900 3907 99 N A Reversing Autofeed Plus Valve 24 900 3906 29 N A Top Feedwheel Hydraulic Motor 25 900 3907 71 N A Bottom Feedwheel Hydraulic Motor 26 a N A 900 3925 06 Yoke Lift ...

Страница 108: ...6 MODEL 1850 7 8 6 7 0 6 6 7 8 8 9 9 0 7 8 0 9 0 9 TYPICAL MODEL 1850 TRACK HYDRAULIC SCHEMATIC Options May Vary NOTE Parts may not be exactly as shown HYDRAULIC COMPONENTS Examples of straight fittings PIPE FITTING JIC SAE O RING ...

Страница 109: ...ylinder Grapple b 900 3917 21 N A Grapple Cylinder Tie Rod Dual Cylinder Grapple c N A 955 200027 Grapple Cylinder Single Cylinder Grapple Not Shown 38 900 3915 64 900 3915 64 Joystick Control Manifold 39 Joystick 40 900 3926 69 900 3926 69 Two Speed For Track 41 900 3906 90 900 3906 90 In Line Pressure Check Gauge Not Shown 42 900 3902 14 900 3921 57 Winch Hydraulic Motor RS Square Motor Not Show...

Страница 110: ...F BLOCK NOTE Parts may not be exactly as shown HOSE CLAMP HOSE GUARD Hydraulic Hose To Tank Hydraulic Hose From Pump Torque Autofeed Cartridge Nut to a Maximum of 4 to 6 ft lbs 5 to 8 Nm and Install Loc Tite 241 Over Torque Will Cause Damage and Will Also Void Warranty ...

Страница 111: ...07 3 4 Double Clamp Assembly Includes s 1 4 i 900 3914 04 1 Single Clamp Assembly Includes s 1 4 j 900 3914 05 1 1 4 Single Clamp Assembly Includes s 1 4 k 900 3914 06 1 1 2 Single Clamp Assembly Includes s 1 4 6 a 900 3914 10 Stacking Bolt for 1 2 Double Clamp Not Shown b 900 3920 11 Stacking Bolt for 3 4 Double Clamp Not Shown HOSE GUARD LOCATION PART NUMBER DESCRIPTION 1 a 900 3934 76 Hose Guar...

Страница 112: ...AGE 110 MODEL 1850 HYDRAULIC COMPONENTS NOTE Parts may not be exactly as shown 11 9 8 4 12 6 6 7 2 1 12 3 12 6 6 7 10 1 2 3 4 6 7 8 9 10 11 12 13 6 6 6 7 9 TYPICAL FEEDWHEEL CONTROL VALVES TYPICAL SPRING LOADED CONTROL VALVE ...

Страница 113: ... 0003 34 Valve Spool Stop For Spring Loaded Valve 10 904 0003 35 Valve Spool Spring 11 904 0003 36 Valve Spacer For Yoke Lift Valve 12 900 A 2941 Spring Center Kit For Spring Loaded Valve 13 904 0003 37 Detent Cap Only For Spring Loaded Valve Short TYPICAL SPRING LOADED CONTROL VALVE COMPONENTS LOCATION PART NUMBER DESCRIPTION 1 900 3905 95H Handle Only Short 2 900 3905 95 Valve Bracket Only With ...

Страница 114: ...YDRAULIC COMPONENTS Dual Control Valve 900 3916 62 NOTE Parts may not be exactly as shown LOCATION PART NUMBER DESCRIPTION A 900 3935 70 Seal Kit Includes 3 through 8 LOCATION PART NUMBER DESCRIPTION B 900 3937 27 Handle Kit Includes 1 through 8 ...

Страница 115: ... 3938 31 Spool Open Center 4 a 900 3938 71 Electrohydraulic Pilot 12V b 900 3938 72 Electrohydraulic Pilot 24V c 900 3938 33 Hydraulic Pilot 5 900 3938 34 Port Relief 6 a 900 3938 71 Electrohydraulic Pilot 12V b 900 3938 72 Electrohydraulic Pilot 24V c 900 3938 33 Hydraulic Pilot 7 900 3938 37 Handle Note Contact your nearest dealer or Bandit Industries NOTE Hydraulic components need to be ordered...

Страница 116: ...hown LOCATION PART NUMBER DESCRIPTION 1 900 3938 46 Solenoid Only 12 Volt 2 N A Pilot Port 3 904 0003 48 Handle Kit 4 900 3917 80 Main Relief 3000 PSI Max 5 a 900 3917 79 Low Pressure Port Relief 1000 PSI Max b 900 3917 80 High Pressure Port Relief 3000 PSI Max 6 900 3938 47 Valve Section Seal Kit Not Shown 1 2 3 4 5 ...

Страница 117: ...GE 115 MODEL 1850 LOCATION PART NUMBER DESCRIPTION 1 a 900 3938 12 Solenoid Only 12 Volt b 900 3938 13 Solenoid Only 24 Volt 2 900 3908 23 Relief Only HYDRAULIC COMPONENTS FPS Valve NOTE Parts may not be exactly as shown 1 1 2 ...

Страница 118: ...rker Valve Bank Not Shown b 900 3938 57 Spring Used With Husco Valve Bank Not Shown 5 a 900 3934 35 Left Joystick Assembly Used With Parker Valve Bank b 900 3937 28 Left Joystick Assembly Used With Husco Valve Bank 6 a 900 3934 36 Right Joystick Assembly Used With Parker Valve Bank Not Shown b 900 3934 29 Right Joystick Assembly Used With Husco Valve Bank Not Shown Kawasaki Joystick NOTE Parts may...

Страница 119: ... DESCRIPTION 1 900 3930 80 Switch Boot For Top Of Handle 2 900 2913 81 Handle Assembly 3 a 900 2914 45 1 4 Spade Snap Action Switch Not Shown b 900 2913 82 3 16 Spade Snap Action Switch Not Shown 4 N A Joystick Assembly Hydro Control Joystick NOTE Parts may not be exactly as shown 1 2 ...

Страница 120: ...Bandit Copyright 9 07 PAGE 118 MODEL 1850 HYDRAULIC COMPONENTS Control Arms Valve Linkages NOTE Parts may not be exactly as shown 1 2 3 5 6 7 4 ...

Страница 121: ...Arm 11 Hole Center f 955 1008 26 Hydraulic Control Arm 10 1 4 Hole Center g 955 300052 Hydraulic Control Arm 5 1 2 Hole Center h 955 300056 Hydraulic Control Arm 6 3 4 Hole Center i 955 1009 46 Hydraulic Control Arm 9 1 2 Hole Center 3 980 0125 74 Single Valve Linkage 4 955 200092 Double Valve Linkage 5 a 955 1010 17 Control Valve Linkage With Handle 1850 With Loader b 900 9904 59 Vinyl Cap For Co...

Страница 122: ...y For Internal Return Hydraulic Filter Assembly 3 900 3910 18 External Hydraulic Return Filter Head 4 900 3901 66 External Hydraulic Return Filter 5 900 3934 84 High Pressure Filter Assembly Includes Filter Element 6 900 3931 99 Filter Element Only For High Pressure Filter 7 900 3914 16 High Pressure Filter Assembly Includes Filter Element 8 900 3914 17 Filter Element Only For High Pressure Filter...

Страница 123: ...ide 7 955 1011 25 Sheave Guard Mount 8 Pump Sheave 9 Pump Bushing 10 955 1010 86 Sheave Guard Cover Specify Right Or Left 11 Pump Sheave 12 Pump Bushing 13 955 1010 86 Sheave Guard Cover Specify Right Or Left 14 Stub Shaft Bushing Track Unit Only 15 Stub Shaft Sheave Track Unit Only 16 955 1011 25 Sheave Guard Mount 17 900 3913 31 Pump Bearing Block Track Unit NOTE Nuts bolts washers and all other...

Страница 124: ...Bandit Copyright 9 07 PAGE 122 MODEL 1850 NOTE Parts may not be exactly as shown FRAME ACCESSORY COMPONENTS ...

Страница 125: ...r 12 a 955 200100 Optional Cone Holder For Mounting On Fender b 980 200202 Optional Cone Holder Replaces 980 0508 30 Not Shown c 980 200215 Optional Bolt On Cone Holder Not Shown d 980 200107 Optional Hoop Style Cone Holder Not Shown e 900 7900 86 Cap For Cone Holder Not Shown 13 a 900 3934 24 Rear Stabilizer Cylinder Welded b 900 3912 12 Rear Stabilizer Cylinder Tie Rod c 904 0007 14 Pin For Weld...

Страница 126: ...Bandit Copyright 9 07 PAGE 124 MODEL 1850 NOTE Parts may not be exactly as shown FRAME ACCESSORY COMPONENTS ...

Страница 127: ...35 85R 16 Tire Only c 900 5904 22 16 x 6 White Spoke 8 Bolt Rim Only d 900 5904 76 235 75R 17 5 Tire and Solid Gray 8 Bolt Rim e 900 5904 48 235 75R 17 5 Tire Only f 900 5904 49 17 5 x 6 75 Solid Gray 8 Bolt Rim Only 28 Brake Hub and Drum Assembly 29 a 980 0508 25 Optional Wheel Chock Holders Aluminum Bolt On Not Shown b 980 0508 26 Optional Wheel Chock Holders Metal Weld On Not Shown 30 900 5902 ...

Страница 128: ...Bandit Copyright 9 07 PAGE 126 MODEL 1850 FUEL HYDRAULIC TANK COMPONENTS NOTE Parts may not be exactly as shown ...

Страница 129: ... 0123 07 Tank Mount Welded To Tank 8 900 7900 14 Rubber Mounting Pad 9 914 0502 10 60 Gallon Rectangle Fuel Tank Assembly 10 900 2904 14 Rochester Sight Gauge For 60 Gallon Fuel Tank 11 a 955 0500 38 Tank Mount Tray For 60 Gallon Fuel Tank b 900 0104 95 Rubber Fuel Tank Pad Not Shown 12 955 0501 12 125 Gallon Rectangle Fuel Tank Assembly 1850 Track 13 a 900 2902 26 Electric Sight Gauge For 100 Gal...

Страница 130: ...Bandit Copyright 9 07 PAGE 128 MODEL 1850 LOADER COMPONENTS MODEL 1700 LOADER START 5 98 NOTE Parts may not be exactly as shown ...

Страница 131: ...2 900 4901 10 Pivot Pin Lock Nut 13 916 0500 90 Pedestal Assembly 14 955 0500 87 Main Boom Pivot Pin 15 900 9900 35 Split Steel Bushing 16 955 0501 04 Rod Cylinder Pin On Main Boom 17 900 1901 90 Spherical Bushing 18 955 0501 03 Base End Cylinder Pin In Pedestal 19 900 3937 00 Main Boom Cylinder 20 955 0501 04 Loader Cylinder Pin On Main Boom 21 916 0500 94 Main Boom Assembly 22 955 0500 88 Jib Bo...

Страница 132: ...Bandit Copyright 9 07 PAGE 130 MODEL 1850 LOADER COMPONENTS BACK HOE LOADER PRE 5 98 NOTE Parts may not be exactly as shown ...

Страница 133: ...Jib Boom Cylinder To Main Boom Pin 11 900 3924 07 Jib Boom Cylinder 12 914 0502 39 Jib Boom To Main Boom Pin 13 914 0502 37 Jib Boom Cylinder To Jib Boom Pin 14 955 0500 42 Jib Boom Assembly 15 914 1010 78 Transport Brace 16 955 1008 66 Cylinder Pin Nut 17 900 3905 32 Main Boom Cylinder 18 955 1007 96 Main Boom Cylinder To Pedestal Pin 19 900 3903 01 Loader Swing Cylinder 20 a 900 4902 26 Loader S...

Страница 134: ...it Copyright 9 07 PAGE 132 MODEL 1850 NOTE Parts may not be exactly as shown PLANETARY SPEED REDUCER LOADER COMPONENTS 1 2 3 4 6 5 7 8 9 10 11 14 12 13 15 16 17 18 19 20 21 14 22 23 25 24 23 26 27 28 29 30 ...

Страница 135: ... Center Flange 13 15121 Pipe Plug 14 15102 O Ring 15 15128 Cup 16 15118 Cone 17 15163 Keyed Washer 18 15162 Lock Washer 19 15138 Lock Nut 20 15004 Planet Carrier 21 15003 Internal Gear 22 Motor Adaptor 15205 SAE A 2 Bolt 15064 SAE B 2 Bolt 15241 Ross MAB MAE 23 15129 Pipe Plug 24 15110 Bolt 25 Input Shaft Sun Gear Order Sun Gear Kit 26 15112 Thrust Washer 27 15113 Planet Bearing 28 15005 Planet Ge...

Страница 136: ... 955 0501 52 Grapple Jaw Pin 5 914 0503 12 Wide Jaw Assembly 6 955 1011 67 Cylinder Cover Wide Jaw 7 900 4903 70 Grapple Jaw Pin Nut 8 a 900 3933 18 Grapple Jaw Cylinder Welded Started 1 06 b 900 3917 21 Grapple Jaw Cylinder Tie Rod Pre 1 06 9 914 0503 13 Grapple Housing 10 955 1011 66 Cylinder Cover Narrow Jaw 11 914 0503 14 Grapple Assembly No Cylinders or Rotator NOTE Nuts bolts washers and all...

Страница 137: ...C x 2 1 4 Hex Head Bolt 6 900 4901 98 7 8 Mill Carb Washer 7 938 300639 Bushing 8 955 200023 Wide Jaw Assembly 9 955 300044 Grapple Jaw Pin 2 Diameter x 11 3 4 10 955 200021 Grapple Housing Assembly 11 955 200024 Narrow Jaw Assembly 12 955 200025 Grapple Assembly No Cylinders or Rotator NOTE Parts may not be exactly as shown SINGLE CYLINDER GRAPPLE LOADER COMPONENTS NOTE Nuts bolts washers and all...

Страница 138: ...Bandit Copyright 9 07 PAGE 136 MODEL 1850 NOTE Parts may not be exactly as shown GRAPPLE ROTATOR LOADER COMPONENTS ...

Страница 139: ...m 0 178 mm 14 1013 580 Roll Pin 15 5002 512 Stator Frame 16 5011 105 Valve 17 1024 066 Seal 18 1024 074 Support Ring 19 5002 514 Stator Plate Lower 20 1022 649 Screw 21 1024 090 Wiper Seal 22 1014 950 Screw 23 1015 304 Washer 24 900 3935 49 Hose Guard 25 1001 825 Grease Nipple 26 1024 017 O Ring 27 1002 153 Screw 28 1020 890 Washer 29 1019 488 Screw 30 1019 496 Washer 31 a 5002 523 Lower Link FK b...

Страница 140: ...Bandit Copyright 9 07 PAGE 138 MODEL 1850 DUAL SWING BRAKE START 9 02 NOTE Parts may not be exactly as shown LOADER COMPONENTS ...

Страница 141: ...sc 8 5016 125 Brake Block 9 1026 616 Cup Spring 10 5016 269 Positioning Flange 11 1003 755 Socket Head Cap Screw 12 1004 027 Retaining Ring 13 1008 374 Lock Nut 14 5002 429 Bushing 30mm Diameter 15 5016 276 Upper Brake Disc 16 5006 650 Brake Kit Includes 8 13 2 Required Per Assembly 17 900 4908 32 Pin Kit Includes 2 4 5 18 900 4905 70 Dual Swing Brake Assembly 19 1029 461 Users Manual LOADER COMPO...

Страница 142: ...Damper Link Body 2 5002 363 Pin 3 1005 594 Nut M24 4 1017 839 Screw M16 x 30 5 900 4904 83 Brake Lining With Disc 2 Required Per Assembly 6 900 4904 84 Cup Spring 7 5002 275 Washer 8 900 4904 81 Pivot Kit With Brake Includes 2 7 2 Required Per Ass y 9 900 4904 89 Damper Link Kit Assembly NOTE Nuts bolts washers and all other components can be ordered by physical description ...

Страница 143: ...00 2917 08 Omnex Radio Receiver Trailerized Unit 3 900 2917 56 Omnex Radio Remote Kit Trailerized Unit Includes 1 2 4 900 2912 81 LOR Radio Transmitter Trailerized Unit 5 900 2912 80 LOR Radio Receiver Trailerized Unit 6 900 2912 66 LOR Antenna 7 900 2912 82 LOR Tether Transmitter Trailerized Unit 8 900 2912 79 LOR Radio Remote Kit Trailerized Unit Includes 4 7 OMNEX REMOTE LOR REMOTE 1 2 4 5 6 7 ...

Страница 144: ...Bandit Copyright 9 07 PAGE 142 MODEL 1850 CAB COMPONENTS NOTE Parts may not be exactly as shown LEVER STYLE CONTROLS ...

Страница 145: ...61 Side Sliding Window Road Side Track 13 a 900 9904 04 A C Unit 12 Volt b 900 9904 31 A C Unit 24 Volt c 900 9906 50 A C Unit Filter Not Shown d 900 9906 51 30 Amp Breaker For A C Unit 12 Volt Not Shown e 900 9906 52 15 Amp Breaker For A C Unit 24 Volt Not Shown f 900 9903 48 A C Compressor 12 Volt Not Shown g 900 9903 23 A C Compressor 24 Volt Not Shown h 900 9904 13 A C Blower Fan Assembly 12 V...

Страница 146: ...Bandit Copyright 9 07 PAGE 144 MODEL 1850 CAB COMPONENTS NOTE Parts may not be exactly as shown LEVER STYLE CONTROLS ...

Страница 147: ... 2906 57 Blade Type Fuse Block Not Shown m 900 2900 96 Glass Fuse Holder Not Shown n 900 2900 95 30 Amp Glass Fuse Not Shown 16 a 955 0501 22 Joystick Console b See Pages 116 117 Joystick c 900 2907 00 Feedwheel Toggle Switch Not Shown d 900 2910 46 Track Loader Toggle Switch Not Shown 17 a 900 9900 06 Operator s Seat b 900 9903 11 Seat Belt Not Shown 18 914 0502 24 Seat Pedestal 19 a 960 0500 83 ...

Страница 148: ...Bandit Copyright 9 07 PAGE 146 MODEL 1850 NOTE Parts may not be exactly as shown OPTIONAL COMPONENTS ...

Страница 149: ... Winch Shift Lever With s 9 10 12 a 40025 Winch Pin For Brake Assembly b 41669 Winch Snap Ring For Winch Pin 13 900 3905 14 Winch Release Lever Pin Assembly 14 900 3905 18 Winch Arm Includes s 4 9 13 15 a 980 200162 Winch Tunnel Assembly b 920 200027 WinchTunnelAssemblyFor2090WithLoaderOr1850WithLoader Cab NotShown c 955 200076 WinchTunnelAssemblyFor1850WithLoaderOr2090WithLoader Cab NotShown 16 a...

Страница 150: ...nder Tie Rod c 904 0007 14 Pin For Welded Cylinder Not Shown 2 914 1000 38 Lock Pin 3 980 0131 50 Inside Tube Assembly 4 980 0509 53 Drop Leg Foot Pad Assembly 5 900 3925 94 Check Valve 6 a 900 3920 01 Tongue Jack Valve SAE O rings b 900 3901 42 Tongue Jack Valve Pipe Fittings 7 980 0509 00 Hydraulic Tongue Jack Kit Includes s 1 6 NOTE Parts may not be exactly as shown ...

Страница 151: ...ab Foldaway Radiator Screen 3 Mount Tray For Foldaway Radiator Screen 4 900 7900 57 Weather Strip 5 a 900 4901 83 Spring Lock Plunger b 900 7900 93 Rubber Cap For Spring Lock 1 2 Diameter 6 900 4901 61 Hook Pull Clamp 7 980 0128 77 Lock Tab For Hook NOTE Parts may not be exactly as shown Will Vary Depending On Engine And Component Options Order By Serial Number Of Chipper Or Physical Description ...

Страница 152: ...Bandit Copyright 9 07 PAGE 150 MODEL 1850 SERVICE RECORD SERVICE RECORD DATE DESCRIPTION AMOUNT ...

Отзывы: