background image

55

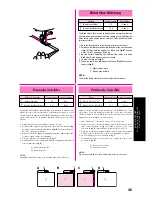
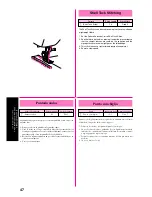
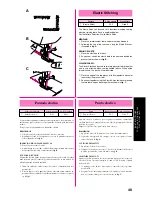
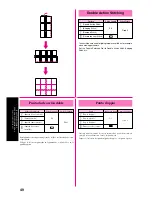
BUTTONHOLE AND BUTTON SEWING

OJALES Y COSTURA DE BOTONES

OCCHIELLI E BOTTONI

(Model XL-6060, XL-6061, XL-6062, XL-6063, XL-6050, XL-
6051, XL-6052, XL-6053)

Making a Buttonhole

(For 1-step BH Type)

Pattern

Stitch Length

Stitch Width

Foot

F-1.5

Fixed 5

Buttonhole Foot

NOTE:

1. It is recommended to practice making a buttonhole on a scrap

piece of fabric before attempting it on the actual garment.

2. When making buttonholes on soft fabrics, place a stabilizer

material on the underside of the fabric.

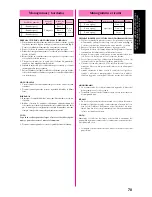
One-step buttonhole-making is a simple process that provides
reliable results.
MAKING A BUTTONHOLE

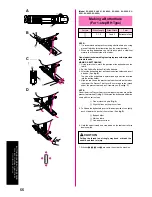
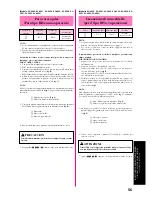
1. Using tailor’s chalk, mark the position of the buttonhole on the

fabric.

2. Set the Pattern Selection Dial to Buttonhole.
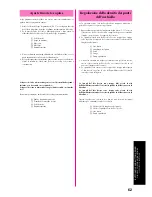
3. Attach the buttonhole foot, pull open the button holder and insert

a button. (See

 fig. B

)

*

The size of the buttonhole is determined by the button inserted
into the button holder.

4. Align the red line on the presser foot with the mark on the fabric,

then lower the Presser Foot Lever. Be sure to pass the thread
under the presser foot and pull it toward you. (See 

fig. C

)

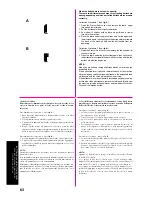
NOTE:

Do not lower the Presser Foot Lever while pushing in the area of the
presser foot marked 

a

 in 

fig. C

. Otherwise the buttonhole will not be

sewn with the correct size.

1

Do not close this gap.(

Fig. A

)

2

Align the lines on the presser foot.

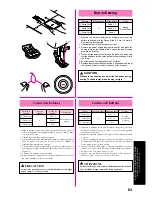
5. Pull down the buttonhole lever to its lowest position, then lightly

push it toward the back of the machine. (See

 fig. D

)

3

Button holder

4

Mark on fabric

5

Line on presser foot

6. Hold the upper thread and step down on the foot controller to

begin sewing.

CAUTION

Pulling the thread too strongly may bend or break the
needle, and lead to injury.

7. Stitches 

1

2

3

 and 

4

 are sewn, then stop the machine.

A

D

5

4

a

B

3

1

A

2

3

2

4

1

C

Содержание XL-6040

Страница 1: ...À ÀÀÀÀÀÀÀÀÀÀÀÀÀÀÀÀ ÀÀÀÀÀÀÀÀÀÀÀÀÀÀÀÀ ÀÀÀÀÀÀÀÀÀÀÀÀÀÀÀÀ ÀÀÀÀÀÀÀÀÀÀÀÀÀÀÀÀ yyyyyyyyyyyyyyyy yyyyyyyyyyyyyyyy yyyyyyyyyyyyyyyy yyyyyyyyyyyyyyyy yyyyyyyyyyyyyyyy yyyyyyyyyyyyyyyy yyyyyyyyyyyyyyyy yyyyyyyyyyyyyyyy yyyyyyyyyyyyyyyy yyyyyyyyyyyyyyyy yyyyyyyyyyyyyyyy yyyyyyyyyyyyyyyy yyyyyyyyyyyyyyyy yyyyyyyyyyyyyyyy yyyyyyyyyyyyyyyy yyyyyyyyyyyyyyyy yyyyyyyyyyyyyyyy yyyyyyyyyyyyyyyy yyyyyyyyyyyyyyyy yyyyyyy...

Страница 2: ...ation openings of the machine and foot control free from the accumulation of lint dust and loose cloth 5 Never drop or insert any object into any opening 6 Do not use outdoors 7 Do not operate where aerosol spray products are being used or where oxygen is being administered 8 To disconnect turn the main switch to the symbol O position which represents off then remove plug from outlet 9 Do not unpl...

Страница 3: ...ventilación de la máquina de coser y el pedal sin acumulacíon de povo Suciedad y restos de tejido 5 No introducir no insertar objetos en los orificios de ventilación 6 No usar al aire libre 7 No usar mientras se estén utilizando productos aerosoles spray o en lugares donde se esté administrando oxígeno 8 Para desconectar girar el interruptor hasta la posición del símbolo O que representa off luego...

Страница 4: ...ture di ventilazione della macchina per cucire ed il reostato privi di fili polvere o stoffa 5 Non far cadere né inserire alcun oggetto in nessuna delle aperture 6 Non usate la macchina all aperto 7 Non fate funzionare la macchina nel caso vengano usati prodotti aerosol spray o ossigeno 8 Per scollegare girate l interruttore principale in posizione O che significa OFF spento quindi toglieri la spi...

Страница 5: ... three pin plug fitted With alternative plugs an approved fuse must be fitted in the plug NOTE The plug severed from the main leads must be destroyed as a plug with bared flexible cords is hazardous if engaged in a live socket outlet In the event of replacing the plug fuse use a fuse approved by ASTA to BS 1362 i e carrying the ASA mark rating as marked on plug Always replace the fuse cover Never ...

Страница 6: ... switch of the machine should be switched off or the plug must be removed from the socket outlet Turn on or off the switch for the main power and sew light 1 Turn on 2 Turn off When servicing the machine or when removing covers or changing bulbs the machine or the electrical set must unplugged 1 2 Connecting Plugs and Main Power Sewing Light Switch ...

Страница 7: ...toring this machine avoid direct sunlight and high humidity locations Do not use or store the machine near a space heater iron halogen lamp or other hot objects 2 Use only neutral soaps or detergents to clean the case Benzene thinner and scouring powders can damage the case and machine and should never be used 3 Do not drop or hit the machine 4 Always consult the operation manual when replacing or...

Страница 8: ...sol y no la guarde en sitios húmedos No utilice o guarde la máquina cerca de una fuente de calor plancha lámpara halógena u otros objetos candentes 2 Utilice sólo detergentes o jabones neutros para limpiar la carcasa Gasolina diluyentes y polvos de limpieza pueden dañar la carcasa y la máquina no los utilice nunca 3 No deje caer o golpee la máquina 4 Consulte siempre el manual de funcionamiento cu...

Страница 9: ...umidità elevata Non utilizzarla o collocarla accanto a termosifoni ferri da stiro lampade alogene o altri oggetti caldi 2 Per pulire la custodia impiegare soltanto saponi o detergenti neutri Benzene solventi e polveri abrasive possono danneggiare sia la macchina che la custodia e vanno quindi evitati 3 Fare attenzione a non far cadere la macchina 4 Consultare sempre il presente manuale d istruzion...

Страница 10: ...Straight Stitching 42 Zigzag Stitching 45 BUILT IN STITCHES Blind Hem Stitching 46 Shell Tuck Stitching 47 Elastic Stitching 48 Double Action Stitching 49 Scallop Stitching 50 Decorative Stitching 51 Patchwork 52 Overedge Stitching 53 Feather Stitching 54 Triple Zigzag Stretch Stitching 54 TABLE OF CONTENTS BUTTONHOLE AND BUTTON SEWING Making a Buttonhole For 1 step BH Type 55 Odd shaped buttons t...

Страница 11: ...ER 41 Puntadas rectas 42 Puntadas zigzag 45 PUNTADAS INCORPORADAS Puntadas invisibles 46 Puntada ondas 47 Puntada elástica 48 Puntada de acción doble 49 Puntada festón 50 Puntadas decorativas 51 Patchwork 52 Puntada por encima de la orilla 53 Puntada pluma 54 Triple puntada zigzag elástica 54 OJALES Y COSTURA DE BOTONES Para coser ojales Para tipo BH en una operación 56 Botones con formas extrañas...

Страница 12: ...LEGGERE PRIMA DI CUCIRE 41 Punto diritto 42 Punto zigzag 45 PUNTI INCORPORATI Punto orlo invisibile 46 Punto conchiglia 47 Punto elastico 48 Punto doppio 49 Punto smerlo 50 Punto decorativo 51 Lavori di patchwork 52 Rifinitura a sopraggitto 53 Punto piuma 54 Punto zigzag triplo 54 OCCHIELLI E BOTTONI Esecuzione di un occhiello per il tipo BH a 1 operazione 56 Bottoni di forma strana che non si ada...

Страница 13: ...MENT Page 12 27 7 ZIGZAG PRESSER FOOT Page 3 11 8 REVERSE SEWING LEVER Page 26 Push for stitching in the reverse direction 9 PATTERN INDICATION WINDOW Page 13 Shows the stitch number to be performed HOLE FOR VERTICAL SPOOL PIN Page 37 Used to hold a second spool of thread for twin needle sewing A BALANCE WHEEL B PATTERN SELECTION DIAL Page 13 Turn in either direction to select the desired stitch C...

Страница 14: ...ITE DELL EQUILIBRATORE DELL OCCHIELLO Pagina 62 F LEVA DEL PIEDINO PREMISTOFFA Pagina 34 G REOSTATO A PEDALE Pagina 8 Utilizzato per controllare la velocità l avviamento e l arresto della macchina per cucire ELEMENTOS PRINCIPALES 1 DISPOSITIVO DE BOBINADO DE LA CANILLA Página 28 Hace bobina para la canilla que va a ser utilizada como hilo inferior 2 SELECTOR DE LARGO DE PUNTADA Página 14 25 Contro...

Страница 15: ...Dust Cover 1pc Parts Code for Zigzag Presser Foot X51953 051 Parts Code for Spool Cap Medium X55260 153 Foot Controller Model N Parts Code J00360 051 110 120V Area XA6400 051 220 240V Area XA6402 051 U K XA6404 051 Australia New Zealand XA6434 051 110 220V Dual Ara NOTE For U S A only Foot Controller Model N Parts Code J00360 051 110 120V Area This foot controller can be used for Model XL 6060 XL ...

Страница 16: ...ara EE UU XA5539 051 para otros países Recambios paquete de 10 piezas 3 Paquete de agujas agujas simples normales No 14 3 pzas 4 Aguja doble 1 pza 5 Prensatelas para ojales 1 pza 6 Tope para carretes grande 1 pza 7 Tope para carretes pequeño 1 pza 8 Cepillo 1 pza 9 Porta carretes extra 1 pza 0 Destornillador 1 pza A Cortador para abrir costuras 1 pza B Placa de zurcir 1 pza C Funda guardapolvo 1 p...

Страница 17: ...result in fire electric shock or damage to the machine Turn off the main power and remove the plug in the following circumstances When you are away from the machine After using the machine When the power fails during use When the machine does not operate correctly due to a bad connection or a disconnection During electrical storms CAUTION Do not use extension cords or multi plug adapters with many...

Страница 18: ...ore Tali condizioni possono danneg giare il cavo e causare rischi di incendio o di scossa elettrica Seilcavoolaspinaèdanneggiato portarelamacchinapresso un rivenditore autorizzato prima di continuare ad utilizzarla Se la macchina da cucire deve restare a lungo inutilizzata scollegare il cavo dalla presa di corrente In caso contrario vi sono rischi di incendio FUNCIONAMIENTO DE LA MÁQUINA DE COSER ...

Страница 19: ... on toward the I mark 2 Turn off toward the O mark Interruttore principale luce area di lavoro Questo interruttore accende e spegne sia la macchina che la luce dell area di lavoro 1 Acceso verso il simbolo I 2 Spento verso il simbolo O Interruptor principal luz de cosido Este interruptor permite apagar y encender la máquina y la luz 1 Encender hacia la marca I 2 Apagar hacia la marca O ...

Страница 20: ...re should be taken that nothing is placed on the foot controller when the machine is not in use 1 Foot controller CAUTION Do not allow fabric pieces and dust to collect in the foot controller Doing so could cause a fire or an electric shock NOTE For U S A only Foot Controller Model N This foot controller can be used for Model XL 6060 XL 6061 XL 6062 XL 6063 XL 6050 XL 6051 XL 6052 XL 6053 XL 6040 ...

Страница 21: ... cause injury Never sew with a bent needle A bent needle will easily break and cause injury 1 Remove the power supply plug from the outlet 2 Raise the needle bar to its highest position 3 Lower the presser foot 4 Remove the needle by loosening the needle clamp screw 1 Presser foot lever CAUTION Do not loosen or tighten the needle clamp screw with a strong force otherwise it may be damaged 5 With t...

Страница 22: ...ere l ago fino a farlo toccare l arresto e serrare saldamente la vite con un cacciavite Se l ago non è completamente inserito o la vite della ghiera di serraggio ago è allentata l ago potrebbe rompersi o la macchina potrebbe danneggiarsi Verificación de la aguja La aguja de costura siempre debe estar bien recta y afilada para una buena costura Para comprobar la aguja Pararevisarlaaguja coloquelapa...

Страница 23: ...o hacerse daño Según sus necesidades de costura puede ser necesario cambiar el prensatelas TIPO DE ENGANCHE DE GOLPE 1 Levante la aguja a su posición más alta girando la ruedecilla hacia usted en el sentido contrario al de las manecillas de un reloj y levante la palanca del prensatelas 2 Suelte el prensatelas levantando la palanca que hay en la parte trasera del soporte 3 Coloque otro prensatelas ...

Страница 24: ...flat bed attachment cover which can be opened by flipping it toward you Plataforma Los accesorios están almacenados en un compartimiento situado debajo de la tapa de la platafoma Para abrir la tapa tire de ella hacia usted Scomparto piano Gli accessori si trovano nello scomparto sotto il coperchio del scomparto piano che può essere aperto tirandolo verso sé stessi ...

Страница 25: ...ction dial 2 Pattern number The stitches that are available depend on the Stitch Length Dial setting If the Stitch Length Dial is set between 0 and 4 any of the stitches in the top row can be selected If the Stitch Length Dial is set to SS any of the stitches in the bottom row can be selected 3 Stitch length dial Model XL 6060 XL 6061 XL 6062 XL 6063 XL 6050 XL 6051 XL 6052 XL 6053 NOTE Since the ...

Страница 26: ...a deseada DISPOSITIVI DI CONTROLLO Selettore dei punti ATTENZIONE Quando si usa il selettore dei punti per selezionare un punto girare il volantino verso il davanti senso antiorario con la mano per portare l ago alla posizione più alta prima di selezionare il punto Se l ago si trova nella posizione abbassata quando si gira il selettore dei punti l ago il piedino premistoffa o il tessuto possono es...

Страница 27: ...9 RAMPART STITCH 3 16 1 64 1 8 ELASTIC SHELL TUCK STITCH 5 F 3 53 3 16 1 64 1 8 BEAD STITCH 51 ARROWHEAD STITCH 5 F 1 PARALLELOGRAM STITCH 3 16 1 64 1 16 TRIANGLE STITCH TRIPLE STRETCH STITCH SS Fixed 42 Left Needle Position 2 5 3 32 TRIPLE STRETCH STITCH SS Fixed 42 Center Needle Position 2 5 3 32 TRIPLE ZIGZAG 1 5 SS Fixed 54 STRETCH STITCH 1 16 2 5 3 32 TRIPLE ZIGZAG 3 5 SS Fixed 54 STRETCH STI...

Страница 28: ...H 5 F 2 5 48 3 16 1 64 3 32 STRETCH BLIND HEM STITCH 4 F 1 5 46 3 16 1 64 1 16 SCALLOP STITCH 5 F 1 5 50 3 16 1 64 1 16 DOUBLE ACTION STITCH 5 F 3 BRIDGING STITCH 49 RAMPART STITCH 3 16 1 64 1 8 TRIPLE STRETCH STITCH SS Fixed 42 Left Needle Position 2 5 3 32 TRIPLE STRETCH STITCH SS Fixed 42 Center Needle Position 2 5 3 32 TRIPLE ZIGZAG 1 5 SS Fixed 54 STRETCH STITCH 1 16 2 5 3 32 TRIPLE ZIGZAG 3 ...

Страница 29: ...64 3 16 ZIGZAG STITCH 3 5 F 4 45 64 68 69 1 8 1 64 3 16 ZIGZAG STITCH 5 F 4 45 64 68 69 3 16 1 64 3 16 BLIND HEM STITCH 3 F 2 46 1 8 1 64 1 16 SHELL TUCK STITCH 5 F 3 47 3 16 1 64 1 8 ELASTIC STITCH 5 F 2 5 48 3 16 1 64 3 32 TRIPLE STRETCH STITCH SS Fixed 42 Left Needle Position 2 5 3 32 TRIPLE STRETCH STITCH SS Fixed 42 Center Needle Position 2 5 3 32 TRIPLE ZIGZAG 1 5 SS Fixed 54 STRETCH STITCH ...

Страница 30: ...50 3 16 1 64 1 16 PUNTADA DE ACCIÓN DOBLE 5 F 3 PUNTADA PUENTE 49 PUNTADA ONDAS ABIERTAS 3 16 1 64 1 8 PUNTADA ONDAS 5 F 3 53 ELÁSTICAS 3 16 1 64 1 8 PUNTADA FESTÓN DOBLE 51 PUNTADA FLECHA 5 F 1 PUNTADA PARALELOGRAMO 3 16 1 64 1 16 PUNTADA TRIÁNGULO TRIPLE PUNTADA PESPUNTO SS Fija 42 Aguja a la izquierda 2 5 3 32 TRIPLE PUNTADA PESPUNTO SS Fija 42 Aguja en el centro 2 5 3 32 TRIPLE PUNTADA 1 5 SS ...

Страница 31: ... 5 48 3 16 1 64 3 32 PUNTADA INVISIBLE 4 F 1 5 46 ELÁSTICA 3 16 1 64 1 16 PUNTADA FESTÓN 5 F 1 5 50 3 16 1 64 1 16 PUNTADA DE ACCIÓN DOBLE 5 F 3 PUNTADA PUENTE 49 PUNTADA ONDAS ABIERTAS 3 16 1 64 1 8 TRIPLE PUNTADA PESPUNTO SS Fija 42 Aguja a la izquierda 2 5 3 32 TRIPLE PUNTADA PESPUNTO SS Fija 42 Aguja en el centro 2 5 3 32 TRIPLE PUNTADA 1 5 SS Fija 54 ZIGZAG ELÁSTICA 1 16 2 5 3 32 TRIPLE PUNTA...

Страница 32: ... 64 3 16 PUNTADA ZIGZAG 3 5 F 4 45 64 68 70 1 8 1 64 3 16 PUNTADA ZIGZAG 5 F 4 45 64 68 70 3 16 1 64 3 16 PUNTADA INVISIBLE 3 F 2 46 1 8 1 64 1 16 PUNTADA ONDAS 5 F 3 47 3 16 1 64 1 8 PUNTADA ELÁSTICA 5 F 2 5 48 3 16 1 64 3 32 TRIPLE PUNTADA PESPUNTO SS Fija 42 Aguja a la izquierda 2 5 3 32 TRIPLE PUNTADA PESPUNTO SS Fija 42 Aguja en el centro 2 5 3 32 TRIPLE PUNTADA 1 5 SS Fija 54 ZIGZAG ELÁSTICA...

Страница 33: ...6 PUNTO SMERLO 5 F 1 5 50 3 16 1 64 1 16 PUNTO DOPPIO 5 F 3 PUNTO A PONTE 49 PUNTO BASTIONE 3 16 1 64 1 8 PUNTO A CONCHIGLIA 5 F 3 53 ELASTICO 3 16 1 64 1 8 PUNTO PERLA 51 PUNTO FRECCIA 5 F 1 PUNTO PARALLELOGRAMMA 3 16 1 64 1 16 PUNTO TRIANGOLO PUNTO ELASTICO TRIPLO SS Fissa 42 ago a sinistra 2 5 3 32 PUNTO ELASTICO TRIPLO SS Fissa 42 ago al centro 2 5 3 32 PUNTO ZIGZAG TRIPLO 1 5 SS Fissa 54 1 16...

Страница 34: ... PUNTO ELASTICO 5 F 2 5 48 3 16 1 64 3 32 PUNTO ELASTICO INVISIBILE 4 F 1 5 46 3 16 1 64 1 16 PUNTO SMERLO 5 F 1 5 50 3 16 1 64 1 16 PUNTO DOPPIO 5 F 3 PUNTO A PONTE 49 PUNTO BASTIONE 3 16 1 64 1 8 PUNTO ELASTICO TRIPLO SS Fissa 42 ago a sinistra 2 5 3 32 PUNTO ELASTICO TRIPLO SS Fissa 42 ago al centro 2 5 3 32 PUNTO ZIGZAG TRIPLO 1 5 SS Fissa 54 1 16 2 5 3 32 PUNTO ZIGZAG TRIPLO 3 5 SS Fissa 54 1...

Страница 35: ...16 1 64 3 16 PUNTO ZIGZAG 3 5 F 4 45 64 68 70 1 8 1 64 3 16 PUNTO ZIGZAG 5 F 4 45 64 68 70 3 16 1 64 3 16 PUNTO ORLO INVISIBILE 3 F 2 46 1 8 1 64 1 16 PUNTO CONCHIGLIA 5 F 3 47 3 16 1 64 1 8 PUNTO ELASTICO 5 F 2 5 48 3 16 1 64 3 32 PUNTO ELASTICO TRIPLO SS Fissa 42 ago a sinistra 2 5 3 32 PUNTO ELASTICO TRIPLO SS Fissa 42 ago al centro 2 5 3 32 PUNTO ZIGZAG TRIPLO 1 5 SS Fissa 54 1 16 2 5 3 32 PUN...

Страница 36: ...needed for making the Satin Stitch varies according to the material and thread being used To determine the exact dial position you should first test the stitch and length settings on a scrap of fabric to observe the feeding of the material 1 Stitch length dial 2 Length 3 Fine SS 4 Coarse CAUTION Do not set the Stitch Length Dial in the range shown by A A A A A If the machine is started while the d...

Страница 37: ...aguja y causar lesiones Selettore della lunghezza del punto In base al tipo di punto selezionato può essere necessario regolarne la lunghezza per ottenere un risultato ottimale I numeri sul selettore rappresentano la lunghezza dei punti in millimetri mm QUANTO PIU ALTO E IL NUMERO TANTO PIU LUNGO E PUNTO Con la regolazione 0 il tessuto non viene alimentato dal trasporta tore Questa regolazione è a...

Страница 38: ...e usa para remates y para reforzar las costuras Para coser hacia atrás apriete a fondo el pulsador de retroceso y mantén galo en esa posición mientras presiona ligeramente el pedal Para volver a coser hacia adelante suelte el pulsador 1 Pulsador de retroceso Tasto di cucitura di ritorno La cucitura di ritorno è indicata fissare e rinforzare le cuciture Per cucire a marcia indietro spingere più a f...

Страница 39: ...alidad de brazo libre Lacosturaconbrazolibreesprácticaparacoserzonastubularesydifíciles de acceso en los tejidos Para transformar su máquina en esa modalidad sólo hace falta levantar el plataforma y sacarlo 1 Deslice el plataforma hacia la izquierda 1 Plataforma Cucitura a braccio libero L utilizzo della macchina a braccio libero è ideale per eseguire cuciture tubolari e di parte di tessuto altrim...

Страница 40: ... si utilizza un fermo per rocchetto con dimensioni inferiori al rocchetto di filo il filo potrebbe rimanere preso nella fessura sul bordo del rocchetto 1 Mettere una spoletta di filo sul portaspoletta orizzontale e fissarla con un fermaspoletta in modo che la spoletta di filo non giri Far passare il filo attraverso il guidafilo come illustrato seguendo la linea tratteggiata sulla macchina ATTENZIO...

Страница 41: ...lly when the bobbin is full take your foot off of the foot controller CAUTION When removing the bobbin do not pull on the bobbin winder seat Doing so could loosen or remove the bobbin winder seat resulting in damage to the machine 6 Cut the thread slide the bobbin winder shaft to the left and remove the bobbin NOTE The needle bar does not move when the bobbin winding shaft is slid to the right Imm...

Страница 42: ... lesión 1 Bobinado correcto 2 Bobinado incorrecto 2 Far passare il capo del filo nel foro sul rocchetto dall interno Inserire il rocchetto sull alberino di avvolgimento e spostare l alberino verso destra Girare il rocchetto in senso orario con la mano fino a che la molla dell alberino entra nella scanalatura del rocchetto sul rocchetto 1 Molla sull alberino 2 Scanalatura del rocchetto 3 Sede di av...

Страница 43: ... Slide button 2 Cover 3 Insert the bobbin so the thread comes out in the direction shown by the arrow Use bobbins intended for use with this machine CAUTION Be sure the bobbin is set so the thread unrolls in the correct direction If the thread unrolls in the wrong direction it may cause the thread tension to be incorrect or the needle to break Hold the thread end push the bobbin down with your fin...

Страница 44: ...cia 2 a sinistra fino a far scattare in posizione lo sportello Inserireilcoperchioinmodocheilcapodelfilofuoriescadalretro del coperchio come mostrato dalla riga tratteggiata nell illustra zione a sinistra Enhebrado inferior PRECAUCIÓN Si la bobina no está colocada correctamente el hilo puede perder tensión romper la aguja y causar alguna lesión 1 Bobinado correcto 2 Bobinado incorrecto PRECAUCIÓN ...

Страница 45: ...closest in size to the thread spool If a spool cap smaller than the thread spool is used the thread may become caught in the slit on the end of the spool and cause the needle to break CAUTION Besuretothreadthemachineproperly Improperthreading cancausethethreadtotangleandbreaktheneedle leading to injury 4 Deliver the upper thread as shown in this diagram 5 Make sure to guide the thread through the ...

Страница 46: ...vvolto intorno alla leva tendifilo Assicurarsi di sollevare la leva del piedino premistoffa e il tendifilo prima di eseguire il trasporto del filo superiore Si possono avere dei problemi nel caso di trasporto errato Enhebrado superior 1 Levante el prensatelas con la palanca correspondiente 2 Levante la aguja a su posición más alta girando la ruedecilla hacia usted en el sentido contrario al de las...

Страница 47: ...rmente l estremità del filo superiore girare lenatmente con la mano una volta il volantino verso il davanti senso antiorario per abbassare e quindi sollevare l ago 2 Tirare il filo superiore per tendere il filo inferiore 3 Staccare circa 10 cm di entrambi i fili e metterli sul retro della macchina sotto il reostato 1 Filo superiore 2 Filo inferiore Levantar el hilo inferior 1 Cojaconsuavidadelfina...

Страница 48: ...igzag triplo 1 5 mm ATTENZIONE Utilizzare esclusivamente aghi doppi studiati per questa macchina codice parte X57521 001 Aghi di altro tipo potrebbero rompersi e causare danneggiamenti L ago gemello deve essere usato solo con il punto diritto ago al centro il punto zigzag 1 5 mm il punto elastico triplo ago al centro e il punto elastico zigzag triplo 1 5 mm Non usare l ago gemello con qualsiasi al...

Страница 49: ... de las agujas debe ser enhebrada por separado 1 Enhebrado de la aguja derecha Observe las mismas instrucciones que para el enhebrado de una sola aguja pero utilizando el hilo del carrete colocado en el porta carretes extra véase página 34 para mayores detalles al respecto 2 Enhebrado de la aguja izquierda Enhebre la aguja izquierda de la misma manera que la aguja derecha Sin embargo no hay que pa...

Страница 50: ... tessuto si arriccia soluzione Diminuirelatensionegirandoilregolatoreditensionesuperiore su un numero più basso La tensione superiore è troppo bassa Fig B Il tessuto si arriccia sul rovescio soluzione Aumentarelatensionegirandoilregolatoreditensionesuperiore su un numero più alto Tensione corretta Fig C La tensione corretta è importante poiché una tensione troppo alta o troppo bassa indebolisce le...

Страница 51: ...4 65 9 75 11 90 14 100 16 Ball point needle golden colored 75 11 90 14 90 14 100 16 Size Thread Size of needle Type COMBINACIONES DE TEJIDO HILO AGUJA NOTA 1 Para hilo de nailon transparente use siempre agujas 90 14 100 16 2 Para el hilo de la bobina y el hilo superior se suele utilizar siempre el mismo hilo PRECAUCIÓN Asegúrese de utilizar las combinaciones de aguja hilo y tejido listadas en la t...

Страница 52: ...ra dell ago e provocare lesioni personali Inoltre la cucitura di giunzione potrebbe risultare irregolare il tessuto potrebbe arricciarsi o la macchina potrebbe saltare dei punt Tessuto medio Tessuto leggero Tessuto pesante Tessuto elastico In caso di filo elastico Tessuto Panno rasato Taffeta Flanella Gabardine Batista Georgette Challis Satin Denim Velluto a coste Tweed Jersey Maglia 60 80 60 80 5...

Страница 53: ...spilli di imbastitura o altri oggetti durante la cucitura In caso contrario l ago potrebbe rompersi e provocare lesioni personali Se i punti sono troppo ravvicinati aumentare l impostazione di lunghezza del punto prima di continuare a cucire In caso contrario l ago potrebbe rompersi e provocare lesioni personali Utilizzare sempre il piedino premistoffa corretto Se si utilizza un piedino premistoff...

Страница 54: ...edinopremistoffa 3 Tirare il filo superiore dietro il piedino premistoffa 4 Stendere il tessuto sotto il piedino premistoffa e posizionare l ago a circa 1 cm dal margine 5 Abbassare il piedino premistoffa 6 Per fissare il punto spingere più a fondo possibile il tasto di cucitura di ritorno poi premere il reostato di controllo per iniziare la cucitura a marcia indietro 7 Rilasciare il tasto di cuci...

Страница 55: ...mo placa giratoria 3 Baje el prensatelas y empiece a coser en la nueva dirección tal como ilustrado PARA TERMINAR LAS COSTURAS La puntada de retroceso se usa para trabar los hilos al final de una costura o en cualquier punto donde sea necesario reforzar la costura 1 Cosa hasta el final de la costura y pare 2 Apriete el pulsador de retroceso y cosa hacia atrás sobre 1 cm 3 8 a partir de la orilla d...

Страница 56: ...elicatamente verso sinistra 3 Tagliare i due fili con il tagliafilo incorporato situato sul fianco sinistro della macchina 1 Tagliafilo 4 Per predisporre la macchina alla cucitura successiva tirare circa 10 cm di filo attraverso la scanalatura del piedino premistoffa verso la parte posteriore della macchina PUNTO DIRITTO E TESSUTI ELASTICI Ilpuntodirittoèindicatoperimpunturediritteepercucituresute...

Страница 57: ... all inizio e alla fine delle cuciture con punto zigzag In questo modo si ottiene una cucitura di rinforzo PUNTO SATIN Quando la manopola della lunghezza è ruotata sull area F si produce un punto satin una successione di punti zigzag molto fitti Il punto satin è utile per eseguire punti decorativi Selezionare il numero del punto in base all ampiezza desiderata quindi regolare la lunghezza ruotando...

Страница 58: ...esso colore del tessuto 2 Ripiegare in sotto il tessuto formando un orlo dell altezza deside rata come illustrato in fig A Quindi piegare l orlo come illustrato in fig B formando una piega di 6 mm sull orlo 3 Disporre il selettore dei punti sulla posizione Punto orlo invisibile o Punto elastico invisibile e regolare la lunghezza del punto 4 Cucire sulla piega come illustrato in fig C 5 Stendendo i...

Страница 59: ...ili al merletto lungo i bordi di tessuti leggeri 1 Disporre il selettore dei punti sul punto conchiglia 2 Cucire il tessuto di sbieco guidandolo sotto il piedino premistoffa in modo che i punti diritti cadano sulla linea di cucitura e i punti a zig zag appena sopra la piega 3 Per questo punto è necessaria una tensione del filo più stretta del normale 4 Cucire a bassa velocità Puntada ondas Modelo ...

Страница 60: ...lustrato in fig A CUCITURA DI ELASTICI 1 Applicare l elastico sul tessuto 2 Durante la cucitura tenere teso l elastico sia davanti che dietro il piedino premistoffa come illustrato in fig B GIUNTURE DI TESSUTI Il punto elastico permette di cucire insieme due pezzi di tessuto ed è molto efficace su tessuti a maglia Usando il filo di nylon il punto sarà invisibile 1 Congiungere i bordi dei due tessu...

Страница 61: ...o Punto doppio Punto a ponte F 3 Fissa 5 Punto bastione Punto orlo decorativo SS Questi punti consentono di cucire insieme due pezzi di tessuto ad esempio per realizzare un lavoro di patchwork Disporre il selettore dei punti sul punto doppio o sul punto a ponte Puntada de acción doble Modelo de puntada Largo de puntada Ancho de puntada Puntada de acción doble Puntada puente F 3 Puntada ondas abier...

Страница 62: ...orato permette di eseguire delle rifiniture decorative lungo le costure 1 Disporre il selettore dei punti sul punto smerlo 2 Cucire lungo il margine del tessuto 3 Se desiderato rifilare i margini delle costure con le forbici per ottenere un bordo smerlato facendo attenzione a non tagliare il filo Puntada festón Modelo de puntada Largo de puntada Ancho de puntada Puntada festón F 1 5 Fija 5 Estamáq...

Страница 63: ...unto Punto perla Punto freccia F 1 Punto parallelogramma Fissa 5 Punto triangolo Punto decorativo Questi punti possono essere usati per eseguire cuciture esterne decorative e punti smock Disporre il selettore dei punti sul punto triangolo o sul punto perla Puntadas decorativas Modelo de puntada Largo de puntada Ancho de puntada Puntada festón doble Puntada flecha F 1 Puntada paralelogramo Fija 5 P...

Страница 64: ...e pezzi di tessuto per realizzare l orlo e imbastire i bordi con della carta sottile lasciando fra di loro una piccola distanza 2 Disporre il selettore dei punti sul punto fagoting 3 Cucire lungo il bordo tirando leggermente entrambi i fili all inizio della cucitura Utilizzare per la cucitura del filo più spesso del normale 4 Terminata la cucitura rimuovere l imbastitura e la carta e fissare annod...

Страница 65: ...tessuto sotto il piedino premistoffa in modo che il margine della cucitura della punta di freccia si trovi a circa 3 mm dal centro del piedino La distanza dal margine ottimale per eseguire questo punto è di circa 5 mm in quanto la cucitura a zig zag eseguita a destra del punto sopraggitta adeguatamente il margine del tessuto come mostrato in fig A 3 Nel caso la distanza dal margine sia più ampia d...

Страница 66: ...ssuto vicinissimo alla cucitura Questo punto impedirà al tessuto di sfilacciarsi Punto zigzag triplo Punto Lunghezza punto Ampiezza Punto zigzag triplo Fissa 1 5 Punto zigzag triplo SS Fissa 3 5 Punto zigzag triplo Fissa 5 Questo punto è indicato per cucire su tessuti elastici pesanti laddove è possibile applicare il punto zig zag Il punto zigzag triplo è indicato anche per eseguire cuciture ester...

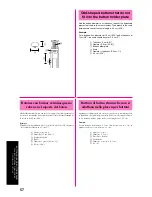
Страница 67: ...r and insert a button See fig B The size of the buttonhole is determined by the button inserted into the button holder 4 Align the red line on the presser foot with the mark on the fabric then lower the Presser Foot Lever Be sure to pass the thread under the presser foot and pull it toward you See fig C NOTE Do not lower the Presser Foot Lever while pushing in the area of the presserfootmarkedainf...

Страница 68: ...o di controllo per iniziare a cucire ATTENZIONE Tirare il filo con troppa forza potrebbe piegare o spezzare l ago con conseguente rischio di lesioni personali 7 I punti 1 2 3 e 4 vengono cuciti quindi la macchina si ferma Modelo XL 6060 XL 6061 XL 6062 XL 6063 XL 6050 XL 6051 XL 6052 XL 6053 Para coser ojales Para tipo BH en una operación Modelo de Largo de Ancho de Prensatelas puntada puntada pun...

Страница 69: ... set the buttonhole presser foot scale to this measurement The distance in the scale between two lines of the same length is 0 5 cm 3 16 Example For a button with a diameter of 1 5 cm 9 16 and a thickness of 1 cm 3 8 the scale should be set at 2 5 cm 1 1 Thickness 1 cm 3 8 2 Diameter 1 5 cm 9 16 3 Button holder plate 4 Scale 5 Diameter thickness 2 5 cm 1 6 0 5 cm 3 16 Bottoni di forma strana che n...

Страница 70: ... coser ojales es un proceso simple que ofrece increíbles resultados PARA COSER OJALES 1 Con jaboncillo marque la posición y el largo del ojal en el tejido 2 Instalelapataparaojalesyvuelvaaempujarelmarcohastaquesepare y la inserción plástica se encuentre delante del marco 3 Primero se cose el remate de la parte delantera del ojal Coloque el tejido debajo del prensatelas de tal manera que la marca d...

Страница 71: ...dino per asole ed eseguire 5 o 6 punti 3 Quando l ago si trova a sinistra della cucitura arrestare la macchina e alzare l ago dal tessuto 1 Disporre il selettore dei punti su b 2 Cucire per la lunghezza prestabilita della linea segnata col gesso 3 Quando l ago si trova a sinistra della cucitura arrestare la macchina e alzare l ago dal tessuto 1 Disporre il selettore dei punti su c stessa posizione...

Страница 72: ...fine della barretta frontale dell occhiello 2 Estrarreiltessutodallamacchina Siconsigliadiinfilaredeglispilli sulledueestremitàdell occhielloperevitareditagliarelacucitura delle barrette 3 Tagliare l apertura al centro dell occhiello con un taglia cuciture facendo attenzione a non scucire i punti ATTENZIONE Quando si utilizza la taglierina per asole per aprire l asola non frapporre la mano o le di...

Страница 73: ... Right row 2 Stitch length 3 Shorter 4 Longer 5 Adjusted stitch 3 After obtaining a satisfactory feeding on the right side stitch the left side of the buttonhole and observe the feeding 4 If the left side is too coarse or fine compared to the right side adjustthebuttonholefineadjustmentscrewasdescribedbelow If the left side is too coarse turn the screw with the enclosed large screwdriver in the di...

Страница 74: ...tore usando il cacciavite grande in dotazione verso la direzione Questa regolazione consente di ottenere una densità dei punti uniforme per entrambi i lati dell occhiello 6 Selettore della lunghezza del punto 7 Vite dell equilibratore dell occhiello 8 Lato destro 9 Punto equilibrato Ajuste fino de los ojales Si las puntadas en ambos lados del ojal no parecen ser uniformes se pueden hacer los sigui...

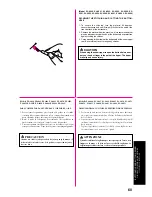
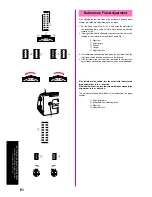
Страница 75: ...cchinapercucirel occhiello dall inizio Procedura correttiva 2 vedere fig B 1 Sollevare la leva del piedino premistoffa togliere il tessuto e il filo che è stato cucito 2 Mettere nuovamente il tessuto sotto il piedino premistoffa quindi premere leggermente la leva dell occhiello verso il retro della macchina e cucire l occhiello dall inizio NOTA Quando si è finito di cucire tutti gli occhielli assi...

Страница 76: ...ación de toma de corriente y ponga la placa de zurcir en la placa de la aguja Conecte el enchufe de alimentación a una toma de corriente 4 Coloque un botón entre el prensatelas y el tejido y asegúrese de que la aguja pase por los agujeros sin picar el botón Si golpea el botón véase el punto 1 5 Cosa unas 10 puntadas a baja velocidad 6 Retire el tejido de la máquina Corte los hilos inferior y super...

Страница 77: ...s not strike the presser foot If another stitch is selected the needle will strike the presser foot causing the needle to break possibly leading to injury 5 Sew from the bottom of the zipper toward the top on both sides The needle should be positioned on the zipper side of the foot for best results See fig B 6 To sew the opposite side of the zipper release the foot by pressing the button located a...

Страница 78: ...i sotto il tessuto 3 Cucire una o più file di punti diritti 4 Tirare il filo o i fili inferiore per arricciare il tessuto Inserción de cremalleras Modelo de puntada Largo de puntada Prensatelas Puntada recta 2 3 Aguja en el centro La pata de cremalleras sirve para coser varios tipos de cremalleras y puede colocarse fácilmente hacia la izquierda o derecha de la aguja Cuando la cremallera se cose po...

Страница 79: ...esa elettrica a muro 2 Disporre il selettore dei punti sul punto diritto 3 Mettere la parte da rammendare sotto il piedino premistoffa assieme ad una tela di rinforzo 4 Abbassare il piedino premistoffa 5 Iniziare a cucire allontanando leggermente il tessuto da sé stessi e quindi tirandolo verso sé stessi 6 Ripetere questo movimento finché la parte da rammendare non è coperta da file parallele di p...

Страница 80: ...ire l applicazione sul tessuto nella posizione desiderata 2 Cucire accuratamente seguendo il contorno del motivo con un punto zigzag a lunghezza molto corta 3 Tagliare via il tessuto in eccesso esterno alla cucitura 4 Se necessario togliere l imbastitura NOTA Fissare l applicazione con cuciture di rinforzo con punto diritto all inizio e alla fine della cucitura ATTENZIONE Assicurarsi che l ago non...

Страница 81: ...eedle and lower the presser bar with the foot removed 6 Pull the lower thread up through the work at the starting position by turning the balance wheel and make a few holding stitches 7 Grip the hoop with the thumb and forefingers of both hands while pressing the fabric with the middle and third fingers and support ing the outside of the hoop with your smaller fingers MONOGRAMMING 1 Sew moving the...

Страница 82: ...do il cerchietto da ricamo velocemente si otterranno dei puntipiùlunghi mentremuovendololentamentesiverrannoprodot ti dei punti più corti 3 Terminata l esecuzione del motivo fissare la cucitura con alcuni punti diritti Monogramas y bordados Modelo de puntada Largo de Ancho de Prensatelas puntada puntada Puntada zigzag Fija 1 5 Quitarlo Puntada zigzag Cualquiera Fija 3 5 sin Puntada zigzag Fija 5 p...

Страница 83: ...e power supply plug from the outlet 2 Raise the needle and the presser foot 3 Loosenthepresserfootscrewtoremovethepresserfootholder See fig A 4 Attach the forked section of the connecting lever to the needle clamp install the walking foot to the presser bar See fig B 5 Lower the presser foot lever and then tighten the accessory presser bar holder fixing screw See fig C 1 Forked part of operation l...

Страница 84: ...ttenzione a non toccare l ago durante questa operazio ne per evitare lesioni personali ATTENZIONE Quando si cuce con il piedino mobile utilizzare una velocità da media a minima ACCESORIOS OPCIONALES Utilización del pie caminante Modelo de puntada Largo de puntada Ancho de puntada Puntada recta 0 Aguja en el centro Puntada zigazg 1 4 Fija 1 5 Puntada zigazg Fija 3 5 Puntada zigazg Fija 5 Este pie r...

Страница 85: ...Needle Clamp Screw CAUTION Be careful not to touch the needle during this time otherwise injury may result Use the screwdriver to tighten the presser foot holder screw securely If the screw is loose the needle may strike the presser foot and cause injury Be sure to turn the balance wheel toward the front of the machine to check that the needle does not strike the presser foot If the needle strikes...

Страница 86: ...ghezza del punto dipende da quanto velocemente si sposta il tessuto e dalla velocità della macchina Cucire muovendo lentamente il tessuto ACCESORIOS OPCIONALES Utilización del prensatelas enguatador accionado por muelle Modelo de puntada Largo de puntada Puntada recta Aguja en el centro Cualquiera El prensatelas enguatador accionado por muelle sirve para zurcir y para coser acolchados con libertad...

Страница 87: ...ilt See fig A 1 Set the Pattern Selection Dial to Straight Stitch Set the Stitch Length between 2 and 2 5 2 Change the foot to the 1 4 Inch Quilting Foot 1 Seam allowance 1 4 6 5 mm 3 Position the presser foot over the fabric and sew as shown in fig B and C Achieving an accurate seam allowance See fig B 2 Beginning of stitching 3 Align this mark with edge of fabric 4 End of stitching 5 Align this ...

Страница 88: ... 4 Fine della cucitura 5 Allineare questo segno con l orlo del tessuto Cucire rapidamente una trapunta vedere fig C 6 Parte superiore del tessuto 7 Cucitura 1 8 3 2 mm ACCESORIOS OPCIONALES Utilización del prensatela para pespunte 1 4 Modelo de puntada Largo de puntada Puntada recta Aguja en el centro 2 2 5 El prensatela para pespunte 1 4 se utiliza para coser costuras con una anchura fija de 6 5 ...

Страница 89: ...hine is on and foot controller is stepped on injuries may result To avoid burns give the light bulb time to cool before changing it 1 Remove the power supply plug from the outlet 2 Loosen the screw on the reverse side of sewing head as shown in fig A 3 Remove the light cover from the machine as illustrated in fig A 4 Replace the sewing light bulb See fig B 1 Bulb 1 Loosen 2 Tighten 5 Reattach the ...

Страница 90: ...ntale dalla macchina come illustrato in fig A 4 Sostituire la lampadina Vedere fig B 1 Lampadina 1 Allentare 2 Serrare 5 Rimontare la placca frontale e stringere la vite come mostrato in fig C Cambio de la bombilla PRECAUCIÓN Apague y desenchufe la máquina de coser de la corriente antes de cambiar la bombilla Si cambia la bombilla con la máquina encendida podrá sufrir una descarga eléctrica Si la ...

Страница 91: ...lf of race CAUTION Be sure to turn the balance wheel towards the front of the machine Turning the balance wheel in the other direction may damage the machine 6 Remove the race See fig C 7 Clean out lint and dust Use soft fabric to clean the race DO NOT OIL the race or shuttle See fig D 5 Race 6 Shuttle DO NOT OIL CAUTION Do not use a damaged race or shuttle Otherwise the thread may tangle and caus...

Страница 92: ...olla Installare la placca dell ago facendola scorrere verso sinistra l opposto della procedura di rimozione 7 Tacca sulla guida della navetta 8 Piano 9 Molla Limpieza PRECAUCIÓN Asegúrese de desenchufar la máquina antes de limpiarla De otra manera podría recibir una descarga eléctrica 1 Retire la clavija de la toma de corriente 2 Levante la aguja y el prensatelas 3 Suelte el tornillo del prensatel...

Страница 93: ...e If the problem continues the following check list may help you to improve the operation If you still have difficulties contact your nearest authorized service center No Page 33 Upper thread is not correctly installed No Page 31 No Page 9 No Page 38 No Page 38 Lower thread is tangled Needle is incorrectly inserted Thread tension is incorrect Thread tension is too tight No Page 33 Upper thread is ...

Страница 94: ... of needle size thread size fabric is incorrect No Page 7 Main power switch is turned off No Page 9 Inferior needle is used No Page 29 The bobbin winder shaft is slid to the right No Page 33 Thread is tangled No Page 55 Not available on models XL 6040 XL 6041 XL 6042 and XL 6043 The buttonhole lever is pushed toward the back of the machine NEEDLE BREAKS No Page 9 Needle is not correctly inserted N...

Страница 95: ...es demasiada fuerte No Página 34 El hilo superior está enredado No Página 34 Los hilos no están bien enhebrados No Página 38 El hilo superior es demasiado tirante No Página 39 No Página 10 El tamaño de la aguja no corresponde La combinación tamaño de aguja grueso de hilo tejido no es correcta No Página 34 El carrete está mal colocado No Página 10 La aguja está doblada o gastada No Página 39 La com...

Страница 96: ...ilo tejido no es correcta No Página 7 El interruptor principal está apagado No Página 10 Se está usando una aguja inferior No Página 30 El eje de bobinado de la canilla está deslizado hacia la derecha No Página 34 El hilo está enredado No Página 56 No disponible en los modelos XL 6040 XL 6041 XL 6042 and XL 6043 La palanca de ojales está colocada hacia atrás LA AGUJA SE ROMPE No Página 10 La aguja...

Страница 97: ...etta No Pag 34 Il filo superiore è aggrovigliato No Pag 34 L infilatura non è corretta No Pag 38 La tensione del filo superiore è troppo stretta No Pag 40 No Pag 10 Si sta usando un ago sbagliato La combinazione fra ago filo e tessuto è sbagliata No Pag 34 La capsula non è inserita correttamente No Pag 10 L ago è piegato o spuntato No Pag 40 La combinazione fra ago filo e tessuto è sbagliata No Pa...

Страница 98: ...g 40 La combinazione fra ago filo e tessuto è sbagliata No Pag 7 L interruttore principale è spento No Pag 10 Si sta usando un ago di misura inferiore No Pag 30 L alberino di avvolgimento spolina è spostato verso destra No Pag 34 Il filo è aggrovigliato No Pag 56 Non disponibile sui modelli XL 6040 XL 6041 XL 6042 e XL6043 La leva dell occhiel lo è premuta verso il retro della macchina L AGO SI SP...

Страница 99: ...izzo di materiali di imballaggio inadatti possono danneggiare la macchinaduranteiltrasporto Sonoillustrateleistruzionipereseguire l imballaggio della macchina IMPORTANTE I materiali di imballaggio sono studiati in modo da proteggere la macchina durante il trasporto Conservare questi materiali nel caso si debba trasportare la macchina da cucire Embalaje de la máquina Guarde la caja de cartón y el e...

Страница 100: ... 65 H Hole for Vertical Spool Pin 37 L Lower Threading 31 M Main Power Sewing Light Switch 7 Monogramming 69 Page N Needle Inspection 9 Replacement 9 O Overedge Stitching 53 P Parallelogram Stitch 51 Patchwork 52 Pattern Indication Window 13 Pattern Selection Dial 13 Performance Check List 81 Presser Foot Lever 33 Principal parts 1 R Race 79 Rampart Stitch 49 Repacking the Machine 87 Reverse Sewin...

Страница 101: ...tabobinas vertical 37 Página P Palanca de ojales 56 Palanca del prensatelas 34 Pata de cremalleras 4 66 Patchwork 52 Pedal 8 Pie caminante 4 72 Pista de la lanzadera 80 Plataforma con compartimento de accesorios 12 27 Prensatela para pespunte 1 4 4 76 Prensatelas enguatador 4 74 Prensatelas zigzag 4 11 Pulsador de retroceso 26 Puntada de acción doble 49 Puntada decorativa 51 Puntada decorativa inv...

Страница 102: ...istoffa a zigzag 4 11 Piedino semovente 4 72 Portarocchetto e fermarocchetto 28 34 Presa del reostato a pedale 6 Pulizia 80 Punto a conchiglia elastico 53 Punto a ponte 49 Pagina Punto bastione 49 Punt a conchiglia 47 Punto decorativo 51 Punto diritto 42 66 67 Punto doppio 49 Punto elastico 48 Punto elastico invisibile 46 Punto elastico triplo 42 Punto fagoting 52 Punto freccia 51 Punto orlo decor...

Страница 103: ......
Отзывы: