- 5 -
[ English ]
How to Set Up the Stapler Finisher
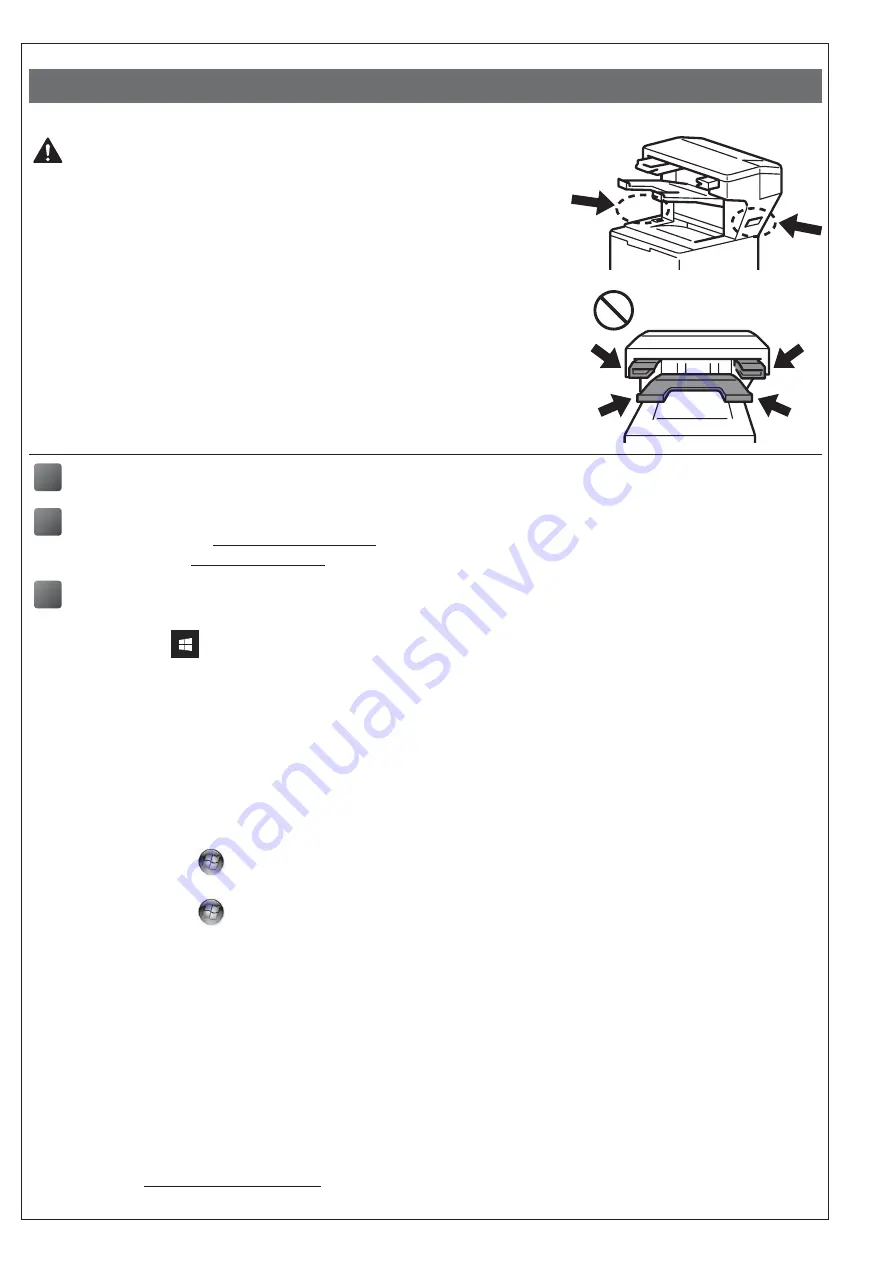
CAUTION
•
The printer must be powered off before attaching the Stapler Finisher.
• Be careful not to pinch your fingers when you install or remove the Stapler
Finisher unit.
•
When connecting or disconnecting the Stapler Finisher, face the printer and
use the handholds on either side to grasp the Stapler Finisher firmly.
DO NOT try to lift the Stapler Finisher using any other parts or openings, as
this could cause injury or damage to the Stapler Finisher.
•
DO NOT put your hands on the moving parts shown in the illustrations. Doing
this may cause injury to your fingers.
•
Remove the Stapler Finisher before moving the printer.
DO NOT lift or move the printer when the Stapler Finisher is connected. The
Stapler Finisher is not securely attached to the printer and moving it may
cause injury or damage to the printer.
1
Connect the Stapler Finisher to your printer and turn the printer on
2
(HL-L63XX and HL-L64XX series only)
Update your printer's firmware and driver
• Firmware: Go to
and check for the latest firmware release.
• Driver: Go to
support.brother.com and search your model's
Downloads
page.
3
Configure your printer driver to use the Stapler Finisher
A
• For Windows 10, Windows Server 2016, and Windows Server 2019:
Click
>
Windows System
>
Control Panel
. In the
Hardware and Sound
group, click
V
iew devices and printers
.
• For Windows Server 2012 R2:
Click
Control Panel
on the
Start
screen. In the
Hardware
group, click
View devices and printers
.
• For Windows 8, Windows 8.1, and Windows Server 2012:
Move your mouse to the lower right corner of your desktop. When the menu bar appears,
click
Settings
>
Control Panel
. In the
Hardware and Sound
(
Hardware
) group, click
View devices and printers
.
• For Windows 7 and Windows Server 2008 R2:
Click the
(
Start
) button >
Devices and Printers
.
• For Windows Vista and Windows Server 2008 (HL-L63XX and HL-L64XX series only):
Click the
(
Start
) button >
Control Panel
>
Hardware and Sound
>
Printers
.
• For Windows XP and Windows Server 2003 (HL-L63XX and HL-L64XX series only):
Click
Start
>
Printers and Faxes
.
B
Right-click the
Brother XXXX series
or
Brother XXXX series Printer
icon (where XXXX is your model
name) and select
Printer properties
(
Properties
), and
Brother XXXX series
if necessary. The printer
properties dialog box appears.
C
Click the
Device Settings
tab, and then click
Auto Detect
. When the Stapler Finisher has been detected,
click
Apply
. (Under certain conditions
Auto Detect
may not be available. If this occurs, manually add the
Stapler Finisher: Under
Available Options
select
Stapler Finisher
, click
Add
, and then click
Apply
.)
NOTE •
The Macintosh printer driver is not supported.
•
All referenced trademarks and registered trademarks are the property of their respective companies.
•
For more information about the Stapler Finisher unit, see the
Stapler Finisher Online User's Guide
at
Содержание SF-4000
Страница 5: ... 4 3 4 5 ...
Страница 36: ......


