Brother Operating Instructions Скачать руководство пользователя страница 137

Settings and features tables 

125

C

 Toner

C

 Wi-Fi Setup

C

NOTE

After Wi-Fi is set up, you cannot change the settings from your More screen. Change the 
settings for Wi-Fi in the Settings screen.
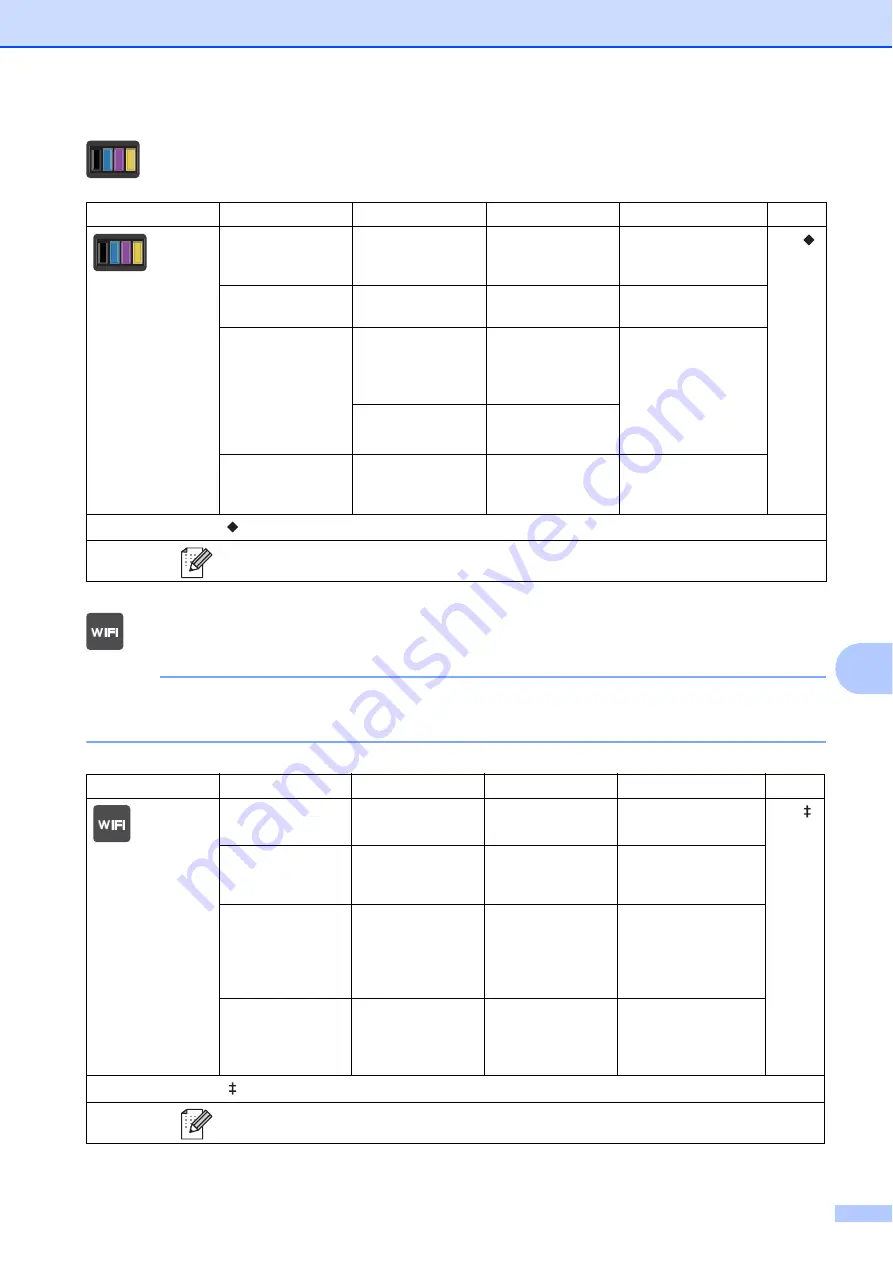
 

Level 1

Level 2

Level 3

Options

Descriptions

See Page

Toner Life

View the approximate 
remaining toner life 
for each color.

See .

Test Print

Print the Test Print 
page.

Calibration

Calibrate

Yes

No

Adjust the color 
density or returns the 
color calibration to the 
factory settings.

Reset

Yes

No

Auto Regist.

Yes

No

Adjust the print 
position of each color 
automatically.

 See Advanced User’s Guide.

The factory settings are shown in Bold with an asterisk.

Level 1

Level 2

Level 3

Options

Descriptions

See Page

Setup Wizard

Configure your 
internal print server.

See .

Setup with PC

Configure the Wi-Fi 
settings using a 
computer.

WPS/AOSS

Easily configure your 
wireless network 
settings using the 
one-button push 
method.

WPS w/PIN Code

Easily configure your 
wireless network 
settings using WPS 
with a PIN code.

 See Quick Setup Guide.

The factory settings are shown in Bold with an asterisk.

Содержание Operating Instructions

Страница 1: ...Basic User s Guide HL 3180CDW In USA Visit the Brother Solutions Center at solutions brother com manuals to download other manuals Version 0 USA CAN ...

Страница 2: ...ttp www brother com registration By registering your product with Brother you will be recorded as the original owner of the product Your registration with Brother may serve as confirmation of the purchase date of your product should you lose your receipt may support an insurance claim by you in the event of product loss covered by insurance and will help us notify you of enhancements to your produ...

Страница 3: ...pecial offers Register your new product online at http www brother com registration FAQs frequently asked questions The Brother Solutions Center is our one stop resource for all your Printer Multi Function Center needs You can download the latest software and utilities and read FAQs and troubleshooting tips to learn how to get the most from your Brother product http support brother com NOTE You ca...

Страница 4: ...ity results use only genuine Brother accessories which are available at most Brother retailers If you cannot find the accessory you need and you have a Visa MasterCard Discover or American Express credit card you can order accessories directly from Brother You can visit us online for a complete selection of the Brother accessories and supplies that are available for purchase NOTE In Canada only Vi...

Страница 5: ...x 1 400 pages 1 2 3 TN 225C Approx 2 200 pages 1 2 4 Toner Cartridge Magenta TN 221M Approx 1 400 pages 1 2 3 TN 225M Approx 2 200 pages 1 2 4 Toner Cartridge Yellow TN 221Y Approx 1 400 pages 1 2 3 TN 225Y Approx 2 200 pages 1 2 4 4 pcs Drum Unit DR 221CL Approx 15 000 pages 5 6 7 1 pc Drum Unit Black DR 221CL BK Approx 15 000 pages 5 6 8 1 pc Drum Unit Color DR 221CL CMY Approx 15 000 pages 5 6 ...

Страница 6: ... LIKE ARISING OUT OF THE USE OR INABILITY TO USE THE SOFTWARE EVEN IF BROTHER S LICENSOR HAS BEEN ADVISED OF THE POSSIBILITY OF SUCH DAMAGES BECAUSE SOME STATES IN THE USA AND SOME PROVINCES IN CANADA DO NOT ALLOW THE EXCLUSION OR LIMITATION OF LIABILITY FOR CONSEQUENTIAL OR INCIDENTAL DAMAGES THE ABOVE LIMITATIONS MAY NOT APPLY TO YOU IN ANY EVENT BROTHER S LICENSOR S LIABILITY TO YOU FOR ACTUAL ...

Страница 7: ...his Guide provides useful information about wireless network settings and security settings using the Brother machine You can also find supported protocol information for your machine and detailed troubleshooting tips For USA PDF file Brother Solutions Center 1 For Other Countries PDF file CD ROM In the Box Wi Fi Direct Guide This Guide provides information about how to configure and use your Brot...

Страница 8: ...uide provides information for using AirPrint to print from OS X v10 7 x 10 8 x and your iPhone iPod touch iPad or other iOS device to your Brother machine without installing a printer driver PDF file Brother Solutions Center 1 Which Guide What s in it Where is it ...

Страница 9: ...ng the Ready screen 13 Basic Operations 13 Shortcut Settings 14 Adding Copy Shortcuts 14 Adding Scan Shortcuts 15 Adding Web Connect Shortcuts 16 Changing Shortcuts 16 Editing Shortcut Names 17 Deleting Shortcuts 17 Recalling Shortcuts 17 2 Loading paper 18 Loading paper and print media 18 Loading paper in the paper tray 18 Loading paper in the manual feed slot 20 Unscannable and unprintable areas...

Страница 10: ...g the waste toner box 64 B Troubleshooting 69 Identifying your problem 69 Error and maintenance messages 71 Paper Jams 77 Paper is jammed in the manual feed slot 77 Paper is jammed in the paper tray 77 Paper is jammed at the output paper tray 78 Paper is jammed at the back of the machine 79 Paper is jammed inside the machine 81 Paper is jammed underneath the paper tray 84 If you are having difficu...

Страница 11: ...ix D Specifications 129 General 129 Document Size 131 Print media 132 Copy 133 Scanner 134 Printer 135 Interfaces 136 Network 137 Computer requirements 138 Consumable items 139 E Index 140 ...

Страница 12: ...ide explains the following features and operations 1 General Setup Memory storage Volume setting Automatic Daylight Saving Time Ecology features Touchscreen 2 Security features Secure Function Lock 2 0 Setting Lock 3 Printing reports Reports 4 Making copies Copy settings A Routine maintenance Cleaning and checking the machine Replacing periodic maintenance parts Packing and shipping the machine B ...

Страница 13: ...OTE Notes tell you how you should respond to a situation that may arise or give tips about how the current operation works with other features Follow all warnings and instructions marked on the product General information 1 Electrical Hazard icons alert you to a possible electrical shock Fire Hazard icons alert you to the possibility of fire Hot Surface icons warn you not to touch machine parts th...

Страница 14: ...n make your selections either by tapping the screen or by clicking with your mouse After the printer driver is installed appears on both the Start screen and the desktop a Tap or click Brother Utilities either on the Start screen or the desktop b Select your machine c Choose the function you want to use ...

Страница 15: ...ms Brother HL XXXX where XXXX is your model name from the programs group and then choose User s Guides Windows 8 Windows Server 2012 Click Brother Utilities and then click the drop down list and select your model name if not already selected Click Support in the left navigation bar and then click User s Guides If you have not installed the software you can find the documentation on the CD ROM by f...

Страница 16: ...s you can scan documents You can find the instructions as follows Software User s Guide Scanning ControlCenter Network Scanning Nuance PaperPort 12SE How to Guides Windows users The complete Nuance PaperPort 12SE How to Guides can be viewed from the Help selection in the Nuance PaperPort 12SE application Presto PageManager User s Guide Macintosh users NOTE Presto PageManager is available as a down...

Страница 17: ...ting the Wi Fi Direct standard Google Cloud Print Guide 1 This Guide provides information about how to configure your Brother machine to a Google account and use Google Cloud Print services for printing over the Internet Mobile Print Scan Guide for Brother iPrint Scan 1 This Guide provides useful information about printing from your mobile device and scanning from your Brother machine to your mobi...

Страница 18: ... Brother online shopping mall http www brothermall com for additional product and service information click Brother Mall com To access Canada s Brother online shopping mall http www brother ca for additional product and services information click Shop Online Canada For the latest news and product support information http support brother com click Brother Solutions Center To visit our website for o...

Страница 19: ...nstall Presto PageManager click Presto PageManager To access the Brother Web Connect application web page click Brother Web Connect To register your machine from the Brother Product Registration Page http www brother com registration click On Line Registration For the latest news and product support information http support brother com click Brother Solutions Center To visit our website for origin...

Страница 20: ... has a 3 7 in Touchscreen LCD and Touchpanel 1 3 7 in Touchscreen LCD Liquid Crystal Display This is a Touchscreen LCD You can access the menus and options by pressing them as they are displayed on this screen 1 800 䣕䣧䣥䣷䣴䣧 䢢䢢䣒䣴䣫䣰䣶 䢢 䢢䢢䣙䣧䣤 䣏䣱䣴䣧 䣅䣱䣲䣻 䣕䣥䣣䣰 ...

Страница 21: ...ation when illuminated in red Numerical Pad Press the numbers on the Touchpanel to enter the number of copies 3 Power On Off Press to turn on the machine Press and hold down to turn off the machine The Touchscreen LCD will show Shutting Down and will stay on for a few seconds before going off 4 The Wi Fi light is on when the network interface is WLAN 3 2 4 ...

Страница 22: ...setup Toner levels Setup screen Secure Print and Web Shortcut When the More screen is displayed the machine is in Ready mode If Secure Function Lock 1 has been turned on an icon is displayed 1 See Advanced User s Guide Secure Function Lock 2 0 Shortcut screens You can quickly create a Shortcut for frequently used functions such as making a copy scanning and Web Connect for more information see Sho...

Страница 23: ...er menu NOTE The indication of remaining toner life will vary depending on the types of documents printed and customer s usage 4 Settings Press to access the main settings for more information see Settings screen on page 12 5 Secure Print Lets you access the secure print menu 6 Web Press to connect the Brother machine to an Internet service for more information see Web Connect Guide 7 Shortcuts Pr...

Страница 24: ...ettings from the following screen 1 Toner See the remaining toner life Press to access the Toner menu 2 Network Press to set up a network connection A four level indicator on the screen shows the current wireless signal strength if you are using a wireless connection 3 Date Time See the date and time Press to access the Date Time menu 4 Volume See the selected Beep volume level Press to access the...

Страница 25: ... Shortcuts 3 i Press The machine will go to your chosen Home screen Basic Operations 1 Press your finger on the Touchscreen to operate it To display and access all the screen menus or options swipe left right up down or press d c or a b to scroll through them IMPORTANT DO NOT press the Touchscreen with a sharp object such as a pen or stylus It may damage the machine The following steps show how to...

Страница 26: ...gs can be included in a copy Shortcut Quality Enlarge Reduce Density Contrast Stack Sort Page Layout Color Adjust 2 sided Copy Remove Background Color a If the displayed screen is More swipe left or right or press d or c to display a Shortcut screen b Press where you have not added a Shortcut c Press Copy d Read the information on the Touchscreen and then confirm it by pressing OK e Swipe up or do...

Страница 27: ...e type of scan you want and then press it e Do one of the following If you pressed to OCR to File to Image or to E mail read the information on the Touchscreen and then press OK to confirm it Go to step f If you pressed to FTP or to Network read the information on the Touchscreen and then press OK to confirm it Swipe up or down or press a or b to display the Profile Name and then press it Press OK...

Страница 28: ...eeds a PIN code enter the PIN for the account using the keyboard on the Touchscreen Press OK g Press the function you want NOTE The functions that can be set vary depending on the selected service h Read and confirm the displayed list of functions you selected and then press OK i Press OK to save your Shortcut NOTE The Shortcut name will be assigned automatically If you want to change the Shortcut...

Страница 29: ...ortcut until the dialog box appears NOTE You can also press All Settings and Shortcut Settings b Press Edit Shortcut Name c To edit the name hold down to delete the current name and then enter a new name using the keyboard on the Touchscreen To help you enter letters see Entering text on page 128 Press OK Deleting Shortcuts 1 You can delete a Shortcut a Press and hold the Shortcut until the dialog...

Страница 30: ...ding paper in the paper tray 2 You can load up to 250 sheets in the paper tray Paper can be loaded up to the maximum paper mark on the right side of the paper tray for the recommended paper to use see Acceptable paper and other print media on page 26 Printing on plain paper thin paper or recycled paper from the paper tray 2 a Pull the paper tray completely out of the machine b While pressing the g...

Страница 31: ... to be printed on is face down The paper guides touch the sides of the paper so it will feed correctly e Put the paper tray firmly back in the machine Make sure the tray is completely inserted into the machine f Lift up the support flap 1 to prevent paper from sliding off the face down output tray or remove each page as soon as it comes out of the machine 1 1 ...

Страница 32: ... media on page 26 NOTE The machine turns on the Manual Feed mode when you put paper in the manual feed slot Printing on plain paper thin paper recycled paper and bond paper from the manual feed slot 2 a Lift up the support flap 1 to prevent paper from sliding off the face down output tray or remove each page as soon as it comes out of the machine b Open the manual feed slot cover c Use both hands ...

Страница 33: ...l feed slot with the side to be printed on face up Make sure the paper is straight and in the correct position on the manual feed slot If it is not the paper may not be fed correctly resulting in a skewed printout or a paper jam Pull the paper out completely when you retry putting the paper into the manual feed slot Do not put more than one sheet of paper in the manual feed slot at any one time as...

Страница 34: ... of the machine Use this paper feed and output method for printing on thick paper labels envelopes or glossy paper a Open the back cover face up output tray b For printing envelopes only Pull down the two gray levers one on the left side and one on the right side as shown in the illustration c Open the manual feed slot cover d Use both hands to slide the manual feed slot paper guides to the width ...

Страница 35: ...er from the manual feed slot even if Manual is not selected as the paper source Make sure the paper or envelope is straight and in the correct position in the manual feed slot If it is not the paper or envelope may not feed correctly resulting in a skewed printout or a paper jam Pull the paper or envelope out completely when you retry putting the paper into the manual feed slot Do not put more tha...

Страница 36: ...ettings in the application you are using Usage Document Size Top 1 Bottom 3 Left 2 Right 4 Copy Letter 0 16 in 4 mm 0 16 in 4 mm a single copy or a 1 in 1 copy A4 0 16 in 4 mm 0 12 in 3 mm Scan Letter 0 12 in 3 mm 0 12 in 3 mm A4 0 12 in 3 mm 0 12 in 3 mm Print Letter 0 16 in 4 2 mm 0 16 in 4 2 mm A4 0 16 in 4 2 mm 0 16 in 4 2 mm Legal 0 16 in 4 2 mm 0 16 in 4 2 mm 1 3 2 4 ...

Страница 37: ... A5 A5 L Long Edge A6 and Folio a Press b Press Tray Setting c Press Paper Size d Swipe up or down or press a or b to display Letter A4 Legal EXE A5 A5 L A6 or Folio and press the option you want e Press Paper Type 2 To get the best print quality set the machine for the type of paper you are using a Press b Press Tray Setting c Press Paper Type d Swipe up or down or press a or b to display Thin Pl...

Страница 38: ...ly after printing Before you buy a lot of paper test a small quantity to make sure the paper is appropriate for the machine Use labels that are designed for use in laser machines Recommended paper and print media 2 To get the best print quality we recommend using the paper in the table Type and size of paper 2 The machine feeds paper from the installed paper tray or the manual feed slot The names ...

Страница 39: ...per size Paper types No of sheets Paper Tray Tray 1 Letter A4 Legal B5 JIS Executive A5 A5 L A6 Folio 1 Plain paper Thin paper Recycled paper up to 250 20 lb 80 g m2 Manual Feed Slot Width 3 0 to 8 5 in 76 2 to 215 9 mm Length 4 57 to 14 in 116 to 355 6 mm Plain paper Thin paper Thick paper Thicker paper Bond paper Recycled paper Envelopes Labels Glossy paper 1 sheet 1 Envelope Basis weight 20 24 ...

Страница 40: ...process If you use bond paper paper having a rough surface or paper that is wrinkled or creased the paper may exhibit degraded performance Types of paper to avoid 2 IMPORTANT Some types of paper may not perform well or may cause damage to your machine DO NOT use paper that is highly textured that is extremely smooth or shiny that is curled or warped 1 A curl of 0 08 in 2 mm or greater may cause ja...

Страница 41: ...r tie strings with self adhesive closures that are of a baggy construction that are not sharply creased that are embossed raised writing that were previously printed by a laser or LED machine that are pre printed on the inside that cannot be arranged neatly when stacked that are made of paper that weighs more than the paper weight specifications for the machine with edges that are not straight or ...

Страница 42: ...ls with spaces may result in labels peeling off and causing serious jams or print problems All labels used in this machine must be able to withstand a temperature of 392 F 200 C for a period of 0 1 seconds Labels can only be fed through the manual feed slot Types of labels to avoid 2 Do not use labels that are damaged curled wrinkled or an unusual shape IMPORTANT Avoid feeding labels with the carr...

Страница 43: ... Supported 3 How to load documents 3 a Lift the document cover b Using the document guidelines on the left and top place the document face down in the upper left corner of the scanner glass c Close the document cover IMPORTANT If the document is a book or is thick do not slam the cover or press on it Loading documents 3 Length Up to 11 8 in 300 0 mm Width Up to 8 5 in 215 9 mm Weight Up to 4 4 lb ...

Страница 44: ...ou can copy with a variety of settings that are already set up for you in the machine simply by pressing them The following preset settings are available Receipt Normal 2in1 ID 2in1 2 sided 1i2 Paper Save a Load your document b Press Copy c Swipe left or right to display Receipt Normal 2in1 ID 2in1 2 sided 1i2 or Paper Save and then press the option you want d Enter the number of copies you want e...

Страница 45: ... 4 You can change the following copy settings Press Copy and then press Options Swipe up or down or press a or b to scroll through the copy settings When the setting you want is displayed press it and choose your option When you have finished changing the options press OK Advanced User s Guide For more information about changing the following settings see Advanced User s Guide Copy settings Qualit...

Страница 46: ...see Quick Setup Guide b From your application choose the Print command c Choose the name of your machine in the Print dialog box and click Properties or Preferences depending on the application you are using d Choose the settings you want to change in the Properties dialog box and then click OK Paper Size Orientation Copies Media Type Print Quality Color Mono Document Type Multiple Page 2 sided Bo...

Страница 47: ...f the machine is on a network configure it with a TCP IP address Install the scanner drivers from the CD ROM see Quick Setup Guide Install MFL Pro Suite Configure the machine with a TCP IP address if network scanning does not work see Software User s Guide How to scan to a computer 6 ...

Страница 48: ... on your computer a Load your document see How to load documents on page 31 b Do one of the following Windows XP Windows Vista and Windows 7 Open ControlCenter4 by clicking Start All Programs Brother XXX XXXX where XXX XXXX is your model name ControlCenter4 The ControlCenter4 application will open Windows 8 Click Brother Utilities and then click the drop down list and select your model name if not...

Страница 49: ...ter 37 6 d Make sure the machine you want to use is selected from the Model pull down list e Click File f Press Scan The machine starts the scanning process The folder where the scanned data is saved will open automatically ...

Страница 50: ...ted in blue d Press OK When the machine is connected to a network press the computer name Do one of the following If you want to use the default settings go to step i If you want to change the default settings go to step e e Press Options f Press Set with Touch Panel Press On g Choose the settings for Scan Type Resolution File Type Scan Size and Remove Background Color as needed h Press OK i Press...

Страница 51: ...6 NOTE The following scan modes are available to Network Windows to FTP to E mail to Image to OCR to File WS Scan 1 Web Services Scan 1 Windows users only Windows Vista SP2 or later Windows 7 and Windows 8 See Software User s Guide ...

Страница 52: ...ge are two separate consumables Make sure both are installed as an assembly If the toner cartridge is placed in the machine without the drum unit the message Drum may be displayed Routine maintenance A Toner cartridge Drum unit See Replacing the toner cartridges on page 44 Order No TN 221BK TN 221C TN 221M TN 221Y TN 225C TN 225M TN 225Y See Replacing the drum units on page 54 Order No DR 221CL 4 ...

Страница 53: ...andard toner cartridge 6 High yield toner cartridge Touchscreen messages Consumable item to get ready Approximate life How to replace Order No Toner Low Prepare New Toner Cartridge Toner cartridge BK Black C Cyan M Magenta Y Yellow Black 2 500 pages 1 2 5 Cyan Magenta Yellow 1 400 pages 1 2 5 2 200 pages 1 2 6 See page 44 TN 221BK 5 TN 221C 5 TN 221M 5 TN 221Y 5 TN 225C 6 TN 225M 6 TN 225Y 6 Drum ...

Страница 54: ...ack C Cyan M Magenta Y Yellow Black 2 500 pages 1 2 5 Cyan Magenta Yellow 1 400 pages 1 2 5 2 200 pages 1 2 6 See page 44 TN 221BK 5 TN 221C 5 TN 221M 5 TN 221Y 5 TN 225C 6 TN 225M 6 TN 225Y 6 Replace DrumX Drum unit X BK C M Y BK Black C Cyan M Magenta Y Yellow 15 000 pages 1 3 4 See page 55 4 Drum units DR 221CL 1 Drum unit DR 221CL BK DR 221CL CMY Drum Stop Drum unit Replace Belt Belt unit 50 0...

Страница 55: ...nsumable items on a piece of paper to prevent accidentally spilling or scattering the material inside If you use paper that is not a direct equivalent for the recommended paper the life of consumable items and machine parts may be reduced The projected life for each of the toner cartridges is based on ISO ICE 19798 Frequency of replacement will vary depending on the print volume percentage of cove...

Страница 56: ...cuments printed and customer s usage It is a good idea to keep a new toner cartridge ready for use when you see the Toner Low warning To ensure high quality printing we recommend that you use only Genuine Brother Brand toner cartridges When you want to buy toner cartridges call Brother Customer Service We recommend that you clean the machine when you replace the toner cartridge see Advanced User s...

Страница 57: ...l it locks in the open position c Remove the toner cartridge and drum unit assembly for the color shown on the Touchscreen WARNING HOT SURFACE After you have just used the machine some internal parts of the machine will be extremely hot Wait for the machine to cool down before you touch the internal parts of the machine ...

Страница 58: ... Push down the green lock lever and take the toner cartridge out of the drum unit WARNING DO NOT put a toner cartridge or a toner cartridge and drum unit assembly into a fire It could explode resulting in injuries DO NOT use flammable substances any type of spray or an organic solvent liquid containing alcohol or ammonia to clean the inside or outside of the product Doing so could cause a fire or ...

Страница 59: ...underneath it in case you accidentally spill or scatter toner NOTE Be sure to seal up the used toner cartridge tightly in a bag so that toner powder does not spill out of the cartridge Visit http www brother com original index html for instructions on how to return your used consumable items to the Brother collection program If you choose not to return your used consumable discard the used consuma...

Страница 60: ...trongly recommend that you continue to use only Genuine Brother Brand replacement toner cartridges Use or attempted use of third party toner and or cartridges in the Brother machine may cause damage to the machine and or may result in unsatisfactory print quality Our limited warranty coverage does not apply to any problem that is caused by the use of third party toner and or cartridges To protect ...

Страница 61: ...rum unit h Clean the corona wire inside the drum unit by gently sliding the green tab from left to right and right to left several times NOTE Be sure to return the tab to the Home position a 1 The arrow on the tab must be aligned with the arrow on the drum unit If it is not printed pages may have a vertical stripe i Repeat step c and step h to clean each of three remaining corona wires NOTE When c...

Страница 62: ...cartridge color to the same color label on the machine BK Black C Cyan M Magenta Y Yellow k Close the top cover of the machine NOTE After replacing a toner cartridge DO NOT turn off the machine or open the top cover until the Touchscreen clears the Please wait message and returns to Ready mode BK C M Y ...

Страница 63: ...orona wires as follows a Open the top cover until it locks in the open position b Remove the toner cartridge and drum unit assembly WARNING HOT SURFACE After you have just used the machine some internal parts of the machine will be extremely hot Wait for the machine to cool down before you touch the internal parts of the machine ...

Страница 64: ...mage to the machine from static electricity DO NOT touch the electrodes shown in the illustration c Clean the corona wire inside the drum unit by gently sliding the green tab from left to right and right to left several times NOTE Be sure to return the tab to the Home position a 1 The arrow on the tab must be aligned with the arrow on the drum unit If it is not printed pages may have a vertical st...

Страница 65: ...tch the toner cartridge color to the same color label on the machine BK Black C Cyan M Magenta Y Yellow e Repeat steps b d to clean the three remaining corona wires NOTE When cleaning the corona wires you do not have to remove the toner cartridge from the drum unit f Close the top cover of the machine BK C M Y ...

Страница 66: ...d an individual drum DR 221CL BK for Black and DR 221CL CMY for Color for reasons other than reaching its rated life For your convenience Brother sells the drum units as a set of four DR 221CL NOTE There are many factors that determine the actual drum life such as the temperature humidity type of paper type of toner used and so on Under ideal conditions the average drum life is estimated at approx...

Страница 67: ...placement reset the drum counter by following the instructions included with the new drum unit see Resetting the drum counter on page 60 Drum Stop A We cannot guarantee the print quality Replace the drum unit with a new one We recommend a genuine Brother drum unit be installed at this time After replacement reset the drum counter by following the instructions included with the new drum unit see Re...

Страница 68: ...xtremely hot Wait for the machine to cool down before you touch the internal parts of the machine IMPORTANT We recommend that you place the toner cartridge and drum unit assembly on a clean flat surface with disposable paper underneath it in case you accidentally spill or scatter toner To prevent damage to the machine from static electricity DO NOT touch the electrodes shown in the illustration ...

Страница 69: ... an organic solvent liquid containing alcohol or ammonia to clean the inside or outside of the product Doing so could cause a fire or electrical shock Instead use only a dry lint free cloth See Product Safety Guide To use the product safely IMPORTANT Handle the toner cartridge carefully If toner scatters on your hands or clothes immediately wipe or wash it off with cold water To avoid print qualit...

Страница 70: ...onsumable items to the Brother collection program If you choose not to return your used consumable discard the used consumable according to local regulations keeping it separate from domestic waste If you have questions call your local waste disposal office e Unpack the new drum unit f Pull off the protective cover g Put the toner cartridge firmly into the new drum unit until you hear it lock into...

Страница 71: ... arrow on the drum unit If it is not printed pages may have a vertical stripe i Repeat step c and step h to clean each of the three remaining corona wires NOTE When cleaning the corona wires you do not have to remove the toner cartridge from the drum unit j Slide each toner cartridge and drum unit assembly into the machine Make sure you match the toner cartridge color to the same color label on th...

Страница 72: ... i Press the color of the drum unit you replaced j Press Yes k Press Replacing the belt unit A Order No BU 220CL A new belt unit can print approximately 50 000 Letter or A4 size single sided pages Replace Belt A When the Replace Belt message appears on the Touchscreen you must replace the belt unit After replacement reset the belt unit by following the instructions included with the new belt unit ...

Страница 73: ...ly hot Wait for the machine to cool down before you touch the internal parts of the machine IMPORTANT We recommend that you place the toner cartridge and drum unit assemblies on a clean flat surface with disposable paper underneath them in case you accidentally spill or scatter toner To prevent damage to the machine from static electricity DO NOT touch the electrodes shown in the illustration ...

Страница 74: ...f the belt unit and lift the belt unit up and then pull it out IMPORTANT To avoid print quality problems DO NOT touch the shaded parts shown in the illustrations e Unpack the new belt unit and put the new belt unit in the machine ...

Страница 75: ...e Resetting the belt unit counter A When you replace a belt unit with a new one you will must reset the belt unit counter by completing the following steps a Press to interrupt the error b Press c Press All Settings d Swipe up or down or press a or b to display Machine Info e Press Machine Info f Press Parts Life g Touch the dial pad area to light up the LEDs h Press until the Touchscreen message ...

Страница 76: ...efore you get a Replace WT Box message Replace WT Box A When the Replace WT Box message appears on the Touchscreen you must replace the waste toner box a Make sure the machine is turned on b Open the top cover until it locks in the open position c Remove all of the toner cartridge and drum unit assemblies WARNING HOT SURFACE After you have just used the machine some internal parts of the machine w...

Страница 77: ...erneath them in case you accidentally spill or scatter toner To prevent damage to the machine from static electricity DO NOT touch the electrodes shown in the illustration d Hold the green handle of the belt unit and lift the belt unit up and then pull it out IMPORTANT To avoid print quality problems DO NOT touch the shaded parts shown in the illustrations ...

Страница 78: ... are replacing the waste toner box for the first time and is not required for the replacement waste toner box The orange packing piece is installed at the factory to protect your machine during shipment f Hold the green handle of the waste toner box and remove the waste toner box from the machine ...

Страница 79: ...r electrical shock Instead use only a dry lint free cloth See Product Safety Guide To use the product safely IMPORTANT DO NOT reuse the waste toner box NOTE Be sure to seal up the waste toner box tightly in a bag so that toner powder does not spill out of the waste toner box Discard the used waste toner box according to local regulations keeping it separate from domestic waste If you have question...

Страница 80: ...ne i Slide each toner cartridge and drum unit assembly into the machine making sure you match the toner cartridge colors to the same color labels on the machine BK Black C Cyan M Magenta Y Yellow j Close the top cover of the machine BK C M Y ...

Страница 81: ...f the machine does not turn on after connecting the power cord see Other difficulties on page 90 All of the protective parts have been removed Paper is inserted correctly in the paper tray The interface cables are securely connected to the machine and the computer or the wireless connection is set up on both the machine and your computer Touchscreen Messages See Error and maintenance messages on p...

Страница 82: ...70 Software and Network problems Software difficulties on page 88 Network difficulties on page 89 ...

Страница 83: ...u want to use is restricted by Secure Function Lock 2 0 Call your administrator to check your Secure Function Lock Settings Calibration failed Calibration failed Press OK and try it again Press and hold down to turn off the machine Wait a few seconds and then turn on the machine again Perform the color calibration again using the Touchscreen or the printer driver see Advanced User s Guide Calibrat...

Страница 84: ...its must be cleaned Clean the corona wires on the drum units see Cleaning the corona wires on page 51 The drum unit or the toner cartridge and drum unit assembly is not installed correctly Put the toner cartridge into the drum unit that is indicated on the Touchscreen Then reinstall the toner cartridge and drum unit assembly into the machine Drum End SoonX 1 1 X shows the drum unit color that is n...

Страница 85: ... not installed correctly Reinstall the belt unit see Replacing the belt unit on page 60 No Paper The machine is out of paper in the paper tray or paper is not correctly loaded in the paper tray Do one of the following Refill paper in the paper tray Make sure the paper guides are set to the correct size Remove the paper and load it again Make sure the paper guides are set to the correct size No Per...

Страница 86: ...n off the machine Wait a few seconds then turn it on again Perform the auto color registration using the Touchscreen see Advanced User s Guide Auto Registration Put in a new belt unit see Replacing the belt unit on page 60 If the problem continues call Brother Customer Service Replace Belt It is time to replace the belt unit Replace the belt unit see Replacing the belt unit on page 60 Replace Drum...

Страница 87: ...ridge is at the end of its life The machine will stop all print operations Replace the toner cartridge for the color indicated on the Touchscreen see Replacing the toner cartridges on page 44 Replace WT Box It is time to replace the waste toner box Replace the waste toner box see Replacing the waste toner box on page 64 Scan Unable XX The machine has a mechanical problem Press and hold down to tur...

Страница 88: ...ow you can still print however the machine is telling you that the toner cartridge is near the end of its life Order a new toner cartridge for the color that is indicated on the Touchscreen now so a replacement toner cartridge will be available when the Touchscreen shows Replace Toner Touchscreen Initialization Failed The Touchscreen was pressed before the power on initialization was completed Mak...

Страница 89: ...mmed in the manual feed slot B If the Touchscreen shows Jam Manual Feed follow these steps a Remove any paper that is jammed in and around the manual feed slot b Press Start to resume printing Paper is jammed in the paper tray B If the Touchscreen shows Jam Tray follow these steps a Pull the paper tray completely out of the machine b Use both hands to slowly pull out the jammed paper NOTE Pulling ...

Страница 90: ...s to fit the paper size Make sure the guides are firmly in the slots d Put the paper tray firmly back in the machine Paper is jammed at the output paper tray B When the paper is jammed at the output paper tray follow the these steps a Use both hands to open the scanner NOTE When the top cover is open you cannot open the scanner b Remove the paper ...

Страница 91: ...hind the back cover Follow these steps a Leave the machine turned on for 10 minutes for the internal fan to cool the extremely hot parts inside the machine b Open the back cover WARNING HOT SURFACE After you have just used the machine some internal parts of the machine will be extremely hot Wait for the machine to cool down before you touch the internal parts of the machine ...

Страница 92: ...ou to release the fuser cover 1 d Use both hands to gently pull the jammed paper out of the fuser unit e Close the fuser cover 1 Make sure the green tabs at the left and right sides lock into place f Close the back cover until it locks in the closed position 1 1 ...

Страница 93: ...al fan to cool the extremely hot parts inside the machine b Open the top cover until it locks in the open position c Remove all of the toner cartridge and drum unit assemblies WARNING HOT SURFACE After you have just used the machine some internal parts of the machine will be extremely hot Wait for the machine to cool down before you touch the internal parts of the machine ...

Страница 94: ...unit assemblies on a clean flat surface with disposable paper underneath them in case you accidentally spill or scatter toner To prevent damage to the machine from static electricity DO NOT touch the electrodes shown in the illustration d Pull out the jammed paper slowly ...

Страница 95: ... same color labels on the machine BK Black C Cyan M Magenta Y Yellow f Close the top cover of the machine NOTE If you turn off the machine during Jam Inside is on the Touchscreen the machine will print incomplete data from your computer when it is turned on Before you turn on the machine delete the job from your computer s print spooler BK C M Y ...

Страница 96: ...0 minutes for the internal fan to cool the extremely hot parts inside the machine b Pull the paper tray completely out of the machine c Make sure the jammed paper does not remain inside the machine d If paper is not caught inside the machine check underneath the paper tray e If the paper is not caught in the paper tray open the back cover ...

Страница 97: ...e machine will be extremely hot Wait for the machine to cool down before you touch the internal parts of the machine f Use both hands to gently pull the jammed paper out of the back of the machine g Close the back cover until it locks in the closed position h Put the paper tray firmly back in the machine ...

Страница 98: ...r in the menu bar Make sure Use Printer Offline is cleared Windows Vista and Windows Server 2008 Click the Start button Control Panel Hardware and Sound Printers Right click Brother HL XXXX Printer Make sure Use Printer Online is not listed If it is listed click this option to set the driver Online Windows XP and Windows Server 2003 Click the Start button Printers and Faxes Right click Brother HL ...

Страница 99: ...river are the same Print speed is too slow Try changing the printer driver setting The highest resolution needs longer data processing sending and printing time The machine does not print from Adobe Illustrator Try to reduce the print resolution see Software User s Guide Poor print quality See Improving the print quality on page 91 Paper handling difficulties Difficulties Suggestions The machine d...

Страница 100: ...r WIA errors appear when starting to scan Windows Make sure the Brother TWAIN or WIA driver is selected as the primary source in your scanning application For example in Nuance PaperPort 12SE click Desktop Scan Settings Select to choose the Brother TWAIN WIA driver TWAIN or ICA errors appear when starting to scan Macintosh Make sure the Brother TWAIN driver is selected as the primary source In Pag...

Страница 101: ...col Make sure UDP is selected See the instruction manual that came with your third party Security Firewall Software or call the software manufacturer For more information you can read FAQs and troubleshooting suggestions at http support brother com Macintosh Re select your machine in the Device Selector window from the Model pop up menu in the main screen of ControlCenter2 The Brother software can...

Страница 102: ... Windows Server 2008 R2 Click the Start button Devices and Printers For Windows Vista and Windows Server 2008 Click the Start button Control Panel Hardware and Sound Printers For Windows XP and Windows Server 2003 Click the Start button Printers and Faxes For Windows 8 and Windows Server 2012 Move your mouse to the lower right corner of your desktop When the menu bar appears click Settings Control...

Страница 103: ...s and toner cartridges are installed correctly Examples of poor print quality Recommendation Printed pages are compressed horizontal stripes appear or characters in the top bottom left and right margins are cut off Adjust the print margins on your application and reprint the job Colored letters and thin letters in the original document are light or faint in the copy Choose Text or Receipt in the c...

Страница 104: ...an the drum unit see Advanced User s Guide Cleaning the drum unit Examples of poor print quality Recommendation ABCDEFGHIJKLMNOPQRSTUVWXYZ 0123456789 abcdefghijklmnopqrstuvwxyz ABCDEFGHIJKLMNOPQRSTUVWXYZ 0123456789 abcdefghijklmnopqrstuvwxyz ABCDEFGHIJKLMNOPQRSTUVWXYZ 0123456789 abcdefghijklmnopqrstuvwxyz ABCDEFGHIJKLMNOPQRSTUVWXYZ 0123456789 abcdefghijklmnopqrstuvwxyz ABCDEFGHIJKLMNOPQRSTUVWXYZ 0...

Страница 105: ...install a new drum unit see Replacing the drum units on page 55 To identify the color of the drum unit visit us at http support brother com to view our FAQs and troubleshooting tips Examples of poor print quality Recommendation ABCDEFGHIJKLMNOPQRSTUVWXYZ 0123456789 abcdefghijklmnopqrstuvwxyz ABCDEFGHIJKLMNOPQRSTUVWXYZ 0123456789 abcdefghijklmnopqrstuvwxyz ABCDEFGHIJKLMNOPQRSTUVWXYZ 0123456789 abcd...

Страница 106: ...w blank pages foreign material such as glue from a label may be stuck on the drum surface Clean the drum unit see Advanced User s Guide Cleaning the drum unit Identify the color causing the problem and install a new drum unit see Replacing the drum units on page 55 To identify the color of the drum unit visit us at http support brother com to view our FAQs and troubleshooting tips Examples of poor...

Страница 107: ...ew our FAQs and troubleshooting tips Identify the color causing the problem and install a new drum unit see Replacing the drum units on page 55 To identify the color of the drum unit visit us at http support brother com to view our FAQs and troubleshooting tips Examples of poor print quality Recommendation ABCDEFGHIJKLMNOPQRSTUVWXYZ 0123456789 abcdefghijklmnopqrstuvwxyz ABCDEFGHIJKLMNOPQRSTUVWXYZ ...

Страница 108: ...roubleshooting tips Identify the color causing the problem and install a new drum unit see Replacing the drum units on page 55 To identify the color of the drum unit visit us at http support brother com to view our FAQs and troubleshooting tips Color misregistration Make sure the machine is on a solid level surface Perform the auto color registration using the Touchscreen see Advanced User s Guide...

Страница 109: ...r Save mode is off in the Touchscreen or the printer driver see Software User s Guide Change the print resolution If you use a Windows printer driver choose Improve Pattern Printing in Print Setting of Basic tab see Software User s Guide Wrinkle Make sure the back cover is closed correctly Make sure the two gray levers inside the back cover are in the up position Make sure the media type setting i...

Страница 110: ...cing the drum units on page 55 To identify the color of the drum unit visit us at http support brother com to view our FAQs and troubleshooting tips Examples of poor print quality Recommendation ABCDEFGHIJKLMNOPQRSTUVWXYZ 0123456789 abcdefghijklmnopqrstuvwxyz ABCDEFGHIJKLMNOPQRSTUVWXYZ 0123456789 abcdefghijklmnopqrstuvwxyz ABCDEFGHIJKLMNOPQRSTUVWXYZ 0123456789 abcdefghijklmnopqrstuvwxyz ABCDEFGHIJ...

Страница 111: ...If the problem is not solved choose Plain Paper in the media type setting If you are printing an envelope choose Env Thin in the Media Type Setting of the printer driver If you do not use the machine often the paper may have been in the paper tray too long Turn over the stack of paper in the paper tray Also fan the paper stack and then rotate the paper 180 in the paper tray Store the paper where i...

Страница 112: ...on when you print envelopes see Loading paper in the manual feed slot on page 20 NOTE When you have finished printing open the back cover and reset the two gray levers back to their original positions 1 Pull up the two gray levers until they stop Examples of poor print quality Recommendation ABCDEFG EFGHIJKLMN 1 ...

Страница 113: ...achine Info d Press Machine Info e Press Serial No f The Touchscreen will show the machine s Serial Number g Press Checking the Firmware Version B You can see the machine s firmware version on the Touchscreen a Press b Press All Settings c Swipe up or down or press a or b to display Machine Info d Press Machine Info e Press Firmware Version f The Touchscreen will show the machine s firmware versio...

Страница 114: ... a or b to display Initial Setup d Press Initial Setup e Press Reset f Press Network or All Settings to choose the reset function you want g Do one of the following To reset the settings press Yes and go to step h To exit without making changes press No and go to step i h You will be asked to reset the machine Do one of the following To reset the machine press Yes for 2 seconds The machine will be...

Страница 115: ... the settings and options you want as they are displayed on the screen We created step by step Settings Tables and Features Tables so you can see at a glance all the available choices for each setting and feature You can use these tables to quickly set up your preferred settings in the machine Settings and features tables C ...

Страница 116: ...k Choose the time format from 12 hour or 24 hour Auto Daylight On Off Change for Daylight Saving Time automatically See Time Zone UTCXXX XX Set the time zone for your country See Toner See Toner on page 125 Access the Toner menus 125 Network WLAN See WLAN on page 109 Access the WLAN setting menus 109 Volume Beep Off Low Med High Access the beep volume setting menu See WiFi Direct See Wi Fi Direct ...

Страница 117: ...aper tray 25 Paper Size Letter A4 Legal EXE A5 A5 L A6 Folio Set the size of paper in the paper tray 25 All Settings See All settings on page 106 Select your default settings 106 Level 1 Level 2 Level 3 Options Descriptions See Page See Advanced User s Guide See Quick Setup Guide The factory settings are shown in Bold with an asterisk ...

Страница 118: ...er A4 Legal EXE A5 A5 L A6 Folio Set the size of paper in the paper tray 25 Volume Beep Off Low Med High Adjust the beeper volume See LCD Settings Backlight Light Med Dark Adjust the brightness of the Touchscreen backlight Dim Timer Off 10Secs 20Secs 30Secs Set how long the Touchscreen backlight stays on after the last key press See Advanced User s Guide The factory settings are shown in Bold with...

Страница 119: ...s that the machine will remain in Deep Sleep mode before going into Power Off mode Security Function Lock Set Password Verify You can restrict selected machine operations for up to 25 restricted users and for all other non authorized Public users Lock OffiOn Setting Lock Set Password Verify Stop unauthorized users from changing the machine s settings Lock OffiOn Shortcut Settings Choose shortcut b...

Страница 120: ...paper size errors and to use the paper in the tray Output Color Auto Color Black and White Choose color or black white for printed documents If you choose Auto the machine selects an appropriate option for the document color or black white Reset Printer Yes No Restore the printer settings to the factory settings Calibration Calibrate Yes No Adjusts the color density See Reset Yes No Returns the co...

Страница 121: ...5 000 255 000 255 000 255 Enter the IP address Subnet Mask 000 255 000 255 000 255 000 255 Enter the Subnet mask Gateway 000 255 000 255 000 255 000 255 Enter the Gateway address Node Name BRWXXXXXXXXX XXX Enter the Node name Up to 32 characters WINS Configuration Auto Static Chooses the WINS configuration mode See Network User s Guide Visit the Brother Solutions Center to download the Wi Fi Direc...

Страница 122: ...address range IPv6 On Off Enable or Disable the IPv6 protocol If you want to use the IPv6 protocol visit http support broth er com for more information Setup Wizard You can configure your internal print server WPS AOSS You can easily configure your wireless network settings using the one button push method Level 1 Level 2 Level 3 Level 4 Level 5 Options Descriptions See Network User s Guide Visit ...

Страница 123: ...the current Communication Mode MAC Address Shows the MAC address of the machine Set to Default Yes No Restore the wireless network settings to factory setting WLAN Enable On Off Enable or disable the wireless LAN manually Wi Fi Direct Push Button You can easily configure your Wi Fi Direct network settings using the one button push method Level 1 Level 2 Level 3 Level 4 Level 5 Options Descriptions...

Страница 124: ...nt IP Address of your machine Status Information Status G O Active Client Active Not Connected Off the number of devices You can see the current Wi Fi Direct network status Signal Strong Medium Weak None You can see the current Wi Fi Direct network signal strength When your machine acts as the Group Owner the Touchscreen always shows Strong Level 1 Level 2 Level 3 Level 4 Level 5 Options Descripti...

Страница 125: ...tings Lists your settings See Network Configuration Lists your Network settings Drum Dot Print Prints the Drum Dot Check Sheet WLAN Report Prints the result of wireless LAN connectivity diagnosis See See Advanced User s Guide See Quick Setup Guide The factory settings are shown in Bold with an asterisk Level 1 Level 2 Level 3 Level 4 Level 5 Options Descriptions See Network User s Guide Visit the ...

Страница 126: ...r Total Color Black and White Check the number of total color or black white pages the machine has printed during its life See List Color Black and White Copy Color Black and White Print Color Black and White Parts Life Drum Black BK Check the percentage of a machine part s life that remains available Drum Cyan C Drum Magenta M Drum Yellow Y Belt Unit Fuser PF kit See Advanced User s Guide The fac...

Страница 127: ...s for Daylight Saving Time automatically See Time Zone UTCXXX XX Sets the time zone for your country See Reset Network Yes No Restores all network settings to the factory settings 102 All Settings Yes No Restores all the machine settings to the factory settings Local Language in USA English Español in Canada English Français Change the Touchscreen language for your country See See Advanced User s ...

Страница 128: ...preset items 32 Options Quality Auto Text Photo Receipt Choose the Copy resolution for your type of document See Enlarge Reduce 100 Enlarge 200 141 A5iA4 104 EXEiLTR Choose an enlargement ratio for the next copy Reduce 97 LTRiA4 94 A4iLTR 91 Full Page 85 LTRiEXE 83 78 70 A4iA5 50 Choose a reduction ratio for the next copy Custom 25 400 Enter an enlargement or reduction ratio See Advanced User s Gu...

Страница 129: ...multiple copies Page Layout Off 1in1 2in1 P 2in1 L 2in1 ID 4in1 P 4in1 L Make N in 1 and 2 in 1 ID copies Color Adjust Red Adjust the red color for copies Green Adjust the green color for copies Level 1 Level 2 Level 3 Options 1 Options 2 Descriptions See Page See Advanced User s Guide The factory settings are shown in Bold with an asterisk 2 1 0 1 2 2 1 0 1 2 2 1 0 1 2 2 1 0 1 2 ...

Страница 130: ...le 2 sided copying and choose long edge or short edge Advanced Settings Off Change the amount of background color that is removed Remove Background Color Low Medium High Save as Shortcut Add the current settings as a shortcut Level 1 Level 2 Level 3 Options 1 Options 2 Descriptions See Page See Advanced User s Guide The factory settings are shown in Bold with an asterisk 2 1 0 1 2 ...

Страница 131: ... and to E mail on page 122 Save as Shortcut Add the current settings as a shortcut Start Start scanning to E mail PC Select Options See Options to File to Image and to E mail on page 122 Save as Shortcut Add the current settings as a shortcut Start Start scanning to FTP Profile name Options See Options to FTP and to Network on page 123 Save as Shortcut Add the current settings as a shortcut Start ...

Страница 132: ...layed in your computer s Network explorer Scan Scan data using Web Service protocol See Scan for E mail Scan for Fax Scan for Print Level 1 Level 2 Level 3 Level 4 Options Descriptions See Page See Software User s Guide The factory settings are shown in Bold with an asterisk ...

Страница 133: ...creen choose On See Scan Type Color Gray Black and White Choose the scan type for your document Resolution 100 dpi 200 dpi 300 dpi 600 dpi Choose the scan resolution for your document File Type Text HTML RTF Choose the file format for your document Scan Size A4 Letter Choose the scan size for your document See Software User s Guide The factory settings are shown in Bold with an asterisk ...

Страница 134: ...i 600 dpi Choose the scan resolution for your document File Type When you select Color or Gray in Scan Type PDF JPEG When you select Black and White in Scan Type PDF TIFF Choose the file format for your document Scan Size A4 Letter Choose the scan size for your document Remove Background Color Off Low Medium High Change the amount of background color that is removed This function is not available ...

Страница 135: ... for your document See Resolution When you select Color in Scan Type 100 dpi 200 dpi 300 dpi 600 dpi Auto When you select Gray in Scan Type 100 dpi 200 dpi 300 dpi Auto When you select Black and White in Scan Type 200 dpi 300 dpi 200x100 Choose the scan resolution and file format for your document See Software User s Guide The factory settings are shown in Bold with an asterisk ...

Страница 136: ...the Glass Scan Size setting File Name BRWXXXXXXXXXXXX Estimate Report Order sheet Contract sheet Check Receipt Manual Choose preset file names If you choose Manual you can name the file as you like File Size Small Medium Large Choose the file size for color or gray scale scanning Remove Background Color Off Low Medium High Change the amount of background color that is removed User Name Enter the u...

Страница 137: ... calibration to the factory settings Reset Yes No Auto Regist Yes No Adjust the print position of each color automatically See Advanced User s Guide The factory settings are shown in Bold with an asterisk Level 1 Level 2 Level 3 Options Descriptions See Page Setup Wizard Configure your internal print server See Setup with PC Configure the Wi Fi settings using a computer WPS AOSS Easily configure y...

Страница 138: ...e Options on page 116 Choose the desired settings from the preset items 14 Normal 2in1 ID 2in1 2 sided 1i2 Paper Save Scan to File PC Select Scan a black white or a color document into your computer 15 to OCR PC Select Convert your text document to an editable text file 15 to Image PC Select Scan a color picture into your graphics application 15 to E mail PC Select Scan a black white or a color do...

Страница 139: ...Web Albums Visit the Brother Solutions Center to download the Web Connect Guide at http support brothe r com 16 Google Drive Flickr Facebook Evernote Dropbox Level 1 Level 2 Level 3 Level 4 Options Descriptions Page The factory settings are shown in Bold with an asterisk ...

Страница 140: ...ered an incorrect character and want to change it use the arrow buttons to move the cursor under the incorrect character Press and then enter the correct character You can also insert letters by moving the cursor and entering a character If the screen does not show d press repeatedly until you have erased the incorrect character Enter the correct characters NOTE The characters available may differ...

Страница 141: ...ions D Model HL 3180CDW Printer Type LED Print Method Electrophotographic LED Printer Memory Capacity 192 MB LCD liquid crystal display 3 7 in 93 4 mm TFT Color Touchscreen LCD 1 and Touchpanel Power Source 110 120 V AC 50 60 Hz Power Consumption 2 Average Peak Approx 1188 W Printing Approx 380 W at 77 F 25 C Copying Approx 380 W at 77 F 25 C Ready Approx 70 W at 77 F 25 C Sleep Approx 8 5 W Deep ...

Страница 142: ... LPAm 33 dB A Sound Power Printing Color LWAd 6 39 B A Printing Black White LWAd 6 42 B A Ready LWAd 4 44 B A Temperature Operating 50 F to 90 5 F 10 to 32 5 C Storage 32 F to 104 F 0 to 40 C Humidity Operating 20 to 80 without condensation Storage 10 to 90 without condensation ...

Страница 143: ...Specifications 131 D Document Size D Model HL 3180CDW Document Size Scanner Glass Width Max 8 5 in 215 9 mm Scanner Glass Length Max 11 8 in 300 0 mm ...

Страница 144: ...r Type Plain Paper Thin Paper Thick Paper Thicker Paper Recycled Paper Bond Paper Label Envelope Env Thin Env Thick Glossy Paper Paper Size Width 3 0 to 8 5 in 76 2 to 215 9 mm Length 4 57 to 14 in 116 to 355 6 mm Paper Weight 16 to 43 lb 60 to 163 g m2 Maximum Paper Capacity One sheet at a time Paper Output 1 Face Down Output Tray Up to 100 sheets of 20 lb 80 g m2 Plain Paper face down delivery t...

Страница 145: ...0CDW Copy Width Max 8 27 in 210 mm Multiple Copies Stacks or Sorts up to 99 pages Reduce Enlarge 25 to 400 in increments of 1 Resolution Up to 600 600 dpi First Copy Out Time 1 Black White Less than 19 seconds at 73 4 F 23 C 115 V Color Less than 22 seconds at 73 4 F 23 C 115 V ...

Страница 146: ...80CDW Color Black Yes Yes TWAIN Compliant Yes Windows XP Windows Vista Windows 7 Windows 8 Mac OS X v10 6 8 10 7 x 10 8 x 1 WIA Compliant Yes Windows XP Windows Vista Windows 7 Windows 8 ICA Compliant Yes Mac OS X v10 6 8 10 7 x 10 8 x Color Depth Color 48 bit color processing Input 24 bit color processing Output Gray Scale 16 bit color processing Input 8 bit color processing Output Resolution Up ...

Страница 147: ...ion 600 dpi 600 dpi 2400 dpi 600 dpi 2400 dpi quality Print Speed 2 sided Black White Up to 7 sides minute Up to 3 5 sheets minute Letter size 1 Color Up to 7 sides minute Up to 3 5 sheets minute Letter size 1 Print Speed Black White Up to 23 pages minute Letter size 1 Color Up to 23 pages minute Letter size 1 First Print Time 2 Black White Less than 16 seconds at 73 4 F 23 C 115 V Color Less than...

Страница 148: ...hird party USB ports are not supported 3 For detailed network specifications see Network on page 137 and Network User s Guide Model HL 3180CDW USB Hi Speed USB 2 0 1 2 We recommend using a USB 2 0 cable Type A B that is no more than 6 feet 2 0 meters long Wireless LAN 3 IEEE 802 11b g n Infrastructure mode Ad hoc mode IEEE 802 11g n Wi Fi Direct ...

Страница 149: ... from http support brother com Model HL 3180CDW Protocols IPv4 ARP RARP BOOTP DHCP APIPA Auto IP WINS NetBIOS name resolution DNS Resolver mDNS LLMNR responder LPR LPD Custom Raw Port Port9100 POP3 SMTP Client IPP IPPS FTP Client and Server CIFS Client TELNET Server SNMPv1 v2c v3 HTTP HTTPS server TFTP client and server ICMP Web Services Print Scan SNTP Client IPv6 NDP RA DNS resolver mDNS LLMNR r...

Страница 150: ... Interface Processor Hard Disk Space to install USB 2 Wireless 802 11b g n For Drivers For Applications Windows Operating System Windows XP Home 1 3 Windows XP Professional 1 3 Printing Scanning 32bit x86 or 64bit x64 processor 150 MB 310 MB Windows XP Professional x64 Edition 1 3 64bit x64 processor Windows Vista 1 3 32bit x86 or 64bit x64 processor 500 MB 500 MB Windows 7 1 3 650 MB 1 2 GB Windo...

Страница 151: ...r A4 page 1 Cyan Magenta Yellow Approx 1 000 pages Letter or A4 page 1 Standard Black Approx 2 500 pages Letter or A4 page 1 TN 221BK Cyan Magenta Yellow Approx 1 400 pages Letter or A4 page 1 TN 221C TN 221M TN 221Y High Yield Black Cyan Magenta Yellow Approx 2 200 pages Letter or A4 page 1 TN 225C TN 225M TN 225Y Drum Unit Approx 15 000 pages Letter or A4 page 1 page job 2 DR 221CL 3 DR 221CL BK...

Страница 152: ...ter4 for Windows See Software User s Guide D Dimensions 129 Document how to load 31 Drum unit cleaning 51 Drum units replacing 54 E Envelopes 22 26 27 29 Error messages on touchscreen 71 No Paper 73 Out of Memory 74 Print Unable XX 74 Scan Unable XX 75 F Folio 25 27 G Gray scale 134 H HELP Settings Tables 104 touchscreen messages 103 Home 9 L Labels 20 26 27 30 M Machine information firmware versi...

Страница 153: ...solution 135 specifications 135 Printing See Software User s Guide Programming your machine 103 Q Quality printing 91 R Replacing belt unit 60 drum units 54 toner cartridges 44 waste toner box 64 Resolution copy 133 print 135 scan 134 S Scan a document to a computer 35 Scanner glass using 31 Scanning See Software User s Guide Serial number how to find See inside top cover Service centers ii Settin...

Страница 154: ...142 W Warranties are in the box Waste toner box replacing 64 Weights 129 Wi Fi Direct 5 Windows See Software User s Guide Wireless Network See Quick Setup Guide and Network User s Guide World Wide Web i ...

Страница 155: ... Brother International Corporation Canada Ltd 1 rue Hôtel de Ville Dollard des Ormeaux QC Canada H9B 3H6 Visit us on the World Wide Web http www brother com This machine is approved for use in the country of purchase only Local Brother companies or their dealers will only support machines purchased in their own countries ...

Отзывы: