Brother MFC-9330CDW Скачать руководство пользователя страница 87

Routine maintenance 

77

A

g

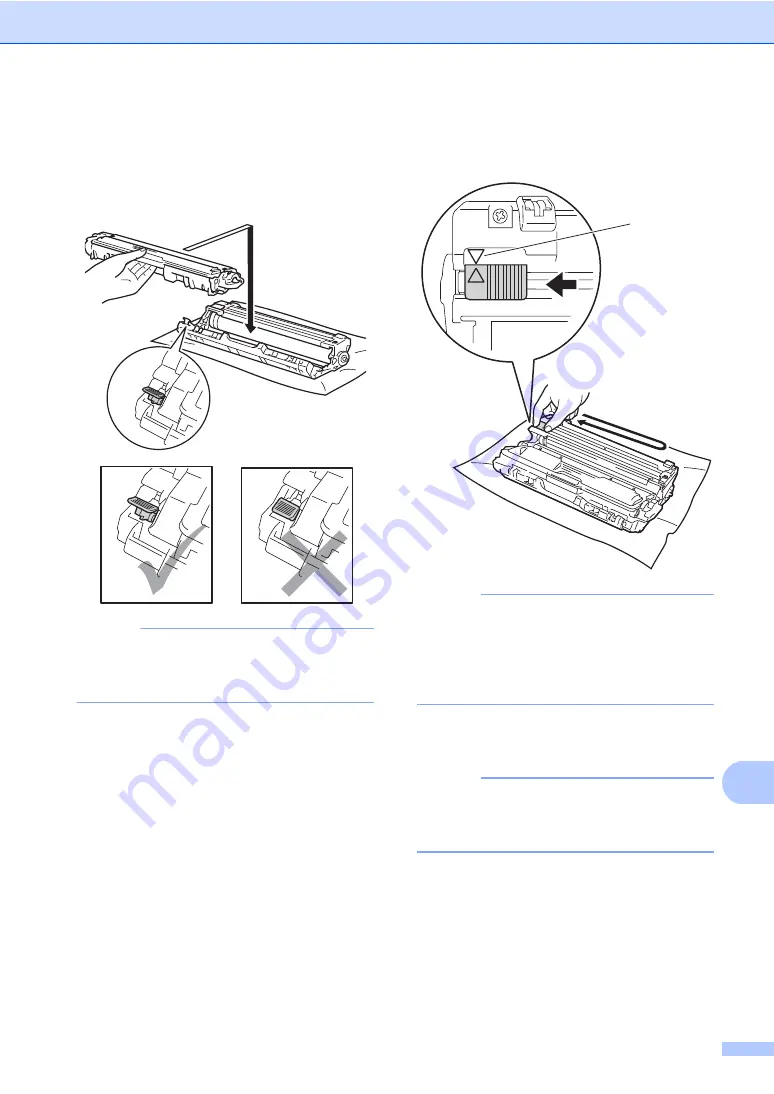
Put the new toner cartridge firmly into 
the drum unit until you hear it lock into 
place. If you put it in correctly, the green 
lock lever on the drum unit will lift 
automatically.


NOTE

Make sure you put the toner cartridge in 
correctly or it may separate from the drum 
unit.


h

Clean the corona wire inside the drum 
unit by gently sliding the green tab from 
left to right and right to left several times.


NOTE

Be sure to return the tab to the Home 
position (

a

) (1). The arrow on the tab must 

be aligned with the arrow on the drum unit. 
If it is not, printed pages may have a 
vertical stripe.


i

Repeat step

c

 and step 

h

 to clean 

each of three remaining corona wires.

NOTE

When cleaning the corona wires, you do 
not have to remove the toner cartridge 
from the drum unit.


1

Содержание MFC-9330CDW

Страница 1: ...Basic User s Guide MFC 9330CDW Version 0 TWN ENG ...

Страница 2: ...ttp www brother com registration By registering your product with Brother you will be recorded as the original owner of the product Your registration with Brother may serve as confirmation of the purchase date of your product should you lose your receipt may support an insurance claim by you in the event of product loss covered by insurance and will help us notify you of enhancements to your produ...

Страница 3: ... utility HTML file CD ROM In the Box Network User s Guide This Guide provides useful information about wired and wireless network settings and security settings using the Brother machine You can also find supported protocol information for your machine and detailed troubleshooting tips PDF file CD ROM In the Box Wi Fi Direct Guide This Guide provides information about how to configure and use your...

Страница 4: ... Guide provides information for using AirPrint to print from OS X v10 7 x 10 8 x and your iPhone iPod touch iPad or other iOS device to your Brother machine without installing a printer driver PDF file Brother Solutions Center 1 Which Guide What s in it Where is it ...

Страница 5: ...reen 13 Basic Operations 14 Shortcut Settings 15 Adding Copy Shortcuts 15 Adding Fax Shortcuts 15 Adding Scan Shortcuts 16 Adding Web Connect Shortcuts 18 Changing Shortcuts 19 Editing Shortcut Names 19 Deleting Shortcuts 19 Recalling Shortcuts 19 2 Loading paper 20 Loading paper and print media 20 Loading paper in the paper tray 20 Loading paper in the manual feed slot 22 Unscannable and unprinta...

Страница 6: ...y 42 Easy Receive 43 Fax Preview Black and White only 44 How to preview a received fax 44 Turning off Fax Preview 46 6 Using PC FAX 47 How to use PC FAX 47 PC Fax Receive For Windows only 47 PC FAX Send 48 7 Telephone services and external devices 49 Connecting an external TAD telephone answering device 49 Connections 50 Recording an outgoing message OGM 50 Multi line connections PBX 50 External a...

Страница 7: ... file for direct printing 58 Printing data directly from the USB Flash memory drive or digital camera supporting mass storage 59 Changing the default settings for direct print 61 11 How to print from a computer 62 Printing a document 62 12 How to scan to a computer 63 Before scanning 63 Scanning a document as a PDF file using ControlCenter4 Windows 64 How to scan a document as a PDF file using the...

Страница 8: ...ed in the paper tray 111 Paper is jammed at the output paper tray 112 Paper is jammed at the back of the machine 113 Paper is jammed inside the machine 115 Paper is jammed underneath the paper tray 118 If you are having difficulty with your machine 120 Setting Dial Tone detection 129 Telephone line interference VoIP 129 Improving the print quality 130 Machine Information 140 Checking the Serial Nu...

Страница 9: ...eral 189 Document Size 191 Print media 192 Fax 193 Copy 194 Scanner 195 Printer 196 Interfaces 197 Network 198 Direct Print feature 199 Computer requirements 200 Consumable items 201 E Appendix 202 Brother numbers 202 F Index 203 ...

Страница 10: ...ax Memory Receive Options Remote retrieval Additional receiving operations Polling 5 Dialing and storing numbers Telephone line services Additional dialing operations Additional ways to store numbers 6 Printing reports Fax reports Reports 7 Making copies Copy settings A Routine maintenance Cleaning and checking the machine Replacing periodic maintenance parts Packing and shipping the machine B Glo...

Страница 11: ...OTE Notes tell you how you should respond to a situation that may arise or give tips about how the current operation works with other features Follow all warnings and instructions marked on the product General information 1 Electrical Hazard icons alert you to a possible electrical shock Fire Hazard icons alert you to the possibility of fire Hot Surface icons warn you not to touch machine parts th...

Страница 12: ...n make your selections either by tapping the screen or by clicking with your mouse After the printer driver is installed appears on both the Start screen and the desktop a Tap or click Brother Utilities either on the Start screen or the desktop b Select your machine c Choose the function you want to use ...

Страница 13: ...d then choose User s Guides Windows 8 Windows Server 2012 Click Brother Utilities and then click the drop down list and select your model name if not already selected Click Support in the left navigation bar and then click User s Guides If you have not installed the software you can find the documentation on the CD ROM by following these steps a Turn on your computer Insert the CD ROM into your CD...

Страница 14: ...you want How to find Scanning instructions 1 There are several ways you can scan documents You can find the instructions as follows Software User s Guide Scanning ControlCenter Network Scanning Presto PageManager User s Guide NOTE Presto PageManager must be installed before use Macintosh users Presto PageManager is available as a download from http nj newsoft com tw download brother PM9SEInstaller...

Страница 15: ...irectly from a mobile device supporting the Wi Fi Direct standard Google Cloud Print Guide 1 This Guide provides information about how to configure your Brother machine to a Google account and use Google Cloud Print services for printing over the Internet Mobile Print Scan Guide for Brother iPrint Scan 1 This Guide provides useful information about printing from your mobile device and scanning fro...

Страница 16: ...er CreativeCenter http www brother com creativecenter for FREE photo projects and printable downloads click Brother CreativeCenter To return to the Top Menu click Back Or if you are finished click Exit Accessing Brother Support Macintosh 1 You can find all the contacts you will need such as web support Brother Solutions Center on the CD ROM Double click the Brother Support icon Choose your model i...

Страница 17: ...General information 7 1 ...

Страница 18: ...nd Touchpanel 1 1 This is a Touchscreen LCD with an electrostatic Touchpanel that only shows the LEDs that can be used 1 3 7 in 93 4 mm Touchscreen LCD Liquid Crystal Display This is a Touchscreen LCD You can access the menus and options by pressing them as they are displayed on this screen 1 ...

Страница 19: ... Ready screen on page 13 Cancel Press to cancel an operation when illuminated in red Dial Pad Press the numbers on the Touchpanel to dial telephone and fax numbers or to enter the number of copies 3 Power On Off Press to turn on the machine Press and hold down to turn off the machine The Touchscreen LCD will show Shutting Down and will stay on for a few seconds before going off If you connect an e...

Страница 20: ...an Wi Fi setup Toner levels and Setup screen When the Home screen is displayed the machine is in Ready mode When Secure Function Lock 1 is turned on an icon will be displayed 1 See Advanced User s Guide Secure Function Lock 2 0 More screen The More screen provides access to additional features such as Secure Print Web Shortcut and USB Shortcut screens You can quickly create a Shortcut for frequent...

Страница 21: ...ication of remaining toner life will vary depending on the types of documents printed and customer s usage 4 Setting Press to access the main settings for more information see Settings screen on page 12 5 Date and Time See the date and time that has been set in the machine 6 Secure Print Lets you access the secure print menu 7 Web Press to connect the Brother machine to an Internet service for mor...

Страница 22: ...egistered trademark of HI CORPORATION in Japan Settings screen 1 The Touchscreen shows the machine s status when you press You can check and access all the machine s settings from the following screen 1 Toner See the remaining toner life Press to access the Toner menu 2 Receive Mode See the current Receive Mode Fax Fax Tel External TAD Manual 3 Network Press to set up a network connection A four l...

Страница 23: ...s 1 Shortcuts 2 or Shortcuts 3 When the machine is idle or you press the Touchscreen will return to the screen you set a Press b Press All Settings c Swipe up or down or press a or b to display General Setup d Press General Setup e Swipe up or down or press a or b to display Button Settings f Press Button Settings g Press Home Button Settings h Swipe up or down or press a or b to display Home More...

Страница 24: ...such as a pen or stylus It may damage the machine The following steps show how to change a setting in the machine In this example the Touchscreen Backlight setting is changed from Light to Med a Press b Press All Settings c Swipe up or down or press a or b to display General Setup d Press General Setup e Swipe up or down or press a or b to display LCD Settings f Press LCD Settings g Press Backligh...

Страница 25: ... or press a or b to display the available settings and then press the setting you want g Swipe up or down or press a or b to display the available options for the setting and then press the option you want Repeat steps f and g until you have selected all the settings for this Shortcut h When you have finished changing the settings press Save as Shortcut i Read and confirm the displayed list of set...

Страница 26: ...ll be the Shortcut name plus a sequential number f Press Options g Swipe up or down or press a or b to display the available settings and then press the setting you want h Press the option you want Repeat steps g and h until you have selected all the settings for this Shortcut Press OK i When you have finished changing the settings press Save as Shortcut j Read and confirm the displayed list of se...

Страница 27: ...d the Profile Name beforehand f Do one of the following To enter an E mail address manually press Manual Enter the E mail address using the keyboard on the Touchscreen To help you enter letters see Entering text on page 188 Press OK To enter an E mail address from the Address Book press Address Book Swipe up or down or press a or b to display the E mail address you want and then press it Press OK ...

Страница 28: ...tcut you must have an account with the desired service for more information see Web Connect Guide a If the displayed screen is either Home or More swipe left or right or press d or c to display a Shortcut screen b Press where you have not added a Shortcut c Press Web d If Information about the Internet connection is displayed read the information and confirm it by pressing OK e Swipe left or right...

Страница 29: ...o step f f To create a new Shortcut hold down to delete the current name and then enter a new name using the keyboard on the Touchscreen To help you enter letters see Entering text on page 188 Press OK g Press OK to confirm Editing Shortcut Names 1 You can edit a Shortcut name a Press and hold the Shortcut until the dialog box appears NOTE You can also press All Settings and Shortcut Settings b Pr...

Страница 30: ...ding paper in the paper tray 2 You can load up to 250 sheets in the paper tray Paper can be loaded up to the maximum paper mark on the right side of the paper tray for the recommended paper to use see Acceptable paper and other print media on page 29 Printing on plain paper thin paper or recycled paper from the paper tray 2 a Pull the paper tray completely out of the machine b While pressing the g...

Страница 31: ... to be printed on is face down The paper guides touch the sides of the paper so it will feed correctly e Put the paper tray firmly back in the machine Make sure the tray is completely inserted into the machine f Lift up the support flap 1 to prevent paper from sliding off the face down output tray or remove each page as soon as it comes out of the machine 1 1 ...

Страница 32: ... media on page 29 NOTE The machine turns on the Manual Feed mode when you put paper in the manual feed slot Printing on plain paper thin paper recycled paper and bond paper from the manual feed slot 2 a Lift up the support flap 1 to prevent paper from sliding off the face down output tray or remove each page as soon as it comes out of the machine b Open the manual feed slot cover c Use both hands ...

Страница 33: ...Start on the Touchscreen Reinsert the paper and be sure to press it firmly against the rollers Put the paper into the manual feed slot with the side to be printed on face up Make sure the paper is straight and in the correct position on the manual feed slot If it is not the paper may not be fed correctly resulting in a skewed printout or a paper jam Pull the paper out completely when you retry put...

Страница 34: ...ls envelopes and glossy paper from the manual feed slot 2 When the back cover face up output tray is pulled down the machine has a straight paper path from the manual feed slot through to the back of the machine Use this paper feed and output method for printing on thick paper labels envelopes or glossy paper a Open the back cover face up output tray b For printing envelopes only Pull down the two...

Страница 35: ...d rollers Continue pressing the paper against the rollers for about two seconds or until the machine grabs the paper and pulls it in further NOTE If the error message Jam Manual Feed appears on the Touchscreen the machine cannot grasp and pull the paper or envelope Reset the machine by removing the paper and then pressing Start on the Touchscreen Reinsert the paper or envelope and be sure to press...

Страница 36: ...ing the paper into the manual feed slot Do not put more than one sheet of paper or one envelope in the manual feed slot at any one time as it may cause a jam f Send the print data to the machine NOTE Remove each printed page or envelope immediately to prevent a paper jam g After the Touchscreen shows Manual Feed return to step e to load the next sheet of paper Repeat for each page you want to prin...

Страница 37: ...settings in the application you are using Usage Document Size Top 1 Bottom 3 Left 2 Right 4 Fax Sending Letter 3 mm 4 mm A4 3 mm ADF 1 mm Scanner Glass 3 mm Legal 3 mm 4 mm Copy Letter 4 mm 4 mm a single copy or a 1 in 1 copy A4 4 mm 3 mm Legal 4 mm 4 mm Scan Letter 3 mm 3 mm A4 3 mm 3 mm Legal ADF 3 mm 3 mm Print Letter 4 2 mm 4 2 mm A4 4 2 mm 4 2 mm Legal 4 2 mm 4 2 mm 1 3 2 4 ...

Страница 38: ...pe up or down or press a or b to display A4 Letter Legal EXE A5 A5 L A6 or Folio and press the option you want e Press NOTE When an appropriate size is not in the tray received faxes will be stored in the machine s memory and Size mismatch will appear on the Touchscreen for more information see Error and maintenance messages on page 99 If the tray is out of paper and received faxes are in the mach...

Страница 39: ... cause the paper to jams or misfeed For correct printing you must choose the same paper size from your software application as the paper in the tray Avoid touching the printed surface of the paper immediately after printing Before you buy a lot of paper test a small quantity to make sure the paper is appropriate for the machine Use labels that are designed for use in laser machines Type and size o...

Страница 40: ...s Paper size Paper types No of sheets Paper Tray Tray 1 A4 Letter Legal B5 JIS Executive A5 A5 L A6 Folio 1 Plain paper Thin paper Recycled paper up to 250 80 g m2 Manual Feed Slot Width 76 2 to 215 9 mm Length 116 0 to 355 6 mm Plain paper Thin paper Thick paper Thicker paper Bond paper Recycled paper Envelopes Labels Glossy paper 1 sheet 1 Envelope Basis weight 75 90 g m2 Thickness 80 110 μm Rou...

Страница 41: ...ing process If you use bond paper paper having a rough surface or paper that is wrinkled or creased the paper may exhibit degraded performance Types of paper to avoid 2 IMPORTANT Some types of paper may not perform well or may cause damage to your machine DO NOT use paper that is highly textured that is extremely smooth or shiny that is curled or warped 1 A curl of 2 mm or greater may cause jams t...

Страница 42: ...ie strings with self adhesive closures that are of a baggy construction that are not sharply creased that are embossed raised writing that were previously printed by a laser or LED machine that are pre printed on the inside that cannot be arranged neatly when stacked that are made of paper that weighs more than the paper weight specifications for the machine with edges that are not straight or con...

Страница 43: ...g labels with spaces may result in labels peeling off and causing serious jams or print problems All labels used in this machine must be able to withstand a temperature of 200 C for a period of 0 1 seconds Labels can only be fed through the manual feed slot Types of labels to avoid 2 Do not use labels that are damaged curled wrinkled or an unusual shape IMPORTANT Avoid feeding labels with the carr...

Страница 44: ...DO NOT use cardboard newspaper or fabric To avoid damaging your machine while using the ADF DO NOT pull on the document while it is feeding NOTE To scan documents that are not appropriate for the ADF see Using the scanner glass on page 35 It is easier to use the ADF if you are loading a multiple page document Make sure documents with correction fluid or written with ink are completely dry a Unfold...

Страница 45: ... one page at a time Document Sizes Supported 3 How to load documents 3 NOTE To use the scanner glass the ADF must be empty a Lift the document cover b Using the document guidelines on the left and top place the document face down in the upper left corner of the scanner glass c Close the document cover IMPORTANT If the document is a book or is thick do not slam the cover or press on it Length Up to...

Страница 46: ...n shows c You can change the following fax sending options Press Options Swipe up or down or press a or b to scroll through the fax options When the setting you want is displayed press it and choose your new option When you have finished changing the options press OK NOTE For the following advanced fax sending operations and settings see Advanced User s Guide Sending a fax Contrast Fax Resolution ...

Страница 47: ...s OK The machine starts scanning the page Repeat this step for each additional page Stop faxing 4 To stop faxing press Faxing Letter size documents from the scanner glass 4 When faxing Letter size documents you must set the scan glass size to Letter otherwise a portion of your faxes will be missing a Do one of the following When Fax Preview is set to Off press Fax When Fax Preview is set to On pre...

Страница 48: ... to a transmission error Off is the factory setting Off Image Prints a report if your fax is unsuccessful due to a transmission error A portion of the fax s first page appears on the report a Press b Press All Settings c Swipe up or down or press a or b to display Fax d Press Fax e Swipe up or down or press a or b to display Report Setting f Press Report Setting g Press Transmission h Press On On ...

Страница 49: ...s b Press All Settings c Swipe up or down or press a or b to display Fax d Press Fax e Swipe up or down or press a or b to display Setup Receive f Press Setup Receive g Swipe up or down or press a or b to display Receive Mode h Press Receive Mode Receiving a fax 5 Do you want to use the telephone features of your machine if available or an external telephone or external telephone answering device ...

Страница 50: ...Chapter 5 40 i Press Fax Fax Tel External TAD or Manual j Press ...

Страница 51: ...x Tel mode only on page 42 and Ring Delay on page 42 Manual 5 Manual mode turns off all automatic answering functions To receive a fax in Manual mode lift the handset of the external telephone or press Fax and then press Hook When you hear fax tones short repeating beeps press Fax Start and then press Receive to receive a fax You can also use the Easy Receive feature to receive faxes by lifting a ...

Страница 52: ...you and your caller will hear the normal telephone ring sound The number of rings is set by the Ring Delay setting If the call is a fax then your machine will receive it however if it is a voice call the machine will sound the F T ring pseudo double ring for the time you set in the F T Ring Time setting If you hear the F T ring it means that a voice caller is on the line Because the F T ring is ma...

Страница 53: ...the Fax If you answered at an extension telephone press l51 see Using external and extension telephones on page 51 NOTE If this feature is set to On but your machine does not connect a fax call when you lift an extension telephone handset press the fax receive code l51 If you send faxes from a computer on the same telephone line and the machine intercepts them set Easy Receive to Off a Press b Pre...

Страница 54: ...eview 5 When you receive a fax you will see a pop up message on the Touchscreen For example New Fax es 01 View a Press View The Touchscreen will display the fax list NOTE Although printed faxes show the received date and time when Fax Receive Stamp is turned on the Fax Preview screen will not show the received date and time The fax list includes the old faxes and the new fax The new fax is indicat...

Страница 55: ...Press Print All Old Faxes to print all faxes you have viewed e Press How to delete all faxes in the list 5 a Press Fax b Press Received Faxes c Press Print Delete d Do one of the following Press Delete All New Fax es to delete all faxes you have not yet viewed Press Delete All Old Faxes to delete all faxes you have viewed e Press Yes to confirm f Press Description Enlarge the fax Reduce the fax or...

Страница 56: ...e If there are faxes stored in the memory do one of the following If you do not want to print the stored faxes press Continue Press Yes to confirm Your faxes will be deleted To print all the stored faxes press Print All Faxes Before Delete If you do not want to turn off Fax Preview press Cancel f Press ...

Страница 57: ...tilities and then click the drop down list and select your model name if not already selected Click PC FAX Receive in the left navigation bar and then click Receive If you choose Backup Print On the machine will also print the fax a Press b Press All Settings c Swipe up or down or press a or b to display Fax d Press Fax e Swipe up or down or press a or b to display Setup Receive f Press Setup Rece...

Страница 58: ...y application on your computer as a PC FAX You can even attach a cover page for more information see Software User s Guide How to send a PC FAX 6 Contact your application vendor if you need more support a From your application select File and then Print The Print dialog box will be displayed The steps may vary depending on your application b Select the Brother PC FAX v 3 c Click OK The Brother PC ...

Страница 59: ...ntil the external TAD has picked up the call The sending machine will send CNG tones for only eight to ten seconds longer We do not recommend using the toll saver feature on your external TAD if it needs more than four rings to activate it The TAD must be connected to the EXT jack of the machine You must plug your TAD into the EXT jack of your machine If your TAD is plugged into a wall jack both y...

Страница 60: ...es b Limit your speaking to 20 seconds c End your 20 second message by giving your Fax Receive Code for people sending manual faxes For example After the beep leave a message or press l51 and Start to send a fax NOTE We recommend beginning your OGM with an initial 5 second silence because the machine cannot hear fax tones over a loud voice You may try leaving out this pause but if your machine has...

Страница 61: ... double rings for you to take over you can take the call at an extension telephone by pressing the Telephone Answer Code 51 see F T Ring Time Fax Tel mode only on page 42 Using an external telephone Connected to the EXT jack of the machine 7 If you answer a fax call at the external telephone connected to the EXT jack of the machine you can make the machine receive the fax by pressing Fax Start and...

Страница 62: ... delay If you pick up the call on an extension telephone you can turn the F T ring off by pressing 51 make sure you press this between the rings If the machine answers a voice call and pseudo double rings for you to take over you can take the call at the external telephone by pressing Pickup Changing the Remote Codes 7 The preset Fax Receive Code is l51 The preset Telephone Answer Code is 51 If yo...

Страница 63: ...nd then enter the first letter of the name and press OK e Press the number or the name you want f To send a fax press Apply g Press Fax Start The machine scans and sends the fax Fax redial 8 If you are sending a fax automatically and the line is busy the machine will automatically redial one time after five minutes If you are sending a fax manually and the line is busy press Hook and then Redial w...

Страница 64: ...u can store up to 200 Addresses with a name a Press Fax b Press Address Book c Press Edit d Press Add New Address e Press Name f Enter the name using the keyboard on the Touchscreen up to 15 characters To help you enter letters see Entering text on page 188 Press OK g Press Address h Enter the fax or telephone number using the keyboard on the Touchscreen up to 20 digits Press OK NOTE If you downlo...

Страница 65: ...elete numbers by pressing them to display a red check mark Press OK Press Yes to confirm Go to step i e Swipe up or down or press a or b to display the number you want f Press the number you want g Do the following To change the name press Name Enter the new name up to 15 characters using the keyboard on the Touchscreen To help you enter letters see Entering text on page 188 Press OK To change the...

Страница 66: ...olor Start or Black Start Stop copying 9 To stop copying press Copy preset settings 9 You can copy with a variety of settings that are already set up for you in the machine simply by pressing them The following preset settings are available Receipt Normal 2in1 ID 2in1 2 sided 1 2 Paper Save a Load your document b Press Copy c Swipe left or right to display Receipt Normal 2in1 ID 2in1 2 sided 1 2 o...

Страница 67: ... 9 You can change the following copy settings Press Copy and then press Options Swipe up or down or press a or b to scroll through the copy settings When the setting you want is displayed press it and choose your option When you have finished changing the options press OK Advanced User s Guide For more information about changing the following settings see Advanced User s Guide Copy settings Qualit...

Страница 68: ...ry depending on your application and operating system a From the menu bar of an application click File then Print b Choose Brother MFC XXXX Printer 1 and check the Print to file box 2 Click Print c Choose the folder you want to save the file to and enter the file name if prompted If you are prompted for a file name only you can also specify the folder you want to save the file in by entering the d...

Страница 69: ...ct your USB Flash memory drive or digital camera to the USB direct interface 1 on the front of the machine The Touchscreen will automatically show the USB memory menu to confirm the intended use of the USB Flash memory drive or digital camera NOTE If an error occurs the USB memory menu will not appear on the Touchscreen When the machine is in Deep Sleep mode the Touchscreen does not show any infor...

Страница 70: ...e Swipe up or down or press a or b to display the setting you want f Press the option you want NOTE You can choose the following settings Paper Type Paper Size Multiple Page Orientation 2 sided Collate Print Quality PDF Option Depending on the file type some of these settings may not appear g Do one of the following To change another setting repeat step e If you do not want to change other setting...

Страница 71: ...ttings for Direct Print a Connect your USB Flash memory drive or digital camera to the USB direct interface on the front of the machine b Press Direct Print c Press DefaultSettings d Swipe up or down or press a or b to display the setting you want Press the setting e Press the new option you want Repeat steps d and e for each setting you want to change f Press OK g Press ...

Страница 72: ...see Quick Setup Guide b From your application choose the Print command c Choose the name of your machine in the Print dialog box and click Properties or Preferences depending on the application you are using d Choose the settings you want to change in the Properties dialog box and then click OK Paper Size Orientation Copies Media Type Print Quality Color Mono Document Type Multiple Page 2 sided Bo...

Страница 73: ...If the machine is on a network configure it with a TCP IP address Install the scanner drivers from the CD ROM see Quick Setup Guide Install MFL Pro Suite Configure the machine with a TCP IP address if network scanning does not work see Software User s Guide How to scan to a computer 12 ...

Страница 74: ...4 on your computer a Load your document see How to load documents on page 34 b Do one of the following Windows XP Windows Vista and Windows 7 Open ControlCenter4 by clicking Start All Programs Brother XXX XXXX where XXX XXXX is your model name ControlCenter4 The ControlCenter4 application will open Windows 8 Click Brother Utilities and then click the drop down list and select your model name if no...

Страница 75: ...ter 65 12 d Make sure the machine you want to use is selected from the Model pull down list e Click File f Press Scan The machine starts the scanning process The folder where the scanned data is saved will open automatically ...

Страница 76: ...hted in blue d Press OK When the machine is connected to a network press the computer name Do one of the following If you want to use the default settings go to step i If you want to change the default settings go to step e e Press Options f Press Set with Touch Panel Press On g Choose the settings for Scan Type Resolution File Type Scan Size and Remove Background Color as needed h Press OK i Pres...

Страница 77: ...ollowing scan modes are available to USB to Network Windows to FTP to E mail Server to E mail to Image to OCR to File WS Scan 1 Web Services Scan 1 Windows users only Windows Vista SP2 or later Windows 7 and Windows 8 See Software User s Guide ...

Страница 78: ...ge are two separate consumables Make sure both are installed as an assembly If the toner cartridge is placed in the machine without the drum unit the message Drum may be displayed Routine maintenance A Toner cartridge Drum unit See Replacing the toner cartridges on page 72 Order No TN 261BK TN 261C TN 261M TN 261Y TN 265C TN 265M TN 265Y See Replacing the drum units on page 82 Order No DR 261CL 4 ...

Страница 79: ...andard toner cartridge 6 High yield toner cartridge Touchscreen messages Consumable item to get ready Approximate life How to replace Order No Toner Low Prepare New Toner Cartridge Toner cartridge BK Black C Cyan M Magenta Y Yellow Black 2 500 pages 1 2 5 Cyan Magenta Yellow 1 400 pages 1 2 5 2 200 pages 1 2 6 See page 72 TN 261BK 5 TN 261C 5 TN 261M 5 TN 261Y 5 TN 265C 6 TN 265M 6 TN 265Y 6 Drum ...

Страница 80: ...ack C Cyan M Magenta Y Yellow Black 2 500 pages 1 2 5 Cyan Magenta Yellow 1 400 pages 1 2 5 2 200 pages 1 2 6 See page 72 TN 261BK 5 TN 261C 5 TN 261M 5 TN 261Y 5 TN 265C 6 TN 265M 6 TN 265Y 6 Replace DrumX Drum unit X BK C M Y BK Black C Cyan M Magenta Y Yellow 15 000 pages 1 3 4 See page 83 4 Drum units DR 261CL 1 Drum unit DR 261CL BK DR 261CL CMY Drum Stop Drum unit Replace Belt Belt unit 50 0...

Страница 81: ...identally spilling or scattering the material inside If you use paper that is not a direct equivalent for the recommended paper the life of consumable items and machine parts may be reduced The projected life for each of the toner cartridges is based on ISO ICE 19798 Frequency of replacement will vary depending on the print volume percentage of coverage types of media used and powering on off the ...

Страница 82: ...cuments printed and customer s usage It is a good idea to keep a new toner cartridge ready for use when you see the Toner Low warning To ensure high quality printing we recommend that you use only Genuine Brother Brand toner cartridges When you want to buy toner cartridges call Brother Customer Service We recommend that you clean the machine when you replace the toner cartridge see Advanced User s...

Страница 83: ...l it locks in the open position c Remove the toner cartridge and drum unit assembly for the color shown on the Touchscreen WARNING HOT SURFACE After you have just used the machine some internal parts of the machine will be extremely hot Wait for the machine to cool down before you touch the internal parts of the machine ...

Страница 84: ... Push down the green lock lever and take the toner cartridge out of the drum unit WARNING DO NOT put a toner cartridge or a toner cartridge and drum unit assembly into a fire It could explode resulting in injuries DO NOT use flammable substances any type of spray or an organic solvent liquid containing alcohol or ammonia to clean the inside or outside of the product Doing so could cause a fire or ...

Страница 85: ...n flat level stable surface with disposable paper underneath it in case you accidentally spill or scatter toner NOTE Be sure to seal up the used toner cartridge tightly in a bag so that toner powder does not spill out of the cartridge Discard used consumable items according to local regulations keeping it separate from domestic waste If you have questions call your local waste disposal office Be s...

Страница 86: ...trongly recommend that you continue to use only Genuine Brother Brand replacement toner cartridges Use or attempted use of third party toner and or cartridges in the Brother machine may cause damage to the machine and or may result in unsatisfactory print quality Our limited warranty coverage does not apply to any problem that is caused by the use of third party toner and or cartridges To protect ...

Страница 87: ...rum unit h Clean the corona wire inside the drum unit by gently sliding the green tab from left to right and right to left several times NOTE Be sure to return the tab to the Home position a 1 The arrow on the tab must be aligned with the arrow on the drum unit If it is not printed pages may have a vertical stripe i Repeat step c and step h to clean each of three remaining corona wires NOTE When c...

Страница 88: ...cartridge color to the same color label on the machine BK Black C Cyan M Magenta Y Yellow k Close the top cover of the machine NOTE After replacing a toner cartridge DO NOT turn off the machine or open the top cover until the Touchscreen clears the Please wait message and returns to Ready mode BK C M Y ...

Страница 89: ...orona wires as follows a Open the top cover until it locks in the open position b Remove the toner cartridge and drum unit assembly WARNING HOT SURFACE After you have just used the machine some internal parts of the machine will be extremely hot Wait for the machine to cool down before you touch the internal parts of the machine ...

Страница 90: ...mage to the machine from static electricity DO NOT touch the electrodes shown in the illustration c Clean the corona wire inside the drum unit by gently sliding the green tab from left to right and right to left several times NOTE Be sure to return the tab to the Home position a 1 The arrow on the tab must be aligned with the arrow on the drum unit If it is not printed pages may have a vertical st...

Страница 91: ...tch the toner cartridge color to the same color label on the machine BK Black C Cyan M Magenta Y Yellow e Repeat steps b d to clean the three remaining corona wires NOTE When cleaning the corona wires you do not have to remove the toner cartridge from the drum unit f Close the top cover of the machine BK C M Y ...

Страница 92: ...d an individual drum DR 261CL BK for Black and DR 261CL CMY for Color for reasons other than reaching its rated life For your convenience Brother sells the drum units as a set of four DR 261CL NOTE There are many factors that determine the actual drum life such as the temperature humidity type of paper type of toner used and so on Under ideal conditions the average drum life is estimated at approx...

Страница 93: ...placement reset the drum counter by following the instructions included with the new drum unit see Resetting the drum counter on page 88 Drum Stop A We cannot guarantee the print quality Replace the drum unit with a new one We recommend a genuine Brother drum unit be installed at this time After replacement reset the drum counter by following the instructions included with the new drum unit see Re...

Страница 94: ...xtremely hot Wait for the machine to cool down before you touch the internal parts of the machine IMPORTANT We recommend that you place the toner cartridge and drum unit assembly on a clean flat surface with disposable paper underneath it in case you accidentally spill or scatter toner To prevent damage to the machine from static electricity DO NOT touch the electrodes shown in the illustration ...

Страница 95: ...ide of the product Doing so could cause a fire or electrical shock Instead use only a dry lint free cloth See Product Safety Guide To use the product safely IMPORTANT Handle the toner cartridge carefully If toner scatters on your hands or clothes immediately wipe or wash it off with cold water To avoid print quality problems DO NOT touch the shaded parts shown in the illustrations We recommend tha...

Страница 96: ... your local waste disposal office Be sure to reseal the consumable items tightly so that the material inside does not spill e Unpack the new drum unit f Pull off the protective cover g Put the toner cartridge firmly into the new drum unit until you hear it lock into place If you put the cartridge in correctly the green lock lever will lift automatically NOTE Make sure you put in the toner cartridg...

Страница 97: ... unit If it is not printed pages may have a vertical stripe i Repeat step c and step h to clean each of the three remaining corona wires NOTE When cleaning the corona wires you do not have to remove the toner cartridge from the drum unit j Slide each toner cartridge and drum unit assembly into the machine Make sure you match the toner cartridge color to the same color label on the machine BK Black...

Страница 98: ... of the drum unit you replaced j Press Yes k Press Replacing the belt unit A Order No BU 220CL A new belt unit can print approximately 50 000 Letter or A4 size single sided pages Replace Belt A When the Replace Belt message appears on the Touchscreen you must replace the belt unit After replacement reset the belt unit by following the instructions included with the new belt unit see Resetting the ...

Страница 99: ...ly hot Wait for the machine to cool down before you touch the internal parts of the machine IMPORTANT We recommend that you place the toner cartridge and drum unit assemblies on a clean flat surface with disposable paper underneath them in case you accidentally spill or scatter toner To prevent damage to the machine from static electricity DO NOT touch the electrodes shown in the illustration ...

Страница 100: ...f the belt unit and lift the belt unit up and then pull it out IMPORTANT To avoid print quality problems DO NOT touch the shaded parts shown in the illustrations e Unpack the new belt unit and put the new belt unit in the machine ...

Страница 101: ...e Resetting the belt unit counter A When you replace a belt unit with a new one you will must reset the belt unit counter by completing the following steps a Press to interrupt the error b Press c Press All Settings d Swipe up or down or press a or b to display Machine Info e Press Machine Info f Press Parts Life g Touch the dial pad area to light up the LEDs h Press until the Touchscreen message ...

Страница 102: ...efore you get a Replace WT Box message Replace WT Box A When the Replace WT Box message appears on the Touchscreen you must replace the waste toner box a Make sure the machine is turned on b Open the top cover until it locks in the open position c Remove all of the toner cartridge and drum unit assemblies WARNING HOT SURFACE After you have just used the machine some internal parts of the machine w...

Страница 103: ...erneath them in case you accidentally spill or scatter toner To prevent damage to the machine from static electricity DO NOT touch the electrodes shown in the illustration d Hold the green handle of the belt unit and lift the belt unit up and then pull it out IMPORTANT To avoid print quality problems DO NOT touch the shaded parts shown in the illustrations ...

Страница 104: ... are replacing the waste toner box for the first time and is not required for the replacement waste toner box The orange packing piece is installed at the factory to protect your machine during shipment f Hold the green handle of the waste toner box and remove the waste toner box from the machine ...

Страница 105: ...r electrical shock Instead use only a dry lint free cloth See Product Safety Guide To use the product safely IMPORTANT DO NOT reuse the waste toner box NOTE Be sure to seal up the waste toner box tightly in a bag so that toner powder does not spill out of the waste toner box Discard the used waste toner box according to local regulations keeping it separate from domestic waste If you have question...

Страница 106: ...ne i Slide each toner cartridge and drum unit assembly into the machine making sure you match the toner cartridge colors to the same color labels on the machine BK Black C Cyan M Magenta Y Yellow j Close the top cover of the machine BK C M Y ...

Страница 107: ... have been removed Paper is inserted correctly in the paper tray The interface cables are securely connected to the machine and the computer or the wireless connection is set up on both the machine and your computer Touchscreen Messages See Error and maintenance messages on page 99 If you did not solve your problem with the above checks identify your problem and then go to the page suggested below...

Страница 108: ...98 Scanning problems Scanning difficulties on page 126 Software and Network problems Software difficulties on page 126 Network difficulties on page 127 ...

Страница 109: ...or to check your Secure Function Lock Settings Access Error The device was removed from the USB direct interface while the data was processing Press Reinsert the device and try to print with Direct Print Calibration failed Calibration failed Press OK and try it again Press and hold down to turn off the machine Wait a few seconds and then turn on the machine again Perform the color calibration agai...

Страница 110: ...p cover is not completely closed Close the top cover of the machine The fuser cover is not completely closed or paper was jammed in the back of the machine when you turned on the power Close the fuser cover located inside the back cover of the machine Make sure paper is not jammed inside the back of the machine and then close the fuser cover and press Start see Paper is jammed at the back of the m...

Страница 111: ...s jammed in the manual feed slot of the machine See Paper is jammed in the manual feed slot on page 111 Jam Rear The paper is jammed in the back of the machine See Paper is jammed at the back of the machine on page 113 Jam Tray The paper is jammed in the paper tray of the machine See Paper is jammed in the paper tray on page 111 Limit Exceeded The print limit set in Secure Function Lock 2 0 was re...

Страница 112: ...Verify the number and try again No Toner The toner cartridge or the toner cartridge and drum unit assembly is not installed correctly Remove the toner cartridge and drum unit assembly for the color indicated on the Touchscreen Remove the toner cartridge from the drum unit and reinstall the toner cartridge back into the drum unit Reinstall the toner cartridge and drum unit assembly back in the mach...

Страница 113: ...g a fax from the memory and Fax Storage Print operation in process Do one of the following Reduce the print resolution See Software User s Guide Clear the faxes from the memory see the above explanation Out of Memory Secure Print Data is full Press Stop Key and delete the previously stored data The machine s memory is full Press and delete the previously stored secure print data Print Unable XX Th...

Страница 114: ... for the color indicated on the Touchscreen see Replacing the drum units on page 83 The drum unit counter was not reset when a new drum was installed Reset the drum unit counter see Replacing the drum units on page 83 Replace Fuser It is time to replace the fuser unit Call Brother Customer Service or a Brother Authorized Service Center to replace the fuser unit Replace PF kit It is time to replace...

Страница 115: ...ray and set the size of paper to the tray see Paper Size on page 28 Small paper The paper size specified in the printer driver is too small for the machine to deliver it to the Face down output tray Open the back cover back output tray to let the printed paper out on the back output tray and then press Start Toner Error One or more toner cartridges are not installed correctly Pull out the drum uni...

Страница 116: ... from the USB direct interface see the specifications for supported USB Flash memory drives in Printing data from a USB Flash memory drive or digital camera supporting mass storage on page 58 USB Access Error The device was removed from USB direct interface while accessing the USB device Press Close Reinsert the device and try to store the scanned data to the device USB Write protected The protect...

Страница 117: ...is an error message on the Touchscreen after the faxes have been transferred disconnect the machine from the power source for several minutes and then reconnect it Transferring faxes to another fax machine B If you have not set up your Station ID you cannot enter fax transfer mode see Quick Setup Guide Set your Station ID a Press to interrupt the error temporarily b Press c Press All Settings d Sw...

Страница 118: ...he machine see PC Fax Receive For Windows only on page 47 If faxes are in the machine s memory when you set up PC Fax Receive the Touchscreen will ask if you want to transfer the faxes to your computer d Do one of the following To transfer all faxes to your computer press Yes If Fax Preview is set to Off you will be asked if you want to print backup copies To exit and leave the faxes in the memory...

Страница 119: ...cument rips or tears be sure you remove all small paper scraps to prevent future jams d Close the ADF cover e Press Document is jammed under the document cover B a Remove any paper from the ADF that is not jammed b Lift the document cover c Pull the jammed document out to the right If the document rips or tears be sure you remove all small paper scraps to prevent future jams d Close the document c...

Страница 120: ... Insert a piece of stiff paper such as cardstock into the ADF to push any small paper scraps through c Close the document cover d Press Document is jammed at the output tray B a Remove any paper from the ADF that is not jammed b Pull the jammed document out to the right c Press ...

Страница 121: ...ammed in the manual feed slot B If the Touchscreen shows Jam Manual Feed follow these steps a Remove any paper that is jammed in and around the manual feed slot b Press Start to resume printing Paper is jammed in the paper trayB If the Touchscreen shows Jam Tray follow these steps a Pull the paper tray completely out of the machine b Use both hands to slowly pull out the jammed paper NOTE Pulling ...

Страница 122: ...es to fit the paper size Make sure the guides are firmly in the slots d Put the paper tray firmly back in the machine Paper is jammed at the output paper tray B When the paper is jammed at the output paper tray follow the these steps a Use both hands to open the scanner NOTE When the top cover is open you cannot open the scanner b Remove the paper ...

Страница 123: ...ehind the back cover Follow these steps a Leave the machine turned on for 10 minutes for the internal fan to cool the extremely hot parts inside the machine b Open the back cover WARNING HOT SURFACE After you have just used the machine some internal parts of the machine will be extremely hot Wait for the machine to cool down before you touch the internal parts of the machine ...

Страница 124: ...you to release the fuser cover 1 d Use both hands to gently pull the jammed paper out of the fuser unit e Close the fuser cover 1 Make sure the green tabs at the left and right sides lock into place f Close the back cover until it locks in the closed position 1 1 ...

Страница 125: ...al fan to cool the extremely hot parts inside the machine b Open the top cover until it locks in the open position c Remove all of the toner cartridge and drum unit assemblies WARNING HOT SURFACE After you have just used the machine some internal parts of the machine will be extremely hot Wait for the machine to cool down before you touch the internal parts of the machine ...

Страница 126: ... unit assemblies on a clean flat surface with disposable paper underneath them in case you accidentally spill or scatter toner To prevent damage to the machine from static electricity DO NOT touch the electrodes shown in the illustration d Pull out the jammed paper slowly ...

Страница 127: ... same color labels on the machine BK Black C Cyan M Magenta Y Yellow f Close the top cover of the machine NOTE If you turn off the machine during Jam Inside is on the Touchscreen the machine will print incomplete data from your computer when it is turned on Before you turn on the machine delete the job from your computer s print spooler BK C M Y ...

Страница 128: ...0 minutes for the internal fan to cool the extremely hot parts inside the machine b Pull the paper tray completely out of the machine c Make sure the jammed paper does not remain inside the machine d If paper is not caught inside the machine check underneath the paper tray e If the paper is not caught in the paper tray open the back cover ...

Страница 129: ...e machine will be extremely hot Wait for the machine to cool down before you touch the internal parts of the machine f Use both hands to gently pull the jammed paper out of the back of the machine g Close the back cover until it locks in the closed position h Put the paper tray firmly back in the machine ...

Страница 130: ...rinting Click Printer in the menu bar Make sure Use Printer Offline is cleared Windows Vista and Windows Server 2008 Click the Start button Control Panel Hardware and Sound Printers Right click Brother MFC XXXX Printer Make sure Use Printer Online is not listed If it is listed click this option to set the driver Online Windows XP and Windows Server 2003 Click the Start button Printers and Faxes Ri...

Страница 131: ...e setting in the application and in the printer driver are the same Print speed is too slow Try changing the printer driver setting The highest resolution needs longer data processing sending and printing time The machine does not print from Adobe Illustrator Try to reduce the print resolution see Software User s Guide Poor print quality See Improving the print quality on page 130 Paper handling d...

Страница 132: ...margins are cut off or a single page is printed on two pages see Paper Size on page 28 Turn on Auto Reduction see Advanced User s Guide Printing a reduced incoming fax Telephone line or connections Difficulties Suggestions Dialing does not work No dial tone Check all line cord connections Make sure the telephone line cord is plugged into the telephone wall jack and the LINE jack of the machine Sen...

Страница 133: ...er all incoming faxes you should select the Fax Tel mode In Fax Tel mode your Brother machine will automatically receive faxes and produce a pseudo double ring to alert you to answer voice calls If you do not want your Brother machine to automatically answer any incoming faxes you should select the Manual mode In Manual mode you must answer every incoming call and activate the machine to receive f...

Страница 134: ... TAD see Receive Mode settings on page 42 Make sure your Brother machine s Easy Receive feature is turned On Easy Receive is a feature that allows you to receive a fax even if you answered the call on an external or extension telephone see Easy Receive on page 43 If you often get transmission errors due to possible interference on the telephone line try changing the Compatibility setting to Basic ...

Страница 135: ...ly interpret certain voices or music on the line as a fax machine calling and respond with fax receiving tones Deactivate the machine by pressing Try avoiding this problem by turning Easy Receive to Off see Easy Receive on page 43 Sending a Fax Call to the machine If you answered on an external or extension telephone press your Fax Receive Code the factory setting is l51 If you answered on the ext...

Страница 136: ...se the Brother TWAIN WIA driver TWAIN or ICA errors appear when starting to scan Macintosh Make sure the Brother TWAIN driver is selected as the primary source In PageManager click File Select Source and choose the Brother TWAIN driver Macintosh users can also scan documents using the ICA Scanner Driver see Software User s Guide OCR does not work Try increasing the scanning resolution Macintosh us...

Страница 137: ...our machine in the Device Selector window from the Model pop up menu in the main screen of ControlCenter2 The network PC Fax Receive feature does not work Windows only It is necessary to set the third party Security Firewall Software to allow PC FAX Rx To add port 54926 for Network PC FAX Rx enter the information below In Name Enter any description for example Brother PC FAX Rx In Port number Ente...

Страница 138: ...indows Server 2008 R2 Click the Start button Devices and Printers For Windows Vista and Windows Server 2008 Click the Start button Control Panel Hardware and Sound Printers For Windows XP and Windows Server 2003 Click the Start button Printers and Faxes For Windows 8 and Windows Server 2012 Move your mouse to the lower right corner of your desktop When the menu bar appears click Settings Control P...

Страница 139: ...or press a or b to display Initial Setup d Press Initial Setup e Swipe up or down or press a or b to display Compatibility f Press Compatibility g Press High Normal or Basic for VoIP Basic for VoIP reduces the modem speed to 9600 bps and turns off ECM error correction mode Unless interference is a recurring problem on your telephone line you may prefer to use it only when needed To improve compati...

Страница 140: ...ner cartridges are installed correctly Examples of poor print quality Recommendation Printed pages are compressed horizontal stripes appear or characters in the top bottom left and right margins are cut off Adjust the print margins on your application and reprint the job Colored letters and thin letters in the original document are light or faint in the copy Choose Text or Receipt in the copy qual...

Страница 141: ...de the machine and around the drum unit and toner cartridge Clean the drum unit see Advanced User s Guide Cleaning the drum unit Examples of poor print quality Recommendation ABCDEFGHIJKLMNOPQRSTUVWXYZ 0123456789 abcdefghijklmnopqrstuvwxyz ABCDEFGHIJKLMNOPQRSTUVWXYZ 0123456789 abcdefghijklmnopqrstuvwxyz ABCDEFGHIJKLMNOPQRSTUVWXYZ 0123456789 abcdefghijklmnopqrstuvwxyz ABCDEFGHIJKLMNOPQRSTUVWXYZ 012...

Страница 142: ...tips Identify the color causing the problem and install a new drum unit see Replacing the drum units on page 83 To identify the color of the drum unit visit us at http solutions brother com to view our FAQs and troubleshooting tips Examples of poor print quality Recommendation ABCDEFGHIJKLMNOPQRSTUVWXYZ 0123456789 abcdefghijklmnopqrstuvwxyz ABCDEFGHIJKLMNOPQRSTUVWXYZ 0123456789 abcdefghijklmnopqrs...

Страница 143: ... on page 83 To identify the color of the drum unit visit us at http solutions brother com to view our FAQs and troubleshooting tips Colored spots at 24 mm Identify the color causing the problem and put in a new toner cartridge see Replacing the toner cartridges on page 73 To identify the color of the toner cartridge visit us at http solutions brother com to view our FAQs and troubleshooting tips E...

Страница 144: ...if you are copying see Advanced User s Guide Adjusting Density and Contrast Make sure Toner Save mode is off in the Touchscreen or the printer driver see Software User s Guide If the print quality is poor clear the Improve Gray Color check box in the printer driver see Software User s Guide If the print quality of the black portion is not what you expected select the Enhance Black Printing check b...

Страница 145: ...problem and install a new drum unit see Replacing the drum units on page 83 To identify the color of the drum unit visit us at http solutions brother com to view our FAQs and troubleshooting tips Missing thin lines in images Make sure Toner Save mode is off in the Touchscreen or the printer driver see Software User s Guide Change the print resolution If you use a Windows printer driver choose Impr...

Страница 146: ...n the driver matches the type of paper you are using see Acceptable paper and other print media on page 29 Examples of poor print quality Recommendation ABCDEFGHIJKLMNOPQRSTUVWXYZ 0123456789 abcdefghijklmnopqrstuvwxyz ABCDEFGHIJKLMNOPQRSTUVWXYZ 0123456789 abcdefghijklmnopqrstuvwxyz ABCDEFGHIJKLMNOPQRSTUVWXYZ 0123456789 abcdefghijklmnopqrstuvwxyz ABCDEFGHIJKLMNOPQRSTUVWXYZ 0123456789 abcdefghijklmn...

Страница 147: ...ee Replacing the drum units on page 83 To identify the color of the drum unit visit us at http solutions brother com to view our FAQs and troubleshooting tips Examples of poor print quality Recommendation ABCDEFGHIJKLMNOPQRSTUVWXYZ 0123456789 abcdefghijklmnopqrstuvwxyz ABCDEFGHIJKLMNOPQRSTUVWXYZ 0123456789 abcdefghijklmnopqrstuvwxyz ABCDEFGHIJKLMNOPQRSTUVWXYZ 0123456789 abcdefghijklmnopqrstuvwxyz ...

Страница 148: ...oblem is not solved choose Plain Paper in the media type setting If you are printing an envelope choose Env Thin in the Media Type Setting of the printer driver If you do not use the machine often the paper may have been in the paper tray too long Turn over the stack of paper in the paper tray Also fan the paper stack and then rotate the paper 180 in the paper tray Store the paper where it will no...

Страница 149: ...pe position when you print envelopes see Loading paper in the manual feed slot on page 22 NOTE When you have finished printing open the back cover and reset the two gray levers back to their original positions 1 Pull up the two gray levers until they stop Examples of poor print quality Recommendation ABCDEFG EFGHIJKLMN 1 ...

Страница 150: ...fo d Press Machine Info e Press Serial No f The Touchscreen will show the machine s Serial Number g Press Checking the Firmware Version B You can see the machine s firmware version on the Touchscreen a Press b Press All Settings c Swipe up or down or press a or b to display Machine Info d Press Machine Info e Press Firmware Version f The Touchscreen will show the machine s firmware version g Press...

Страница 151: ...mmends you perform this operation when you dispose of the machine NOTE Unplug the interface cable before you choose Network or All Settings How to reset the machine B a Press b Press All Settings c Swipe up or down or press a or b to display Initial Setup d Press Initial Setup e Swipe up or down or press a or b to display Reset f Press Reset g Press Network Address Book Fax or All Settings to choo...

Страница 152: ...the settings and options you want as they are displayed on the screen We created step by step Settings Tables and Features Tables so you can see at a glance all the available choices for each setting and feature You can use these tables to quickly set up your preferred settings in the machine Settings and features tables C ...

Страница 153: ...ime automatically See Time Zone UTCXXX XX Set the time zone for your country See Toner See Toner on page 184 Access the Toner menus 184 Network Wired LAN See Wired LAN on page 152 Access the Wired LAN setting menus 152 WLAN See WLAN on page 154 Access the WLAN setting menus 154 Fax Preview On Off View faxes you receive on the Touchscreen 44 WiFi Direct See Wi Fi Direct on page 156 Access the Wi Fi...

Страница 154: ... Set the size of paper in the paper tray 28 All Settings See All settings on page 145 Select your default settings 145 Level 1 Level 2 Level 3 Options Descriptions See Page See Advanced User s Guide See Quick Setup Guide The factory settings are shown in Bold with an asterisk ...

Страница 155: ...Set the size of paper in the paper tray 28 Volume Ring Off Low Med High Adjust the ring volume See Beep Off Low Med High Adjust the beeper volume Speaker Off Low Med High Adjust the speaker volume LCD Settings Backlight Light Med Dark Adjust the brightness of the Touchscreen backlight Dim Timer Off 10Secs 20Secs 30Secs Set how long the Touchscreen backlight stays on after the last key press See Ad...

Страница 156: ...ity Function Lock Set Password Verify You can restrict selected machine operations for up to 25 restricted users and for all other non authorized Public users Lock Off On Setting Lock Set Password Verify Stop unauthorized users from changing the machine s settings Lock Off On Shortcut Settings Choose shortcut button Edit Shortcut Name Change the shortcut name 19 Delete Delete the shortcut 19 Level...

Страница 157: ...e length of the pseudo double ring time in Fax Tel mode 42 Fax Preview On Off View faxes you receive on the Touchscreen 44 Easy Receive On Off Receive fax messages automatically when you answer a call and hear fax tones 43 Remote Codes Remote Codes Options On Off Fax Receive Code l51 Tel Answer 51 Answer calls at an extension telephone and use codes to turn the machine on or off You can personaliz...

Страница 158: ...ephone numbers to the fax blocking list Delete Delete registered fax telephone numbers from the fax blocking list Print Reports Print a list of registered fax telephone numbers in the fax blocking list Print Density Make printouts darker or lighter Fax Rx Stamp On Off Print the received time and date on the top of the received faxes 2 sided On Off Print received faxes on both sides of the paper Se...

Страница 159: ...port 38 Journal Period Journal Period Off Every 50 Faxes Every 6 Hours Every 12 Hours Every 24 Hours Every 2 Days Every 7 Days Set the interval for automatic printing of the Fax Journal If you select other than Off or Every 50 Faxes you can set the time for the option Ifyou select Every 7 Days you can also set the day of the week See Time Day Every Monday Every Tuesday Every Wednesday Every Thursd...

Страница 160: ...dress Book Shortcuts Enter Twice On Off Set the machine to restrict the dialing when using a Shortcut Remaining Jobs Check which scheduled jobs are in the memory and cancel selected jobs Miscellaneous Caller ID On Off Set the machine to use the Caller ID subscriber service Level 1 Level 2 Level 3 Level 4 Options Descriptions See Page See Advanced User s Guide The factory settings are shown in Bold...

Страница 161: ...u want the machine to clear paper size errors and to use the paper in the tray Output Color Auto Color Black and White Choose color or black white for printed documents If you choose Auto the machine selects an appropriate option for the document color or black white Reset Printer Yes No Restore the printer settings to the factory settings Calibration Calibrate Yes No Adjusts the color density See...

Страница 162: ... the Subnet mask Gateway 000 255 000 255 000 255 000 255 Enter the Gateway address Node Name BRNXXXXXXXXXXXX Enter the Node name Up to 32 characters WINS Configuration Auto Static Chooses the WINS configuration mode WINS Server Primary 000 255 000 255 000 255 000 255 Secondary 000 255 000 255 000 255 000 255 Specifies the IP address of the primary or secondary WINS server See Network User s Guide ...

Страница 163: ...n Ethernet Auto 100B FD 100B HD 10B FD 10B HD Choose the Ethernet link mode Wired Status Active 100B FD Active 100B HD Active 10B FD Active 10B HD Inactive Wired OFF You can see the current wired status MAC Address Shows the MAC address of the machine Set to Default Yes No Restore the wired network setting to the factory setting Level 1 Level 2 Level 3 Level 4 Level 5 Options Descriptions See Netw...

Страница 164: ...he IP address Subnet Mask 000 255 000 255 000 255 000 255 Enter the Subnet mask Gateway 000 255 000 255 000 255 000 255 Enter the Gateway address Node Name BRWXXXXXXXXXXXX Enter the Node name Up to 32 characters WINS Configuration Auto Static Chooses the WINS configuration mode Level 1 Level 2 Level 3 Level 4 Level 5 Options Descriptions See Network User s Guide Visit the Brother Solutions Center ...

Страница 165: ...e link local address range IPv6 On Off Enable or Disable the IPv6 protocol If you want to use the IPv6 protocol visit http solutions brother com for more information Setup Wizard You can configure your internal print server WPS AOSS You can easily configure your wireless network settings using the one button push method Level 1 Level 2 Level 3 Level 4 Level 5 Options Descriptions See Network User ...

Страница 166: ...nt Communication Mode MAC Address Shows the MAC address of the machine Set to Default Yes No Restore the wireless network settings to factory setting WLAN Enable On Off Enable or disable the wireless LAN manually Wi Fi Direct Push Button You can easily configure your Wi Fi Direct network settings using the one button push method Level 1 Level 2 Level 3 Level 4 Level 5 Options Descriptions See Netw...

Страница 167: ...current IP Address of your machine Status Information Status G O Active Client Active Not Connected Off Wired LAN Active the number of devices You can see the current Wi Fi Direct network status Signal Strong Medium Weak None You can see the current Wi Fi Direct network signal strength Whenyour machine acts as the Group Owner the Touchscreen always shows Strong Level 1 Level 2 Level 3 Level 4 Leve...

Страница 168: ...r receive an E mail via an E mail server that requires secure SSL TLS communication Verify SMTPCert On Off Verify the SMTP Server Certificate automatically POP3 POP3 Server Name Up to 64 characters IP Address 000 255 000 255 000 255 000 255 Enter the POP3 server address POP3 Port 110 1 65535 Enter the POP3 port number Mailbox Name Enter the mail box name up 60 characters Level 1 Level 2 Level 3 Le...

Страница 169: ...s set to On 1Min 3Mins 5Mins 10Mins 30Mins 60Mins Set the interval for checking for new messages on the POP3 server Header All Subject From To None Select the contents of the mail header to be printed Delete Error Mail On Off Delete error mails automatically Notification On MDN Off Receive notification messages Setup Mail TX Sender Subject Displaysthesubject that is attached to the Internet Fax da...

Страница 170: ...the Web connection settings Address Port 8080 User Name Password Fax to Server Available after IFAX is downloaded Fax to Server On Off You can store a prefix suffix address in the machine and can send a document from a fax server system Prefix Suffix Network Reset Yes No Restore all network settings to the factory settings Level 1 Level 2 Level 3 Level 4 Level 5 Options Descriptions See Network Us...

Страница 171: ...ddress Book Fax Journal Lists information about your last 200 incoming and outgoing faxes TX means Transmit RX means Receive User Settings Lists your settings Network Configuration Lists your Network settings Drum Dot Print Prints the Drum Dot Check Sheet WLAN Report Prints the result of wireless LAN connectivity diagnosis See Caller ID History Prints the caller Id list of incoming calls and faxes...

Страница 172: ...Total Color Black and White Check the number of total color or black white pages the machine has printed during its life See Fax List Color Black and White Copy Color Black and White Print Color Black and White Parts Life Drum Black BK Check the percentage of a machine part s life that remains available Drum Cyan C Drum Magenta M Drum Yellow Y Belt Unit Fuser PF kit See Advanced User s Guide The f...

Страница 173: ...ect pause 129 Dial Prefix On Off Sets a prefix number that will always be added before the fax number every time you dial See Compatibility High Normal Basic for VoIP Adjusts the equalization for transmission difficulties VoIP service providers offer fax support using various standards If you regularly experience fax transmission errors choose Basic for VoIP 129 Reset Network Yes No Restores all n...

Страница 174: ...hen you set up addresses Hook Press before dialing when you want to listen to make sure a fax machine has answered and then press Fax Start Address Book Search Search within the Address Book 53 Edit Add New Address Store Address Book numbers so you can dial by pressing Address Book on the Touchscreen and Fax Start 54 Setup Groups Set up Group numbers for Broadcasting See Change Change Address Book...

Страница 175: ...t the resolution for outgoing faxes See Contrast Auto Light Dark Change the lightness or darkness of faxes you send Broadcasting Add Number Add Number Send the same fax message to more than one fax number Add from Address book Search in Address book Delayed Fax Delayed Fax On Off Set the time of day that delayed faxes will be sent Set Time Real Time TX On Off Send a fax without using the memory Po...

Страница 176: ...iculty sending faxes overseas set this to On Glass Scan Size Letter A4 To fax a Letter size document you must change the Glass Scan Size setting 37 Set New Default Yes No Save your fax settings as the default settings See Factory Reset Yes No Restore all the fax settings you changed back to the factory settings Save as Shortcut Register the current settings as a shortcut Level 1 Level 2 Level 3 Op...

Страница 177: ...Print All New Fax es Print the new received faxes 45 Print All Old Faxes Print the old received faxes Delete All New Fax es Delete the new received faxes 45 Delete All Old Faxes Delete the old received faxes Address Book See Fax When Fax Preview is Off on page 164 Call History See Fax When Fax Preview is Off on page 164 See Advanced User s Guide The factory settings are shown in Bold with an aster...

Страница 178: ...t Photo Receipt Choose the Copy resolution for your type of document See Enlarge Reduce 100 Enlarge 200 141 A5 A4 104 EXE LTR Choose an enlargement ratio for the next copy Reduce 97 LTR A4 94 A4 LTR 91 Full Page 85 LTR EXE 83 LGL A4 78 LGL LTR 70 A4 A5 50 Choose a reduction ratio for the next copy Custom 25 400 Enter an enlargement or reduction ratio Density Adjust the Density for copies See Advan...

Страница 179: ...Adjust Red Adjust the red color for copies Green Adjust the green color for copies Blue Adjust the blue color for copies 2 sided Copy Off 1 sided 2 sided Long Edge Flip 1 sided 2 sided Short Edge Flip Enable or disable 2 sided copying and choose long edge or short edge Level 1 Level 2 Level 3 Options 1 Options 2 Descriptions See Page See Advanced User s Guide The factory settings are shown in Bold...

Страница 180: ...und color that is removed See Remove Background Color Low Medium High Save as Shortcut Add the current settings as a shortcut Level 1 Level 2 Level 3 Options 1 Options 2 Descriptions See Page See Advanced User s Guide The factory settings are shown in Bold with an asterisk ...

Страница 181: ...e current settings as a shortcut Start Start scanning to USB Options See Options to USB on page 175 Save as Shortcut Add the current settings as a shortcut Start Start scanning to E mail PC Select Options See Options to File to Image and to E mail on page 174 Save as Shortcut Add the current settings as a shortcut Start Start scanning to E mail Server Download only Address Book Choose the address ...

Страница 182: ...n page 179 Save as Shortcut Add the current settings as a shortcut Start Start scanning WS Scan Appears when you install a Web Services Scanner which is displayed in your computer s Network explorer Scan Scan data using Web Service protocol Scan for E mail Scan for Fax Scan for Print Level 1 Level 2 Level 3 Level 4 Options Descriptions See Page See Software User s Guide The factory settings are sh...

Страница 183: ...en choose On See Scan Type Color Gray Black and White Choose the scan type for your document Resolution 100 dpi 200 dpi 300 dpi 600 dpi Choose the scan resolution for your document File Type Text HTML RTF Choose the file format for your document Scan Size A4 Letter Legal Choose the scan size for your document See Software User s Guide The factory settings are shown in Bold with an asterisk ...

Страница 184: ...00 dpi Choose the scan resolution for your document File Type When you select Color or Gray in Scan Type PDF JPEG When you select Black and White in Scan Type PDF TIFF Choose the file format for your document Scan Size A4 Letter Legal Choose the scan size for your document Remove Background Color Off Low Medium High Change the amount of background color that is removed This function is not availab...

Страница 185: ... for your document See Resolution When you select Color in Scan Type 100 dpi 200 dpi 300 dpi 600 dpi Auto When you select Gray in Scan Type 100 dpi 200 dpi 300 dpi Auto When you select Black and White in Scan Type 200 dpi 300 dpi 200x100 Choose the scan resolution for your document See Software User s Guide The factory settings are shown in Bold with an asterisk ...

Страница 186: ...Size setting File Name Enter a file name for the scanned data File Size Small Medium Large Choose the file size for color or gray scale scanning Remove Background Color Off Low Medium High Change the amount of background color that is removed Set New Default Yes No Save your scan settings as the default settings Factory Reset Yes No Restore all the scan settings you changed back to the factory set...

Страница 187: ... type for your document See Resolution When you select Color in Scan Type 100 dpi 200 dpi 300 dpi 600 dpi Auto When you select Gray in Scan Type 100 dpi 200 dpi 300 dpi Auto When you select Black and White in Scan Type 200 dpi 300 dpi 200x100 Choose the scan resolution for your document See Software User s Guide The factory settings are shown in Bold with an asterisk ...

Страница 188: ... A4 Letter To scan a Letter sized document you must change the Glass Scan Size setting File Size Small Medium Large Choose the file size for color or gray scale scanning Set New Default Yes No Save your scan settings as the default settings Factory Reset Yes No Restore all the scan settings you changed back to the factory settings Level 1 Level 2 Options Descriptions See Page See Software User s G...

Страница 189: ... for your document See Resolution When you select Color in Scan Type 100 dpi 200 dpi 300 dpi 600 dpi Auto When you select Gray in Scan Type 100 dpi 200 dpi 300 dpi Auto When you select Black and White in Scan Type 200 dpi 300 dpi 200x100 Choose the scan resolution and file format for your document See Software User s Guide The factory settings are shown in Bold with an asterisk ...

Страница 190: ...e the Glass Scan Size setting File Name BRNXXXXXXXXXX Estimate Report Order sheet Contract sheet Check Receipt Manual Choose preset file names If you choose Manual you can name the file as you like File Size Small Medium Large Choose the file size for color or gray scale scanning Remove Background Color Off Low Medium High Change the amount of background color that is removed User Name Enter the u...

Страница 191: ...Set the paper size when printing directly from the USB flash memory drive 59 Multiple Page 1in1 2in1 4in1 9in1 16in1 25in1 1 in 2x2 pages 1 in 3x3 pages 1 in 4x4 pages 1 in 5x5 pages Set the page layout when printing multiple pages directly from the USB Flash memory drive 59 Orientation Portrait Landscape Set the page orientation when printing directly from the USB Flash memory drive 59 2 sided Of...

Страница 192: ...ext 59 Index Print Print a thumbnail page 59 Default Settings Paper Type Thin Plain Paper Thick Thicker Recycled Paper Glossy Set the default media type when printing directly from the USB flash memory drive 61 Paper Size A4 Letter Legal EXE A5 A5 L A6 B5 Folio Set the default paper size when printing directly from the USB flash memory drive 61 Multiple Page 1in1 2in1 4in1 9in1 16in1 25in1 1 in 2x...

Страница 193: ...e 61 Print Quality Normal Fine Set the default print quality option when printing directly from the USB Flash memory drive 61 PDF Option Document Document Markup Document Stamps Set the default USB direct print setting to print comments Markup or stamps in the PDF file along with the text 61 Index Print Simple Details Set the default index print option to simple format or details 61 Level 1 Level ...

Страница 194: ...e factory settings Reset Yes No Auto Regist Yes No Adjust the print position of each color automatically See Software User s Guide The factory settings are shown in Bold with an asterisk Level 1 Level 2 Level 3 Options Descriptions See Page Setup Wizard Configure your internal print server See Setup with PC Configure the Wi Fi settings using a computer WPS AOSS Easily configure your wireless netwo...

Страница 195: ...riptions Page Web Picasa Web Albums Connect the Brother machine to an Internet service See Google Drive Flickr Facebook Evernote Dropbox Visit the Brother Solutions Center to download the Web Connect Guide at http solutions brother com The factory settings are shown in Bold with an asterisk ...

Страница 196: ...dd Number Options Add Number Add from Address book Search in Address book Send the same fax message to more than one fax number 15 Real Time TX On Off Send a fax without using the memory 15 Coverpage Setup Coverpage Setup On Off Automaticallysend a cover page you programmed 15 Coverpage Message 1 Comment Off 2 Please Call 3 Urgent 4 Confidential 5 6 Total Pages Overseas Mode On Off If you are havi...

Страница 197: ... Scan a black white or a color document into your E mail application 16 to E mail Server Address Scan Type Resolution File Type Glass Scan Size File Size Scan a black white or a color document into your E mail Server 16 to Network Profile Name Send scanned data to a CIFS server on your local network or on the Internet 16 to FTP Profile Name Send scanned data via FTP 16 Web Picasa Web Albums Visit ...

Страница 198: ...ered an incorrect character and want to change it use the arrow buttons to move the cursor under the incorrect character Press and then enter the correct character You can also insert letters by moving the cursor and entering a character If the screen does not show d press repeatedly until you have erased the incorrect character Enter the correct characters NOTE The characters available may differ...

Страница 199: ...part wear Specifications D Model MFC 9330CDW Printer Type LED Print Method Electrophotographic LED Printer Memory Capacity 192 MB LCD liquid crystal display 3 7 in 93 4 mm TFT Color Touchscreen LCD 1 and Touchpanel Power Source 110 120 V AC 50 60 Hz Power Consumption 2 Average Peak Approx 1188 W Printing Approx 380 W at 25 C Copying Approx 380 W at 25 C Ready Approx 70 W at 25 C Sleep Approx 7 5 W...

Страница 200: ... B A Printing Black White LWAd 6 42 B A Ready LWAd 4 44 B A Temperature Operating 10 to 32 5 C Storage 0 to 40 C Humidity Operating 20 to 80 without condensation Storage 10 to 90 without condensation ADF automatic document feeder Up to 35 pages For best results we recommend Temperature 20 to 30 C Humidity 50 to 70 Paper 80 g m2 ...

Страница 201: ...Specifications 191 D Document Size D Model MFC 9330CDW Document Size 1 sided ADF Width 147 3 to 215 9 mm ADF Length 147 3 to 355 6 mm Scanner Glass Width Max 215 9 mm Scanner Glass Length Max 300 0 mm ...

Страница 202: ... Paper Manual Feed Slot Paper Type Plain Paper Thin Paper Thick Paper Thicker Paper Recycled Paper Bond Paper Label Envelope Env Thin Env Thick Glossy Paper Paper Size Width 76 2 to 215 9 mm Length 116 to 355 6 mm Paper Weight 60 to 163 g m2 Maximum Paper Capacity One sheet at a time Paper Output 1 Face Down Output Tray Up to 100 sheets of 80 g m2 Plain Paper face down delivery to the face down ou...

Страница 203: ... Modem Speed 33 600 bps with Automatic Fallback 2 sided Print Receiving Yes Scanning Width Max 208 mm Printing Width Max 208 mm Gray Scale 8 bit 256 levels Resolution Horizontal 8 dot mm Vertical Standard 3 85 line mm Fine 7 7 line mm Photo 7 7 line mm Superfine 15 4 line mm Address Book 200 names Groups Up to 20 Broadcasting 250 200 Address Book 50 Manual Dial Automatic Redial Yes 1 time after 5 ...

Страница 204: ...9330CDW Copy Width Max 210 mm Multiple Copies Stacks or Sorts up to 99 pages Reduce Enlarge 25 to 400 in increments of 1 Resolution Up to 600 600 dpi First Copy Out Time 1 Black White Less than 19 seconds at 23 C 115 V Color Less than 22 seconds at 23 C 115 V ...

Страница 205: ... Color Black Yes Yes TWAIN Compliant Yes Windows XP Windows Vista Windows 7 Windows 8 Mac OS X v10 6 8 10 7 x 10 8 x 1 WIA Compliant Yes Windows XP Windows Vista Windows 7 Windows 8 ICA Compliant Yes Mac OS X v10 6 8 10 7 x 10 8 x Color Depth Color 48 bit color processing Input 24 bit color processing Output Gray Scale 16 bit color processing Input 8 bit color processing Output Resolution Up to 19...

Страница 206: ...pt3 PostScript 3 Resolution 600 dpi 600 dpi Print Speed 2 sided Black White Up to 7 sides minute Up to 3 5 sheets minute A4 size 1 Color Up to 7 sides minute Up to 3 5 sheets minute A4 size 1 Print Speed Black White Up to 22 pages minute A4 size 1 Color Up to 22 pages minute A4 size 1 First Print Time 2 Black White Less than 16 seconds at 23 C 115 V Color Less than 16 seconds at 23 C 115 V ...

Страница 207: ...ed 3 For detailed network specifications see Network on page 198 and Network User s Guide Model MFC 9330CDW USB Hi Speed USB 2 0 1 2 We recommend using a USB 2 0 cable Type A B that is no more than 2 0 meters long Ethernet 3 10BASE T 100BASE TX Use a straight through Category 5 or greater twisted pair cable Wireless LAN 3 IEEE 802 11b g n Infrastructure mode Ad hoc mode IEEE 802 11g n Wi Fi Direct...

Страница 208: ...tocols IPv4 ARP RARP BOOTP DHCP APIPA Auto IP WINS NetBIOS name resolution DNS Resolver mDNS LLMNR responder LPR LPD Custom Raw Port Port9100 POP3 SMTP Client IPP IPPS FTP Client and Server CIFS Client TELNET Server SNMPv1 v2c v3 HTTP HTTPS server TFTP client and server ICMP Web Services Print Scan SNTP Client IPv6 NDP RA DNS resolver mDNS LLMNR responder LPR LPD Custom Raw Port Port9100 POP3 IPP ...

Страница 209: ...G2 image file a JPEG2000 image file or a transparency file is not supported Model MFC 9330CDW Compatibility PDF version 1 7 1 JPEG Exif JPEG PRN created by Brother printer driver TIFF scanned by all Brother MFC or DCP models XPS version 1 0 Interface USB direct interface ...

Страница 210: ...10 100Base TX Ethernet Wireless 802 11b g n For Drivers For Applications Windows Operating System Windows XP Home 1 4 Windows XP Professional 1 4 Printing PC Fax 3 Scanning 32bit x86 or 64bit x64 processor 150 MB 310 MB Windows XP Professional x64 Edition 1 4 64bit x64 processor Windows Vista 1 4 32bit x86 or 64bit x64 processor 500 MB 500 MB Windows 7 1 4 650 MB 1 2 GB Windows 8 1 4 Windows Serve...

Страница 211: ... Approx 1 000 pages A4 or Letter page 1 Cyan Magenta Yellow Approx 1 000 pages A4 or Letter page 1 Standard Black Approx 2 500 pages A4 or Letter page 1 TN 261BK Cyan Magenta Yellow Approx 1 400 pages A4 or Letter page 1 TN 261C TN 261M TN 261Y High Yield Black Cyan Magenta Yellow Approx 2 200 pages A4 or Letter page 1 TN 265C TN 265M TN 265Y Drum Unit Approx 15 000 pages A4 or Letter page 1 page ...

Страница 212: ...n download the latest drivers software and utilities read FAQs and troubleshooting tips to learn how to get the most from your Brother product http solutions brother com You can check here for Brother driver updates Customer Service E Toll Free Number 0800600211 Service Hour 9am 6pm Monday to Friday Except Public Holidays Service center locations E For service center in Taiwan contact your local B...

Страница 213: ...70 Control panel overview 8 ControlCenter2 for Macintosh See Software User s Guide ControlCenter4 for Windows See Software User s Guide Cordless telephone non Brother 52 D Dialing a pause 54 Address Book 53 automatic fax redial 53 manual 53 Dimensions 189 Direct print 58 59 specification 199 Document how to load 34 35 Drum unit cleaning 79 Drum units replacing 82 E Envelopes 24 30 32 Equalization ...

Страница 214: ...195 H HELP Settings Tables 143 touchscreen messages 142 Home 9 Hook 52 J Jacks EXT external telephone 51 TAD answering machine 49 L Labels 22 30 33 M Machine information firmware version 140 how to reset the machine 141 reset functions 141 serial number 140 Macintosh See Software User s Guide Maintenance routine replacing belt unit 88 drum units 82 toner cartridges 72 waste toner box 92 Manual dia...

Страница 215: ... 196 quality 130 resolution 196 specifications 196 Printing See Software User s Guide Programming your machine 142 Q Quality printing 130 R Redial 53 Remote setup See Software User s Guide Replacing belt unit 88 drum units 82 toner cartridges 72 waste toner box 92 Reports Transmission Verification 38 Resolution copy 194 fax standard fine superfine photo 193 print 196 scan 195 Ring delay setting 42...

Страница 216: ... 109 110 error messages on touchscreen 99 if you are having difficulty copy quality 125 incoming calls 125 network 127 paper handling 121 print quality 130 printing 120 122 receiving faxes 123 scanning 126 sending faxes 124 software 126 telephone line 129 maintenance messages on touchscreen 99 paper jam 111 112 113 115 118 V VoIP 129 W Waste toner box replacing 92 Weights 189 Wi Fi Direct 5 Window...

Страница 217: ...om Visit us on the World Wide Web http www brother com This machine is approved for use in the country of purchase only Local Brother companies or their dealers will only support machines purchased in their own countries ...

Отзывы: